ASTM C338-93(2019)
(Test Method)Standard Test Method for Softening Point of Glass
Standard Test Method for Softening Point of Glass
SIGNIFICANCE AND USE
2.1 This test method is useful to determine approximately the temperature below which the glass behaves as a rigid solid in glass-forming operations and for a control test to indicate changes in composition. It has been found useful for specification acceptance and for providing information in research and development work with glass.
SCOPE
1.1 This test method covers the determination of the softening point of a glass by determining the temperature at which a round fiber of the glass, nominally 0.65 mm in diameter and 235 mm long with specified tolerances, elongates under its own weight at a rate of 1 mm/min when the upper 100 mm of its length is heated in a specified furnace at the rate of 5 ± 1 °C/min.
1.2 The values stated in SI units are to be regarded as standard. No other units of measurement are included in this standard.
1.3 This standard does not purport to address all of the safety concerns, if any, associated with its use. It is the responsibility of the user of this standard to establish appropriate safety, health, and environmental practices and determine the applicability of regulatory limitations prior to use.
1.4 This international standard was developed in accordance with internationally recognized principles on standardization established in the Decision on Principles for the Development of International Standards, Guides and Recommendations issued by the World Trade Organization Technical Barriers to Trade (TBT) Committee.
General Information
- Status
- Published
- Publication Date
- 31-Jul-2019
- Technical Committee
- C14 - Glass and Glass Products
- Drafting Committee
- C14.04 - Physical and Mechanical Properties
Relations
- Effective Date
- 01-Aug-2019
- Effective Date
- 01-Aug-2019
- Effective Date
- 01-Aug-2019
- Effective Date
- 01-Aug-2019
- Effective Date
- 01-Aug-2019
- Effective Date
- 01-Aug-2019
- Effective Date
- 01-Aug-2019
- Effective Date
- 01-Aug-2019
Overview
ASTM C338-93(2019), titled "Standard Test Method for Softening Point of Glass," is an internationally recognized standard published by ASTM International. This document details a precise laboratory method for determining the softening point of glass, defined as the temperature at which a drawn glass fiber elongates under its own weight at a specified rate. Knowing the softening point is crucial for glass manufacturing, specification acceptance, and research and development, serving as an important indicator of glass behavior during forming operations and changes in composition.
Key Topics
- Softening Point Determination: The standard establishes a procedure to identify the temperature at which a round glass fiber of specific dimensions elongates at a rate of 1 mm/min under a controlled heating rate in a furnace.
- Test Apparatus Requirements: The method requires a resistance furnace, precise temperature measurement (using calibrated thermocouples), a heating rate controller, elongation measurement device, and a timing mechanism with defined accuracy.
- Test Specimen Preparation: The document specifies detailed requirements for the glass fiber test specimen, including diameter and length tolerances, surface quality, and preparation techniques.
- Calibration and Accuracy: The procedure includes calibration steps using standard reference glasses to ensure measurement accuracy and repeatability.
- Reporting: The standard sets out requirements for documenting test results, including material designation, manufacturer details, apparatus identification, measured softening point, and testing personnel.
Applications
ASTM C338-93(2019) provides significant value to a range of stakeholders in the glass industry and research community, including:
- Specification Acceptance: Ensuring materials meet required softening point criteria for specific applications in building, automotive, or specialty glass products.
- Quality Control: Routine testing for manufacturing consistency and detection of compositional changes that affect glassforming behavior.
- Product Development: Supporting research and development activities to tailor glass properties according to end-use requirements.
- Academic Research: Serving as a reference for scientific studies involving the thermal properties of glass.
- Regulatory Compliance: Providing a standard procedure that meets international trade and industry guidelines, recognized by agencies such as the U.S. Department of Defense and aligned with WTO principles.
Related Standards
For comprehensive materials testing and quality assurance in glass production, the following standards may also be relevant:
- ASTM C162: Standard Terminology of Glass and Glass Products
- ASTM C598: Standard Test Method for Annealing Point and Strain Point of Glass by Fiber Elongation
- ASTM E287: Standard Specification for Laboratory Glass Thermometers
- ISO 7884: Glass - Viscosity and Glass Transition Temperature Methods
Practical Value
Adherence to ASTM C338-93(2019) ensures reliable, repeatable measurement of the softening point of glass, essential for process control in glass manufacturing and for verifying compliance with product specifications. The standard's robust procedure minimizes variability and enables comparison across different laboratories and production lots. Employing this test method helps organizations improve product quality, meet regulatory standards, and advance research in glass science and engineering.
Keywords: ASTM C338, softening point of glass, glass fiber elongation, glass testing standards, glass manufacturing quality control, ASTM glass standards
Buy Documents
ASTM C338-93(2019) - Standard Test Method for Softening Point of Glass
Frequently Asked Questions
ASTM C338-93(2019) is a standard published by ASTM International. Its full title is "Standard Test Method for Softening Point of Glass". This standard covers: SIGNIFICANCE AND USE 2.1 This test method is useful to determine approximately the temperature below which the glass behaves as a rigid solid in glass-forming operations and for a control test to indicate changes in composition. It has been found useful for specification acceptance and for providing information in research and development work with glass. SCOPE 1.1 This test method covers the determination of the softening point of a glass by determining the temperature at which a round fiber of the glass, nominally 0.65 mm in diameter and 235 mm long with specified tolerances, elongates under its own weight at a rate of 1 mm/min when the upper 100 mm of its length is heated in a specified furnace at the rate of 5 ± 1 °C/min. 1.2 The values stated in SI units are to be regarded as standard. No other units of measurement are included in this standard. 1.3 This standard does not purport to address all of the safety concerns, if any, associated with its use. It is the responsibility of the user of this standard to establish appropriate safety, health, and environmental practices and determine the applicability of regulatory limitations prior to use. 1.4 This international standard was developed in accordance with internationally recognized principles on standardization established in the Decision on Principles for the Development of International Standards, Guides and Recommendations issued by the World Trade Organization Technical Barriers to Trade (TBT) Committee.
SIGNIFICANCE AND USE 2.1 This test method is useful to determine approximately the temperature below which the glass behaves as a rigid solid in glass-forming operations and for a control test to indicate changes in composition. It has been found useful for specification acceptance and for providing information in research and development work with glass. SCOPE 1.1 This test method covers the determination of the softening point of a glass by determining the temperature at which a round fiber of the glass, nominally 0.65 mm in diameter and 235 mm long with specified tolerances, elongates under its own weight at a rate of 1 mm/min when the upper 100 mm of its length is heated in a specified furnace at the rate of 5 ± 1 °C/min. 1.2 The values stated in SI units are to be regarded as standard. No other units of measurement are included in this standard. 1.3 This standard does not purport to address all of the safety concerns, if any, associated with its use. It is the responsibility of the user of this standard to establish appropriate safety, health, and environmental practices and determine the applicability of regulatory limitations prior to use. 1.4 This international standard was developed in accordance with internationally recognized principles on standardization established in the Decision on Principles for the Development of International Standards, Guides and Recommendations issued by the World Trade Organization Technical Barriers to Trade (TBT) Committee.
ASTM C338-93(2019) is classified under the following ICS (International Classification for Standards) categories: 81.040.10 - Raw materials and raw glass. The ICS classification helps identify the subject area and facilitates finding related standards.
ASTM C338-93(2019) has the following relationships with other standards: It is inter standard links to ASTM C338-93(2013), ASTM E438-92(2018), ASTM C162-05(2015), ASTM C1350M-96(2019), ASTM C1351M-96(2022), ASTM F79-69(2019), ASTM C336-71(2020), ASTM F105-72(2019). Understanding these relationships helps ensure you are using the most current and applicable version of the standard.
ASTM C338-93(2019) is available in PDF format for immediate download after purchase. The document can be added to your cart and obtained through the secure checkout process. Digital delivery ensures instant access to the complete standard document.
Standards Content (Sample)
This international standard was developed in accordance with internationally recognized principles on standardization established in the Decision on Principles for the
Development of International Standards, Guides and Recommendations issued by the World Trade Organization Technical Barriers to Trade (TBT) Committee.
Designation: C338 − 93 (Reapproved 2019)
Standard Test Method for
Softening Point of Glass
This standard is issued under the fixed designation C338; the number immediately following the designation indicates the year of
original adoption or, in the case of revision, the year of last revision. A number in parentheses indicates the year of last reapproval. A
superscript epsilon (´) indicates an editorial change since the last revision or reapproval.
This standard has been approved for use by agencies of the U.S. Department of Defense.
1. Scope heating rate of the furnace, equipment for measuring the
temperature of the furnace, and equipment for measuring the
1.1 This test method covers the determination of the soft-
elongation rate of a fiber of glass suspended in the furnace.
ening point of a glass by determining the temperature at which
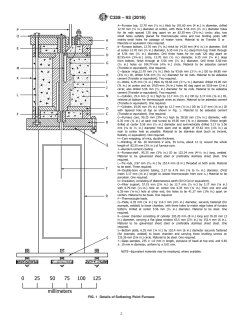
3.1.1 Furnace—The furnace shall conform in all essential
a round fiber of the glass, nominally 0.65 mm in diameter and
respects to the requirements shown in Fig. 1.
235mmlongwithspecifiedtolerances,elongatesunderitsown
3.1.2 Furnace Stand—A means shall be provided for sup-
weight at a rate of 1 mm/min when the upper 100 mm of its
porting the furnace so that the fiber hangs below it. This stand
length is heated in a specified furnace at the rate of 5 6
must be provided with a leveling device such as three screws.
1 °C⁄min.
The stand shown in Fig. 1 is convenient when used with either
1.2 The values stated in SI units are to be regarded as
a cathetometer or a telescope and scale.
standard. No other units of measurement are included in this
3.1.3 Heating Rate Controller—Suitable controls shall be
standard.
provided for maintaining the furnace heating rate at 5 6
1.3 This standard does not purport to address all of the
1 °C⁄min.
safety concerns, if any, associated with its use. It is the
NOTE 1—A continually adjustable transformer has proved effective for
responsibility of the user of this standard to establish appro-
controlling the heating rate.
priate safety, health, and environmental practices and deter-
3.1.4 Temperature-Measuring Equipment— The furnace
mine the applicability of regulatory limitations prior to use.
temperature shall be measured with a calibrated Type R or S
1.4 This international standard was developed in accor-
thermocouple and a calibrated potentiometer capable of mea-
dance with internationally recognized principles on standard-
suring the true temperature of the furnace within 60.2 °C. The
ization established in the Decision on Principles for the
cold junction shall be maintained at 0 °C by means of an ice
Development of International Standards, Guides and Recom-
bath.An alternative acceptable means of temperature measure-
mendations issued by the World Trade Organization Technical
ment is the use of a potentiometer to oppose the thermocouple
Barriers to Trade (TBT) Committee.
electromotive force. This potentiometer shall be set at a
standard setting for the type of glass being measured, and
2. Significance and Use
galvanometer deflection shall serve as a means of obtaining
2.1 This test method is useful to determine approximately
relative temperatures, the deflection of the galvanometer hav-
the temperature below which the glass behaves as a rigid solid
ing been calibrated. Also acceptable for temperature measure-
in glass-forming operations and for a control test to indicate
ment is a solid-state digital thermometer that is capable of the
changes in composition. It has been found useful for specifi-
accuracy specified.
cation acceptance and for providing information in research
3.1.5 Fiber-ElongationMeasurementEquipment—The fiber
and development work with glass.
elongation shall be measured by a device capable of measuring
the position of the end of the fiber within 0.02 mm throughout
3. Apparatus
the entire elongation period.
3.1 The apparatus for determining the softening point of
NOTE 2—Suitable devices that have proved effective for measuring the
glass shall consist essentially of an electrically heated resis-
elongation are cathetometers, projection magnifiers, and telescope and
tance furnace, a furnace stand, a device for controlling the
scale combinations.
3.1.6 Timer—A timing device with a least count and accu-
1 racy of 1 s shall be used.
This test method is under the jurisdiction of ASTM Committee C14 on Glass
and Glass Products and is the direct responsibility of Subcommittee C14.04 on
Physical and Mechanical Properties. 4. Preparation of Test Specimens
Current edition approved Aug. 1, 2019. Published August 2019. Originally
4.1 The fiber specimen used for the test shall meet the
approved in 1954. Last previous edition approved in 2013 as C338 – 93 (2013).
DOI: 10.1520/C0338-93R19. following requirements:
Copyright © ASTM International, 100 Barr Harbor Drive, PO Box C700, West Conshohocken, PA 19428-2959. United States
C338 − 93 (2019)
FIG. 1 Details of Softening Point Furnace
C338 − 93 (2019)
4.1.1 It shall be round. 6.2 Again, cool and hold the furnace about 20 °C below the
4.1.2 It shall be smooth and shall contain no void spots or expected softening point and insert the fiber in the furnace by
foreign matter. placing the bead end in the furnace sample holder. Check the
4.1.3 Its average diameter shall be 0.65 6 0.10 mm and the fiber to be certain it is hanging free in the center of the furnace
maximum diameter shall not exceed the minimum diameter by and relevel the furnace if necessary. Standardize the potenti-
more than 0.02 mm over the entire length of the fiber.
...


Questions, Comments and Discussion
Ask us and Technical Secretary will try to provide an answer. You can facilitate discussion about the standard in here.
Loading comments...