ASTM D3704-96(2017)
(Test Method)Standard Test Method for Wear Preventive Properties of Lubricating Greases Using the (Falex) Block on Ring Test Machine in Oscillating Motion
Standard Test Method for Wear Preventive Properties of Lubricating Greases Using the (Falex) Block on Ring Test Machine in Oscillating Motion
SIGNIFICANCE AND USE
5.1 This test method is used to differentiate between greases having high, medium, and low wear preventive properties using oscillating motion. The user of this method should determine to his own satisfaction whether results of this test procedure correlate with field performance or other bench test machines.
SCOPE
1.1 This test method covers the determination of wear properties of lubricating greases by means of the Falex block-on-ring friction and wear test machine.
1.2 The values stated in SI units are to be regarded as standard except where equipment is supplied using inch-pound units and would then be regarded as standard.
1.2.1 Exception—The metric equivalents of inch-pound units given in such cases in the body of the standard may be approximate.
1.3 This standard does not purport to address all of the safety concerns, if any, associated with its use. It is the responsibility of the user of this standard to establish appropriate safety, health, and environmental practices and determine the applicability of regulatory limitations prior to use.
1.4 This international standard was developed in accordance with internationally recognized principles on standardization established in the Decision on Principles for the Development of International Standards, Guides and Recommendations issued by the World Trade Organization Technical Barriers to Trade (TBT) Committee.
General Information
- Status
- Published
- Publication Date
- 14-Nov-2017
- Technical Committee
- D02 - Petroleum Products, Liquid Fuels, and Lubricants
- Drafting Committee
- D02.G0.04 - Functional Tests - Tribology
Relations
- Effective Date
- 15-Nov-2017
- Effective Date
- 01-Jun-2020
- Effective Date
- 01-Apr-2020
- Effective Date
- 01-Feb-2020
- Effective Date
- 01-May-2019
- Effective Date
- 01-May-2019
- Effective Date
- 01-Aug-2018
- Effective Date
- 01-Nov-2015
- Effective Date
- 01-May-2014
- Effective Date
- 01-Jun-2013
- Effective Date
- 01-May-2012
- Effective Date
- 01-Dec-2010
- Effective Date
- 01-Jul-2010
- Effective Date
- 01-May-2010
- Effective Date
- 01-Jan-2010
Overview
ASTM D3704-96(2017) is the standard test method for assessing the wear preventive properties of lubricating greases. Utilizing the Falex Block on Ring Test Machine in oscillating motion, this standard provides a reproducible laboratory procedure to evaluate how well lubricating greases minimize wear between contacting metal surfaces. The method is widely recognized by industries relying on machinery and equipment lubrication, providing an objective way to differentiate between high, medium, and low wear preventive greases.
Key Topics
- Lubricating Grease Wear Testing: The method outlines how to use oscillating block-on-ring friction and wear tests to determine grease performance under simulated operating conditions.
- Test Equipment Specification: Describes the required apparatus, including the Falex Block on Ring Test Machine, oscillating drive accessory, and measuring devices such as a low-power microscope.
- Sample Preparation and Test Procedure:
- Working the grease sample prior to testing
- Applying appropriate test loads and oscillation angles
- Measuring wear scar width on test blocks for assessment
- Units and Safety: Allows for both SI and inch-pound units and emphasizes the responsibility of users to address health and safety practices.
- Correlation to Field Performance: Recommends that users evaluate how laboratory results relate to real-world applications and field performance.
Applications
ASTM D3704-96(2017) is essential for quality assurance and research in the lubricants and tribology sectors. Practical applications include:
- Product Evaluation: Enables lubricant manufacturers to classify and compare wear preventive properties of different grease formulations.
- Quality Control: Industries using heavy machinery and automotive equipment utilize this test to select greases that offer optimal protection and longevity.
- Development and Innovation: Tribology researchers apply this standard to develop new lubricating greases and investigate wear mechanisms under oscillating motion.
- Benchmarking: Provides a consistent framework for benchmarking greases against industry standards or competitive products.
- Compliance and Specification: Helps ensure products meet internal or client requirements where wear prevention is critical.
The Falex Block on Ring Test Machine, operated in oscillating motion, simulates operating conditions where metal surfaces repeatedly move against each other, reflecting challenging application scenarios such as bearings, joints, and gear contacts.
Related Standards
For comprehensive grease performance assessment, ASTM D3704-96(2017) is often used in conjunction with other ASTM and industry standards:
- ASTM D1403: Cone Penetration of Lubricating Grease, essential for understanding grease consistency, which may correlate with wear behavior.
- ASTM D2714: Calibration and Operation of the Falex Block-on-Ring Friction and Wear Testing Machine, ensuring reliable and repeatable test results.
- ASTM G40: Standard Terminology Relating to Wear and Erosion, providing definitions relevant to interpretation of test outcomes.
These related standards help laboratories and manufacturers maintain rigorous testing protocols for lubricating greases, driving improvements in both product performance and machinery reliability.
Adhering to ASTM D3704-96(2017) supports technical excellence in lubricating grease selection and application, safeguarding equipment from premature wear and ensuring operational efficiency.
Buy Documents
ASTM D3704-96(2017) - Standard Test Method for Wear Preventive Properties of Lubricating Greases Using the (Falex) Block on Ring Test Machine in Oscillating Motion
Get Certified
Connect with accredited certification bodies for this standard

Element Materials Technology
Materials testing and product certification.

ABS Group Brazil
ABS Group certification services in Brazil.

ABS Quality Evaluations Inc.
American Bureau of Shipping quality certification.
Sponsored listings
Frequently Asked Questions
ASTM D3704-96(2017) is a standard published by ASTM International. Its full title is "Standard Test Method for Wear Preventive Properties of Lubricating Greases Using the (Falex) Block on Ring Test Machine in Oscillating Motion". This standard covers: SIGNIFICANCE AND USE 5.1 This test method is used to differentiate between greases having high, medium, and low wear preventive properties using oscillating motion. The user of this method should determine to his own satisfaction whether results of this test procedure correlate with field performance or other bench test machines. SCOPE 1.1 This test method covers the determination of wear properties of lubricating greases by means of the Falex block-on-ring friction and wear test machine. 1.2 The values stated in SI units are to be regarded as standard except where equipment is supplied using inch-pound units and would then be regarded as standard. 1.2.1 Exception—The metric equivalents of inch-pound units given in such cases in the body of the standard may be approximate. 1.3 This standard does not purport to address all of the safety concerns, if any, associated with its use. It is the responsibility of the user of this standard to establish appropriate safety, health, and environmental practices and determine the applicability of regulatory limitations prior to use. 1.4 This international standard was developed in accordance with internationally recognized principles on standardization established in the Decision on Principles for the Development of International Standards, Guides and Recommendations issued by the World Trade Organization Technical Barriers to Trade (TBT) Committee.
SIGNIFICANCE AND USE 5.1 This test method is used to differentiate between greases having high, medium, and low wear preventive properties using oscillating motion. The user of this method should determine to his own satisfaction whether results of this test procedure correlate with field performance or other bench test machines. SCOPE 1.1 This test method covers the determination of wear properties of lubricating greases by means of the Falex block-on-ring friction and wear test machine. 1.2 The values stated in SI units are to be regarded as standard except where equipment is supplied using inch-pound units and would then be regarded as standard. 1.2.1 Exception—The metric equivalents of inch-pound units given in such cases in the body of the standard may be approximate. 1.3 This standard does not purport to address all of the safety concerns, if any, associated with its use. It is the responsibility of the user of this standard to establish appropriate safety, health, and environmental practices and determine the applicability of regulatory limitations prior to use. 1.4 This international standard was developed in accordance with internationally recognized principles on standardization established in the Decision on Principles for the Development of International Standards, Guides and Recommendations issued by the World Trade Organization Technical Barriers to Trade (TBT) Committee.
ASTM D3704-96(2017) is classified under the following ICS (International Classification for Standards) categories: 75.100 - Lubricants, industrial oils and related products. The ICS classification helps identify the subject area and facilitates finding related standards.
ASTM D3704-96(2017) has the following relationships with other standards: It is inter standard links to ASTM D3704-96(2012), ASTM D1403-20b, ASTM D1403-20a, ASTM D1403-20, ASTM D1403-19, ASTM D2714-94(2019), ASTM D1403-18, ASTM G40-15, ASTM D2714-94(2014), ASTM G40-13, ASTM G40-12, ASTM G40-10b, ASTM G40-10a, ASTM D1403-10, ASTM G40-10. Understanding these relationships helps ensure you are using the most current and applicable version of the standard.
ASTM D3704-96(2017) is available in PDF format for immediate download after purchase. The document can be added to your cart and obtained through the secure checkout process. Digital delivery ensures instant access to the complete standard document.
Standards Content (Sample)
This international standard was developed in accordance with internationally recognized principles on standardization established in the Decision on Principles for the
Development of International Standards, Guides and Recommendations issued by the World Trade Organization Technical Barriers to Trade (TBT) Committee.
Designation: D3704 − 96 (Reapproved 2017)
Standard Test Method for
Wear Preventive Properties of Lubricating Greases Using
the (Falex) Block on Ring Test Machine in Oscillating
Motion
This standard is issued under the fixed designation D3704; the number immediately following the designation indicates the year of
original adoption or, in the case of revision, the year of last revision.Anumber in parentheses indicates the year of last reapproval.A
superscript epsilon (´) indicates an editorial change since the last revision or reapproval.
1. Scope 3. Terminology
1.1 This test method covers the determination of wear
3.1 Definitions:
properties of lubricating greases by means of the Falex
3.1.1 coeffıcient of friction, µ or f, n—in tribology, the
block-on-ring friction and wear test machine.
dimensionless ratio of the friction force (F) between two
1.2 The values stated in SI units are to be regarded as bodies to the normal force (N) pressing these two bodies
standardexceptwhereequipmentissuppliedusinginch-pound
together.
units and would then be regarded as standard.
µ or 5 F/N (1)
~ !
1.2.1 Exception—The metric equivalents of inch-pound
3.1.1.1 Discussion—A distinction is often made between
units given in such cases in the body of the standard may be
static coeffıcient of friction and kinetic coeffıcient of friction.
approximate.
G40
1.3 This standard does not purport to address all of the
safety concerns, if any, associated with its use. It is the 3.1.2 friction force, n—the resisting force tangential to the
responsibility of the user of this standard to establish appro- interface between two bodies when, under the action of an
priate safety, health, and environmental practices and deter-
externalforce,onebodymovesortendstomoverelativetothe
mine the applicability of regulatory limitations prior to use.
other. G40
1.4 This international standard was developed in accor-
3.1.3 kinetic coeffıcient of friction, n—the coefficient of
dance with internationally recognized principles on standard-
friction under conditions of macroscopic relative motion be-
ization established in the Decision on Principles for the
tween two bodies. G40
Development of International Standards, Guides and Recom-
mendations issued by the World Trade Organization Technical
3.1.4 wear, n—damage to a solid surface, generally involv-
Barriers to Trade (TBT) Committee.
ingprogressivelossofmaterial,duetorelativemotionbetween
that surface and a contacting substance or substances. G40
2. Referenced Documents
2.1 ASTM Standards: 4. Summary of Test Method
D1403Test Methods for Cone Penetration of Lubricating
4.1 The tester is operated with a steel test ring oscillating
Grease Using One-Quarter and One-Half Scale Cone
against a steel test block.Test speed, load, angle of oscillation,
Equipment
timeandspecimensurfacefinishandhardnesscanbevariedto
D2714Test Method for Calibration and Operation of the
simulate field conditions.
Falex Block-on-Ring Friction and Wear Testing Machine
G40Terminology Relating to Wear and Erosion
4.2 The width of the wear scar, developed on the test block
from contact with the oscillating test ring, is measured.
This test method is under the jurisdiction of ASTM Committee D02 on
5. Significance and Use
Petroleum Products, Liquid Fuels, and Lubricants and is the direct responsibility of
Subcommittee D02.G0.04 on Functional Tests - Tribology.
5.1 Thistestmethodisusedtodifferentiatebetweengreases
Current edition approved Nov. 15, 2017. Published December 2017. Originally
having high, medium, and low wear preventive properties
approved in 1978. Last previous edition approved in 2012 as D3704–96(2012).
DOI: 10.1520/D3704-96R17. using oscillating motion. The user of this method should
For referenced ASTM standards, visit the ASTM website, www.astm.org, or
determine to his own satisfaction whether results of this test
contact ASTM Customer Service at service@astm.org. For Annual Book of ASTM
procedure correlate with field performance or other bench test
Standards volume information, refer to the standard’s Document Summary page on
the ASTM website. machines.
Copyright © ASTM International, 100 Barr Harbor Drive, PO Box C700, West Conshohocken, PA 19428-2959. United States
D3704 − 96 (2017)
6. Apparatus 7.3 Solvent, non-film forming, nonchlorinated.
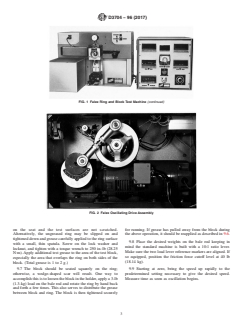
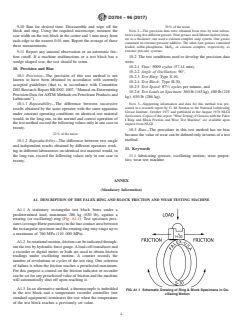
6.1 Falex Block-on-Ring Test Machine with Friction
NOTE 1—Solvents formerly used in this test method were eliminated
due to possible toxic effects. Each user should select a solvent that can
Recorder, described in detail in Annex A1 and illustrated in
meethisapplicablesafetystandardsandstillthoroughlycleanthemachine
Fig. 1.
parts.
6.2 Falex Oscillating Drive Accessory, described in detail
8. Calibration and Standardization
in A1.6 and illustrated in Fig. 2.
8.1 RunTestMethodD2714calibrationproceduretoensure
6.3 Microscope, low-power (50× to 60×) having sufficient
good mechanical operation of test equipment.
clearance under objective to accommodate the test block. It
should be fitted with a filar micrometer so that scar width may
9. Procedure
be measured with accuracy of 60.01 mm.
9.1 Before each test, clean the apparatus with appropriate
6.4 Timer, graduated in minutes and seconds.
solvent chosen in 7.3 and blow dry.
7. Reagents and Materials
9.2 Select a new test ring and block, wash with solvent, and
7.1 Test Rings, Falex Type S-10 or S-25 —SAE 4620 dry with clean soft cloth or paper.
carburize steel, having a hardness of 58HRCto 63 HRC. The
9.3 The grease sample should be worked 60 strokes, one-
test ring has a width of 8.15 mm (0.321 in.), a diameter of 35
half scale or one-quarter scale (Test Methods D1403), prior to
mm (1.3775 in.), and a maximum radial run out of 0.013 mm
starting runs. One working per running day is sufficient. For
(0.0005 in.). The surface roughness of the S-10 ring shall be
those who may not have small workers, working briefly with a
0.15µm to 0.30 µm (6µin. to 12 µin.) rms. The surface
spatula is sufficient.
roughnessoftheS-25ringshallbe0.51µmto0.71µm(22µin.
9.4 Adjust the amplitude of oscillation for the desired arc.
to 28 µin.) rms.
3 9.5 Lubricate the quarter segment (or the ball seat) of the
7.2 Test Blocks, Falex Type H-30 or H-60 —SAE 01 tool
specimen holder with the grease to be tested.
steel having two ground test surfaces of 0.10 to 0.20 µm (4 to
8µin.)rms.Thetestblockhasawidth6.35mm(0.250in.)and 9.6 Withnoweightsonthebalerod,applyathinfilmofthe
a 15.76 mm (0.620 in.) length. The H-30 test block has a test grease to the surface of a clean test block and mount the
hardness of HRC 27 to 33. The H-60 test block has a hardness testblockinthequartersegment(orballseat)andpositionboth
of HRC 58 to 63. securely in the specimen holder. On models with the ball seat,
tighten the set screws so that the block is held lightly.Apply a
thinfilmofthetestgreasealongthetestsurfaceofthering,and
The sole source of supply of the apparatus known to the committee at this time
slipitonoverthetestshaft,takingcarethatgreasedoesnotget
is Falex Corp., 1020 Airpark Dr., Sugar Grove, IL 60554. If you are aware of
alternative suppliers, please provide this information to ASTM International
Headquarters.Your comments will receive careful consideration at a meeting of the
1 Consult instruction manual for proper operation.
responsible technical committee, which you may attend.
FIG. 1 Falex Block on Ring Test Machine
D3704 − 96 (2017)
FIG. 1 Falex Ring and Block Test Machine (continued)
FIG. 2 Falex Oscillating Drive Assembly
on the seat and the test surfaces are not scratched. for running.
...


Questions, Comments and Discussion
Ask us and Technical Secretary will try to provide an answer. You can facilitate discussion about the standard in here.
Loading comments...