ASTM E436-03(2021)
(Test Method)Standard Test Method for Drop-Weight Tear Tests of Ferritic Steels
Standard Test Method for Drop-Weight Tear Tests of Ferritic Steels
SIGNIFICANCE AND USE
4.1 This test method can be used to determine the appearance of propagating fractures in plain carbon or low-alloy pipe steels (yield strengths less than 825 MPa) over the temperature range where the fracture mode changes from brittle (cleavage or flat) to ductile (shear or oblique).
4.2 This test method can serve the following purposes:
4.2.1 For research and development, to study the effect of metallurgical variables such as composition or heat treatment, or of fabricating operations such as welding or forming on the mode of fracture propagation.
4.2.2 For evaluation of materials for service to indicate the suitability of a material for specific applications by indicating fracture propagation behavior at the service temperature(s).
4.2.3 For information or specification purposes, to provide a manufacturing quality control only when suitable correlations have been established with service behavior.
SCOPE
1.1 This test method covers drop-weight tear tests (DWTT) on ferritic steels with thicknesses between 3.18 mm and 19.1 mm.
1.2 The values stated in SI units are to be regarded as standard. No other units of measurement are included in this standard.
1.3 This standard does not purport to address all of the safety concerns, if any, associated with its use. It is the responsibility of the user of this standard to establish appropriate safety, health, and environmental practices and determine the applicability of regulatory limitations prior to use.
1.4 This international standard was developed in accordance with internationally recognized principles on standardization established in the Decision on Principles for the Development of International Standards, Guides and Recommendations issued by the World Trade Organization Technical Barriers to Trade (TBT) Committee.
General Information
- Status
- Published
- Publication Date
- 31-May-2021
- Technical Committee
- E28 - Mechanical Testing
- Drafting Committee
- E28.07 - Impact Testing
Relations
- Effective Date
- 15-Feb-2024
- Effective Date
- 01-Feb-2024
- Effective Date
- 01-Feb-2020
- Effective Date
- 01-Dec-2017
- Effective Date
- 15-Dec-2012
- Effective Date
- 15-Nov-2012
- Effective Date
- 01-Sep-2012
- Effective Date
- 01-Aug-2012
- Effective Date
- 15-May-2012
- Effective Date
- 15-Mar-2012
- Effective Date
- 01-Jun-2011
- Effective Date
- 01-Jun-2010
- Effective Date
- 01-Jan-2010
- Effective Date
- 01-Jul-2009
- Effective Date
- 15-Feb-2009
Overview
ASTM E436-03(2021), Standard Test Method for Drop-Weight Tear Tests of Ferritic Steels, establishes procedures for evaluating the fracture behavior of plain carbon and low-alloy ferritic steels, covering materials with thicknesses from 3.18 mm to 19.1 mm. The method is primarily used to assess how steel transitions from brittle to ductile fracture under impact loading, providing essential information for industries relying on structural integrity in pipeline, pressure vessel, and other critical components.
This drop-weight tear test (DWTT) is vital for quality control, research, and material selection processes, especially for steel products used in varying temperature conditions where fracture mode is a significant concern.
Key Topics
- Fracture Appearance: The test examines propagating fractures in ferritic steels, identifying the point where the fracture changes from brittle (cleavage or flat) to ductile (shear or oblique).
- Temperature Range: The method addresses steel behavior across temperatures significant to real-world service, revealing the material's transition temperature.
- Material Suitability: The DWTT helps determine if a steel is appropriate for intended applications, particularly under impact or crash conditions.
- Quality Control: When correlated with field performance, the drop-weight tear test can serve as a manufacturing quality check, ensuring consistent fracture resistance.
- Test Equipment and Procedure: The test requires either a pendulum-type or vertical-drop weight machine capable of fully fracturing specimens in a single impact, and is performed at controlled temperatures for accurate assessment.
Applications
The drop-weight tear test specified by ASTM E436-03(2021) is broadly applicable in:
- Pipeline Industry: Ensuring pipeline steels exhibit sufficient ductility and resistance to brittle fracture at operational temperatures, thus minimizing catastrophic failures.
- Material Research & Development: Studying the influence of metallurgical factors such as alloy composition, heat treatment, welding, and forming processes on fracture propagation.
- Service Suitability Evaluation: Assessing new or existing steels for their ability to withstand impact loading in field conditions, particularly in cold climates or in applications requiring high toughness.
- Specification and Compliance: Providing objective fracture appearance data to support procurement and product certification, especially when aligned with additional in-service performance data.
By following this standard, engineers and metallurgists can make informed choices about materials for critical infrastructure, enhancing safety and performance in demanding environments.
Related Standards
For comprehensive fracture testing and material characterization, ASTM E436-03(2021) is often used in conjunction with the following standards:
- ASTM E208: Standard Test Method for Conducting Drop-Weight Test to Determine Nil-Ductility Transition Temperature of Ferritic Steels. Focuses specifically on the nil-ductility transition temperature, which complements DWTT data.
- ASTM E1823: Terminology Relating to Fatigue and Fracture Testing. Provides an established vocabulary for discussing fracture phenomena and impact test results.
Consider referencing relevant national and international guidelines on pipeline safety, pressure vessel integrity, and structural steel performance for a holistic evaluation framework.
Practical Value
Complying with ASTM E436-03(2021) helps organizations:
- Lower the risk of brittle fracture failures in carbon and low-alloy steel products
- Optimize material selection and processing for demanding environments
- Verify product quality through standardized impact testing methods
- Meet regulatory and industry requirements for structural steel performance
By employing the drop-weight tear test, users can reliably assess material toughness, ensure product consistency, and uphold safety standards in critical steel applications.
Buy Documents
ASTM E436-03(2021) - Standard Test Method for Drop-Weight Tear Tests of Ferritic Steels
Get Certified
Connect with accredited certification bodies for this standard

Element Materials Technology
Materials testing and product certification.

Inštitut za kovinske materiale in tehnologije
Institute of Metals and Technology. Materials testing, metallurgical analysis, NDT.
Sponsored listings
Frequently Asked Questions
ASTM E436-03(2021) is a standard published by ASTM International. Its full title is "Standard Test Method for Drop-Weight Tear Tests of Ferritic Steels". This standard covers: SIGNIFICANCE AND USE 4.1 This test method can be used to determine the appearance of propagating fractures in plain carbon or low-alloy pipe steels (yield strengths less than 825 MPa) over the temperature range where the fracture mode changes from brittle (cleavage or flat) to ductile (shear or oblique). 4.2 This test method can serve the following purposes: 4.2.1 For research and development, to study the effect of metallurgical variables such as composition or heat treatment, or of fabricating operations such as welding or forming on the mode of fracture propagation. 4.2.2 For evaluation of materials for service to indicate the suitability of a material for specific applications by indicating fracture propagation behavior at the service temperature(s). 4.2.3 For information or specification purposes, to provide a manufacturing quality control only when suitable correlations have been established with service behavior. SCOPE 1.1 This test method covers drop-weight tear tests (DWTT) on ferritic steels with thicknesses between 3.18 mm and 19.1 mm. 1.2 The values stated in SI units are to be regarded as standard. No other units of measurement are included in this standard. 1.3 This standard does not purport to address all of the safety concerns, if any, associated with its use. It is the responsibility of the user of this standard to establish appropriate safety, health, and environmental practices and determine the applicability of regulatory limitations prior to use. 1.4 This international standard was developed in accordance with internationally recognized principles on standardization established in the Decision on Principles for the Development of International Standards, Guides and Recommendations issued by the World Trade Organization Technical Barriers to Trade (TBT) Committee.
SIGNIFICANCE AND USE 4.1 This test method can be used to determine the appearance of propagating fractures in plain carbon or low-alloy pipe steels (yield strengths less than 825 MPa) over the temperature range where the fracture mode changes from brittle (cleavage or flat) to ductile (shear or oblique). 4.2 This test method can serve the following purposes: 4.2.1 For research and development, to study the effect of metallurgical variables such as composition or heat treatment, or of fabricating operations such as welding or forming on the mode of fracture propagation. 4.2.2 For evaluation of materials for service to indicate the suitability of a material for specific applications by indicating fracture propagation behavior at the service temperature(s). 4.2.3 For information or specification purposes, to provide a manufacturing quality control only when suitable correlations have been established with service behavior. SCOPE 1.1 This test method covers drop-weight tear tests (DWTT) on ferritic steels with thicknesses between 3.18 mm and 19.1 mm. 1.2 The values stated in SI units are to be regarded as standard. No other units of measurement are included in this standard. 1.3 This standard does not purport to address all of the safety concerns, if any, associated with its use. It is the responsibility of the user of this standard to establish appropriate safety, health, and environmental practices and determine the applicability of regulatory limitations prior to use. 1.4 This international standard was developed in accordance with internationally recognized principles on standardization established in the Decision on Principles for the Development of International Standards, Guides and Recommendations issued by the World Trade Organization Technical Barriers to Trade (TBT) Committee.
ASTM E436-03(2021) is classified under the following ICS (International Classification for Standards) categories: 77.040.10 - Mechanical testing of metals. The ICS classification helps identify the subject area and facilitates finding related standards.
ASTM E436-03(2021) has the following relationships with other standards: It is inter standard links to ASTM E1823-24a, ASTM E1823-24, ASTM E1823-20, ASTM E208-17, ASTM E1823-12e, ASTM E1823-12d, ASTM E1823-12c, ASTM E1823-12b, ASTM E1823-12a, ASTM E1823-12, ASTM E1823-11, ASTM E1823-10a, ASTM E1823-10, ASTM E1823-09b, ASTM E1823-09a. Understanding these relationships helps ensure you are using the most current and applicable version of the standard.
ASTM E436-03(2021) is available in PDF format for immediate download after purchase. The document can be added to your cart and obtained through the secure checkout process. Digital delivery ensures instant access to the complete standard document.
Standards Content (Sample)
This international standard was developed in accordance with internationally recognized principles on standardization established in the Decision on Principles for the
Development of International Standards, Guides and Recommendations issued by the World Trade Organization Technical Barriers to Trade (TBT) Committee.
Designation: E436 −03 (Reapproved 2021)
Standard Test Method for
Drop-Weight Tear Tests of Ferritic Steels
This standard is issued under the fixed designation E436; the number immediately following the designation indicates the year of
original adoption or, in the case of revision, the year of last revision.Anumber in parentheses indicates the year of last reapproval.A
superscript epsilon (´) indicates an editorial change since the last revision or reapproval.
1. Scope range where the fracture mode changes from brittle (cleavage
or flat) to ductile (shear or oblique).
1.1 This test method covers drop-weight tear tests (DWTT)
on ferritic steels with thicknesses between 3.18mm and 19.1 4.2 This test method can serve the following purposes:
mm.
4.2.1 For research and development, to study the effect of
metallurgical variables such as composition or heat treatment,
1.2 The values stated in SI units are to be regarded as
or of fabricating operations such as welding or forming on the
standard. No other units of measurement are included in this
mode of fracture propagation.
standard.
4.2.2 For evaluation of materials for service to indicate the
1.3 This standard does not purport to address all of the
suitability of a material for specific applications by indicating
safety concerns, if any, associated with its use. It is the
fracture propagation behavior at the service temperature(s).
responsibility of the user of this standard to establish appro-
4.2.3 Forinformationorspecificationpurposes,toprovidea
priate safety, health, and environmental practices and deter-
manufacturing quality control only when suitable correlations
mine the applicability of regulatory limitations prior to use.
have been established with service behavior.
1.4 This international standard was developed in accor-
dance with internationally recognized principles on standard-
5. Apparatus
ization established in the Decision on Principles for the
Development of International Standards, Guides and Recom- 5.1 The testing machine shall be either a pendulum type or
mendations issued by the World Trade Organization Technical a vertical-dropped-weight (Note 1) type. The machine shall
Barriers to Trade (TBT) Committee. provide sufficient energy to completely fracture a specimen in
one impact.
2. Referenced Documents
5.1.1 As a guide in the design of the equipment it has been
found that up to 2712 J of energy may be required to
2.1 ASTM Standards:
completely fracture specimens of steel up to 12.7 mm in
E208Test Method for Conducting Drop-Weight Test to
thickness with tensile strengths to 690 MPa.
Determine Nil-Ductility Transition Temperature of Fer-
ritic Steels
NOTE 1—Equipment of the vertical-dropped-weight variety that can be
E1823TerminologyRelatingtoFatigueandFractureTesting
readily modified to conduct the drop-weight tear test is described in Test
Method E208.
NOTE 2—Current pipeline grade steels take more thn 4kJ at design
3. Terminology
temperature of -5°C
3.1 Terminology E1823 is applicable to this test method.
5.2 Thespecimenshallbesupportedinasuitablemannerto
prevent sidewise rotation of the specimen.
4. Significance and Use
5.3 The velocity of the hammer (in either type of testing
4.1 This test method can be used to determine the appear-
machine) shall be not less than 4.88 m/s.
ance of propagating fractures in plain carbon or low-alloy pipe
steels(yieldstrengthslessthan825MPa)overthetemperature
6. Test Specimen
6.1 The test specimen shall be a 76.2mm by 305mm by
This method is under the jurisdiction ofASTM Committee E28 on Mechanical full-plate-thickness edge-notch bend specimen employing a
Testing and is the direct responsibility of Subcommittee E28.07 on Impact Testing.
pressednotch.Fig.1presentsthedimensionsandtolerancesof
Current edition approved June 1, 2021. Published June 2021. Originally
the specimens. The specimens shall be removed from the
approved in 1971. Last previous edition approved 2014 as E436–03(2014). DOI:
material under test by sawing, shearing, or flame cutting, with
10.1520/E0436-03R21.
For referenced ASTM standards, visit the ASTM website, www.astm.org, or
or without machining.
contact ASTM Customer Service at service@astm.org. For Annual Book of ASTM
Standards volume information, refer to the standard’s Document Summary page on NOTE3—Ifthespecimenisflamecutitisusuallydifficulttopressinthe
the ASTM website. notch unless the heat-affected zone is removed by machining.
Copyright © ASTM International, 100 Barr Harbor Drive, PO Box C700, West Conshohocken, PA 19428-2959. United States
E436 − 03 (2021)
1 3
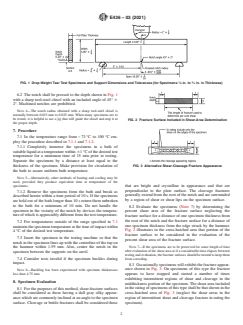
FIG. 1 Drop-Weight Tear Test Specimens and Support Dimensions and Tolerances (for Specimens ⁄8 in. to ⁄4 in. in Thickness)
6.2 The notch shall be pressed to the depth shown in Fig. 1
with a sharp tool-steel chisel with an included angle of 45° 6
2°. Machined notches are prohibited.
NOTE 4—The notch radius obtained with a sharp tool-steel chisel is
normally between 0.013mm to 0.025 mm. When many specimens are to
be tested, it is helpful to use a jig that will guide the chisel and stop it at
FIG. 2 Fracture Surface Included in Shear-Area Determination
the proper depth.
7. Procedure
7.1 In the temperature range from−73°C to 100°C em-
ploy the procedure described in 7.1.1 and 7.1.2.
7.1.1 Completely immerse the specimens in a bath of
suitableliquidatatemperaturewithin 61°Cofthedesiredtest
temperature for a minimum time of 15 min prior to testing.
Separate the specimens by a distance at least equal to the
thickness of the specimen. Make provision for circulation of FIG. 3 Alternative Shear-Cleavage Fracture Appearance
the bath to assure uniform bath temperature.
NOTE 5—Alternatively, other methods of heating and cooling may be
used, provided they produce equivalent time at temperature of the
specimens.
that are bright and crystalline in appearance and that are
perpendicular to the plate surface. The cleavage fractures
7.1.2 Remove the specimens from the bath and break as
generally extend from the root of the notch and are surrounded
described herein within a time period of 10s. If the specimens
by a region of shear or shear lips on the specimen surface.
are held out of the bath longer than 10 s return them unbroken
to the bath for a minimum of 10 min. Do not handle the
8.2 Evaluate the specimens (Note 7) by determining the
specimen in the vicinity of the notch by devices the tempera-
percent shear area of the fracture surface neglecting the
tureofwhichisappreciablydifferentfromthetesttemperature.
fracture surface for a distance of one specimen thickness from
the root of the notch and the fracture surface for a distance of
7.2 For temperatures outside of the range specified in 7.1
one specimen thickness from the edge struck by the hammer.
maintainthespecimentemperatureatthetimeofimpactwithin
Fig. 2 illustrates in the cross-hatched area that portion of the
4°C of the desired test temperature.
fracture surface to be considered in the evaluation of the
7.3 Insert the specimen in the testing machine so that the
percent shear area of the fracture surface.
notchinthespecimenlinesupwiththecenterlineofthetupon
NOTE 7—If the specimens are to be preserved for some length of time
the hammer within 1.59 mm. Also, center the notch in the
afterevaluationoftheshearareaorifaconsiderabletimeelapsesbetween
specimen between the supports on the anvil.
testingandevaluation,thefracturesurfacesshouldbetreatedtokeepthem
7.4 Consider tests invalid if the specimen buckles during from corroding.
impact.
8.3 Occasionallyspecimenswillexhibitthefractureappear-
ance shown in Fig. 3. On specimens of this type the fracture
NOTE 6—Buckling has been experienced with specimen thicknesses
less than 4.75 mm. appears to have stopped and started a number of times
exhibiting intermittent regions of shear and cleavage in the
8. Specimen Evaluation
midthickness portion of the specimen.The shear area included
8.1 For the purposes of this method, shear-fracture surfaces intheratingofspecimensofthistypeshallbethatshowninthe
shall be considered as those having a dull gray silky appear- cross-hatched area of Fig. 3 (neglect the shear areas in the
ance which are commonly inclined at an angle to the specimen region of intermittent shear and cleavage fracture in rating the
surface. Cleavage or brittle fractures shall be considered those specimen).
E436 − 03 (2021)
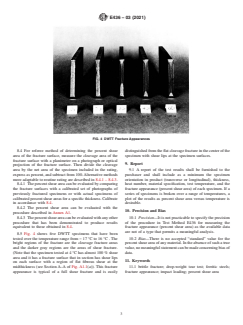
FIG. 4 DWTT Fracture Appearances
8.4 For referee method of determining the percent shear distinguishedfromt
...


Questions, Comments and Discussion
Ask us and Technical Secretary will try to provide an answer. You can facilitate discussion about the standard in here.
Loading comments...