ASTM C695-21
(Test Method)Standard Test Method for Compressive Strength of Carbon and Graphite
Standard Test Method for Compressive Strength of Carbon and Graphite
SIGNIFICANCE AND USE
4.1 Carbon and graphite can usually support higher loads in compression than in any other mode of stress. This test, therefore, provides a measure of the maximum load-bearing capability of carbon and graphite objects.
SCOPE
1.1 This test method covers the determination of the compressive strength of carbon and graphite at room temperature.
1.2 The values stated in inch-pound units are to be regarded as standard. The values given in parentheses are mathematical conversions to SI units that are provided for information only and are not considered standard.
1.3 This standard does not purport to address all of the safety concerns, if any, associated with its use. It is the responsibility of the user of this standard to establish appropriate safety, health, and environmental practices and determine the applicability of regulatory limitations prior to use.
1.4 This international standard was developed in accordance with internationally recognized principles on standardization established in the Decision on Principles for the Development of International Standards, Guides and Recommendations issued by the World Trade Organization Technical Barriers to Trade (TBT) Committee.
General Information
- Status
- Published
- Publication Date
- 30-Apr-2021
- Technical Committee
- D02 - Petroleum Products, Liquid Fuels, and Lubricants
- Drafting Committee
- D02.F0 - Manufactured Carbon and Graphite Products
Relations
- Effective Date
- 01-Jun-2015
- Effective Date
- 01-Jun-2014
- Effective Date
- 01-May-2014
- Effective Date
- 01-May-2013
- Effective Date
- 01-May-2013
- Effective Date
- 01-Dec-2011
- Effective Date
- 01-Dec-2011
- Effective Date
- 01-Nov-2011
- Effective Date
- 01-Oct-2010
- Effective Date
- 01-Jun-2010
- Effective Date
- 01-Nov-2009
- Effective Date
- 01-Apr-2009
- Effective Date
- 01-Dec-2008
- Effective Date
- 01-Oct-2008
- Effective Date
- 01-Oct-2008
Overview
ASTM C695-21: Standard Test Method for Compressive Strength of Carbon and Graphite establishes the procedure for determining the compressive strength of carbon and graphite materials at room temperature. Developed by ASTM International, this standard is essential for industries that require a reliable measure of the load-bearing capacity of carbon and graphite products. Compressive strength is a key property that determines how much load these materials can support without failure, making this test critical for product quality and safety.
Key Topics
- Compressive Strength Testing: The standard outlines the method for assessing the ability of carbon and graphite specimens to withstand uniaxial compressive loads.
- Test Specimens: Provides specifications for specimen preparation, including recommended sizes, shapes, and surface finishes to ensure accurate and consistent results.
- Testing Equipment: Details requirements for machines and loading arrangements, such as the use of spherical and steel contact blocks and necessary hardness and finish for surfaces in contact with specimens.
- Evaluation Procedures: Defines how to properly position specimens, apply loading, and measure the maximum force at failure.
- Reporting Results: Requires detailed reporting, including equipment types, specimen characteristics, loading rates, and compressive strength outcomes, for traceability and consistency.
- Precision and Repeatability: Discusses intra-laboratory and inter-laboratory repeatability, ensuring reliability in results across different users and locations.
- Safety Considerations: Emphasizes the responsibility of users to adhere to appropriate safety, health, and environmental practices, as the standard does not specify these requirements.
- International Applicability: Developed in line with World Trade Organization Technical Barriers to Trade (TBT) principles, supporting global adoption.
Applications
ASTM C695-21 is widely used in:
- Manufacturing Quality Control: Ensures carbon and graphite components such as electrical brushes, seals, and crucibles meet specified compressive strength requirements.
- Material Specification and Development: Supports R&D by providing a consistent method for evaluating new carbon and graphite formulations.
- Component Qualification: Used by industries like aerospace, electronics, and energy to assess suitability of materials for high-compression environments.
- Research and Standards Compliance: Facilitates comparison and reproducibility in academic research and compliance with purchasing specifications.
Regular testing to ASTM C695-21 helps manufacturers and engineers ensure reliable performance and safety of carbon and graphite products in end-use applications.
Related Standards
ASTM C695-21 references and is related to several other ASTM standards, including:
- ASTM D7775: Guide for Measurements on Small Graphite Specimens
- ASTM E4: Practices for Force Verification of Testing Machines
- ASTM E177: Practice for Use of the Terms Precision and Bias in ASTM Test Methods
- ASTM E691: Practice for Conducting an Interlaboratory Study to Determine the Precision of a Test Method
These complementary standards support the accurate measurement and reporting required by ASTM C695-21 and help establish a robust framework for testing and verifying the compressive strength of carbon and graphite materials.
Keywords: ASTM C695, compressive strength, carbon, graphite, test method, material testing, load-bearing capacity, quality control, ASTM standards
Buy Documents
ASTM C695-21 - Standard Test Method for Compressive Strength of Carbon and Graphite
REDLINE ASTM C695-21 - Standard Test Method for Compressive Strength of Carbon and Graphite
Get Certified
Connect with accredited certification bodies for this standard

ECOCERT
Organic and sustainability certification.

Eurofins Food Testing Global
Global leader in food, environment, and pharmaceutical product testing.

Intertek Bangladesh
Intertek certification and testing services in Bangladesh.
Sponsored listings
Frequently Asked Questions
ASTM C695-21 is a standard published by ASTM International. Its full title is "Standard Test Method for Compressive Strength of Carbon and Graphite". This standard covers: SIGNIFICANCE AND USE 4.1 Carbon and graphite can usually support higher loads in compression than in any other mode of stress. This test, therefore, provides a measure of the maximum load-bearing capability of carbon and graphite objects. SCOPE 1.1 This test method covers the determination of the compressive strength of carbon and graphite at room temperature. 1.2 The values stated in inch-pound units are to be regarded as standard. The values given in parentheses are mathematical conversions to SI units that are provided for information only and are not considered standard. 1.3 This standard does not purport to address all of the safety concerns, if any, associated with its use. It is the responsibility of the user of this standard to establish appropriate safety, health, and environmental practices and determine the applicability of regulatory limitations prior to use. 1.4 This international standard was developed in accordance with internationally recognized principles on standardization established in the Decision on Principles for the Development of International Standards, Guides and Recommendations issued by the World Trade Organization Technical Barriers to Trade (TBT) Committee.
SIGNIFICANCE AND USE 4.1 Carbon and graphite can usually support higher loads in compression than in any other mode of stress. This test, therefore, provides a measure of the maximum load-bearing capability of carbon and graphite objects. SCOPE 1.1 This test method covers the determination of the compressive strength of carbon and graphite at room temperature. 1.2 The values stated in inch-pound units are to be regarded as standard. The values given in parentheses are mathematical conversions to SI units that are provided for information only and are not considered standard. 1.3 This standard does not purport to address all of the safety concerns, if any, associated with its use. It is the responsibility of the user of this standard to establish appropriate safety, health, and environmental practices and determine the applicability of regulatory limitations prior to use. 1.4 This international standard was developed in accordance with internationally recognized principles on standardization established in the Decision on Principles for the Development of International Standards, Guides and Recommendations issued by the World Trade Organization Technical Barriers to Trade (TBT) Committee.
ASTM C695-21 is classified under the following ICS (International Classification for Standards) categories: 71.060.10 - Chemical elements. The ICS classification helps identify the subject area and facilitates finding related standards.
ASTM C695-21 has the following relationships with other standards: It is inter standard links to ASTM D7775-11(2015), ASTM E4-14, ASTM E177-14, ASTM E691-13, ASTM E177-13, ASTM D7775-11, ASTM D7775-11e1, ASTM E691-11, ASTM E177-10, ASTM E4-10, ASTM E4-09a, ASTM E4-09, ASTM E4-08, ASTM E691-08, ASTM E177-08. Understanding these relationships helps ensure you are using the most current and applicable version of the standard.
ASTM C695-21 is available in PDF format for immediate download after purchase. The document can be added to your cart and obtained through the secure checkout process. Digital delivery ensures instant access to the complete standard document.
Standards Content (Sample)
This international standard was developed in accordance with internationally recognized principles on standardization established in the Decision on Principles for the
Development of International Standards, Guides and Recommendations issued by the World Trade Organization Technical Barriers to Trade (TBT) Committee.
Designation: C695 − 21
Standard Test Method for
Compressive Strength of Carbon and Graphite
This standard is issued under the fixed designation C695; the number immediately following the designation indicates the year of
original adoption or, in the case of revision, the year of last revision. A number in parentheses indicates the year of last reapproval. A
superscript epsilon (´) indicates an editorial change since the last revision or reapproval.
This standard has been approved for use by agencies of the U.S. Department of Defense.
1. Scope* 3.1.1 compressive strength, n—property of solid material
that indicates its ability to withstand a uniaxial compressive
1.1 This test method covers the determination of the com-
load.
pressive strength of carbon and graphite at room temperature.
1.2 The values stated in inch-pound units are to be regarded
4. Significance and Use
as standard. The values given in parentheses are mathematical
4.1 Carbon and graphite can usually support higher loads in
conversions to SI units that are provided for information only
compression than in any other mode of stress. This test,
and are not considered standard.
therefore, provides a measure of the maximum load-bearing
1.3 This standard does not purport to address all of the
capability of carbon and graphite objects.
safety concerns, if any, associated with its use. It is the
responsibility of the user of this standard to establish appro- 5. Apparatus
priate safety, health, and environmental practices and deter-
5.1 Test Machine, conforming to Practice E4 and to the
mine the applicability of regulatory limitations prior to use.
requirementsforspeedoftestingprescribedinSection8ofthis
1.4 This international standard was developed in accor-
test method.
dance with internationally recognized principles on standard-
5.2 Spherical Bearing Blocks attached to the upper or lower
ization established in the Decision on Principles for the
head of the machine in such a manner that the spherical
Development of International Standards, Guides and Recom-
surfaces are in full contact when not loaded. The center of
mendations issued by the World Trade Organization Technical
curvative of the spherical surface shall lie on the surface that
Barriers to Trade (TBT) Committee.
contacts the specimen and on the machine axis. The spherical
surfaces shall be well-lubricated. The radius of the spherical
2. Referenced Documents
surface shall be equal to or greater than the radius of the test
2.1 ASTM Standards:
specimen.
D7775 Guide for Measurements on Small Graphite Speci-
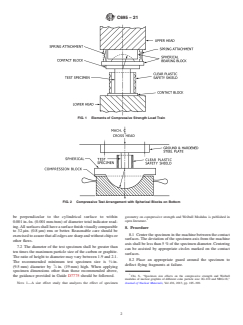
5.3 Steel Contact Blocks may be used above or below the
mens
specimen, or both, to protect fixture and test machine surfaces
E4 Practices for Force Verification of Testing Machines
from damage, as illustrated in Fig. 1 and Fig. 2. Contact block
E177 Practice for Use of the Terms Precision and Bias in
surfaces shall be plane and parallel to within 0.0005 in./in.
ASTM Test Methods
(0.0005 mm/mm).
E691 Practice for Conducting an Interlaboratory Study to
Determine the Precision of a Test Method 5.4 All load-bearing machine and fixture surfaces shall have
a minimum hardness of 45 HRC and surface finish of 16 µin.
3. Terminology (0.4 µm) rms maximum. Surfaces in contact with the specimen
shall be flat to less than 0.0005 in./in. (0.0005 mm/mm).
3.1 Definitions:
5.5 Examples of arrangements of the load train are shown
schematically in Fig. 1 and Fig. 2.
This test method is under the jurisdiction of ASTM Committee D02 on
6. Sampling
Petroleum Products, Liquid Fuels, and Lubricants and is the direct responsibility of
Subcommittee D02.F0 on Manufactured Carbon and Graphite Products.
6.1 Samples may be taken from locations and orientations
Current edition approved May 1, 2021. Published May 2021. Originally
that satisfy the objectives of the test.
approved in 1971. Last previous edition approved in 2020 as C695 – 15 (2020).
DOI: 10.1520/C0695-21.
For referenced ASTM standards, visit the ASTM website, www.astm.org, or 7. Test Specimen
contact ASTM Customer Service at service@astm.org. For Annual Book of ASTM
7.1 The test specimen shall be a right cylinder with ends
Standards volume information, refer to the standard’s Document Summary page on
the ASTM website. machined to yield planar and parallel faces. These faces shall
*A Summary of Changes section appears at the end of this standard
Copyright © ASTM International, 100 Barr Harbor Drive, PO Box C700, West Conshohocken, PA 19428-2959. United States
C695 − 21
FIG. 1 Elements of Compressive Strength Load Train
FIG. 2 Compressive Test Arrangement with Spherical Blocks on Bottom
geometry on compressive strength and Weibull Modulus is published in
be perpendicular to the cylindrical surface to within
open literature.
0.001 in.⁄in. (0.001 mm⁄mm) of diameter total indicator read-
ing.Allsurfacesshallhaveasurfacefinishvisuallycomparable
8. Procedure
to 32 µin. (0.8 µm) rms or better. Reasonable care should be
8.1 Center the specimen in the machine between the contact
exercisedtoassurethatalledgesaresharpandwithoutchipsor
surfaces. The deviation of the specimen axis from the machine
other flaws.
axis shall be less than 5 % of the specimen diameter. Centering
7.2 The diameter of the test specimen shall be greater than
can be assisted by appropriate circles marked on the contact
ten times the maximum par
...
This document is not an ASTM standard and is intended only to provide the user of an ASTM standard an indication of what changes have been made to the previous version. Because
it may not be technically possible to adequately depict all changes accurately, ASTM recommends that users consult prior editions as appropriate. In all cases only the current version
of the standard as published by ASTM is to be considered the official document.
Designation: C695 − 15 (Reapproved 2020) C695 − 21
Standard Test Method for
Compressive Strength of Carbon and Graphite
This standard is issued under the fixed designation C695; the number immediately following the designation indicates the year of
original adoption or, in the case of revision, the year of last revision. A number in parentheses indicates the year of last reapproval. A
superscript epsilon (´) indicates an editorial change since the last revision or reapproval.
This standard has been approved for use by agencies of the U.S. Department of Defense.
1. Scope Scope*
1.1 This test method covers the determination of the compressive strength of carbon and graphite at room temperature.
1.2 The values stated in inch-pound units are to be regarded as standard. The values given in parentheses are mathematical
conversions to SI units that are provided for information only and are not considered standard.
1.3 This standard does not purport to address all of the safety concerns, if any, associated with its use. It is the responsibility
of the user of this standard to establish appropriate safety, health, and environmental practices and determine the applicability of
regulatory limitations prior to use.
1.4 This international standard was developed in accordance with internationally recognized principles on standardization
established in the Decision on Principles for the Development of International Standards, Guides and Recommendations issued
by the World Trade Organization Technical Barriers to Trade (TBT) Committee.
2. Referenced Documents
2.1 ASTM Standards:
D7775 Guide for Measurements on Small Graphite Specimens
E4 Practices for Force Verification of Testing Machines
E177 Practice for Use of the Terms Precision and Bias in ASTM Test Methods
E691 Practice for Conducting an Interlaboratory Study to Determine the Precision of a Test Method
3. Terminology
3.1 Definitions:
3.1.1 compressive strength, n—property of solid material that indicates its ability to withstand a uniaxial compressive load.
4. Significance and Use
4.1 Carbon and graphite can usually support higher loads in compression than in any other mode of stress. This test, therefore,
provides a measure of the maximum load-bearing capability of carbon and graphite objects.
This test method is under the jurisdiction of ASTM Committee D02 on Petroleum Products, Liquid Fuels, and Lubricants and is the direct responsibility of Subcommittee
D02.F0 on Manufactured Carbon and Graphite Products.
Current edition approved May 1, 2020May 1, 2021. Published June 2020May 2021. Originally approved in 1971. Last previous edition approved in 20152020 as
C695 – 15.C695 – 15 (2020). DOI: 10.1520/C0695-15R20.10.1520/C0695-21.
For referenced ASTM standards, visit the ASTM website, www.astm.org, or contact ASTM Customer Service at service@astm.org. For Annual Book of ASTM Standards
volume information, refer to the standard’s Document Summary page on the ASTM website.
*A Summary of Changes section appears at the end of this standard
Copyright © ASTM International, 100 Barr Harbor Drive, PO Box C700, West Conshohocken, PA 19428-2959. United States
C695 − 21
5. Apparatus
5.1 Test Machine, conforming to Practice E4 and to the requirements for speed of testing prescribed in Section 8 of this test
method.
5.2 Spherical Bearing Blocks attached to the upper or lower head of the machine in such a manner that the spherical surfaces are
in full contact when not loaded. The center of curvative of the spherical surface shall lie on the surface that contacts the specimen
and on the machine axis. The spherical surfaces shall be well-lubricated. The radius of the spherical surface shall be equal to or
greater than the radius of the test specimen.
5.3 Steel Contact Blocks may be used above or below the specimen, or both, to protect fixture and test machine surfaces from
damage, as illustrated in Fig. 1 and Fig. 2. Contact block surfaces shall be plane and parallel to within 0.0005 in./in. (0.0005
mm/mm).
5.4 All load-bearing machine and fixture surfaces shall have a minimum hardness of 45 HRC and surface finish of 16 μin. (0.4
μm) rms maximum. Surfaces in contact with the specimen shall be flat to less than 0.0005 in./in. (0.0005 mm/mm).
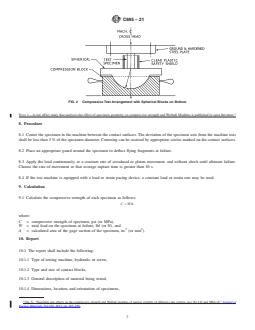
5.5 Examples of arrangements of the load train are shown schematically in Fig. 1 and Fig. 2.
6. Sampling
6.1 Samples may be taken from locations and orientations that satisfy the objectives of the test.
7. Test Specimen
7.1 The test specimen shall be a right cylinder with ends machined to yield planar and parallel faces. These faces shall be
perpendicular to the cylindrical surface to within 0.001 in. ⁄in. (0.001 mm ⁄mm) of diameter total indicator reading. All surfaces
shall have a surface finish visually comparable to 32 μin. (0.8 μm) rms or better. Reasonable care should be exercised to assure
that all edges are sharp and without chips or other flaws.
7.2 The diameter of the test specimen shall be greater than ten times the maximum particle size of the carbon or graphite. The
ratio of height to diameter may vary between 1.9 and 2.1. The recommended minimum test specimen size is ⁄8 in. (9.5 mm)
diameter by ⁄4 in. (19 mm) high. When applying specimen dimensions other than those recommended above, the guidance
provided in Guide D7775 should be followed.
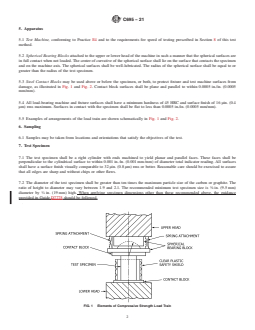
FIG. 1 Elements of Compressive Strength Load Train
...

Questions, Comments and Discussion
Ask us and Technical Secretary will try to provide an answer. You can facilitate discussion about the standard in here.
Loading comments...