ASTM D97-17b(2022)
(Test Method)Standard Test Method for Pour Point of Petroleum Products
Standard Test Method for Pour Point of Petroleum Products
SIGNIFICANCE AND USE
5.1 The pour point of a petroleum specimen is an index of the lowest temperature of its utility for certain applications.
SCOPE
1.1 This test method covers and is intended for use on any petroleum product.3 A procedure suitable for black specimens, cylinder stock, and nondistillate fuel oil is described in 8.8. The cloud point procedure formerly part of this test method now appears as Test Method D2500.
1.2 Currently there is no ASTM test method for automated Test Method D97 pour point measurements.
1.3 Several ASTM test methods offering alternative procedures for determining pour points using automatic apparatus are available. None of them share the same designation number as Test Method D97. When an automatic instrument is used, the ASTM test method designation number specific to the technique shall be reported with the results. A procedure for testing the pour point of crude oils is described in Test Method D5853.
1.4 The values stated in SI units are to be regarded as standard. No other units of measurement are included in this standard.
1.5 WARNING—Mercury has been designated by many regulatory agencies as a hazardous substance that can cause serious medical issues. Mercury, or its vapor, has been demonstrated to be hazardous to health and corrosive to materials. Use caution when handling mercury and mercury-containing products. See the applicable product Safety Data Sheet (SDS) for additional information. The potential exists that selling mercury or mercury-containing products, or both, is prohibited by local or national law. Users must determine legality of sales in their location.
1.6 This standard does not purport to address all of the safety concerns, if any, associated with its use. It is the responsibility of the user of this standard to establish appropriate safety, health, and environmental practices and determine the applicability of regulatory limitations prior to use.
1.7 This international standard was developed in accordance with internationally recognized principles on standardization established in the Decision on Principles for the Development of International Standards, Guides and Recommendations issued by the World Trade Organization Technical Barriers to Trade (TBT) Committee.
General Information
- Status
- Published
- Publication Date
- 31-Oct-2022
- Technical Committee
- D02 - Petroleum Products, Liquid Fuels, and Lubricants
- Drafting Committee
- D02.07 - Flow Properties
Relations
- Effective Date
- 01-Mar-2024
- Effective Date
- 01-Dec-2023
- Effective Date
- 15-Dec-2019
- Effective Date
- 01-Dec-2019
- Effective Date
- 01-Nov-2019
- Effective Date
- 01-May-2019
- Effective Date
- 01-May-2019
- Effective Date
- 01-Oct-2018
- Effective Date
- 01-May-2018
- Effective Date
- 01-Dec-2017
- Effective Date
- 01-Jul-2017
- Effective Date
- 01-Dec-2016
- Effective Date
- 01-Dec-2016
- Effective Date
- 01-Oct-2016
- Effective Date
- 01-Oct-2016
Overview
ASTM D97-17b(2022): Standard Test Method for Pour Point of Petroleum Products is an internationally recognized method developed by ASTM International. This standard defines the procedure to determine the pour point of petroleum products, which is the lowest temperature at which an oil or fuel remains pourable under specified conditions. Knowing the pour point is essential for understanding the operational limits of lubricants, fuel oils, and other petroleum-based products, especially in cold climates or during cold storage and transportation.
This method applies to a broad range of petroleum products, including black oils, cylinder stock, and non-distillate fuel oils. ASTM D97 is widely referenced in the petroleum industry for quality control, specification compliance, and product development.
Key Topics
Purpose and Significance
- Determines the lowest temperature at which petroleum products are still flowable.
- Critical for assessing product suitability in low-temperature environments.
- Indicates performance limits for applications like lubricants, diesel fuels, and heating oils.
Scope of the Standard
- Applicable to all petroleum products.
- Describes specific procedures for products with different characteristics, such as black oils and residual fuels.
- Does not address automated pour point determination; separate ASTM standards exist for automatic methods.
Test Procedure
- The sample is heated, cooled at a controlled rate, and checked at intervals for fluid movement.
- The pour point is reported as the temperature, in degrees Celsius, at which the product ceases to flow after a prescribed cooling and testing schedule.
- Required equipment includes test jars, calibrated thermometers (including liquid-in-glass and digital contact thermometers), and temperature-controlled baths.
Safety Considerations
- Warns against the use and handling of mercury-containing devices due to health and environmental risks.
- Users must ensure compliance with local regulations regarding hazardous materials.
Applications
ASTM D97 is essential for:
- Fuel and Lubricant Manufacturers
- Ensuring products meet required cold temperature performance standards.
- Evaluating product formulation changes affecting low-temperature flow characteristics.
- Quality Control Laboratories
- Routine specification testing for petroleum products.
- Compliance with international and regional standards for import, export, and market access.
- Equipment and Engine OEMs
- Specifying appropriate lubricants and fuels for operations in varying climates.
- Transport and Storage Operators
- Assessing the risk of product solidification during winter shipping and storage.
- Selecting products based on regional temperature extremes.
Understanding the pour point aids in preventing operational issues such as clogged pipelines, fuel filter blockages, and insufficient lubrication at low temperatures.
Related Standards
Several ASTM and international standards complement or reference ASTM D97:
- ASTM D2500 - Test Method for Cloud Point of Petroleum Products and Liquid Fuels
- ASTM D5853 - Test Method for Pour Point of Crude Oils
- ASTM D396 - Specification for Fuel Oils
- ASTM D6300 - Practice for Determination of Precision and Bias Data for Use in Test Methods for Petroleum Products
- ASTM E1 - Specification for ASTM Liquid-in-Glass Thermometers
- ASTM E2877 - Guide for Digital Contact Thermometers
- Energy Institute Standards - IP standard thermometers
Keywords: ASTM D97, pour point, petroleum products, lubricants, fuel oils, cold flow properties, standard test method, low-temperature performance, quality control, oil testing, ASTM standards.
Buy Documents
ASTM D97-17b(2022) - Standard Test Method for Pour Point of Petroleum Products
Get Certified
Connect with accredited certification bodies for this standard

ABS Quality Evaluations Inc.
American Bureau of Shipping quality certification.

Element Materials Technology
Materials testing and product certification.

ABS Group Brazil
ABS Group certification services in Brazil.
Sponsored listings
Frequently Asked Questions
ASTM D97-17b(2022) is a standard published by ASTM International. Its full title is "Standard Test Method for Pour Point of Petroleum Products". This standard covers: SIGNIFICANCE AND USE 5.1 The pour point of a petroleum specimen is an index of the lowest temperature of its utility for certain applications. SCOPE 1.1 This test method covers and is intended for use on any petroleum product.3 A procedure suitable for black specimens, cylinder stock, and nondistillate fuel oil is described in 8.8. The cloud point procedure formerly part of this test method now appears as Test Method D2500. 1.2 Currently there is no ASTM test method for automated Test Method D97 pour point measurements. 1.3 Several ASTM test methods offering alternative procedures for determining pour points using automatic apparatus are available. None of them share the same designation number as Test Method D97. When an automatic instrument is used, the ASTM test method designation number specific to the technique shall be reported with the results. A procedure for testing the pour point of crude oils is described in Test Method D5853. 1.4 The values stated in SI units are to be regarded as standard. No other units of measurement are included in this standard. 1.5 WARNING—Mercury has been designated by many regulatory agencies as a hazardous substance that can cause serious medical issues. Mercury, or its vapor, has been demonstrated to be hazardous to health and corrosive to materials. Use caution when handling mercury and mercury-containing products. See the applicable product Safety Data Sheet (SDS) for additional information. The potential exists that selling mercury or mercury-containing products, or both, is prohibited by local or national law. Users must determine legality of sales in their location. 1.6 This standard does not purport to address all of the safety concerns, if any, associated with its use. It is the responsibility of the user of this standard to establish appropriate safety, health, and environmental practices and determine the applicability of regulatory limitations prior to use. 1.7 This international standard was developed in accordance with internationally recognized principles on standardization established in the Decision on Principles for the Development of International Standards, Guides and Recommendations issued by the World Trade Organization Technical Barriers to Trade (TBT) Committee.
SIGNIFICANCE AND USE 5.1 The pour point of a petroleum specimen is an index of the lowest temperature of its utility for certain applications. SCOPE 1.1 This test method covers and is intended for use on any petroleum product.3 A procedure suitable for black specimens, cylinder stock, and nondistillate fuel oil is described in 8.8. The cloud point procedure formerly part of this test method now appears as Test Method D2500. 1.2 Currently there is no ASTM test method for automated Test Method D97 pour point measurements. 1.3 Several ASTM test methods offering alternative procedures for determining pour points using automatic apparatus are available. None of them share the same designation number as Test Method D97. When an automatic instrument is used, the ASTM test method designation number specific to the technique shall be reported with the results. A procedure for testing the pour point of crude oils is described in Test Method D5853. 1.4 The values stated in SI units are to be regarded as standard. No other units of measurement are included in this standard. 1.5 WARNING—Mercury has been designated by many regulatory agencies as a hazardous substance that can cause serious medical issues. Mercury, or its vapor, has been demonstrated to be hazardous to health and corrosive to materials. Use caution when handling mercury and mercury-containing products. See the applicable product Safety Data Sheet (SDS) for additional information. The potential exists that selling mercury or mercury-containing products, or both, is prohibited by local or national law. Users must determine legality of sales in their location. 1.6 This standard does not purport to address all of the safety concerns, if any, associated with its use. It is the responsibility of the user of this standard to establish appropriate safety, health, and environmental practices and determine the applicability of regulatory limitations prior to use. 1.7 This international standard was developed in accordance with internationally recognized principles on standardization established in the Decision on Principles for the Development of International Standards, Guides and Recommendations issued by the World Trade Organization Technical Barriers to Trade (TBT) Committee.
ASTM D97-17b(2022) is classified under the following ICS (International Classification for Standards) categories: 75.080 - Petroleum products in general. The ICS classification helps identify the subject area and facilitates finding related standards.
ASTM D97-17b(2022) has the following relationships with other standards: It is inter standard links to ASTM D6300-24, ASTM D6300-23a, ASTM D396-19a, ASTM D6300-19a, ASTM E644-11(2019), ASTM E2877-12(2019), ASTM D396-19, ASTM D396-18a, ASTM D396-18, ASTM D396-17a, ASTM D396-17, ASTM D5853-16, ASTM D7962-16, ASTM D396-16, ASTM D396-16e1. Understanding these relationships helps ensure you are using the most current and applicable version of the standard.
ASTM D97-17b(2022) is available in PDF format for immediate download after purchase. The document can be added to your cart and obtained through the secure checkout process. Digital delivery ensures instant access to the complete standard document.
Standards Content (Sample)
This international standard was developed in accordance with internationally recognized principles on standardization established in the Decision on Principles for the
Development of International Standards, Guides and Recommendations issued by the World Trade Organization Technical Barriers to Trade (TBT) Committee.
Designation: D97 − 17b (Reapproved 2022)
Designation: 15/22
Standard Test Method for
1,2
Pour Point of Petroleum Products
ThisstandardisissuedunderthefixeddesignationD97;thenumberimmediatelyfollowingthedesignationindicatestheyearoforiginal
adoptionor,inthecaseofrevision,theyearoflastrevision.Anumberinparenthesesindicatestheyearoflastreapproval.Asuperscript
epsilon (´) indicates an editorial change since the last revision or reapproval.
This standard has been approved for use by agencies of the U.S. Department of Defense.
1. Scope mercuryormercury-containingproducts,orboth,isprohibited
bylocalornationallaw.Usersmustdeterminelegalityofsales
1.1 This test method covers and is intended for use on any
3 in their location.
petroleum product. Aprocedure suitable for black specimens,
1.6 This standard does not purport to address all of the
cylinderstock,andnondistillatefueloilisdescribedin8.8.The
safety concerns, if any, associated with its use. It is the
cloud point procedure formerly part of this test method now
responsibility of the user of this standard to establish appro-
appears as Test Method D2500.
priate safety, health, and environmental practices and deter-
1.2 Currently there is no ASTM test method for automated
mine the applicability of regulatory limitations prior to use.
Test Method D97 pour point measurements.
1.7 This international standard was developed in accor-
1.3 Several ASTM test methods offering alternative proce-
dance with internationally recognized principles on standard-
dures for determining pour points using automatic apparatus
ization established in the Decision on Principles for the
areavailable.Noneofthemsharethesamedesignationnumber
Development of International Standards, Guides and Recom-
as Test Method D97. When an automatic instrument is used,
mendations issued by the World Trade Organization Technical
the ASTM test method designation number specific to the
Barriers to Trade (TBT) Committee.
technique shall be reported with the results. A procedure for
testing the pour point of crude oils is described inTest Method
2. Referenced Documents
D5853.
2.1 ASTM Standards:
1.4 The values stated in SI units are to be regarded as
D117Guide for Sampling, Test Methods, and Specifications
standard. No other units of measurement are included in this
for Electrical Insulating Liquids
standard.
D396Specification for Fuel Oils
D2500Test Method for Cloud Point of Petroleum Products
1.5 WARNING—Mercury has been designated by many
and Liquid Fuels
regulatory agencies as a hazardous substance that can cause
D5853Test Method for Pour Point of Crude Oils
serious medical issues. Mercury, or its vapor, has been dem-
D6300Practice for Determination of Precision and Bias
onstrated to be hazardous to health and corrosive to materials.
Data for Use in Test Methods for Petroleum Products,
Use caution when handling mercury and mercury-containing
Liquid Fuels, and Lubricants
products. See the applicable product Safety Data Sheet (SDS)
D7962Practice for Determination of Minimum Immersion
for additional information. The potential exists that selling
Depth and Assessment of Temperature Sensor Measure-
ment Drift
This test method is under the jurisdiction of ASTM International Committee
E1Specification for ASTM Liquid-in-Glass Thermometers
D02 on Petroleum Products, Liquid Fuels, and Lubricants and is the direct
E644Test Methods for Testing Industrial Resistance Ther-
responsibility ofASTM Subcommittee D02.07 on Flow Properties. The technically
equivalent standard as referenced is under the jurisdiction of the Energy Institute mometers
Subcommittee SC-C-4.
E1137SpecificationforIndustrialPlatinumResistanceTher-
Current edition approved Nov. 1, 2022. Published November 2022. Originally
mometers
approved in 1927, replacing D47. Last previous edition approved in 2017 as
E2877Guide for Digital Contact Thermometers
D97–17b. DOI: 10.1520/D0097-17BR22.
This test method was adopted as a joint ASTM-IP Standard in 1965.
This test method has been developed through the cooperative effort between
ASTMandtheEnergyInstitute,London.ASTMandIPstandardswereapprovedby
ASTMandEItechnicalcommitteesasbeingtechnicallyequivalentbutthatdoesnot For referenced ASTM standards, visit the ASTM website, www.astm.org, or
imply both standards are identical. contact ASTM Customer Service at service@astm.org. For Annual Book of ASTM
Statements defining this test and its significance when applied to electrical Standards volume information, refer to the standard’s Document Summary page on
insulating oils of mineral origin will be found in Guide D117. the ASTM website.
Copyright © ASTM International, 100 Barr Harbor Drive, PO Box C700, West Conshohocken, PA 19428-2959. United States
D97 − 17b (2022)
2.2 Energy Institute Standards: 3.1.3.2 Discussion—PET is an acronym for portable elec-
Specifications for IP Standard Thermometers tronic thermometers, a subset of digital contact thermometers
(DCT).
3. Terminology
3.1.4 pour point, n—in petroleum products, the lowest
3.1 Definitions: temperature at which movement of the test specimen is
3.1.1 black oil, n—lubricant containing asphaltic materials. observed under prescribed conditions of test.
Blackoilsareusedinheavy-dutyequipmentapplications,such
3.1.5 residual fuel, n—a liquid fuel containing bottoms
as mining and quarrying, where extra adhesiveness is desired.
remaining from crude distillation or thermal cracking; some-
3.1.2 cylinder stock, n—lubricant for independently lubri- times referred to as heavy fuel oil.
cated engine cylinders, such as those of steam engines and air 3.1.5.1 Discussion—Residual fuels comprise Grades 4, 5,
compressors. Cylinder stock are also used for lubrication of and 6 fuel oils, as defined in Specification D396.
valves and other elements in the cylinder area.
4. Summary of Test Method
3.1.3 digital contact thermometer (DCT), n—an electronic
device consisting of a digital display and associated tempera-
4.1 After preliminary heating, the sample is cooled at a
ture sensing probe.
specified rate and examined at intervals of 3°C for flow
3.1.3.1 Discussion—This device consists of a temperature
characteristics. The lowest temperature at which movement of
sensor connected to a measuring instrument; this instrument
the specimen is observed is recorded as the pour point.
measures the temperature-dependent quantity of the sensor,
computes the temperature from the measured quantity, and
5. Significance and Use
provides a digital output. This digital output goes to a digital
5.1 The pour point of a petroleum specimen is an index of
displayand/orrecordingdevicethatmaybeinternalorexternal
the lowest temperature of its utility for certain applications.
to the device. These devices are sometimes referred to as
“digital thermometers.”
6. Apparatus
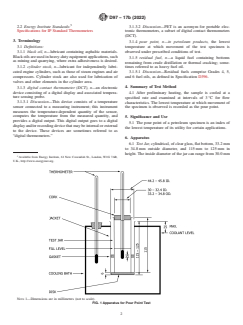
6.1 TestJar,cylindrical,ofclearglass,flatbottom,33.2mm
to 34.8mm outside diameter, and 115mm to 125mm in
height. The inside diameter of the jar can range from 30.0mm
Available from Energy Institute, 61 New Cavendish St., London, W1G 7AR,
U.K., http://www.energyinst.org.
NOTE 1—Dimensions are in millimetres (not to scale).
FIG. 1 Apparatus for Pour Point Test
D97 − 17b (2022)
may be necessary to use a 1000Ω sensor in order to obtain accurate
to 32.4mm, within the constraint that the wall thickness be no
measurements.
greater than 1.6mm. The jar shall have a line to indicate a
NOTE 2—When the DCT display is mounted on the end to the probe’s
sample height 54mm 6 3mm above the inside bottom. See
sheath,thetestjarwiththeprobeinsertedwillbeunstable.Toresolvethis,
Fig. 1.
it is recommended that the probe be less than 30 cm in length but no less
than15cm.A5cmlongstopper,thathasalowthermalconductivity,with
6.2 Temperature Measuring Device—Either liquid-in-glass
approximately half of it inserted in the sample tube will improve stability.
thermometer as described in 6.2.1 or Digital Contact Ther-
6.2.2.1 The DCT calibration drift shall be checked at least
mometer (DCT) meeting the requirements described in 6.2.2.
annually by either measuring the ice point or against a
6.2.1 Liquid-in-Glass Thermometers, having the following
reference thermometer in a constant temperature bath at the
ranges and conforming to the requirements prescribed in
prescribed immersion depth to ensure compliance with 6.2.2.
Specification E1 or Specifications for IP Standard Thermom-
See Practice D7962.
eters:
Temperature Thermometer
NOTE 3—When a DCT’s calibration drifts in one direction over several
Number
calibration checks, that is, ice point, it may be an indication of deteriora-
Thermometer Range ASTM IP
tion of the DCT.
High cloud and pour −38 °C to +50 °C 5C 1C
Low cloud and pour −80 °C to +20 °C 6C 2C 6.3 Cork, to fit the test jar, bored centrally for the test
Melting point +32 °C to +127 °C 61C 63C
temperature measuring device.
6.2.1.1 Since separation of liquid column thermometers
6.4 Jacket, watertight, cylindrical, metal, flat-bottomed,
occasionally occurs and may escape detection, thermometers
115 mm 6 3mm depth, with inside diameter of 44.2mm to
should be checked immediately prior to the test and used only
45.8mm. It shall be supported in a vertical position in the
if they prove accurate within 61°C (for example ice point).
coolingbath(see6.7)sothatnotmorethan25mmprojectsout
6.2.2 Digital Contact Thermometer Requirements:
of the cooling medium, and shall be capable of being cleaned.
Parameter Requirement
6.5 Disk, cork or felt, 6mm thick to fit loosely inside the
DCT Guide E2877 Class F or better
jacket.
A
Nominal temperature range High Pour: –38 °C to 50 °C
Low Pour: –80 °C to 20 °C 6.6 Gasket Ring Form, about 5mm in thickness, to fit
Melt Point: 32 °C to 127 °C
snugly around the outside of the test jar and loosely inside the
Display resolution 0.1 °C minimum
B jacket. The gasket may be made of rubber, leather, or other
Accuracy ±500 mK (±0.5 °C)
Sensor type Platinum resistance thermometer (PRT), material that is elastic enough to cling to the test jar and hard
thermistor, thermocouple
enough to hold its shape. Its purpose is to prevent the test jar
C
Sensor sheath 4.2 mm OD maximum
D from touching the jacket.
Sensor length Less than 10 mm
E
Immersion depth Less than 40 mm per Practice D7962
6.7 Bath or Baths, maintained at prescribed temperatures
Sample immersion depth Tip of sheath between 10 mm and 15 mm
with a firm support to hold the jacket vertical. The required
below sample meniscus
Fig. 1
bath temperatures may be obtained by refrigeration if
E
Measurement drift Less than 500 mK (0.5 °C) per year
available, otherwise by suitable cooling mixtures. Cooling
F
Response time Less than or equal to 4 s per footnote F
mixtures commonly used for bath temperatures down to those
Calibration error Less than 500 mK (0.5 °C) over the range of
intended use
shown are in Table 1.
Calibration range Consistent with temperature range of use
Calibration data Four data points evenly distributed over the cali-
7. Reagents and Materials
bration range that is consistent with the range of
use. The calibration data is to be included in the
7.1 The following solvents of technical grade are appropri-
calibration report.
ate for low-temperature bath media.
Calibration report From a calibration laboratory with demonstrated
competency in temperature calibration which is
7.1.1 Acetone, (Warning—Extremely flammable).
traceable to a national calibration laboratory or
7.1.2 Alcohol, Ethanol (Warning—Flammable).
metrology standards body
7.1.3 Alcohol, Methanol (Warning—Flammable. Vapor
A
harmful).
The nominal temperature range may be different from the values shown provided
the calibration and accuracy criteria are met.
7.1.4 Petroleum Naphtha, (Warning—Combustible. Vapor
B
Accuracy is the combined accuracy of the DCT unit, which is the display and
harmful).
sensor.
C
7.1.5 Solid Carbon Dioxide, (Warning—Extremely cold
Sensor sheath is the tube that holds the sensing element. The value is the
outside diameter of the sheath segment containing the sensor element.
−78.5°C).
D
The physical length of the temperature sensing element.
E
As determined by Practice D7962 or an equivalent procedure.
8. Procedure
F
Response Time—The time for a DCT to respond to a step change in tempera-
ture. The response time is 63.2 % of the step change time as determined per
8.1 Pour the specimen into the test jar to the level mark.
Section 9 of Test Methods E644. The step change evaluation begins at 20 °C ±
When necessary, heat the specimen in a bath until it is just
5 °C air to 77 °C ± 5 °C with water circulating at 0.9 m ⁄s ± 0.09 m ⁄s past the
sensor.
sufficiently fluid to pour into the test jar.
NOTE 1—When making measurements below –40°C with a PRT, it
NOTE4—Itisknownthatsomematerials,whenheatedtoatemperature
higher than 45°C during the preceding 24h, do not yield the same pour
point results as when they are kept at room temperature for 24h prior to
Supporting data have been filed atASTM International Headquarters and may
beobtainedbyrequestingResearchReportRR:D02-1826.ContactASTMCustomer testing. Examples of mater
...


Questions, Comments and Discussion
Ask us and Technical Secretary will try to provide an answer. You can facilitate discussion about the standard in here.
Loading comments...