ASTM F801-21
(Test Method)Standard Test Method for Measuring Optical Angular Deviation of Transparent Parts
Standard Test Method for Measuring Optical Angular Deviation of Transparent Parts
SIGNIFICANCE AND USE
5.1 One of the measures of optical quality of a transparent part is its angular deviation. It is possible that excessive angular deviation, or variations in angular deviation throughout the part, will result in visible distortion of scenes viewed through the part. Angular deviation, its detection, and quantification are of extreme importance in the area of certain aircraft transparency applications, that is, aircraft equipped with Heads-up Displays (HUD). It is possible that HUDs will require stringent control over the optics of the portion of the transparency (windscreen or canopy) which lies between the HUD combining glass and the external environment. Military aircraft equipped with HUDs or similar devices require precise knowledge of the effects of the windscreen or canopy on image position in order to maintain weapons aiming accuracy.
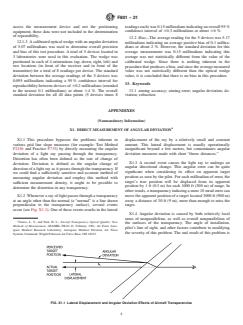
5.2 Two optical parameters have the effect of changing image position. The first, lateral displacement, is inherent in any transparency which is tilted with respect to the line of sight. The effect of lateral displacement is constant over distance, and seldom exceeds a fraction of an inch. The second parameter, angular deviation, is usually caused by a wedginess or nonparallelism of the transparency surfaces. The effect of angular deviation is related to the tangent of the angle of deviation, thus the magnitude of the image position displacement increases as does the distance between image and transparency. The quantification of angular deviation is then the more critical of the two parameters. Both parameters are illustrated in Fig. X1.1.
SCOPE
1.1 This test method covers measuring the angular deviation of a light ray imposed by transparent parts such as aircraft windscreens and canopies. The results are uncontaminated by the effects of lateral displacement, and it is possible to perform the procedure in a relatively short optical path length. This is not intended as a referee standard. It is one convenient method for measuring angular deviations through transparent windows.
1.2 This standard does not purport to address all of the safety concerns, if any, associated with its use. It is the responsibility of the user of this standard to establish appropriate safety, health, and environmental practices and determine the applicability of regulatory limitations prior to use.
1.3 This international standard was developed in accordance with internationally recognized principles on standardization established in the Decision on Principles for the Development of International Standards, Guides and Recommendations issued by the World Trade Organization Technical Barriers to Trade (TBT) Committee.
General Information
- Status
- Published
- Publication Date
- 30-Apr-2021
- Technical Committee
- F07 - Aerospace and Aircraft
- Drafting Committee
- F07.08 - Transparent Enclosures and Materials
Relations
- Effective Date
- 01-Nov-2019
- Effective Date
- 01-Dec-2014
- Effective Date
- 01-May-2013
- Effective Date
- 01-Dec-2011
- Effective Date
- 01-Nov-2011
- Effective Date
- 15-May-2009
- Effective Date
- 01-Oct-2008
- Effective Date
- 01-Nov-2006
- Effective Date
- 01-Nov-2005
- Effective Date
- 01-Oct-2003
- Effective Date
- 10-Nov-2001
- Effective Date
- 10-May-1999
Overview
ASTM F801-21, titled Standard Test Method for Measuring Optical Angular Deviation of Transparent Parts, establishes a procedure for evaluating the optical angular deviation in transparent parts such as aircraft windscreens and canopies. Developed by ASTM International, this standard is widely recognized for its role in assessing the optical quality of transparent components, especially in aerospace applications. The method is particularly significant where precision in visual display alignment is critical, such as in aircraft equipped with Heads-up Displays (HUDs).
The test method involves measuring the angular deviation-a deviation of light rays as they pass through a transparent material-which can result in visible distortion and misalignment of images. It allows for accurate measurement of angular deviation, independent of lateral displacement effects, using a relatively short optical path length.
Key Topics
Angular Deviation: The main focus of the standard is on measuring the angular deviation, which is essential for maintaining the visual accuracy and clarity of images seen through transparent materials. Angular deviation often results from nonparallelism or wedginess in the material's surfaces.
Lateral Displacement: While lateral displacement represents a consistent, minor shift of a light ray, angular deviation increases with distance and can critically affect image positioning in applications such as weapon aiming and navigation.
Measurement Approach: The standard describes an optoelectronic measurement setup that uses collimated light, a target pattern, field lens, beam splitter, and position-detecting devices like linear or two-dimensional diode arrays.
Precision and Bias: According to the standard, precision and reproducibility are high for the measurement device itself, with repeatability within 0.1 milliradians in controlled settings. The test method is validated by interlaboratory testing.
Practical Considerations: The method provides guidance for proper specimen setup, calibration, and potential error sources, emphasizing the need to position the part accurately and calibrate the system to ensure reliable results.
Applications
Aircraft Transparency Quality Control: Vital for the aerospace industry, especially where HUDs are installed, ensuring windscreen and canopy transparency does not cause unacceptable image displacement or distortion that could interfere with pilot operations or weapon targeting accuracy.
Military and Defense: Supports stringent requirements for optical quality in combat aircraft and military vehicles, where misalignments caused by angular deviation could have critical consequences.
Aerospace Manufacturing: Used by manufacturers of windscreens, canopies, and other transparent enclosures to validate product quality before installation or delivery.
R&D and Testing Laboratories: Useful for research and development teams analyzing transparent materials or new designs for aircraft glazing and similar applications.
Related Standards
For broader context and enhanced assessment of optical properties, the following ASTM standards are often referenced alongside ASTM F801-21:
- ASTM E691: Practice for Conducting an Interlaboratory Study to Determine the Precision of a Test Method - Supports validation of repeatability and reproducibility.
- ASTM F2156: Test Method for Measuring Optical Distortion in Transparent Parts Using Grid Line Slope - Addresses optical distortion by grid analysis.
- ASTM F733: Practice for Optical Distortion and Deviation of Transparent Parts Using the Double-Exposure Method - Offers another technique for measuring optical quality using double-exposure imaging.
Keywords: optical angular deviation, transparent parts, ASTM F801-21, optical quality, aircraft windscreens, canopies, HUD, optical distortion, aerospace transparency, quality control, lateral displacement
Implementing ASTM F801-21 helps ensure that transparent components in critical applications meet the required optical standards for safety, performance, and visual accuracy.
Buy Documents
ASTM F801-21 - Standard Test Method for Measuring Optical Angular Deviation of Transparent Parts
REDLINE ASTM F801-21 - Standard Test Method for Measuring Optical Angular Deviation of Transparent Parts
Get Certified
Connect with accredited certification bodies for this standard

DEKRA North America
DEKRA certification services in North America.

Eagle Registrations Inc.
American certification body for aerospace and defense.

Element Materials Technology
Materials testing and product certification.
Sponsored listings
Frequently Asked Questions
ASTM F801-21 is a standard published by ASTM International. Its full title is "Standard Test Method for Measuring Optical Angular Deviation of Transparent Parts". This standard covers: SIGNIFICANCE AND USE 5.1 One of the measures of optical quality of a transparent part is its angular deviation. It is possible that excessive angular deviation, or variations in angular deviation throughout the part, will result in visible distortion of scenes viewed through the part. Angular deviation, its detection, and quantification are of extreme importance in the area of certain aircraft transparency applications, that is, aircraft equipped with Heads-up Displays (HUD). It is possible that HUDs will require stringent control over the optics of the portion of the transparency (windscreen or canopy) which lies between the HUD combining glass and the external environment. Military aircraft equipped with HUDs or similar devices require precise knowledge of the effects of the windscreen or canopy on image position in order to maintain weapons aiming accuracy. 5.2 Two optical parameters have the effect of changing image position. The first, lateral displacement, is inherent in any transparency which is tilted with respect to the line of sight. The effect of lateral displacement is constant over distance, and seldom exceeds a fraction of an inch. The second parameter, angular deviation, is usually caused by a wedginess or nonparallelism of the transparency surfaces. The effect of angular deviation is related to the tangent of the angle of deviation, thus the magnitude of the image position displacement increases as does the distance between image and transparency. The quantification of angular deviation is then the more critical of the two parameters. Both parameters are illustrated in Fig. X1.1. SCOPE 1.1 This test method covers measuring the angular deviation of a light ray imposed by transparent parts such as aircraft windscreens and canopies. The results are uncontaminated by the effects of lateral displacement, and it is possible to perform the procedure in a relatively short optical path length. This is not intended as a referee standard. It is one convenient method for measuring angular deviations through transparent windows. 1.2 This standard does not purport to address all of the safety concerns, if any, associated with its use. It is the responsibility of the user of this standard to establish appropriate safety, health, and environmental practices and determine the applicability of regulatory limitations prior to use. 1.3 This international standard was developed in accordance with internationally recognized principles on standardization established in the Decision on Principles for the Development of International Standards, Guides and Recommendations issued by the World Trade Organization Technical Barriers to Trade (TBT) Committee.
SIGNIFICANCE AND USE 5.1 One of the measures of optical quality of a transparent part is its angular deviation. It is possible that excessive angular deviation, or variations in angular deviation throughout the part, will result in visible distortion of scenes viewed through the part. Angular deviation, its detection, and quantification are of extreme importance in the area of certain aircraft transparency applications, that is, aircraft equipped with Heads-up Displays (HUD). It is possible that HUDs will require stringent control over the optics of the portion of the transparency (windscreen or canopy) which lies between the HUD combining glass and the external environment. Military aircraft equipped with HUDs or similar devices require precise knowledge of the effects of the windscreen or canopy on image position in order to maintain weapons aiming accuracy. 5.2 Two optical parameters have the effect of changing image position. The first, lateral displacement, is inherent in any transparency which is tilted with respect to the line of sight. The effect of lateral displacement is constant over distance, and seldom exceeds a fraction of an inch. The second parameter, angular deviation, is usually caused by a wedginess or nonparallelism of the transparency surfaces. The effect of angular deviation is related to the tangent of the angle of deviation, thus the magnitude of the image position displacement increases as does the distance between image and transparency. The quantification of angular deviation is then the more critical of the two parameters. Both parameters are illustrated in Fig. X1.1. SCOPE 1.1 This test method covers measuring the angular deviation of a light ray imposed by transparent parts such as aircraft windscreens and canopies. The results are uncontaminated by the effects of lateral displacement, and it is possible to perform the procedure in a relatively short optical path length. This is not intended as a referee standard. It is one convenient method for measuring angular deviations through transparent windows. 1.2 This standard does not purport to address all of the safety concerns, if any, associated with its use. It is the responsibility of the user of this standard to establish appropriate safety, health, and environmental practices and determine the applicability of regulatory limitations prior to use. 1.3 This international standard was developed in accordance with internationally recognized principles on standardization established in the Decision on Principles for the Development of International Standards, Guides and Recommendations issued by the World Trade Organization Technical Barriers to Trade (TBT) Committee.
ASTM F801-21 is classified under the following ICS (International Classification for Standards) categories: 49.035 - Components for aerospace construction. The ICS classification helps identify the subject area and facilitates finding related standards.
ASTM F801-21 has the following relationships with other standards: It is inter standard links to ASTM F733-19, ASTM F733-09(2014), ASTM E691-13, ASTM F2156-11, ASTM E691-11, ASTM F733-09, ASTM E691-08, ASTM F2156-06, ASTM E691-05, ASTM F733-90(2003), ASTM F2156-01, ASTM E691-99. Understanding these relationships helps ensure you are using the most current and applicable version of the standard.
ASTM F801-21 is available in PDF format for immediate download after purchase. The document can be added to your cart and obtained through the secure checkout process. Digital delivery ensures instant access to the complete standard document.
Standards Content (Sample)
This international standard was developed in accordance with internationally recognized principles on standardization established in the Decision on Principles for the
Development of International Standards, Guides and Recommendations issued by the World Trade Organization Technical Barriers to Trade (TBT) Committee.
Designation: F801 − 21
Standard Test Method for
Measuring Optical Angular Deviation of Transparent Parts
ThisstandardisissuedunderthefixeddesignationF801;thenumberimmediatelyfollowingthedesignationindicatestheyearoforiginal
adoption or, in the case of revision, the year of last revision.Anumber in parentheses indicates the year of last reapproval.Asuperscript
epsilon (´) indicates an editorial change since the last revision or reapproval.
This standard has been approved for use by agencies of the U.S. Department of Defense.
1. Scope change in angle of such a light ray. The displacement of an
image due to the change in direction of the light ray.
1.1 Thistestmethodcoversmeasuringtheangulardeviation
3.1.2 lateral (or linear) displacement, n—the shift or move-
of a light ray imposed by transparent parts such as aircraft
ment of a light ray from its original path as it passes through a
windscreens and canopies. The results are uncontaminated by
transparent material, while maintaining parallelism between
the effects of lateral displacement, and it is possible to perform
the original and final paths.The change in location of an image
the procedure in a relatively short optical path length. This is
due to this change in path.
not intended as a referee standard. It is one convenient method
formeasuringangulardeviationsthroughtransparentwindows.
3.1.3 modulation transfer function (MTF), n—the ratio of
output modulation to the input modulation.The modulus of the
1.2 This standard does not purport to address all of the
Fourier transform of the optical spread function.
safety concerns, if any, associated with its use. It is the
responsibility of the user of this standard to establish appro-
4. Summary of Test Method
priate safety, health, and environmental practices and deter-
4.1 This test method provides a basic procedure for mea-
mine the applicability of regulatory limitations prior to use.
1.3 This international standard was developed in accor- suring the angular deviation induced by a transparent part.
Angular deviation measurements are made by an optoelec-
dance with internationally recognized principles on standard-
ization established in the Decision on Principles for the tronic system employing collimated light from an appropriate
target pattern, a field lens, and a position-detecting device/
Development of International Standards, Guides and Recom-
mendations issued by the World Trade Organization Technical system such as linear diode arrays or a two-dimensional diode
array. Hold the transparent part either in its installed angle or
Barriers to Trade (TBT) Committee.
perpendicular to the collimated light source or any other
2. Referenced Documents
orientation suitable for the purpose of making the measure-
2.1 ASTM Standards: ment. One specific optoelectronic system suitable for conduct-
ing this test method is provided in Appendix X2 and Appendix
E691 Practice for Conducting an Interlaboratory Study to
Determine the Precision of a Test Method X3 and in Section 6 below.
F733 Practice for Optical Distortion and Deviation ofTrans-
5. Significance and Use
parent Parts Using the Double-Exposure Method
F2156 Test Method for Measuring Optical Distortion in 5.1 One of the measures of optical quality of a transparent
Transparent Parts Using Grid Line Slope
part is its angular deviation. It is possible that excessive
angulardeviation,orvariationsinangulardeviationthroughout
3. Terminology
the part, will result in visible distortion of scenes viewed
3.1 Definitions: through the part. Angular deviation, its detection, and quanti-
3.1.1 angular deviation, n—thedepartureofalightrayfrom ficationareofextremeimportanceintheareaofcertainaircraft
its original path as it passes through a transparent material.The transparency applications, that is, aircraft equipped with
Heads-up Displays (HUD). It is possible that HUDs will
require stringent control over the optics of the portion of the
This test method is under the jurisdiction of ASTM Committee F07 on
transparency (windscreen or canopy) which lies between the
Aerospace and Aircraft and is the direct responsibility of Subcommittee F07.08 on
Transparent Enclosures and Materials.
HUD combining glass and the external environment. Military
Current edition approved May 1, 2021. Published June 2021. Originally
aircraft equipped with HUDs or similar devices require precise
approved in 1983. Last previous edition approved in 2016 as F801 – 16. DOI:
knowledgeoftheeffectsofthewindscreenorcanopyonimage
10.1520/F0801-21.
For referenced ASTM standards, visit the ASTM website, www.astm.org, or position in order to maintain weapons aiming accuracy.
contact ASTM Customer Service at service@astm.org. For Annual Book of ASTM
5.2 Two optical parameters have the effect of changing
Standards volume information, refer to the standard’s Document Summary page on
the ASTM website. image position. The first, lateral displacement, is inherent in
Copyright © ASTM International, 100 Barr Harbor Drive, PO Box C700, West Conshohocken, PA 19428-2959. United States
F801 − 21
any transparency which is tilted with respect to the line of tionedasspecifiedbytheagencyrequestingthetest.Nospecial
sight. The effect of lateral displacement is constant over conditioning other than cleaning is required.
distance, and seldom exceeds a fraction of an inch.The second
8. Calibration and Standardization
parameter, angular deviation, is usually caused by a wedginess
or nonparallelism of the transparency surfaces. The effect of
8.1 Position the transmitter and receiver so that the optical
angular deviation is related to the tangent of the angle of
axes of both are parallel and approximately colinear. The light
deviation, thus the magnitude of the image position displace-
from the transmitter shall pass through the test specimen to fall
ment increases as does the distance between image and
on the receiver lens. Depending on the configuration of the test
transparency. The quantification of angular deviation is then
specimen, locate the transmitter and receiver approximately 4
the more critical of the two parameters. Both parameters are
ft (1219 mm or less) apart. This distance depends on the
illustrated in Fig. X1.1.
specific equipment used and is not critical (see Appendix X4
for more information).
6. Apparatus
8.2 Ifnecessary,adjustthetransmitterlensortargetposition
6.1 Transmitter, capable of projecting collimated light rays
to provide collimated light. A dioptometer is sufficient for this
from a suitable target. The target is allowed to be a small hole,
adjustment.
a transparent cross, or an “L” with one arm horizontal and one
arm vertical, embedded in an opaque background. The stroke 8.3 If necessary, adjust the receiver field lens and positions
width of the “L” or cross shall be uniform. Choice of an “L” or
of the CCD arrays so each array is at the focal plane of the
a cross is optional, since only one half of the cross target is receiver lens. Perform rough adjustment by using the receiver
used at any time. The transmitter shall be firmly affixed to the
lens to sharply focus the target from the previously adjusted
floor or other stationary fixture. Note that the choice of the transmitter. Check by interposing a thick optical flat (plane
transmitter target shall be compatible with the position detect-
parallel-sided transparent plate) in the optical path, and tilting
ing mechanism in the receiver. the flat with respect to the optical axis. When correctly
adjusted,therewillbenomovementofthetransmitterimageat
6.2 Receiver, shall be firmly affixed to the floor or a stable
the plane of the CCD array. If the image moves (the readout
platform, consisting of the following components:
varies by more than 0.1 mrad), adjust the position of the
6.2.1 Displacement Compensation and Imaging Lens—The
appropriate CCD array to eliminate this movement.
sensitivity of the instrument is in part determined by the focal
length of the lens. An appropriate focal length is likely to be 8.4 A method of conducting an accuracy test is made by
(but is not limited to) 10 in. (254 mm).
interposing a standard or highly accurate optical wedge in the
6.2.2 Optical Beam Splitter, to separate the incoming light light path between transmitter and receiver. The display shall
into two orthogonal elements; one for elevation and the other
accurately indicate the angular deviation imposed by the
for azimuth. The type of beam splitter shall be chosen to keep optical wedge in both the vertical or horizontal meridians. An
both optical path lengths equal.
alternative method would be to tilt the transmitter or receiver
6.2.3 Two Linear Charge Coupled Devices (CCD or diode) on an accurate tilt table. The tilt, converted to milliradians,
Arrays, each located at the focal plane of the displacement
shall equal that shown on the display. The latter method is
compensating lens. One array is oriented horizontally (for the
usually preferable since it yields a continuous accuracy check
measurement of azimuthal changes), and the other oriented
over the entire range of measurement.
vertically (for the measurement of elevation changes). A
8.5 A method of performing a check to ensure operation of
convenient element spacing of the arrays is 0.001 in. (0.0254
all diodes is performed by illuminating the entire CCD array
mm).Usingthiselementspacing,andthe10 in.(254 mm)lens,
and noting the default reading on the display. (This default
each diode represents the equivalent of 0.1 milliradian (mrad)
reading is also dependent on the specific circuitry used, but is
angular deviation.
ideally a constant).
6.2.4 Electronic System capable of determining the center
NOTE 1—The area of transparency being measured at any one time is
diode of the band of illuminated diodes on each CCD array.
related to the smallest diameter lens being used at the transmitter or
6.2.5 Electronics System capable of converting the diode
receiver. The system will average angular deviations throughout a subset
number to an angular deviation to be displayed on a digital
of this area. Use of lenses of significantly larger or smaller diameters will
readout.
affectrepeatabilityofmeasurementfromoneinstrumenttoanother.Useof
lenses with small diameters will improve performance on transparencies
6.3 Transmitter and Receiver Lenses are permitted to be of
with rapidly changing angular deviations, but will reduce available light
achromatic construction to reduce the effect of aberrations on
energy at the CCD array, possibly below its threshold. Lens size is further
the measurement.
discussed in the Appendixes.
6.4 Dioptometer, to verify attainment of collimated light.
8.6 It is possible that certain variations will be as a result of
the following sources of error:
6.5 For further information on the rationale and develop-
8.6.1 Transmitter or receiver lens malfocus. Noncollimated
ment of the design, see the appendixes (Appendix X1 –
light from the transmitter will cause the receiver to measure
Appendix X4).
some lateral displacement as well as angular deviation.
7. Test Specimen
8.6.2 Poor transparency optics (MTF or modulation transfer
7.1 The part to be tested shall be positioned in such a function losses) will cause a blurred image on CCD arrays. If
manner as to approximate its installed configuration or posi- this blur is asymmetric, it is possible that some error will be
F801 − 21
introduced. If the MTF loss is great enough, it is possible that 10.3 AlinearCCDarraycontaining512elements,eachwith
the light energy will fall below the threshold of the CCD array, a 0.001 in. (0.025 mm) spacing, has an active surface 12.5 mm
and a no-reading condition will result. long. Calculate the maximum angular deviation that can be
detected by such an array as follows.
9. Procedure
M 5 2 3arc tan 12.5/f
~ !
9.1 Mount the transparent part on a fixture that allows
where:
accuratedeterminationoftheelevationandazimuthpositionof
M = maximum angular deviation from one end of array to
the part.
the other and
9.2 Locate and firmly mount the transmitter at an appropri-
f = focal length of receiver lens
atepositioncorrespondingtotheobservationalpointofinterest
(for example: pilot design eye position), or along a line 11. Report
connecting this point with the receiver lens.
11.1 Draft a graph or chart, derived from the digital data,
showing the angular deviation found at each point of interest.
9.3 Locate and firmly mount the receiver external to the
transparent part and at a suitable distance from the transmitter
12. Precision and Bias
(see Appendix X4).
12.1 Precision—The data used to develop this section was
9.4 Establish a baseline or zero determination without a
obtained as the result of a round-robin test reported at the
transparency in the optical path. Record the number as dis-
September 1990 F7.08 subcommittee meeting. The written
played on the digital readout under this condition (depending
report was entitled “Angular Deviation Revisited: Results of a
on the electronic system used, this value will be zero or
Round Robin Test” and is available from ASTM International
adjustable to zero).
headquarters. Notealsothatthereareonlyafeworganizations
9.5 Locate the transparency between the transmitter and
capable of making these types of measurements on aircraft
receiver. Take readings at points specified by the using activity
transparencies.At the time of the inter-laboratory test program,
by rotating the canopy about a critical point such as the pilot
therewereonly5measurementdevicesavailableat3facilities.
designeyepositionorotherpositionofinterestspecifiedbythe
Although this is a lower number than that recommended by
using activity. The difference between these readings and the
Practice E691, the results provide a reasonable indication of
baseline figures represent the angular deviation in milliradians
the expected repeatability and reproducibility of the procedure.
through each poin
...
This document is not an ASTM standard and is intended only to provide the user of an ASTM standard an indication of what changes have been made to the previous version. Because
it may not be technically possible to adequately depict all changes accurately, ASTM recommends that users consult prior editions as appropriate. In all cases only the current version
of the standard as published by ASTM is to be considered the official document.
Designation: F801 − 16 F801 − 21
Standard Test Method for
Measuring Optical Angular Deviation of Transparent Parts
This standard is issued under the fixed designation F801; the number immediately following the designation indicates the year of original
adoption or, in the case of revision, the year of last revision. A number in parentheses indicates the year of last reapproval. A superscript
epsilon (´) indicates an editorial change since the last revision or reapproval.
This standard has been approved for use by agencies of the U.S. Department of Defense.
1. Scope
1.1 This test method covers measuring the angular deviation of a light ray imposed by transparent parts such as aircraft
windscreens and canopies. The results are uncontaminated by the effects of lateral displacement, and it is possible to perform the
procedure in a relatively short optical path length. This is not intended as a referee standard. It is one convenient method for
measuring angular deviations through transparent windows.
1.2 This standard does not purport to address all of the safety concerns, if any, associated with its use. It is the responsibility
of the user of this standard to establish appropriate safety safety, health, and healthenvironmental practices and determine the
applicability of regulatory limitations prior to use.
1.3 This international standard was developed in accordance with internationally recognized principles on standardization
established in the Decision on Principles for the Development of International Standards, Guides and Recommendations issued
by the World Trade Organization Technical Barriers to Trade (TBT) Committee.
2. Referenced Documents
2.1 ASTM Standards:
E691 Practice for Conducting an Interlaboratory Study to Determine the Precision of a Test Method
F2156 Test Method for Measuring Optical Distortion in Transparent Parts Using Grid Line Slope
F733 Practice for Optical Distortion and Deviation of Transparent Parts Using the Double-Exposure Method
F2156 Test Method for Measuring Optical Distortion in Transparent Parts Using Grid Line Slope
3. Terminology
3.1 Definitions:
3.1.1 angular deviation—deviation, n—the departure of a light ray from its original path as it passes through a transparent material.
The change in angle of such a light ray. The displacement of an image due to the change in direction of the light ray.
3.1.2 lateral (or linear) displacement,—n—the shift or movement of a light ray from its original path as it passes through a
transparent material, while maintaining parallelism between the original and final paths. The change in location of an image due
to this change in path.
This test method is under the jurisdiction of ASTM Committee F07 on Aerospace and Aircraft and is the direct responsibility of Subcommittee F07.08 on Transparent
Enclosures and Materials.
Current edition approved April 1, 2016May 1, 2021. Published April 2016June 2021. Originally approved in 1983. Last previous edition approved in 20082016 as
F801 – 96 (2008).F801 – 16. DOI: 10.1520/F0801-16.10.1520/F0801-21.
For referenced ASTM standards, visit the ASTM website, www.astm.org, or contact ASTM Customer Service at service@astm.org. For Annual Book of ASTM Standards
volume information, refer to the standard’s Document Summary page on the ASTM website.
Copyright © ASTM International, 100 Barr Harbor Drive, PO Box C700, West Conshohocken, PA 19428-2959. United States
F801 − 21
3.1.3 modulation transfer function (MTF)—), n—the ratio of output modulation to the input modulation. The modulus of the
Fourier transform of the optical spread function.
4. Summary of Test Method
4.1 This test method provides a basic procedure for measuring the angular deviation induced by a transparent part. Angular
deviation measurements are made by an optoelectronic system employing collimated light from an appropriate target pattern, a
field lens, and a position-detecting device/system such as linear diode arrays or a two-dimensional diode array. Hold the transparent
part either in its installed angle or perpendicular to the collimated light source or any other orientation suitable for the purpose of
making the measurement. One specific optoelectronic system suitable for conducting this test method is provided in Appendix X2
and Appendix X3 and in Section 6 below.
5. Significance and Use
5.1 One of the measures of optical quality of a transparent part is its angular deviation. It is possible that excessive angular
deviation, or variations in angular deviation throughout the part, will result in visible distortion of scenes viewed through the part.
Angular deviation, its detection, and quantification are of extreme importance in the area of certain aircraft transparency
applications, that is, aircraft equipped with Heads-up Displays (HUD). It is possible that HUDs will require stringent control over
the optics of the portion of the transparency (windscreen or canopy) which lies between the HUD combining glass and the external
environment. Military aircraft equipped with HUDs or similar devices require precise knowledge of the effects of the windscreen
or canopy on image position in order to maintain weapons aiming accuracy.
5.2 Two optical parameters have the effect of changing image position. The first, lateral displacement, is inherent in any
transparency which is tilted with respect to the line of sight. The effect of lateral displacement is constant over distance, and seldom
exceeds a fraction of an inch. The second parameter, angular deviation, is usually caused by a wedginess or nonparallelism of the
transparency surfaces. The effect of angular deviation is related to the tangent of the angle of deviation, thus the magnitude of the
image position displacement increases as does the distance between image and transparency. The quantification of angular
deviation is then the more critical of the two parameters. Both parameters are illustrated in Fig. X1.1.
6. Apparatus
6.1 Transmitter, capable of projecting collimated light rays from a suitable target. The target is allowed to be a small hole, a
transparent cross, or an “L” with one arm horizontal and one arm vertical, embedded in an opaque background. The stroke width
of the “L” or cross shall be uniform. Choice of an “L” or a cross is optional, since only one half of the cross target is used at any
time. The transmitter shall be firmly affixed to the floor or other stationary fixture. Note that the choice of the transmitter target
shall be compatible with the position detecting mechanism in the receiver.
6.2 Receiver, shall be firmly affixed to the floor or a stable platform, consisting of the following components:
6.2.1 Displacement Compensation and Imaging Lens—The sensitivity of the instrument is in part determined by the focal length
of the lens. An appropriate focal length is likely to be (but is not limited to) 10 in. (254 mm).
6.2.2 Optical Beam Splitter, to separate the incoming light into two orthogonal elements; one for elevation and the other for
azimuth. The type of beam splitter shall be chosen to keep both optical path lengths equal.
6.2.3 Two Linear Charge Coupled Devices (CCD or diode) Arrays, each located at the focal plane of the displacement
compensating lens. One array is oriented horizontally (for the measurement of azimuthal changes), and the other oriented vertically
(for the measurement of elevation changes). A convenient element spacing of the arrays is 0.001 in. (0.0254 mm). Using this
element spacing, and the 10-in. (254-mm)10 in. (254 mm) lens, each diode represents the equivalent of 0.1 milliradian (mrad)
angular deviation.
6.2.4 Electronic System capable of determining the center diode of the band of illuminated diodes on each CCD array.
6.2.5 Electronics System capable of converting the diode number to an angular deviation to be displayed on a digital readout.
F801 − 21
6.3 Transmitter and Receiver Lenses are permitted to be of achromatic construction to reduce the effect of aberrations on the
measurement.
6.4 Dioptometer, to verify attainment of collimated light.
6.5 For further information on the rationale and development of the design, see the appendixes.appendixes (Appendix X1 –
Appendix X4.)).
7. Test Specimen
7.1 The part to be tested shall be positioned in such a manner as to approximate its installed configuration or positioned as
specified by the agency requesting the test. No special conditioning other than cleaning is required.
8. Calibration and Standardization
8.1 Position the transmitter and receiver so that the optical axes of both are parallel and approximately colinear. The light from
the transmitter shall pass through the test specimen to fall on the receiver lens. Depending on the configuration of the test specimen,
locate the transmitter and receiver approximately 4 ft (1219 mm or less) apart. This distance depends on the specific equipment
used and is not critical (see Appendix X4 for more information).
8.2 If necessary, adjust the transmitter lens or target position to provide collimated light. A dioptometer is sufficient for this
adjustment.
8.3 If necessary, adjust the receiver field lens and positions of the CCD arrays so each array is at the focal plane of the receiver
lens. Perform rough adjustment by using the receiver lens to sharply focus the target from the previously adjusted transmitter.
Check by interposing a thick optical flat (plane parallel-sided transparent plate) in the optical path, and tilting the flat with respect
to the optical axis. When correctly adjusted, there will be no movement of the transmitter image at the plane of the CCD array.
If the image moves (the readout varies by more than 0.1 mrad), adjust the position of the appropriate CCD array to eliminate this
movement.
8.4 A method of conducting an accuracy test is made by interposing a standard or highly accurate optical wedge in the light path
between transmitter and receiver. The display shall accurately indicate the angular deviation imposed by the optical wedge in both
the vertical or horizontal meridians. An alternative method would be to tilt the transmitter or receiver on an accurate tilt table. The
tilt, converted to milliradians, shall equal that shown on the display. The latter method is usually preferable since it yields a
continuous accuracy check over the entire range of measurement.
8.5 A method of performing a check to ensure operation of all diodes is performed by illuminating the entire CCD array and noting
the default reading on the display. (This default reading is also dependent on the specific circuitry used, but is ideally a constant).
NOTE 1—The area of transparency being measured at any one time is related to the smallest diameter lens being used at the transmitter or receiver. The
system will average angular deviations throughout a subset of this area. Use of lenses of significantly larger or smaller diameters will affect repeatability
of measurement from one instrument to another. Use of lenses with small diameters will improve performance on transparencies with rapidly changing
angular deviations, but will reduce available light energy at the CCD array, possibly below its threshold. Lens size is further discussed in the Appendixes.
8.6 It is possible that certain variations will be as a result of the following sources of error:
8.6.1 Transmitter or receiver lens malfocus. Noncollimated light from the transmitter will cause the receiver to measure some
lateral displacement as well as angular deviation.
8.6.2 Poor transparency optics (MTF or modulation transfer function losses) will cause a blurred image on CCD arrays. If this blur
is asymmetric, it is possible that some error will be introduced. If the MTF loss is great enough, it is possible that the light energy
will fall below the threshold of the CCD array, and a no-reading condition will result.
F801 − 21
9. Procedure
9.1 Mount the transparent part on a fixture that allows accurate determination of the elevation and azimuth position of the part.
9.2 Locate and firmly mount the transmitter at an appropriate position corresponding to the observational point of interest (for
example: pilot’s pilot design eye designed position), or along a line connecting this point with the receiver lens.
9.3 Locate and firmly mount the receiver external to the transparent part and at a suitable distance from the transmitter (see
Appendix X4).
9.4 Establish a baseline or zero determination without a transparency in the optical path. Record the number as displayed on the
digital readout under this condition (depending on the electronic system used, this value will be zero or adjustable to zero).
9.5 Locate the transparency between the transmitter and receiver. Take readings at points specified by the using activity by rotating
the canopy about a critical point such as the pilot’s pilot design eye position or other position of interest specified by the using
activity. The difference between these readings and the baseline figures represent the angular deviation in milliradians through each
point.
10. Calculation
10.1 With appropriate selection of receiver lens focal length and CCD array diode separation, the display readout will be in
0.1-milliradian0.1 milliradian increments. It is possible to vary the sensitivity of the instrument by altering either of these
parameters. Assuming a 0.001 in. (0.025 mm) diode spacing as standard, increasing the focal length will improve the sensitivity
as follows:
a 5 arc tan 0.001/f
~ !
where:
a = sensitivity (minimum measurable angle), mrad and
f = focal length of receiver lens, in.
10.2 Although the separation distance between the projector and receiver is not critical and does not affect the measurement
accuracy, it does have an effect on both the light energy at the image plane and the maximum amounts of angular deviation that
can be measured. Calculate the largest distance from the optical axis at the image plane that does not produce vignetting as follows:
H 5 f 3 d 2 d /2S
~ !
2 2 1
where:
H = maximum unvignetted ray height at image plane,
d = diameter o
...
Questions, Comments and Discussion
Ask us and Technical Secretary will try to provide an answer. You can facilitate discussion about the standard in here.
Loading comments...