ASTM F2600-09(2023)
(Specification)Standard Specification for Electrofusion Type Polyamide-11 Fittings for Outside Diameter Controlled Polyamide-11 Pipe and Tubing
Standard Specification for Electrofusion Type Polyamide-11 Fittings for Outside Diameter Controlled Polyamide-11 Pipe and Tubing
SCOPE
1.1 This specification covers polyamide-11 electrofusion fittings for use with outside diameter-controlled polyamide-11 pipe, covered by Specification D2513. Requirements for materials, workmanship, and testing performance are included. Where applicable in this specification “pipe” shall mean “pipe” or “tubing.”
1.2 The values stated in inch-pound units are to be regarded as standard. The values given in parentheses are mathematical conversions to SI units that are provided for information only and are not considered standard.
1.3 The following safety hazards caveat pertains only to the test method portion, Section 9, of this specification: This standard does not purport to address all of the safety concerns, if any, associated with its use. It is the responsibility of the user of this standard to establish appropriate safety, health, and environmental practices and determine the applicability of regulatory limitations prior to use.
1.4 This international standard was developed in accordance with internationally recognized principles on standardization established in the Decision on Principles for the Development of International Standards, Guides and Recommendations issued by the World Trade Organization Technical Barriers to Trade (TBT) Committee.
General Information
- Status
- Published
- Publication Date
- 31-Oct-2023
- Technical Committee
- F17 - Plastic Piping Systems
- Drafting Committee
- F17.60 - Gas
Relations
- Effective Date
- 01-Nov-2023
- Refers
ASTM D1600-18 - Standard Terminology for Abbreviated Terms Relating to Plastics (Withdrawn 2024) - Effective Date
- 01-Jan-2018
- Effective Date
- 01-Nov-2023
Overview
ASTM F2600-09(2023) is the industry standard specification for electrofusion type polyamide-11 (PA11) fittings designed for use with outside diameter (OD)-controlled polyamide-11 pipe and tubing. Published by ASTM International, this document establishes requirements for materials, manufacturing, dimensions, performance testing, and product marking of PA11 electrofusion fittings. Its primary application is in plastic piping systems, especially for gas distribution and other pressure piping applications. The standard ensures uniformity and safety in connecting PA-11 pipes and tubes via reliable electrofusion techniques.
Key Topics
Material Requirements:
Fittings must be manufactured from polyamide-11 (PA11), compliant with Group 3, Class 2, and Grade 3 (PA32312) as per ASTM D6779. Only clean rework materials of the same resin, free from contamination, are permitted.Manufacturing and Workmanship:
Fittings must be of high-quality workmanship, homogeneous, and free from cracks, holes, foreign inclusion, or defects like gouges and dents.Dimensions and Tolerances:
Electrofusion fittings must have precise dimensions to ensure proper heat fusion with OD-controlled PA11 piping. Manufacturers are required to specify coupling diameters, temperature joining limits, and pressure ratings.Performance Testing:
Includes minimum hydraulic burst pressure, sustained pressure testing, tensile strength, impact resistance, and joint integrity. Test procedures ensure the fittings maintain integrity and safety under expected service conditions.Safety and Quality Assurance:
Users are responsible for safe handling and regulatory compliance. Manufacturers must follow rigorous in-plant quality assurance, including frequent inspection for dimensions, voids, knit line strength, and correct material use.Product Marking:
Fittings must be visibly and permanently marked with manufacturer identification, material type, ASTM designation, size, and coded traceability information.
Applications
Gas Distribution:
PA11 electrofusion fittings are widely used for connecting pipelines in natural gas and liquefied petroleum gas (LPG) distribution networks. Compliance with this standard is often required by utilities and regulatory agencies.Pressure Pipe Systems:
The standard supports high-performance connections in various pressure piping systems utilizing PA11 materials-ensuring safer, leak-proof joints.Polyamide-11 Tubing Installations:
Outside diameter-controlled PA11 tubing in industrial or residential piping systems often relies on these fittings for reliable, fusion-welded installation.Infrastructure Projects:
Utilities, contractors, and engineers specify F2600 compliance to ensure uniform quality, durability, and compatibility across multiple projects and suppliers.Global Trade:
Developed in accordance with World Trade Organization (WTO) principles, ASTM F2600-09(2023) facilitates international acceptance of fittings in global markets, supporting valve and piping system interoperability.
Related Standards
For comprehensive system specification, the following ASTM standards are referenced in connection with F2600-09(2023):
- ASTM D2513 – Specification for Thermoplastic Gas Pressure Pipe, Tubing, and Fittings
- ASTM D6779 – Classification System for Polyamide Molding and Extrusion Materials
- ASTM D638 – Test Method for Tensile Properties of Plastics
- ASTM D1598 / D1599 – Test Methods for Pressure Performance of Plastic Pipes and Fittings
- ASTM D2122 – Test Method for Determining Dimensions of Thermoplastic Pipe and Fittings
- ASTM F412 – Terminology Relating to Plastic Piping Systems
- ASTM F905 – Practice for Qualification of Polyethylene Saddle-Fused Joints
These related documents provide additional procedures and terminology applicable to PA11 pipes and electrofusion fittings, ensuring standardized performance and compatibility across plastic piping systems.
Keywords: electrofusion, polyamide-11, PA11 fittings, ASTM F2600, OD-controlled pipe, gas distribution, plastic piping standard, pressure pipe, testing requirements, plastic pipe fittings.
Buy Documents
ASTM F2600-09(2023) - Standard Specification for Electrofusion Type Polyamide-11 Fittings for Outside Diameter Controlled Polyamide-11 Pipe and Tubing
Get Certified
Connect with accredited certification bodies for this standard

Institut za varilstvo d.o.o. (Welding Institute)
Slovenia's leading welding institute since 1952. ISO 3834, EN 1090, pressure equipment certification, NDT personnel, welder qualification. Only IIW Au
Sponsored listings
Frequently Asked Questions
ASTM F2600-09(2023) is a technical specification published by ASTM International. Its full title is "Standard Specification for Electrofusion Type Polyamide-11 Fittings for Outside Diameter Controlled Polyamide-11 Pipe and Tubing". This standard covers: SCOPE 1.1 This specification covers polyamide-11 electrofusion fittings for use with outside diameter-controlled polyamide-11 pipe, covered by Specification D2513. Requirements for materials, workmanship, and testing performance are included. Where applicable in this specification “pipe” shall mean “pipe” or “tubing.” 1.2 The values stated in inch-pound units are to be regarded as standard. The values given in parentheses are mathematical conversions to SI units that are provided for information only and are not considered standard. 1.3 The following safety hazards caveat pertains only to the test method portion, Section 9, of this specification: This standard does not purport to address all of the safety concerns, if any, associated with its use. It is the responsibility of the user of this standard to establish appropriate safety, health, and environmental practices and determine the applicability of regulatory limitations prior to use. 1.4 This international standard was developed in accordance with internationally recognized principles on standardization established in the Decision on Principles for the Development of International Standards, Guides and Recommendations issued by the World Trade Organization Technical Barriers to Trade (TBT) Committee.
SCOPE 1.1 This specification covers polyamide-11 electrofusion fittings for use with outside diameter-controlled polyamide-11 pipe, covered by Specification D2513. Requirements for materials, workmanship, and testing performance are included. Where applicable in this specification “pipe” shall mean “pipe” or “tubing.” 1.2 The values stated in inch-pound units are to be regarded as standard. The values given in parentheses are mathematical conversions to SI units that are provided for information only and are not considered standard. 1.3 The following safety hazards caveat pertains only to the test method portion, Section 9, of this specification: This standard does not purport to address all of the safety concerns, if any, associated with its use. It is the responsibility of the user of this standard to establish appropriate safety, health, and environmental practices and determine the applicability of regulatory limitations prior to use. 1.4 This international standard was developed in accordance with internationally recognized principles on standardization established in the Decision on Principles for the Development of International Standards, Guides and Recommendations issued by the World Trade Organization Technical Barriers to Trade (TBT) Committee.
ASTM F2600-09(2023) is classified under the following ICS (International Classification for Standards) categories: 23.040.45 - Plastics fittings. The ICS classification helps identify the subject area and facilitates finding related standards.
ASTM F2600-09(2023) has the following relationships with other standards: It is inter standard links to ASTM F2600-09(2018), ASTM D1600-18, ASTM F2945-18(2023). Understanding these relationships helps ensure you are using the most current and applicable version of the standard.
ASTM F2600-09(2023) is available in PDF format for immediate download after purchase. The document can be added to your cart and obtained through the secure checkout process. Digital delivery ensures instant access to the complete standard document.
Standards Content (Sample)
This international standard was developed in accordance with internationally recognized principles on standardization established in the Decision on Principles for the
Development of International Standards, Guides and Recommendations issued by the World Trade Organization Technical Barriers to Trade (TBT) Committee.
Designation: F2600 − 09 (Reapproved 2023) An American National Standard
Standard Specification for
Electrofusion Type Polyamide-11 Fittings for Outside
Diameter Controlled Polyamide-11 Pipe and Tubing
This standard is issued under the fixed designation F2600; the number immediately following the designation indicates the year of
original adoption or, in the case of revision, the year of last revision. A number in parentheses indicates the year of last reapproval. A
superscript epsilon (´) indicates an editorial change since the last revision or reapproval.
1. Scope D1600 Terminology for Abbreviated Terms Relating to Plas-
tics
1.1 This specification covers polyamide-11 electrofusion
D2122 Test Method for Determining Dimensions of Ther-
fittings for use with outside diameter-controlled polyamide-11
moplastic Pipe and Fittings
pipe, covered by Specification D2513. Requirements for
D2513 Specification for Thermoplastic Gas Pressure Pipe,
materials, workmanship, and testing performance are included.
Tubing, and Fittings
Where applicable in this specification “pipe” shall mean “pipe”
D6779 Classification System for and Basis of Specification
or “tubing.”
for Polyamide Molding and Extrusion Materials (PA)
1.2 The values stated in inch-pound units are to be regarded
F412 Terminology Relating to Plastic Piping Systems
as standard. The values given in parentheses are mathematical
F905 Practice for Qualification of Polyethylene Saddle-
conversions to SI units that are provided for information only
Fused Joints
and are not considered standard.
1.3 The following safety hazards caveat pertains only to the
3. Terminology
test method portion, Section 9, of this specification: This
3.1 Definitions—Definitions are in accordance with Termi-
standard does not purport to address all of the safety concerns,
nology F412, and abbreviations are in accordance with Termi-
if any, associated with its use. It is the responsibility of the user
nology D1600, unless otherwise specified.
of this standard to establish appropriate safety, health, and
environmental practices and determine the applicability of
3.2 Definitions of Terms Specific to This Standard:
regulatory limitations prior to use.
3.2.1 electrofusion—a heat fusion joining process where the
1.4 This international standard was developed in accor-
heat source is an integral part of the fitting, such that when
dance with internationally recognized principles on standard-
electric current is applied, heat is produced that melts and joins
ization established in the Decision on Principles for the
the plastics.
Development of International Standards, Guides and Recom-
3.2.2 fusion interface—surface in the heat fusion process
mendations issued by the World Trade Organization Technical
where the plastic materials of the products being joined bond
Barriers to Trade (TBT) Committee.
together.
2. Referenced Documents
3.2.3 fusion zone length—total length of the melted material
2.1 ASTM Standards:
in the fitting cross-section under evaluation.
D618 Practice for Conditioning Plastics for Testing
D638 Test Method for Tensile Properties of Plastics
4. Materials and Manufacture
D1598 Test Method for Time-to-Failure of Plastic Pipe
4.1 This specification covers fittings made from polyamide
Under Constant Internal Pressure
11 (PA11) meeting the requirements for Group 3, Class 2, and
D1599 Test Method for Resistance to Short-Time Hydraulic
Grade 3, (PA32312) as prescribed in Specification D6779.
Pressure of Plastic Pipe, Tubing, and Fittings
4.2 Rework Material—Clean rework polyamide-11 material
of the same resin, free of any wire or contaminants generated
This specification is under the jurisdiction of ASTM Committee F17 on Plastic
from the fitting manufacturer’s own production, may be used
Piping Systems and is the direct responsibility of Subcommittee F17.60 on Gas.
Current edition approved Nov. 1, 2023. Published November 2023. Originally
by the same manufacturer, as long as the fittings produced
approved in 2006. Last previous edition approved in 2018 as F2600–09(2018). DOI:
conform to the requirements of this specification.
10.1520/F2600-09R23.
For referenced ASTM standards, visit the ASTM website, www.astm.org, or
4.3 Heating Mechanism—The heat mechanism shall be of
contact ASTM Customer Service at service@astm.org. For Annual Book of ASTM
materials not detrimental to the performance of the fitting or
Standards volume information, refer to the standard’s Document Summary page on
the ASTM website. the pipe to which it is intended to be joined.
Copyright © ASTM International, 100 Barr Harbor Drive, PO Box C700, West Conshohocken, PA 19428-2959. United States
F2600 − 09 (2023)
5. Performance Requirements D2513, such that the joints will satisfy the performance
requirements in Section 5. ( See Test Method D2122.)
5.1 The following requirements are for electrofusion joints
6.2 Because of the varying designs for electrofusion fittings,
that have been joined using the manufacturer’s recommended
the actual spread of dimensions may be quite different from
joining procedures. These requirements must be met by each
manufacturer to manufacturer. A table of dimensions and
electrofusion joint design, on each size and type of pipe
tolerances encompassing these differences would be meaning-
material for which the manufacturer recommends use of his
less and without value and, therefore, is omitted from this
fitting. Any revisions to the electrofusion joint design or
specification.
processing by the manufacturer after the initial testing requires
retesting to ensure these requirements can still be met. Fittings
6.3 The manufacturer shall furnish to the user the electrical
intended for use in the distribution of natural gas or liquid
resistance, critical dimensions, and tolerances of his fittings.
petroleum gas shall also meet the requirements of Specification
This information must include at least the following dimen-
D2513.
sions and tolerances:
5.1.1 It is not required that each configuration of a fitting be
6.3.1 Coupling inside diameter,
tested to meet all of these qualifications (that is, 2 in. main 6.3.2 Temperature joining limits, and
saddle joint with multiple outlet configurations offered) as long
6.3.3 Operating pressure of the fitting.
as the electrofusion joint design is not altered in the configu-
NOTE 2—There are other items that fall beyond the scope of this
ration differences.
specification which would be of interest to the user for proper application
of the fittings and is recommended as additional information to be
NOTE 1—It is permissible when accomplishing these tests, to do so on
furnished. A few of these are: (1) maximum pipe out of round allowed at
the highest and lowest dimension ratio of the same pipe material. If in
joint area; (2) minimum/maximum pipe SDR capability of the fitting, and
those tests all performance requirements are met, all dimension ratios
(3) for saddles intended for use on a live main, the maximum allowable
between those tested may be considered as having met the requirements.
line pressure when making the joint.
These tests do not have to cover the full range of dimension ratios
available, only the dimension ratio range on which the manufacturer
7. Workmanship, Finish, and Appearance
recommends his fitting be used.
7.1 The manufacture of these fittings shall be in accordance
5.2 Pressure Requirements:
with good commercial practice so as to produce fittings
5.2.1 Minimum Hydraulic Burst Pressure—The minimum
meeting the requirements of this specification.
hydraulic burst pressure of the test specimen shall not be less
7.2 The fittings shall be homogeneous throughout, except
than that required to produce 3900 psi (26.9 MPa) fiber stress
where a heating coil or electrical connectors are incorporated,
in the pipe being used in the test when tested in accordance
and free of cracks, holes, foreign inclusions, or injurious
with 9.1. The test equipment, procedures, and failures defini-
defects such as gouges, dents, cuts, etc. The fittings shall be as
tions shall be as specified in Test Method D1599.
uniform as commercially practicable in opacity, density, and
5.2.2 Sustained Pressure—The fitting and fused joint shall
other physical properties. Any heating coils, connecting cables,
not fail when tested in accordance with 9.2.
connectors, and related electrical power source shall be de-
signed to prevent electrical shock to the user.
5.3 Tensile Strength Requirements (Coupling Type Joints
Only)—The fitting or the pipe to fitting joint made on pipe shall
8. Specimen Preparation
not fail when tested in accordance with 9.3. Specimens shall be
8.1 Conditioning:
subjected to a tensile stress that causes the pipe to yield or
8.1.1 Unless otherwise specified, condition the specimens
causes the pipe to break outside the joint area. Tensile tests
(pipe and fittings) prior to joining at the minimum pipe
must be made on specimens as joined, not on straps cut from
temperature allowable for fusion as recommended by the
the specimen. Yielding must be measured only in the pipe,
manufacturer, for not less than 16 h and make the fusion joint
independent of the fitting or joint.
at that temperature for those tests where conditioning is
5.4 Impact Resistance (Saddle Type Joints Only)—The joint
required.
made on the specimen shall not fail when impacted with a force
8.1.2 Unless otherwise specified, condition the specimens
sufficient to break the body or other portion of the specimen.
(pipe and fittings) prior to joining at the maximum pipe
Tests of 500 ft-lb or higher impact with no failures noted shall
temperature allowable for fusion as recommended by the
be considered as a “pass” impact test. The device for testing
manufacturer, for not less than 16 h and make the fusion joint
and the methods shall be as defined in Practice F905.
at that temperature for those tests where conditioning is
required.
5.5 Joint Integrity Tests—(Couplings and Saddle Type
Joints)—The joint made on the specimen shall meet the
8.2 Test Conditions—Conduct the tests at the Standard
requirements in 9.4 and 9.5 of this specification, when tested in
Laboratory Temperature of 23 6 2 °C (73.4 6 3.6 °F) unless
accordance with 9.4.
otherwise specified.
8.3 Preparation of Specimens for Testing:
6. Dimensions, Mass, and Permissible Variations
8.3.1 Prepare test specimens so that the minimum length of
6.1 Dimension and tolerances of electrofusion fittings must unreinforced pipe on one side of any fitting is equal to three
be such that heat fusion is possible to outside diameter (OD) times the diameter of the pipe, but in no case less than 12 in.
controlled PA-11 pipes such as those listed in Specifications (304 mm). It is permissible to test multiple fittings together
F2600 − 09 (2023)
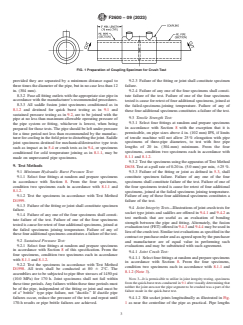
FIG. 1 Preparation of Coupling Specimen for Crush Test
provided they are separated by a minimum distance equal to 9.2.3 Failure of the fitting or joint shall constitute specimen
three times the diameter of the pipe, but in no case less than 12 failure.
in. (304 mm).
9.2.4 Failure of any one of the four specimens shall consti-
8.3.2 Fuse all fitting outlets with the appropriate size pipe in
tute failure of the test. Failure of one of the four specimens
accordance with the manufacturer’s recommended procedures.
tested is cause for retest of four additional specimens, joined at
8.3.3 All saddle fusion joint specimens conditioned as in
the failed-specimens-joining temperature. Failure of any of
8.1.2 and destined for quick burst testing as in 9.1 and
these four additional specimens constitutes a failure of the test.
sustained pressure testing as in 9.2, are to be joined with the
9.3 Tensile Strength Test:
pipe at no less than maximum allowable operating pressure of
9.3.1 Select four fittings at random and prepare specimens
the pipe system or fitting, whichever is lowest, when being
in accordance with Section 8 with the exception that it is
prepared for those tests. The pipe should be left under pressure
permissible, on pipe sizes above 4 in. (102 mm) IPS, if limits
for a time period not less than recommended by the manufac-
of tensile machine will not allow 25 % elongation with pipe
turer for cooling in the field prior to disturbing the joint. Saddle
specimens of three-pipe diameters, to test with free pipe
joint specimens destined for mechanical/destructive type tests
lengths of 20 in. (304-mm) minimum. From the four
such as impact as in 5.4 or crush tests as in 9.4, or specimens
specimens, condition two specimens each in accordance with
conditioned for cold temperature joining as in 8.1.1, may be
8.1.1 and 8.1.2.
made on unpressured pipe specimens.
9.3.2 Test the specimens using the apparatus of Test Method
9. Test Methods
D638. Test at a pull rate of 0.20 in. (5.0 mm) per min, 625 %.
9.1 Minimum Hydraulic Burst Pressure Test:
9.3.3 Failure of the fitting or joint as defined in 5.3, shall
9.1.1 Select four fittings at random and prepare specimens constitute specimen failure. Failure of any one of the four
in accordance with Section 8. From the four specimens,
specimens shall constitute failure of the test. Failure of one of
condition two specimens each in accordance with 8.1.1 and the four specimens tested is cause for retest of four additional
8.1.2.
specimens, joined at the failed specimens joining temperature.
9.1.2 Test the specimens in accordance with Test Method Failure of any of these four additional specimens constitutes a
D1599.
failure of the test.
9.1.3 Failure of the fitting or joint shall constitute specimen
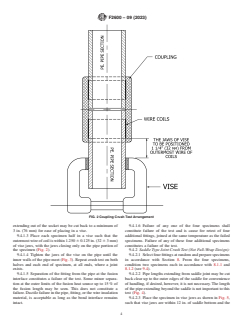
9.4 Joint Integrity Tests—Illustrations of joint crush tests for
failure.
socket type joints and saddles are offered in 9.4.1 and 9.4.2 as
9.1.4 Failure of any one of the four specimens shall consti-
test methods that are useful as an evaluation of bonding
tute failure of the test. Failure of one of the four specimens
strength between the pipe and fitting. Alternately, the fusion
tested is cause for retest of four additional specimens, joined at
evaluation test (FET) offered in 9.4.3 and 9.4.4 may be used in
the failed specimens joining temperature. Failure of any of
lieu of the crush test. Similar test evaluations as specified in the
these four additional specimens constitutes a failure of the test.
contract or purchase order and as agreed upon by the purchaser
9.2 Sustained Pressure Test:
and manufacturer are of equal value in performing such
9.2.1 Select four fittings at random and prepare specimens
evaluations and may be substituted with such agreement.
in accordance with Section 8 of this specification. From the
9.4.1 Joint Crush Test:
four specimens, condition two specimens each in accordance
9.4.1.1 Select four
...


Questions, Comments and Discussion
Ask us and Technical Secretary will try to provide an answer. You can facilitate discussion about the standard in here.
Loading comments...