ASTM B550/B550M-23
(Specification)Standard Specification for Zirconium and Zirconium Alloy Bar and Wire
Standard Specification for Zirconium and Zirconium Alloy Bar and Wire
ABSTRACT
This specification covers three grades of zirconium and zirconium alloy bar and wire as grade R60702, unalloyed zirconium; grade R60704, zirconium-tin; and grade R60705, zirconium-niobium. The chemical composition; and mechanical properties requirements, such as tensile strength, yield strength, and elongation; are detailed.
SCOPE
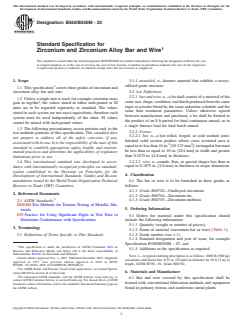
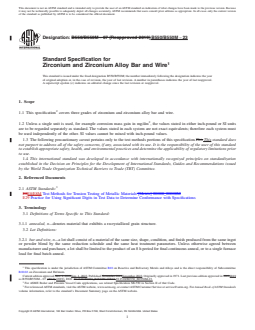
1.1 This specification2 covers three grades of zirconium and zirconium alloy bar and wire.
1.2 Unless a single unit is used, for example corrosion mass gain in mg/dm2, the values stated in either inch-pound or SI units are to be regarded separately as standard. The values stated in each system are not exact equivalents; therefore each system must be used independently of the other. SI values cannot be mixed with inch-pound values.
1.3 The following precautionary caveat pertains only to the test methods portions of this specification. This standard does not purport to address all of the safety concerns, if any, associated with its use. It is the responsibility of the user of this standard to establish appropriate safety, health, and environmental practices and determine the applicability of regulatory limitations prior to use.
1.4 This international standard was developed in accordance with internationally recognized principles on standardization established in the Decision on Principles for the Development of International Standards, Guides and Recommendations issued by the World Trade Organization Technical Barriers to Trade (TBT) Committee.
General Information
- Status
- Published
- Publication Date
- 31-Oct-2023
- Technical Committee
- B10 - Reactive and Refractory Metals and Alloys
- Drafting Committee
- B10.02 - Zirconium and Hafnium
Relations
- Replaces
ASTM B550/B550M-07(2019) - Standard Specification for Zirconium and Zirconium Alloy Bar and Wire - Effective Date
- 01-Nov-2023
- Effective Date
- 01-Jan-2024
- Effective Date
- 01-May-2022
- Effective Date
- 01-Nov-2023
- Effective Date
- 01-Nov-2023
Overview
ASTM B550/B550M-23: Standard Specification for Zirconium and Zirconium Alloy Bar and Wire, established by ASTM International, delineates requirements for three grades of zirconium and zirconium alloy bar and wire: R60702 (unalloyed zirconium), R60704 (zirconium-tin), and R60705 (zirconium-niobium). This specification defines the chemical composition, mechanical properties, dimensional tolerances, and quality standards for manufacturing high-purity zirconium and zirconium alloy products used in critical applications.
By adhering to this standard, manufacturers and purchasers ensure the consistent quality and performance of zirconium bar and wire, supporting their reliable use in demanding environments.
Key Topics
1. Grades of Zirconium Bar and Wire
- R60702: Unalloyed zirconium for applications requiring high corrosion resistance.
- R60704: Zirconium-tin alloy suited to environments where added tin enhances performance.
- R60705: Zirconium-niobium alloy offering improved mechanical properties.
2. Chemical and Mechanical Requirements
- Each grade must meet specified chemical composition limits, including zirconioum, hafnium, iron, chromium, tin, niobium, hydrogen, nitrogen, carbon, and oxygen.
- Mechanical properties such as minimum tensile strength, yield strength, and elongation are defined for each grade, ensuring performance under load.
3. Dimensions and Conditions
- Product forms: Hot-finished and cold-finished bars, and wire in round, square, hexagon, octagon, and flat shapes.
- Size and finish tolerances: Prescribed permissible variations on thickness, width, length, and straightness to ensure precise manufacturing.
- Supplied conditions: Varied by request (hot finished, cold finished, annealed, turned, polished, etc.).
4. Testing and Certification
- Mandatory testing includes tension tests and chemical analysis for elements affecting corrosion resistance and strength.
- Certification by the supplier confirms compliance with the standard’s requirements.
5. Quality and Inspection
- Products are inspected before shipment and must be free of defects such as cracks, seams, or surface imperfections.
- Clear markings on packaging identify product grade, size, batch, and other required information.
Applications
Zirconium and zirconium alloy bars and wires covered by ASTM B550/B550M-23 are widely used in industries where high-purity, corrosion-resistant, and mechanically robust materials are required. Typical applications include:
- Nuclear industry: Fuel cladding and structural components, thanks to zirconium’s low neutron absorption and superior corrosion resistance.
- Chemical processing: Equipment exposed to aggressive media, including acid and alkali environments.
- Aerospace and aviation: Structural parts requiring reduced weight and improved strength.
- Medical devices: Due to zirconium’s biocompatibility and inert properties.
- Welding materials: Wires for fabrication in critical assemblies.
By specifying products to ASTM B550/B550M-23, end-users ensure safe, reliable performance in these high-stakes applications.
Related Standards
For comprehensive quality and compatibility, the following standards are often referenced in conjunction with ASTM B550/B550M-23:
- ASTM E8/E8M: Test Methods for Tension Testing of Metallic Materials
- ASTM E29: Practice for Using Significant Digits in Test Data to Determine Conformance with Specifications
- ASME SB-550: Specification for Zirconium and Zirconium Alloy Bar and Wire (for boiler and pressure vessel code applications)
These related standards support robust testing, accurate measurement, and regulatory compliance in the use of zirconium bar and wire.
Keywords: zirconium bar, zirconium alloy wire, ASTM B550/B550M, R60702, R60704, R60705, chemical composition, mechanical properties, dimensional tolerances, corrosion resistance, standards compliance
Buy Documents
ASTM B550/B550M-23 - Standard Specification for Zirconium and Zirconium Alloy Bar and Wire
REDLINE ASTM B550/B550M-23 - Standard Specification for Zirconium and Zirconium Alloy Bar and Wire
Get Certified
Connect with accredited certification bodies for this standard

Element Materials Technology
Materials testing and product certification.

Inštitut za kovinske materiale in tehnologije
Institute of Metals and Technology. Materials testing, metallurgical analysis, NDT.
Sponsored listings
Frequently Asked Questions
ASTM B550/B550M-23 is a technical specification published by ASTM International. Its full title is "Standard Specification for Zirconium and Zirconium Alloy Bar and Wire". This standard covers: ABSTRACT This specification covers three grades of zirconium and zirconium alloy bar and wire as grade R60702, unalloyed zirconium; grade R60704, zirconium-tin; and grade R60705, zirconium-niobium. The chemical composition; and mechanical properties requirements, such as tensile strength, yield strength, and elongation; are detailed. SCOPE 1.1 This specification2 covers three grades of zirconium and zirconium alloy bar and wire. 1.2 Unless a single unit is used, for example corrosion mass gain in mg/dm2, the values stated in either inch-pound or SI units are to be regarded separately as standard. The values stated in each system are not exact equivalents; therefore each system must be used independently of the other. SI values cannot be mixed with inch-pound values. 1.3 The following precautionary caveat pertains only to the test methods portions of this specification. This standard does not purport to address all of the safety concerns, if any, associated with its use. It is the responsibility of the user of this standard to establish appropriate safety, health, and environmental practices and determine the applicability of regulatory limitations prior to use. 1.4 This international standard was developed in accordance with internationally recognized principles on standardization established in the Decision on Principles for the Development of International Standards, Guides and Recommendations issued by the World Trade Organization Technical Barriers to Trade (TBT) Committee.
ABSTRACT This specification covers three grades of zirconium and zirconium alloy bar and wire as grade R60702, unalloyed zirconium; grade R60704, zirconium-tin; and grade R60705, zirconium-niobium. The chemical composition; and mechanical properties requirements, such as tensile strength, yield strength, and elongation; are detailed. SCOPE 1.1 This specification2 covers three grades of zirconium and zirconium alloy bar and wire. 1.2 Unless a single unit is used, for example corrosion mass gain in mg/dm2, the values stated in either inch-pound or SI units are to be regarded separately as standard. The values stated in each system are not exact equivalents; therefore each system must be used independently of the other. SI values cannot be mixed with inch-pound values. 1.3 The following precautionary caveat pertains only to the test methods portions of this specification. This standard does not purport to address all of the safety concerns, if any, associated with its use. It is the responsibility of the user of this standard to establish appropriate safety, health, and environmental practices and determine the applicability of regulatory limitations prior to use. 1.4 This international standard was developed in accordance with internationally recognized principles on standardization established in the Decision on Principles for the Development of International Standards, Guides and Recommendations issued by the World Trade Organization Technical Barriers to Trade (TBT) Committee.
ASTM B550/B550M-23 is classified under the following ICS (International Classification for Standards) categories: 77.150.99 - Other products of non-ferrous metals. The ICS classification helps identify the subject area and facilitates finding related standards.
ASTM B550/B550M-23 has the following relationships with other standards: It is inter standard links to ASTM B550/B550M-07(2019), ASTM E8/E8M-24, ASTM E8/E8M-22, ASTM B653/B653M-11(2020), ASTM F2384-10(2016). Understanding these relationships helps ensure you are using the most current and applicable version of the standard.
ASTM B550/B550M-23 is available in PDF format for immediate download after purchase. The document can be added to your cart and obtained through the secure checkout process. Digital delivery ensures instant access to the complete standard document.
Standards Content (Sample)
This international standard was developed in accordance with internationally recognized principles on standardization established in the Decision on Principles for the
Development of International Standards, Guides and Recommendations issued by the World Trade Organization Technical Barriers to Trade (TBT) Committee.
Designation: B550/B550M − 23
Standard Specification for
Zirconium and Zirconium Alloy Bar and Wire
This standard is issued under the fixed designation B550/B550M; the number immediately following the designation indicates the year
of original adoption or, in the case of revision, the year of last revision. A number in parentheses indicates the year of last reapproval.
A superscript epsilon (´) indicates an editorial change since the last revision or reapproval.
1. Scope 3.1.1 annealed, n—denotes material that exhibits a recrys-
tallized grain structure.
1.1 This specification covers three grades of zirconium and
zirconium alloy bar and wire. 3.2 Lot Definitions:
3.2.1 bar and wire, n—a lot shall consist of a material of the
1.2 Unless a single unit is used, for example corrosion mass
2 same size, shape, condition, and finish produced from the same
gain in mg/dm , the values stated in either inch-pound or SI
ingot or powder blend by the same reduction schedule and the
units are to be regarded separately as standard. The values
same heat treatment parameters. Unless otherwise agreed
stated in each system are not exact equivalents; therefore each
between manufacturer and purchaser, a lot shall be limited to
system must be used independently of the other. SI values
the product of an 8 h period for final continuous anneal, or to
cannot be mixed with inch-pound values.
a single furnace load for final batch anneal.
1.3 The following precautionary caveat pertains only to the
3.2.2 Forms:
test methods portions of this specification. This standard does
3.2.2.1 bar, n—a hot rolled, forged, or cold worked semi-
not purport to address all of the safety concerns, if any,
finished solid section product whose cross sectional area is
associated with its use. It is the responsibility of the user of this
2 2
equal to or less than 16 in. [10 323 mm ]; rectangular bar must
standard to establish appropriate safety, health, and environ-
be less than or equal to 10 in. [254 mm] in width and greater
mental practices and determine the applicability of regulatory
than 0.1875 in. [4.8 mm] in thickness.
limitations prior to use.
3.2.2.2 wire, n—rounds, flats, or special shapes less than or
1.4 This international standard was developed in accor-
equal to 0.1875 in. [4.8 mm] in thickness or major dimension.
dance with internationally recognized principles on standard-
ization established in the Decision on Principles for the
4. Classification
Development of International Standards, Guides and Recom-
mendations issued by the World Trade Organization Technical 4.1 The bar or wire is to be furnished in three grades as
Barriers to Trade (TBT) Committee.
follows:
4.1.1 Grade R60702—Unalloyed zirconium.
2. Referenced Documents
4.1.2 Grade R60704—Zirconium-tin.
4.1.3 Grade R60705—Zirconium-niobium.
2.1 ASTM Standards:
E8/E8M Test Methods for Tension Testing of Metallic Ma-
5. Ordering Information
terials
E29 Practice for Using Significant Digits in Test Data to
5.1 Orders for material under this specification should
Determine Conformance with Specifications
include the following information:
5.1.1 Quantity (weight or number of pieces),
3. Terminology
5.1.2 Name of material (zirconium bar or wire) (Table 1),
3.1 Definitions of Terms Specific to This Standard: 5.1.3 Grade number (see 4.1),
5.1.4 Standard designation and year of issue, for example
Specification B550/B550M – 07, and
This specification is under the jurisdiction of ASTM Committee B10 on
5.1.5 Additions to the specification as required.
Reactive and Refractory Metals and Alloys and is the direct responsibility of
Subcommittee B10.02 on Zirconium and Hafnium.
NOTE 1—A typical ordering description is as follows: 1000 lb [500 kg]
Current edition approved Nov. 1, 2023. Published November 2023. Originally
zirconium cold drawn bar, 0.35 in. [10 mm] in diameter by 10 ft [3 m] in
approved in 1971. Last previous edition approved in 2019 as B550/
length, ASTM B550 – 01, Grade R60702.
B550M – 07 (2019). DOI: 10.1520/B0550_B0550M-23.
For ASME Boiler and Pressure Vessel Code applications, see related Specifi-
6. Materials and Manufacture
cation SB-550 in Section II of that Code.
For referenced ASTM standards, visit the ASTM website, www.astm.org, or
6.1 Bar and wire covered by this specification shall be
contact ASTM Customer Service at service@astm.org. For Annual Book of ASTM
formed with conventional fabrication methods and equipment
Standards volume information, refer to the standard’s Document Summary page on
the ASTM website. found in primary ferrous and nonferrous metal plants.
Copyright © ASTM International, 100 Barr Harbor Drive, PO Box C700, West Conshohocken, PA 19428-2959. United States
B550/B550M − 23
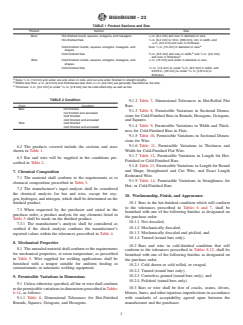
TABLE 1 Product Sections and Size
Product Section Size
Bars: Hot-finished round, squares, octagons, and hexagons ⁄4 in. [6.4 mm] and over in diameter or size
Hot-finished flats ⁄4 in. [6.4 mm] to 10 in. [250 mm], incl, in width, and
⁄8 in. [3.2 mm] and over in thickness
A
Cold-finished rounds, squares, octagons, hexagons, and Over ⁄2 in. [13 mm] in diameter or size
shapes
B
3 1
Cold-finished flats ⁄8 in. [9.5 mm] and over in width, and ⁄8 in. [3.2 mm]
C
and over in thickness
Wire: Cold-finished rounds, squares, octagons, hexagons, and ⁄2 in. [13 mm] and under in diameter or size
shapes
1 3
Cold-finished flats ⁄16 in. [1.6 mm] to under ⁄8 in. [9.5 mm] in width, and
0.010 in. [.25 mm] to under ⁄16 in. [4.8 mm] in
thickness
A 1
Sizes ⁄2 in. [13 mm] and under are wire when in coils, and cut wire when finished in straight lengths.
B
3 3
Widths less than ⁄8 in. [9.5 mm] and thicknesses less than ⁄16 in. [4.8 mm] are generally described as flat wire.
C 1 3
Thickness ⁄8 in. [3.2 mm] to under ⁄16 in. [4.8 mm] can be cold-rolled strip as well as bar.
TABLE 2 Condition
9.1.2 Table 7, Dimensional Tolerances in Hot-Rolled Flat
Form Condition Bars.
Bars hot finished
9.1.3 Table 8, Permissible Variations in Sectional Dimen-
hot finished and annealed
sions for Cold-Finished Bars in Rounds, Hexagons, Octagons,
cold finished
cold finished and annealed
and Squares.
Wire cold finished
9.1.4 Table 9, Permissible Variations in Width and Thick-
cold finished and annealed
ness for Cold-Finished Bars in Flats.
9.1.5 Table 10, Permissible Variations in Sectional Dimen-
sions for Wire.
9.1.6 Table 11, Permissible Variations in Thickness and
6.2 The products covered include the sections and sizes
Width for Cold-Finished Flat Wire.
shown in Table 1.
9.1.7 Table 12, Permissible Variations in Length for Hot-
6.3 Bar and wire will be supplied in the conditions pre-
Finished or Cold-Finished Bars.
scribed in Table 2.
9.1.8 Table 13, Permissible Variations in Length for Round
and Shape, Straightened and Cut Wire, and Exact Length
7. Chemical Composition
Resheared Wire.
7.1 The material shall conform to the requirements as to
9.1.9 Table 14, Permissible Variations in Straightness for
chemical composition prescribed in Table 3.
Hot- or Cold-Finished Bars.
7.2 The manufacturer’s ingot analysis shall be considered
the chemical analysis for bar and wire, except for oxy-
10. Workmanship, Finish, and Appearance
gen, hydrogen, and nitrogen, which shall be determined on the
10.1 Bars in the hot-finished condition which will conform
finished product.
to the tolerances prescribed in Tables 6 and 7, shall be
7.3 When requested by the purchaser and stated in the
furnished with one of the following finishes as designated on
purchase order, a product analysis for any elements listed in
the purchase order:
Table 3 shall be made on the finished product.
10.1.1 Not descaled,
7.3.1 The manufacturer’s analysis shall be considered as
10.1.2 Mechanically descaled,
verified if the check analysis confirms the manufacturer’s
10.1.3 Mechanically descaled and pickled, and
reported values within the tolerances prescribed in Table 4.
10.1.4 Turned (round bars only).
8. Mechanical Properties
10.2 Bars and wire in cold-finished condition that will
8.1 The annealed material shall conform to the requirements
conform to the tolerances prescribed in Tables 8-12, shall be
for mechanical properties, at room temperature, as prescribed
furnished with one of the following finishes as designated on
in Table 5. Wire supplied for welding applications shall be
the purchase order.
furnished with a temper suitable for uniform feeding in
10.2.1 Cold drawn or cold rolled, or swaged,
semiautomatic or automatic welding equipment.
10.2.2 Turned (round bars only),
10.2.3 Centerless ground (round bars only), and
9. Permissible Variations in Dimensions
10.2.4 Polished (round bars only).
9.1 Unless otherwise specified, all bar or wire shall conform
to the permissible variations in dimensions prescribed in Tables 10.3 Bars or wire shall be free of cracks, seams, slivers,
6-14, as follows: blisters, burrs, and other injurious imperfections in accordance
9.1.1 Table 6, Dimensional Tolerances for Hot-Finished with standards of acceptability agreed upon between the
Rounds, Squares, Octagons, and Hexagons. manufacturer and the purchaser.
B550/B550M − 23
A
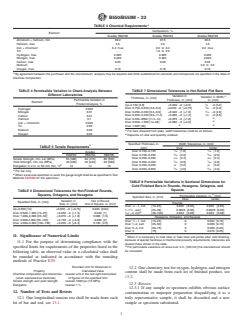
TABLE 3 Chemical Requirements
Composition, %
Element
Grades R60702 Grades R60704 Grades R60705
Zirconium + hafnium, min 99.2 97.5 95.5
Hafnium, max 4.5 4.5 4.5
Iron + chromium 0.2 max 0.2 to 0.4 0.2 max
Tin . . . 1.0 to 2.0 . . .
Hydrogen, max 0.005 0.005 0.005
Nitrogen, max 0.025 0.025 0.025
Carbon, max 0.05 0.05 0.05
Niobium . . . . . . 2.0 to 3.0
Oxygen, max 0.16 0.18 0.18
A
By agreement between the purchaser and the manufacturer, analysis may be required and limits established for elements and compounds not specified in the table of
chemical composition.
TABLE 4 Permissible Variation in Check Analysis Between TABLE 7 Dimensional Tolerances in Hot-Rolled Flat Bars
Different Laboratories
A
Variation in
Variation in Width,
Thickness, in. [mm]
in. [mm]
Thickness, in. [mm]
Permissible Variation in
Element
Product Analysis, % 1
Up–0.150 [3.8] +0.020 –0 [+0.5] ⁄8 –0 [3.2]
Over 0.150–0.250 [3.8–6.3] +0.030 –0 [+0.75] ⁄32 –0 [4.0]
Hydrogen 0.002
Over 0.250–0.350 [6.3–8.9] +0.040 –0 [+1.0] ⁄16 –0 [4.8]
Nitrogen 0.01
Over 0.350–0.450 [8.9–11.4] +0.050 –0 [+1.3] ⁄32 –0 [5.6]
Carbon 0.01
B
Over 0.450–0550 [11.4–14] +0.070 –0 [+1.8]
Hafnium 0.1
B
Over 0.550–1.500 [14–38] +0.080 –0 [+2.0]
Iron + chromium 0.025
B B
Over 1.500 [38]
Tin 0.05
Niobium 0.05 A
For bars sheared from plate, width tolerances shall be as follows:
Oxygen 0.02
B
Depends on size and quantity ordered.
Specified Thickness, in. Width Tolerances, in. [mm]
A
TABLE 5 Tensile Requirements
[mm] Over Under
1 1
Over 0.100–0.150 ⁄16 [1.6] ⁄16 [1.6]
Grades
5 5
Over 0.150–0.250 ⁄64 [2.0] ⁄64 [2.0]
R60702 R60704 R60705
3 3
Over 0.250–0.350 ⁄32 [2.4] ⁄32 [2.4]
Tensile Strength, min, ksi (MPa) 55 [380] 60 [415] 80 [550]
7 7
Over 0.350–0.450 ⁄64 [2.8] ⁄64 [2.8]
Yield Strength, min, ksi (MPa) 30 [205] 35 [240] 55 [380]
B 1 1
Over 0.450–0.550 ⁄8 [3.2] ⁄8 [3.2]
Elongation in 2 in. or 50 mm min, % 16 14 16
5 5
Over 0.550–0.650 ⁄32 [4.0] ⁄32 [4.0]
A
For bar only.
B
When a sub-size specimen is used, the gauge length shall be as specified in Test
Methods E8/E8M for the specimen.
TABLE 8 Permissible Variations in Sectional Dimensions for
Cold-Finished Bars in Rounds, Hexagons, Octagons, and
Squares
TABLE 6 Dimensional Tolerances for Hot-Finished Rounds,
A
Squares, Octagons, and Hexagons Permissible Variation, in. [mm]
Specified Size, in. [mm]
Over Under
Variation in Out of Round,
Specified Size, in. [mm] Rou
...
This document is not an ASTM standard and is intended only to provide the user of an ASTM standard an indication of what changes have been made to the previous version. Because
it may not be technically possible to adequately depict all changes accurately, ASTM recommends that users consult prior editions as appropriate. In all cases only the current version
of the standard as published by ASTM is to be considered the official document.
Designation: B550/B550M − 07 (Reapproved 2019) B550/B550M − 23
Standard Specification for
Zirconium and Zirconium Alloy Bar and Wire
This standard is issued under the fixed designation B550/B550M; the number immediately following the designation indicates the year
of original adoption or, in the case of revision, the year of last revision. A number in parentheses indicates the year of last reapproval.
A superscript epsilon (´) indicates an editorial change since the last revision or reapproval.
1. Scope
1.1 This specification covers three grades of zirconium and zirconium alloy bar and wire.
1.2 Unless a single unit is used, for example corrosion mass gain in mg/dm , the values stated in either inch-pound or SI units
are to be regarded separately as standard. The values stated in each system are not exact equivalents; therefore each system must
be used independently of the other. SI values cannot be mixed with inch-pound values.
1.3 The following precautionary caveat pertains only to the test methods portions of this specification.This This standard does
not purport to address all of the safety concerns, if any, associated with its use. It is the responsibility of the user of this standard
to establish appropriate safety, health, and environmental practices and determine the applicability of regulatory limitations prior
to use.
1.4 This international standard was developed in accordance with internationally recognized principles on standardization
established in the Decision on Principles for the Development of International Standards, Guides and Recommendations issued
by the World Trade Organization Technical Barriers to Trade (TBT) Committee.
2. Referenced Documents
2.1 ASTM Standards:
E8E8/E8M Test Methods for Tension Testing of Metallic Materials [Metric] E0008_E0008M
E29 Practice for Using Significant Digits in Test Data to Determine Conformance with Specifications
3. Terminology
3.1 Definitions of Terms Specific to This Standard:
3.1.1 annealed, n—denotes material that exhibits a recrystallized grain structure.
3.2 Lot Definitions:
3.2.1 bar and wire, n—a lot shall consist of a material of the same size, shape, condition, and finish produced from the same ingot
or powder blend by the same reduction schedule and the same heat treatment parameters. Unless otherwise agreed between
manufacturer and purchaser, a lot shall be limited to the product of an 8 h period for final continuous anneal, or to a single furnace
load for final batch anneal.
This specification is under the jurisdiction of ASTM Committee B10 on Reactive and Refractory Metals and Alloys and is the direct responsibility of Subcommittee
B10.02 on Zirconium and Hafnium.
Current edition approved Nov. 1, 2019Nov. 1, 2023. Published November 2019November 2023. Originally approved in 1971. Last previous edition approved in 20122019
as B550/B550M – 07 (2012).(2019). DOI: 10.1520/B0550_B0550M-07R19.10.1520/B0550_B0550M-23.
For ASME Boiler and Pressure Vessel Code applications, see related Specification SB-550 in Section II of that Code.
For referenced ASTM standards, visit the ASTM website, www.astm.org, or contact ASTM Customer Service at service@astm.org. For Annual Book of ASTM Standards
volume information, refer to the standard’s Document Summary page on the ASTM website.
Copyright © ASTM International, 100 Barr Harbor Drive, PO Box C700, West Conshohocken, PA 19428-2959. United States
B550/B550M − 23
3.2.2 Forms:
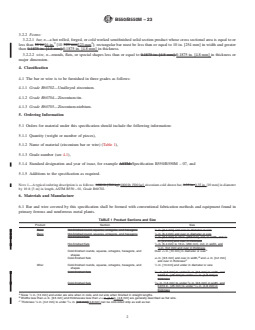
3.2.2.1 bar, n—a hot rolled, forged, or cold worked semifinished solid section product whose cross sectional area is equal to or
2 2
less than 16 in.16 in. [10 323 mm323 mm ]; rectangular bar must be less than or equal to 10 in. [254 mm] in width and greater
than 0.1875 in. [4.8 mm] 0.1875 in. [4.8 mm] in thickness.
3.2.2.2 wire, n—rounds, flats, or special shapes less than or equal to 0.1875 in. [4.8 mm] 0.1875 in. [4.8 mm] in thickness or
major dimension.
4. Classification
4.1 The bar or wire is to be furnished in three grades as follows:
4.1.1 Grade R60702—Unalloyed zirconium.
4.1.2 Grade R60704—Zirconium-tin.
4.1.3 Grade R60705—Zirconium-niobium.
5. Ordering Information
5.1 Orders for material under this specification should include the following information:
5.1.1 Quantity (weight or number of pieces),
5.1.2 Name of material (zirconium bar or wire) (Table 1),
5.1.3 Grade number (see 4.1),
5.1.4 Standard designation and year of issue, for example ASTM Specification B550/B550M – 07, and
5.1.5 Additions to the specification as required.
NOTE 1—A typical ordering description is as follows: 1000 lb [500 kg] 1000 lb [500 kg] zirconium cold drawn bar, 0.35 in. 0.35 in. [10 mm] in diameter
by 10 ft [3 m] in length, ASTM B550 – 01, Grade R60702.
6. Materials and Manufacture
6.1 Bar and wire covered by this specification shall be formed with conventional fabrication methods and equipment found in
primary ferrous and nonferrous metal plants.
TABLE 1 Product Sections and Size
Product Section Size
Bars: Hot-finished round, squares, octagons, and hexagons ⁄4 in. [6.4 mm] and over in diameter or size
Bars: Hot-finished round, squares, octagons, and hexagons ⁄4 in. [6.4 mm] and over in diameter or size
1 1
Hot-finished flats ⁄4 in. [6.4 mm] to 10 in. [250 mm], incl, in width, and ⁄8
in. [3.2 mm] and over in thickness
Hot-finished flats ⁄4 in. [6.4 mm] to 10 in. [250 mm], incl, in width, and
⁄8 in. [3.2 mm] and over in thickness
A
Cold-finished rounds, squares, octagons, hexagons, and Over ⁄2 in. [13 mm] in diameter or size
shapes
B
3 1
Cold-finished flats ⁄8 in. [9.5 mm] and over in width, and ⁄8 in. [3.2 mm]
C
and over in thickness
Wire: Cold-finished rounds, squares, octagons, hexagons, and ⁄2 in. [13 mm] and under in diameter or size
shapes
1 3
Cold-finished flats ⁄16 in. [1.6 mm] to under ⁄8 in. [9.5 mm] in width, and
0.010 in. [.25 mm] to under ⁄16 in. [4.8 mm] in
thickness
1 3
Cold-finished flats ⁄16 in. [1.6 mm] to under ⁄8 in. [9.5 mm] in width, and
0.010 in. [.25 mm] to under ⁄16 in. [4.8 mm] in
thickness
A
Sizes ⁄2 in. [13 mm] and under are wire when in coils, and cut wire when finished in straight lengths.
B 3 3
Widths less than ⁄8 in. [9.5 mm] and thicknesses less than ⁄16 in. [4.8 in. [4.8 mm] are generally described as flat wire.
C
1 3
Thickness ⁄8 in. [3.2 mm] to under ⁄16 in. [4.8 mm] [4.8 mm] can be cold-rolled strip as well as bar.
B550/B550M − 23
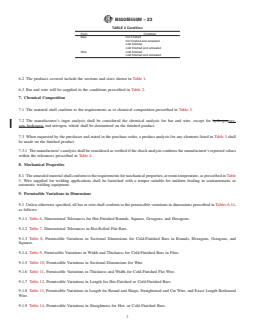
TABLE 2 Condition
Form Condition
Bars hot finished
hot finished and annealed
cold finished
cold finished and annealed
Wire cold finished
cold finished and annealed
6.2 The products covered include the sections and sizes shown in Table 1.
6.3 Bar and wire will be supplied in the conditions prescribed in Table 2.
7. Chemical Composition
7.1 The material shall conform to the requirements as to chemical composition prescribed in Table 3.
7.2 The manufacturer’s ingot analysis shall be considered the chemical analysis for bar and wire, except for hydrogenoxy-
gen, hydrogen, and nitrogen, which shall be determined on the finished product.
7.3 When requested by the purchaser and stated in the purchase order, a product analysis for any elements listed in Table 3 shall
be made on the finished product.
7.3.1 The manufacturer’s analysis shall be considered as verified if the check analysis confirms the manufacturer’s reported values
within the tolerances prescribed in Table 4.
8. Mechanical Properties
8.1 The annealed material shall conform to the requirements for mechanical properties, at room temperature, as prescribed in Table
5. Wire supplied for welding applications shall be furnished with a temper suitable for uniform feeding in semiautomatic or
automatic welding equipment.
9. Permissible Variations in Dimensions
9.1 Unless otherwise specified, all bar or wire shall conform to the permissible variations in dimensions prescribed in Tables 6-14,
as follows:
9.1.1 Table 6, Dimensional Tolerances for Hot-Finished Rounds, Squares, Octagons, and Hexagons.
9.1.2 Table 7, Dimensional Tolerances in Hot-Rolled Flat Bars.
9.1.3 Table 8, Permissible Variations in Sectional Dimensions for Cold-Finished Bars in Rounds, Hexagons, Octagons, and
Squares.
9.1.4 Table 9, Permissible Variations in Width and Thickness for Cold-Finished Bars in Flats.
9.1.5 Table 10, Permissible Variations in Sectional Dimensions for Wire.
9.1.6 Table 11, Permissible Variations in Thickness and Width for Cold-Finished Flat Wire.
9.1.7 Table 12, Permissible Variations in Length for Hot-Finished or Cold-Finished Bars.
9.1.8 Table 13, Permissible Variations in Length for Round and Shape, Straightened and Cut Wire, and Exact Length Resheared
Wire.
9.1.9 Table 14, Permissible Variations in Straightness for Hot- or Cold-Finished Bars.
B550/B550M − 23
A
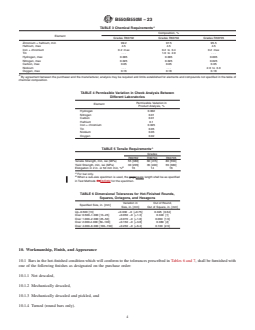
TABLE 3 Chemical Requirements
Composition, %
Element
Grades R60702 Grades R60704 Grades R60705
Zirconium + hafnium, min 99.2 97.5 95.5
Hafnium, max 4.5 4.5 4.5
Iron + chromium 0.2 max 0.2 to 0.4 0.2 max
Tin . . . 1.0 to 2.0 . . .
Hydrogen, max 0.005 0.005 0.005
Nitrogen, max 0.025 0.025 0.025
Carbon, max 0.05 0.05 0.05
Niobium . . . . . . 2.0 to 3.0
Oxygen, max 0.16 0.18 0.18
A
By agreement between the purchaser and the manufacturer, analysis may be required and limits established for elements and compounds not specified in the table of
chemical composition.
TABLE 4 Permissible Variation in Check Analysis Between
Different Laboratories
Permissible Variation in
Element
Product Analysis, %
Hydrogen 0.002
Nitrogen 0.01
Carbon 0.01
Hafnium 0.1
Iron + chromium 0.025
Tin 0.05
Niobium 0.05
Oxygen 0.02
A
TABLE 5 Tensile Requirements
Grades
R60702 R60704 R60705
Tensile Strength, min, ksi (MPa) 55 [380] 60 [415] 80 [550]
Yield Strength, min, ksi (MPa) 30 [205] 35 [240] 55 [380]
B
Elongation in 2 in. or 50 mm min, % 16 14 16
A
For bar only.
B
When a sub-size specimen is used, the gagegauge length shall be as specified
in Test Methods E8E8/E8M for the specimen.
TABLE 6 Dimensional Tolerances for Hot-Finished Rounds,
Squares, Octagons, and Hexagons
Variation in Out of Round,
Specified Size, in. [mm]
Size, in. [mm] Out of Square, in. [mm]
Up–0.500 [13] +0.030 –0 [+0.75] 0.025 [0.64]
Over 0.500–1.000 [13–25] +0.050 –0 [+1.3] 0.040 [1]
Over 1.000–2.000 [25–50] +0.070 –0 [+1.8] 0.060 [1.5]
Over 2.000-4.000 [50–100] +0.150 –0 [+3.8] 0.080 [2]
Over 4.000–6.000 [100–150] +0.250 –0 [+6.4] 0.100 [2.5]
10. Workmanship, Finish, and Appearance
10.1 Bars in the hot-finished condition which will conform to the tolerances prescribed in Tables 6 and 7, shall be furnished with
one of the following finishes as designated on the purchase order:
10.1.1 Not descaled,
10.1.2 Mechanically descaled,
10.1.3 Mechanically descaled and pickled, and
10.1.4 Turned (round bars only).
B550/B550M − 23
TABLE 7 Dimensional Tolerances in Hot-Rolled Flat Bars
A
Variation in
Variation in Width,
Thickness, in. [mm]
Thickness, in. [mm] in. [mm]
Up–0.150 [3.8] +0.020 –0 [+0.5] ⁄8 –0 [3.2]
Over 0.150–0.250 [3.8–6.3] +0.030 –0 [+0.75] ⁄32 –0 [4.0]
Over 0.250–0.350 [6.3–8.9] +0.040 –0 [+1.0] ⁄16 –0 [4.8]
Over 0.350–0.450 [8.9–11.4] +0.050 –0 [+1.3] ⁄32 –0 [5.6]
B
Over 0.450–0550 [11.4–14] +0.070 –0 [+1.8]
B
Over 0.550–1.500 [14–38] +0.080 –0 [+2.0]
B B
Over 1.500 [38]
A
For bars sheared from plate, width tolerances shall be as follows:
B
Depends on size and quantity ordered.
Specified Thickness, in. Width Tolerances, in. [mm]
[mm] Over Under
1 1
Over 0.100–0.150 ⁄16 [1.6] ⁄16 [1.6]
5 5
Over 0.150–0.250 ⁄64 [2.0] ⁄64 [2.0]
3 3
Over 0.250–0.350 ⁄32 [2.4] ⁄32 [2.4]
7 7
Over 0.350–0.450 ⁄64 [2.8] ⁄64 [2.8]
1 1
Over 0.450–0.550 ⁄8 [3.2] ⁄8 [3.2]
5 5
Over 0.550–0.650 ⁄32 [4.0] ⁄32 [4.0]
TABLE 8 Permissible Variations in Sectional Dimensions for
Cold-Finished Bars in Rounds, Hexagons, Octagons, and
Sq
...
Questions, Comments and Discussion
Ask us and Technical Secretary will try to provide an answer. You can facilitate discussion about the standard in here.
Loading comments...