ASTM B1-13(2018)
(Specification)Standard Specification for Hard-Drawn Copper Wire
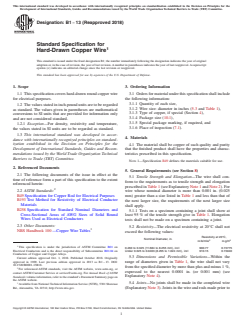
Standard Specification for Hard-Drawn Copper Wire
ABSTRACT
This specification covers hard-drawn round copper wire for electrical purposes. The wire shall be tested and shall conform to the requirements as to tensile strength, elongation, and electrical resistivity. No joints shall be made in the completed wire. Joints in the wire and rod made prior to final drawing shall be in accordance with the best commercial practice.
SCOPE
1.1 This specification covers hard-drawn round copper wire for electrical purposes.
1.2 The values stated in inch-pound units are to be regarded as standard. The values given in parentheses are mathematical conversions to SI units that are provided for information only and are not considered standard.
1.2.1 Exception—For density, resistivity and temperature, the values stated in SI units are to be regarded as standard.
1.3 This international standard was developed in accordance with internationally recognized principles on standardization established in the Decision on Principles for the Development of International Standards, Guides and Recommendations issued by the World Trade Organization Technical Barriers to Trade (TBT) Committee.
General Information
- Status
- Published
- Publication Date
- 30-Sep-2018
- Technical Committee
- B01 - Electrical Conductors
- Drafting Committee
- B01.04 - Conductors of Copper and Copper Alloys
Relations
- Effective Date
- 01-Oct-2018
- Effective Date
- 15-Apr-2020
- Effective Date
- 01-Apr-2017
- Effective Date
- 01-Apr-2016
- Effective Date
- 01-Apr-2016
- Effective Date
- 15-Sep-2015
- Effective Date
- 01-May-2015
- Effective Date
- 01-Apr-2014
- Effective Date
- 01-Oct-2010
- Effective Date
- 01-Nov-2009
- Effective Date
- 01-Nov-2008
- Effective Date
- 01-Sep-2008
- Effective Date
- 01-Sep-2008
- Effective Date
- 01-Apr-2008
- Refers
ASTM B49-98(2004) - Standard Specification for Copper Rod Drawing Stock for Electrical Purposes - Effective Date
- 01-May-2004
Overview
ASTM B1-13(2018): Standard Specification for Hard-Drawn Copper Wire provides guidelines and requirements for round hard-drawn copper wire intended for electrical purposes. Developed by ASTM, this international standard establishes essential physical and electrical properties to ensure consistency, reliability, and safety in the manufacture and use of hard-drawn copper wire. The specification is recognized and used globally for the selection and quality assurance of copper conductor wire in a variety of electrical applications.
Key Topics
- Material Quality: Hard-drawn copper wire covered by this standard must be manufactured from copper of such purity and quality that the finished product meets the required properties.
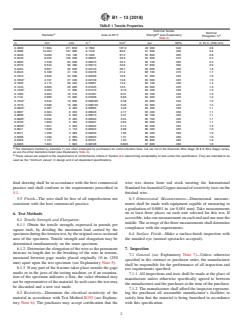
- Physical Properties: The standard includes minimum requirements for tensile strength and elongation based on the wire diameter, ensuring mechanical durability.
- Electrical Properties: Maximum electrical resistivity at 20°C is prescribed to maintain conductivity necessary for electrical conductors.
- Dimensional Tolerances: Strict controls are set for nominal wire diameters, with permissible variation limited to ±1% of specified values.
- Joints: No joints are allowed in completed wire spools, and any joints in precursor rod or wire must conform to commercial best practices.
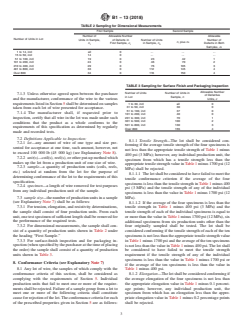
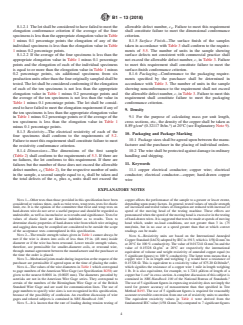
- Sampling and Inspection: Detailed guidance is provided for quality assurance, including sampling sizes, inspection procedures, and acceptance criteria for tensile strength, elongation, resistivity, dimensions, surface finish, and packaging.
- Unit Systems: Inch-pound units are primarily used, though SI units are included for density, resistivity, and temperature.
- Packaging: Wire must be protected against handling and shipping damage, with package size and markings specified by the purchaser.
Applications
Hard-drawn copper wire specified by ASTM B1-13(2018) is widely used as an electrical conductor in:
- Transmission and Distribution: Used in overhead lines where mechanical strength and good conductivity are required.
- Power Cables: Forms the main conductor in power cable construction for industrial, commercial, and residential power distribution.
- Grounding Systems: Employs the mechanical and electrical properties of hard-drawn copper for safe and effective grounding.
- Communication Lines: Certain wire diameters are utilized in the telecommunications sector for signal transmission.
- General Electrical Installations: Suitable for use in a wide range of control panels, switchgear, and assemblies where hard-drawn wire properties are specified.
Related Standards
The requirements and practices outlined in ASTM B1-13(2018) reference and align with other important ASTM and industry standards:
- ASTM B49: Specification for Copper Rod for Electrical Purposes.
- ASTM B193: Test Method for Resistivity of Electrical Conductor Materials.
- ASTM B258: Specification for Standard Nominal Diameters and Cross-Sectional Areas of AWG Sizes of Solid Round Wires Used as Electrical Conductors.
- NBS Handbook 100: Copper Wire Tables - referenced for wire gage and resistivity values.
Keyword focus: Hard-drawn copper wire, electrical conductor, ASTM B1-13, copper wire standards, tensile strength, electrical resistivity, wire elongation, wire packaging, international standards for copper conductors.
By adhering to ASTM B1-13(2018), manufacturers and users in the electrical industry ensure the delivery and installation of copper conductors that meet rigorous mechanical and electrical benchmarks, supporting safe, efficient, and reliable power and signal transmission across a range of critical infrastructure.
Buy Documents
ASTM B1-13(2018) - Standard Specification for Hard-Drawn Copper Wire
Get Certified
Connect with accredited certification bodies for this standard

Intertek Testing Services NA Inc.
Intertek certification services in North America.

UL Solutions
Global safety science company with testing, inspection and certification.

ANCE
Mexican certification and testing association.
Sponsored listings
Frequently Asked Questions
ASTM B1-13(2018) is a technical specification published by ASTM International. Its full title is "Standard Specification for Hard-Drawn Copper Wire". This standard covers: ABSTRACT This specification covers hard-drawn round copper wire for electrical purposes. The wire shall be tested and shall conform to the requirements as to tensile strength, elongation, and electrical resistivity. No joints shall be made in the completed wire. Joints in the wire and rod made prior to final drawing shall be in accordance with the best commercial practice. SCOPE 1.1 This specification covers hard-drawn round copper wire for electrical purposes. 1.2 The values stated in inch-pound units are to be regarded as standard. The values given in parentheses are mathematical conversions to SI units that are provided for information only and are not considered standard. 1.2.1 Exception—For density, resistivity and temperature, the values stated in SI units are to be regarded as standard. 1.3 This international standard was developed in accordance with internationally recognized principles on standardization established in the Decision on Principles for the Development of International Standards, Guides and Recommendations issued by the World Trade Organization Technical Barriers to Trade (TBT) Committee.
ABSTRACT This specification covers hard-drawn round copper wire for electrical purposes. The wire shall be tested and shall conform to the requirements as to tensile strength, elongation, and electrical resistivity. No joints shall be made in the completed wire. Joints in the wire and rod made prior to final drawing shall be in accordance with the best commercial practice. SCOPE 1.1 This specification covers hard-drawn round copper wire for electrical purposes. 1.2 The values stated in inch-pound units are to be regarded as standard. The values given in parentheses are mathematical conversions to SI units that are provided for information only and are not considered standard. 1.2.1 Exception—For density, resistivity and temperature, the values stated in SI units are to be regarded as standard. 1.3 This international standard was developed in accordance with internationally recognized principles on standardization established in the Decision on Principles for the Development of International Standards, Guides and Recommendations issued by the World Trade Organization Technical Barriers to Trade (TBT) Committee.
ASTM B1-13(2018) is classified under the following ICS (International Classification for Standards) categories: 29.060.10 - Wires. The ICS classification helps identify the subject area and facilitates finding related standards.
ASTM B1-13(2018) has the following relationships with other standards: It is inter standard links to ASTM B1-13, ASTM B49-20, ASTM B49-17, ASTM B193-16, ASTM B49-16, ASTM B49-15a, ASTM B49-15, ASTM B193-02(2014), ASTM B49-10, ASTM B49-09, ASTM B49-08a, ASTM B193-02(2008), ASTM B258-02(2008), ASTM B49-08, ASTM B49-98(2004). Understanding these relationships helps ensure you are using the most current and applicable version of the standard.
ASTM B1-13(2018) is available in PDF format for immediate download after purchase. The document can be added to your cart and obtained through the secure checkout process. Digital delivery ensures instant access to the complete standard document.
Standards Content (Sample)
This international standard was developed in accordance with internationally recognized principles on standardization established in the Decision on Principles for the
Development of International Standards, Guides and Recommendations issued by the World Trade Organization Technical Barriers to Trade (TBT) Committee.
Designation:B1 −13 (Reapproved 2018)
Standard Specification for
Hard-Drawn Copper Wire
This standard is issued under the fixed designation B1; the number immediately following the designation indicates the year of original
adoption or, in the case of revision, the year of last revision.Anumber in parentheses indicates the year of last reapproval.Asuperscript
epsilon (´) indicates an editorial change since the last revision or reapproval.
This standard has been approved for use by agencies of the U.S. Department of Defense.
1. Scope 3. Ordering Information
1.1 This specification covers hard-drawn round copper wire
3.1 Orders for material under this specification shall include
for electrical purposes. the following information:
3.1.1 Quantity of each size,
1.2 The values stated in inch-pound units are to be regarded
3.1.2 Wire size: diameter in inches (5.3 and Table 1),
as standard. The values given in parentheses are mathematical
3.1.3 Type of copper, if special (Section 4),
conversions to SI units that are provided for information only
3.1.4 Package size (10.1),
and are not considered standard.
3.1.5 Special package marking, if required, and
1.2.1 Exception—For density, resistivity and temperature,
3.1.6 Place of inspection (7.1).
the values stated in SI units are to be regarded as standard.
1.3 This international standard was developed in accor-
4. Materials
dance with internationally recognized principles on standard-
ization established in the Decision on Principles for the
4.1 The material shall be copper of such quality and purity
Development of International Standards, Guides and Recom- that the finished product shall have the properties and charac-
mendations issued by the World Trade Organization Technical
teristics prescribed in this specification.
Barriers to Trade (TBT) Committee.
NOTE 1—Specification B49 defines the materials suitable for use.
2. Referenced Documents
5. General Requirements (see Section 8)
2.1 The following documents of the issue in effect at the
5.1 Tensile Strength and Elongation—The wire shall con-
time of reference form a part of this specification to the extent
form to the requirements as to tensile strength and elongation
referenced herein:
prescribed in Table 1 (see Explanatory Note 1 and Note 2). For
2.2 ASTM Standards:
wire whose nominal diameter is more than 0.001 in. (0.025
B49 Specification for Copper Rod for Electrical Purposes
mm) greater than a size listed in Table 1 and less than that of
B193 Test Method for Resistivity of Electrical Conductor
the next larger size, the requirements of the next larger size
Materials
shall apply.
B258 Specification for Standard Nominal Diameters and
5.1.1 Tests on a specimen containing a joint shall show at
Cross-Sectional Areas of AWG Sizes of Solid Round
least 95 % of the tensile strength give in Table 1. Elongation
Wires Used as Electrical Conductors
tests shall not be made on a specimen containing a joint.
2.3 Other Documents:
5.2 Resistivity—The electrical resistivity at 20°C shall not
NBS Handbook 100 —Copper Wire Tables
exceed the following values:
Resistivity at 20°C,
Nominal Diameter, in.
2 2
Ω·lb/mile Ω·g/m
This specification is under the jurisdiction of ASTM Committee B01 on
0.460 to 0.325 (11.684 to 8.255 mm), incl 900.77 0.15775
Electrical Conductors and is the direct responsibility of Subcommittee B01.04 on
Under 0.325 to 0.0403 (8.255 to 1.024 mm), incl 910.15 0.15940
Conductors of Copper and Copper Alloys.
5.3 Dimensions and Permissible Variations—Within the
Current edition approved Oct. 1, 2018. Published October 2018. Originally
approved in 1909. Last previous edition approved in 2013 as B1 – 13. DOI:
range of diameters given in Table 1, the wire shall not vary
10.1520/B0001-13R18.
from the specified diameter by more than plus and minus 1 %,
For referenced ASTM standards, visit the ASTM website, www.astm.org, or
expressed to the nearest 0.0001 in. (or 0.001 mm) (see
contact ASTM Customer Service at service@astm.org. For Annual Book of ASTM
Standards volume information, refer to the standard’s Document Summary page on Explanatory Note 4).
the ASTM website.
5.4 Joints—No joints shall be made in the completed wire
Available from National Technical Information Service (NTIS), 5301 Shawnee
Rd., Alexandria, VA 22312, http://www.ntis.gov. (Explanatory Note 3). Joints in the wire and rods made prior to
Copyright © ASTM International, 100 Barr Harbor Drive, PO Box C700, West Conshohocken, PA 19428-2959. United States
B1−13 (2018)
TABLE 1 Tensile Properties
Nominal Tensile
Nominal
A
B
Diameter Area at 20°C Strength (see Explanatory
B
Elongation,%
Note 2)
2 2
in. mm cmil in. mm psi MPa in 10 in. (250 mm)
0.4600 11.684 211 600 0.1662 107.0 49 000 340 3.8
0.4096 10.464 167 800 0.1318 85.0 51 000 350 3.3
0.3648 9.266 133 100 0.1045 67.4 52 800 365 2.8
0.3249 8.252 105 600 0.08291 53.5 54 500 375 2.4
0.2893 7.348 83 690 0.06573 42.4 56 100 385 2.2
0.2576 6.543 66 360 0.05213 33.6 57 600 395 2.0
0.2294 5.827 52 620 0.04133 26.7 59 000 405 1.8
0.2043 5.189 41 740 0.03278 21.2 60 100 415 1.7
0.1819 4.620 33 090 0.02599 16.8 61 200 420 1.6
0.1650* 4.191 27 220 0.02138 13.8 62 000 425 1.5
0.1620 4.115 26 240 0.02061 13.3 62 100 430 1.4
0.1443 3.665 20 820 0.01635 10.5 63 000 435 1.3
0.1340* 3.404 17 960 0.01410 9.10 63 400 435 1.3
0.1285 3.264 16 510 0.01297 8.37 63 700 440 1.3
0.1144 2.906 13 090 0.01028 6.63 64 300 445 1.2
0.1040* 2.642 10 820 0.008495 5.48 64 800 445 1.2
0.1019 2.588 10 380 0.008155 5.26 64 900 445 1.2
0.0920* 2.387 8 460 0.00665 4.29 65 400 450 1.1
0.0907 2.304 8 230 0.00646 4.17 65 400 450 1.1
0.0808 2.052 6 530 0.00513 3.31 65 700 455 1.1
0.0800* 2.032 6 400 0.00503 3.24 65 700 455 1.1
0.0720 1.829 5 180 0.00407 2.63 65 900 455 1.1
0.0650* 1.651 4 220 0.00332 2.14 66 200 455 1.0
0.0641 1.628 4 110 0.00323 2.08 66 200 455 1.0
0.0571 1.450 3 260 0.00256 1.65 66 400 460 1.0
0.0508 1.290 2 580 0.00203 1.31 66 600 460 1.0
0.0453 1.151 2 050 0.00161 1.04 66 800 460 1.0
0.0403 1.024 1 620 0.00128 0.823 67 000 460 1.0
A
The diameters marked by asterisks (*) are often employed by purchasers for communication lines, but are not in the American Wire Gage (B&SWire Gage) series,
as are the other diameters listed (see Explanatory Note 4).
B
These values are subject to the requirements of conformance criteria in Section 8 in determining acceptability of wire under this specification. They are intended to be
used as the “minimum values” in design and in all dependent specifications.
final drawing shall be in accordance with the best commercial wire was drawn from rod stock meeting the International
practice and shall conform to the requirements prescribed in Standard forAnnealed Copper instead of resistivity tests on the
5.1. finished wire.
5.5 Finish—The wire shall be free of all imperfections not 6.3 Dimensional Measurements—Dimensional measure-
consistent with the best commercial practice. ments shall be made with equipment capable of measuring to
a graduation of 0.0001 in. (or 0.001 mm). Take measurements
on at least three places on each unit selected for this test. If
6. Test Methods
accessible,takeonemeasurementoneachendandonenearthe
6.1 Tensile Strength and Elongation:
middle.Theaverageofthethreemeasurementsshalldetermine
6.1.1 Obtain the tensile strength, expressed in pounds per
compliance with the requirements.
square inch, by dividing the maximum load carried by the
specimenduringthetensiontest,bytheoriginalcross-sectional 6.4 Surface Finish—Make a surface-finish inspection with
area of the specimen. Tensile strength and elongation may be the unaided eye (normal spectacles accepted).
determined simultaneously on the same specimen.
6.1.2 Determine the elongation of the wire as the permanent 7. Inspection
increase in length due to the breaking of the wire in tension,
7.1 General (see Explanatory Note 7)—Unless otherwise
measured between gage marks placed originally 10 in. (250
specified in the contract or purchaser order, the manufacturer
mm) apart upon the test specimen (see Explanatory Note 5).
shall be responsible for the performance of all inspection and
6.1.3 If any part of the fracture takes place outside the gage
test requirements specified.
marks or in the jaws of the testing machine, or if an examina-
7.1.1 All inspections and tests shall be made at the place of
tion of the specimen indicates a flaw, the value obtained may
manufacture unless otherwise specifically agreed to between
not be representative of the material. In such cases the test may
the manufacturer and the purchaser at the time of the purchase.
be discarded and a new test made.
7.1.2 The manufacturer shall afford the inspector represent-
6.2 Resistivity—Determine the electrical resistivity of the ing the purchaser all reasonable manufacturer’s facilities to
material in accordance with Test Method B193 (see Explana- satisfy him that the material is being furnished in accordance
tory Note 6). The purchaser may accept certification that the with this specification.
B1−13 (2018)
TABLE 2 Sampling for Dimensional Measurements
First Sample Second Sample
Number of Allowable Number Allowable
Number of Units in Lot
Units in Sample, of Defects in Number of Units Number of
n, plus n
n First Sample, c in Sample, n Defects in Both
1 1 2
Samples, c
1 to 14, incl all 0 . . .
15 to 50, incl 14 0 . . .
51 to 100, incl 19 0 23 42 1
101 to 200, incl 24 0 46 70 2
210 to 400, incl 29 0 76 105 3
401 to 800, incl 33 0 112 145 4
Over 800 34 0 116 150 4
TABLE 3 Sampling for Surface Finish and Packaging Inspection
Allowable Number
Number of Units Number of Units in
7.1.3 Unless otherwise agreed upon between the purchaser
of Defective
in Lot Sample, n
and the manufacturer, conformance of the wire to the various Units, c
requirementslistedinSection5shallbedeterminedonsamples 1 to 30, incl all 0
31 to 50, incl 30 0
taken from each lot of wire presented for acceptance.
51 to 100, incl 37 0
7.1.4 The manufacturer shall, if requested prior to
101 to 200, incl 40 0
201 to 300, incl 70 1
inspection, certify that all wire in the lot was made under such
301 to 500, incl 100 2
conditions that the product as a whole conforms to the
501 to 800, incl 130 3
requirements of this specification as determined by regularly
Over 800 155 4
made and recorded tests.
7.2 Definitions Applicable to Inspection:
8.1.1 Tensile Strength—The lot shall be considered con-
7.2.1 lot—any amount of wire of one type and size pre-
forming if the average tensile strength of the four specimens is
sented for acceptance at one time, such amount, however, not
not less than the appropriate tensile strength of Table 1 minus
to exceed 100 000 lb (45 000 kg) (see Explanatory Note 8).
400 psi (3 MPa); however, any individual production unit, the
7.2.2 unit(s)—coil(s), reel(s), or other put-up method which
specimen from which has a tensile strength less than the
makes up the lot from a production unit of one size of wire.
appropriatetensilestrengthvalueinTable1minus1700psi(12
7.2.3 sample—a quantity of production units (coils, reels,
MPa) shall be rejected.
etc.) selected at random from the lot for the purpose of
8.1.1.1 Thelotshallbeconsideredtohavefailedtomeetthe
determining conformance of the lot to the requirements of this
tensile conformance criterion if the average of the four
specification.
specimens is less than the tensile strength in Table 1 minus 400
7.2.4 specimen—a length of wire removed for test purposes
psi (3 MPa) and the tensile strength of any of the individual
from any individual production unit of the sample.
specimens is less than the value in Table 1 minus 1700 psi (12
7.3 sample size—thenumberofproductionunitsinasample
MPa).
(see Explanatory Note 7) shall be as follows: 8.1.1.2 If the average of the four specimens is less than the
7.3.1 Fortension,elongation,andresistivitydeterminations,
tensile strength in Table 1 minus 400 psi (3 MPa) and the
the sample shall consist of four production units. From each
...


Questions, Comments and Discussion
Ask us and Technical Secretary will try to provide an answer. You can facilitate discussion about the standard in here.
Loading comments...