ASTM E1127-08(2015)
(Guide)Standard Guide for Depth Profiling in Auger Electron Spectroscopy
Standard Guide for Depth Profiling in Auger Electron Spectroscopy
SIGNIFICANCE AND USE
5.1 Auger electron spectroscopy yields information concerning the chemical and physical state of a solid surface in the near surface region. Nondestructive depth profiling is limited to this near surface region. Techniques for measuring the crater depths and film thicknesses are given in (1).5
5.2 Ion sputtering is primarily used for depths of less than the order of 1 μm.
5.3 Angle lapping or mechanical cratering is primarily used for depths greater than the order of 1 μm.
5.4 The choice of depth profiling methods for investigating an interface depends on surface roughness, interface roughness, and film thickness (2).
5.5 The depth profile interface widths can be measured using a logistic function which is described in Practice E1636.
SCOPE
1.1 This guide covers procedures used for depth profiling in Auger electron spectroscopy.
1.2 Guidelines are given for depth profiling by the following:
Section
Ion Sputtering
6
Angle Lapping and Cross-Sectioning
7
Mechanical Cratering
8
Mesh Replica Method
9
Nondestructive Depth Profiling
10
1.3 The values stated in SI units are to be regarded as standard. No other units of measurement are included in this standard.
1.4 This standard does not purport to address all of the safety problems, if any, associated with its use. It is the responsibility of the user of this standard to establish appropriate safety and health practices and determine the applicability of regulatory limitations prior to use.
General Information
- Status
- Published
- Publication Date
- 31-May-2015
- Technical Committee
- E42 - Surface Analysis
Relations
- Effective Date
- 01-Jun-2015
- Effective Date
- 01-Nov-2019
- Effective Date
- 01-Nov-2018
- Effective Date
- 01-Nov-2011
- Effective Date
- 01-May-2011
- Effective Date
- 01-Nov-2010
- Effective Date
- 01-Jan-2010
- Effective Date
- 01-May-2009
- Effective Date
- 01-May-2009
- Effective Date
- 01-Oct-2008
- Effective Date
- 01-Oct-2007
- Effective Date
- 01-Jun-2007
- Effective Date
- 01-Nov-2004
- Effective Date
- 01-Nov-2004
- Effective Date
- 01-Nov-2004
Overview
ASTM E1127-08(2015) - Standard Guide for Depth Profiling in Auger Electron Spectroscopy provides a comprehensive set of procedures and best practices for performing depth profiling using Auger Electron Spectroscopy (AES). Depth profiling is a critical technique in surface analysis, allowing researchers to obtain quantitative and qualitative information about the chemical and physical states of materials near their surfaces. This guide addresses both destructive and nondestructive profiling methods, helping laboratories and industry maintain high standards in microanalysis and materials characterization. The document is maintained by ASTM International and reflects globally recognized methodologies.
Key Topics
Depth Profiling Techniques: Guidelines are provided for several approaches, including:
- Ion Sputtering: Effective for profiling depths under approximately 1 μm, where ions remove surface layers for analysis.
- Angle Lapping and Cross-Sectioning: Used for depths greater than 1 μm, involving mechanical preparation to expose interfaces.
- Mechanical Cratering: Involves creating controlled craters for profile analysis, suitable for various material types.
- Mesh Replica Method: Converts ion-sputtering time to actual depth, especially in homogeneous materials.
- Nondestructive Profiling: Uses the variation in electron escape depth for characterizing the uppermost nanometers, preserving specimen integrity.
Factors Influencing Method Selection:
- Surface and interface roughness
- Film thickness
- Required depth resolution and measurement accuracy
Data Reporting and Calibration:
- Emphasis on the importance of using SI units
- Guidelines for reporting sputtering conditions and results in line with best practice standards
- Calibration using certified reference materials and measurement techniques
Safety and Compliance:
- Highlights the necessity of following appropriate safety and health practices
- Encourages users to be aware of regulatory limitations regarding instrumentation and specimen handling
Applications
Employing ASTM E1127-08(2015) ensures reliable and repeatable depth profiling for a variety of scientific and industrial applications:
- Microelectronics: Analysis of thin films and interfaces in semiconductor and device fabrication
- Materials Science: Characterization of coatings, oxides, and multilayer structures for quality control and research
- Surface Engineering: Investigation of wear layers, corrosion products, and compositional gradients
- Failure Analysis: Determining contamination or interfacial reactions in manufactured components
- Academic Research: Providing a structured approach for studies involving surface composition and thin film analysis
This standard is valuable for technical professionals, laboratory analysts, and researchers seeking to optimize the accuracy and reliability of depth profile measurements in AES.
Related Standards
Several other standards and guides complement ASTM E1127-08(2015) and are often referenced in conjunction with it for comprehensive surface analysis:
- ASTM E1634: Guide for performing sputter crater depth measurements
- ASTM E1636: Practice for analytically describing depth-profile and linescan-profile data
- ASTM E827: Practice for identifying elements by Auger peaks
- ASTM E996: Practice for reporting data in Auger electron spectroscopy and X-ray photoelectron spectroscopy
- ISO/TR 22335:2007: Surface chemical analysis - Depth profiling - Measurement of sputtering rate using the mesh-replica method
Utilizing these related standards alongside ASTM E1127-08(2015) helps ensure a robust, standardized approach to Auger electron spectroscopy, enhancing comparability and consistency across laboratories.
Keywords: Auger electron spectroscopy, depth profiling, ion sputtering, surface analysis, interface analysis, ASTM E1127, thin film characterization, nondestructive testing, mechanical cratering, angle lapping, surface engineering, microanalysis standards
Buy Documents
ASTM E1127-08(2015) - Standard Guide for Depth Profiling in Auger Electron Spectroscopy
Get Certified
Connect with accredited certification bodies for this standard

ECOCERT
Organic and sustainability certification.

Eurofins Food Testing Global
Global leader in food, environment, and pharmaceutical product testing.

Intertek Bangladesh
Intertek certification and testing services in Bangladesh.
Sponsored listings
Frequently Asked Questions
ASTM E1127-08(2015) is a guide published by ASTM International. Its full title is "Standard Guide for Depth Profiling in Auger Electron Spectroscopy". This standard covers: SIGNIFICANCE AND USE 5.1 Auger electron spectroscopy yields information concerning the chemical and physical state of a solid surface in the near surface region. Nondestructive depth profiling is limited to this near surface region. Techniques for measuring the crater depths and film thicknesses are given in (1).5 5.2 Ion sputtering is primarily used for depths of less than the order of 1 μm. 5.3 Angle lapping or mechanical cratering is primarily used for depths greater than the order of 1 μm. 5.4 The choice of depth profiling methods for investigating an interface depends on surface roughness, interface roughness, and film thickness (2). 5.5 The depth profile interface widths can be measured using a logistic function which is described in Practice E1636. SCOPE 1.1 This guide covers procedures used for depth profiling in Auger electron spectroscopy. 1.2 Guidelines are given for depth profiling by the following: Section Ion Sputtering 6 Angle Lapping and Cross-Sectioning 7 Mechanical Cratering 8 Mesh Replica Method 9 Nondestructive Depth Profiling 10 1.3 The values stated in SI units are to be regarded as standard. No other units of measurement are included in this standard. 1.4 This standard does not purport to address all of the safety problems, if any, associated with its use. It is the responsibility of the user of this standard to establish appropriate safety and health practices and determine the applicability of regulatory limitations prior to use.
SIGNIFICANCE AND USE 5.1 Auger electron spectroscopy yields information concerning the chemical and physical state of a solid surface in the near surface region. Nondestructive depth profiling is limited to this near surface region. Techniques for measuring the crater depths and film thicknesses are given in (1).5 5.2 Ion sputtering is primarily used for depths of less than the order of 1 μm. 5.3 Angle lapping or mechanical cratering is primarily used for depths greater than the order of 1 μm. 5.4 The choice of depth profiling methods for investigating an interface depends on surface roughness, interface roughness, and film thickness (2). 5.5 The depth profile interface widths can be measured using a logistic function which is described in Practice E1636. SCOPE 1.1 This guide covers procedures used for depth profiling in Auger electron spectroscopy. 1.2 Guidelines are given for depth profiling by the following: Section Ion Sputtering 6 Angle Lapping and Cross-Sectioning 7 Mechanical Cratering 8 Mesh Replica Method 9 Nondestructive Depth Profiling 10 1.3 The values stated in SI units are to be regarded as standard. No other units of measurement are included in this standard. 1.4 This standard does not purport to address all of the safety problems, if any, associated with its use. It is the responsibility of the user of this standard to establish appropriate safety and health practices and determine the applicability of regulatory limitations prior to use.
ASTM E1127-08(2015) is classified under the following ICS (International Classification for Standards) categories: 71.040.50 - Physicochemical methods of analysis. The ICS classification helps identify the subject area and facilitates finding related standards.
ASTM E1127-08(2015) has the following relationships with other standards: It is inter standard links to ASTM E1127-08, ASTM E1634-11(2019), ASTM E996-10(2018), ASTM E1634-11, ASTM E1577-11, ASTM E996-10, ASTM E1636-10, ASTM E1829-09, ASTM E1078-09, ASTM E827-08, ASTM E827-07, ASTM E1634-02(2007), ASTM E1577-04, ASTM E1636-04, ASTM E996-04. Understanding these relationships helps ensure you are using the most current and applicable version of the standard.
ASTM E1127-08(2015) is available in PDF format for immediate download after purchase. The document can be added to your cart and obtained through the secure checkout process. Digital delivery ensures instant access to the complete standard document.
Standards Content (Sample)
This international standard was developed in accordance with internationally recognized principles on standardization established in the Decision on Principles for the
Development of International Standards, Guides and Recommendations issued by the World Trade Organization Technical Barriers to Trade (TBT) Committee.
Designation: E1127 −08 (Reapproved 2015)
Standard Guide for
Depth Profiling in Auger Electron Spectroscopy
This standard is issued under the fixed designation E1127; the number immediately following the designation indicates the year of
original adoption or, in the case of revision, the year of last revision.Anumber in parentheses indicates the year of last reapproval.A
superscript epsilon (´) indicates an editorial change since the last revision or reapproval.
1. Scope E1577GuideforReportingofIonBeamParametersUsedin
Surface Analysis
1.1 Thisguidecoversproceduresusedfordepthprofilingin
E1634Guide for Performing Sputter Crater Depth Measure-
Auger electron spectroscopy.
ments
1.2 Guidelines are given for depth profiling by the follow-
E1636Practice for Analytically Describing Depth-Profile
ing:
and Linescan-Profile Data by an Extended Logistic Func-
Section
tion
Ion Sputtering 6
E1829Guide for Handling Specimens Prior to Surface
Angle Lapping and Cross-Sectioning 7
Analysis
Mechanical Cratering 8
Mesh Replica Method 9
2.2 ISO Standard:
Nondestructive Depth Profiling 10
ISO/TR 22335: 2007 Surface Chemical Analysis—Depth
1.3 The values stated in SI units are to be regarded as
Profiling—Measurement of Sputtering Rate: Mesh-
standard. No other units of measurement are included in this
Replica Method Using a Mechanical Stylus Profilometer
standard.
3. Terminology
1.4 This standard does not purport to address all of the
safety problems, if any, associated with its use. It is the
3.1 Definitions:
responsibility of the user of this standard to establish appro-
3.1.1 For definitions of terms used in this guide, refer to
priate safety and health practices and determine the applica-
Terminology E673.
bility of regulatory limitations prior to use.
4. Summary of Guide
2. Referenced Documents
4.1 In ion sputtering, the surface layers are removed by ion
2.1 ASTM Standards:
bombardment in conjunction with Auger analysis.
E673TerminologyRelatingtoSurfaceAnalysis(Withdrawn
4.2 In angle lapping, the surface is lapped or polished at a
2012)
small angle to improve the depth resolution as compared to a
E684Practice for Approximate Determination of Current
cross section.
Density of Large-Diameter Ion Beams for Sputter Depth
4.3 In mechanical cratering, a spherical or cylindrical crater
Profiling of Solid Surfaces (Withdrawn 2012)
is created in the surface using a rotating ball or wheel. The
E827Practice for Identifying Elements by the Peaks in
sloping sides of the crater are used to improve the depth
Auger Electron Spectroscopy
resolution as in angle lapping.
E996Practice for Reporting Data in Auger Electron Spec-
troscopy and X-ray Photoelectron Spectroscopy
4.4 Innondestructivetechniques,differentmethodsofvary-
E1078Guide for Specimen Preparation and Mounting in
ing the electron information depth are involved.
Surface Analysis
5. Significance and Use
5.1 Auger electron spectroscopy yields information con-
This guide is under the jurisdiction of ASTM Committee E42 on Surface
cerningthechemicalandphysicalstateofasolidsurfaceinthe
Analysisand is the direct responsibility of Subcommittee E42.03 on Auger Electron
Spectroscopy and X-Ray Photoelectron Spectroscopy.
near surface region. Nondestructive depth profiling is limited
Current edition approved June 1, 2015. Published June 2015. Originally
tothisnearsurfaceregion.Techniquesformeasuringthecrater
approved in 1986. Last previous edition approved in 2008 as E1127–08. DOI:
depths and film thicknesses are given in (1).
10.1520/E1127-08R15.
For referenced ASTM standards, visit the ASTM website, www.astm.org, or
contact ASTM Customer Service at service@astm.org. For Annual Book of ASTM
Standards volume information, refer to the standard’s Document Summary page on Available from International Organization for Standardization (ISO), 1, ch. de
the ASTM website. la Voie-Creuse, CP 56, CH-1211 Geneva 20, Switzerland, http://www.iso.org.
3 5
The last approved version of this historical standard is referenced on The boldface numbers in parentheses refer to a list of references at the end of
www.astm.org. this standard.
Copyright © ASTM International, 100 Barr Harbor Drive, PO Box C700, West Conshohocken, PA 19428-2959. United States
E1127 − 08 (2015)
5.2 Ion sputtering is primarily used for depths of less than determine if any of the Auger peaks have been displaced
the order of 1 µm. outside of their analysis windows (6).
5.3 Angle lapping or mechanical cratering is primarily used
6.3 Crater-edge profiling of the sputter-formed crater by
for depths greater than the order of 1 µm.
usingAuger line scans is a technique similar to the analysis of
the mechanically formed craters in Section 8 (7). Forming the
5.4 The choice of depth profiling methods for investigating
craterbysputteringmayintroducetheadditionalcomplications
an interface depends on surface roughness, interface
of ion-induced damage and asymmetric crater dimensions.
roughness, and film thickness (2).
6.4 If specimen rotation is used to reduce ion-induced
5.5 The depth profile interface widths can be measured
using a logistic function which is described in Practice E1636. roughness, then the rotational speed, rotation axis runout
relative to ion beam sputtered area or wobble and data
acquisition rate should be reported (8, 9).
6. Ion Sputtering
6.1 The specimen should be handled in accordance with
6.5 Identify the elements in the survey scans using Practice
Guides E1078 and E1829. First introduce the specimen into a
E827.
vacuum chamber equipped with anAuger analyzer and an ion
6.6 TheAuger data and the sputtering conditions should be
sputtering gun.Align the ion beam using a sputtering target or
reported as described in Practice E996.
a Faraday cup, paying careful attention to the relative spot size
of the electron beam, ion beam, and Faraday cup and their
6.7 Thereisextensiveinformationavailableintheliterature
respective orientations to ensure accurate convergence of the
on the effects of ion bombardment on solid surfaces (10-15).
two beams at the specimen surface.
6.8 Special care must be exercised whenever specimen
6.1.1 Place the specimen in front of theAuger analyzer and
temperature changes are present because effects due to surface
direct the ion gun towards the analysis area. If the ion beam is
diffusion, surface segregation or diffusion limited bulk pro-
notnormaltothespecimensurfacethenpossibleshadowingof
cesses such as point defect migration can occur and dramati-
the analysis area from the ion beam, due to surface roughness,
cally alter the specimen composition, even over depths larger
must be considered. The ion beam conditions should be
than the ion beam penetration depth which is typically a few
reported in accordance with Guide E1577.
nanometers (16, 17). The concept of preferential sputtering in
6.2 Choose the elements to be investigated from previous
multielement, single-phase specimens has altered significantly
experience or from an initial Auger electron spectrum or an
so that chemical effects such as surface segregation are
energy-dispersiveX-rayspectrumsincethelatterspectrumcan
considered to be at least as important as physical effects such
reveal additional elements present at depths greater than those
as mass differences in the evolution of the near surface
that contribute to the Auger electron spectrum (3). Select a
composition during sputter depth profiling (18-21). Since the
specifictransitionforeachelement.Duringthedepthprofiling,
probing depths in Auger electron spectroscopy are usually
record the peak-to-peak heights for Auger derivative data, or
smaller than the ion-penetration depth these effects are very
peak heights or peak areas for N(E) data. The data may be
important in any interpretation of Auger signal intensity in
gatheredduringcontinuoussputteringorbetweentimedsputter
terms of composition during ion-beam profiling. Computer
segments. Results may vary between the two techniques.
modelling of these and other ion-induced phenomena has been
6.2.1 Onesourceoftheirdifferenceisduetothepresenceof
extensively studied and has provided new insights into this
ion-induced electrons during continuous sputter depth
field (22, 23).
profiling, especially at low-electron kinetic energies, that can
6.8.1 It should be determined for each specimen if compo-
becomecomparableinintensitytotheelectronsinducedbythe
sitional changes or other sputter effects are likely to occur. It
probing incident electron beam. Unless one or the other of the
maybepossibletominimizetheseeffectsinsomeinstancesby
excitation beams is modulated and detected synchronously
adjusting the sputtering parameters.
these two types of emitted electrons are difficult to distinguish.
These ion-induced electrons usually form a featureless back- 6.9 Ion guns used in Auger analysis are normally self-
contained units capable of producing a focused beam of ions.
ground that rises steeply as their kinetic energy decreases, but
sometimes ion-induced Auger peaks might be present whose The specimen is not used as an anode for the gun. Many ion
guns are able to raster the ion beam.Arastered ion beam will
lineshapemaybedifferentfromthoseproducedbytheelectron
beam (4). As a result, care must be taken during continuous produce a more uniform ion current distribution on the
specimen surface in the region of analysis.
sputtering to ensure reliable results. Another source of differ-
ence is due to the buildup of adsorbed species during the data
6.10 If the ion gun is differentially pumped, the vacuum
acquisition time in the discontinuous sputter depth profile
pumps may be left on during sputtering, removing most of the
mode (5). If portions of the ion-eroded surface expose very
sputtered gases. If not, then the chamber must be back filled
reactive phases, thenAuger peaks due to adsorbed species, for
withgasandprovisionsforremovingthesputteredactivegases
example, oxygen or carbon, or both, will appear in the spectra
must be considered. Titanium sublimation is effective in
and mask the actual depth distribution.
removing these gases.
6.2.2 It is advisable when analyzing an unknown specimen
to periodically examine survey scans to detect any new 6.11 Noble gas ions are normally used in sputtering and the
elements that were not present in the initial survey scan and to most commonly used gas is argon. Xenon is occasionally used
E1127 − 08 (2015)
with high beam energies when rapid sputtering is needed. 7.4 The depth resolution, ∆d, is given by the following
Activegasessuchasoxygenandmetalionsareusedinspecial equation:
circumstances.
∆ d 5∆Ytanθ (2)
6.11.1 Ion energies commonly used for depth profiling
where ∆Y includes the electron beam diameter and uncer-
usingnoblegasesareintherangefrom1to5keVwherelower
tainties in position that may be due to errors in specimen or
ion energies are usually preferred for improved depth resolu-
electron beam positioning.
tion. Higher ion energies usually can be obtained with higher
ion currents and less preferential sputtering.
7.5 Augeranalysiscanincludelinescansandpointanalysis
6.11.2 Ion beam current density can be measured by a
along the lapped surface. Perform the analysis by either
Faraday cup or by following Practice E684.
moving the specimen using micrometer adjustments or by
6.11.3 Thesputterrateisneededtocalibratethedepthscale
electronically moving the electron beam.
(24, 25, Guide E1634) when depth profiling using ion sputter-
7.6 Ion sputtering (Section 6) is often used in conjunction
ing. Several reference standards are available for this purpose.
with angle lapping to remove contaminants and to investigate
One reference material consists of 30 and 100-nm thick
6 interfaces beneath the lapped surfaces.
tantalum pentoxide films (26). Another reference material is
an alternating nickel and chromium thin film structure; each
7.7 Consideration should be given if specimen mounting
layer is nominally 50-nm thick.
methods, for example, plastic embedding media, are used
which may employ high vapor pressure materials. Out-gassing
7. Angle Lapping and Cross-Sectioning
of the media as well as trapped gases between the media and
7.1 In cross-sectioning, polish the specimen perpendicular the specimen may require complete removal of the mounting
materials prior to analysis.
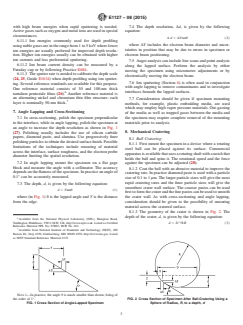
to the interface, while in angle lapping, polish the specimen at
an angle to increase the depth resolution as shown in Fig. 1
(27). Polishing usually includes the use of silicon carbide 8. Mechanical Cratering
papers, diamond paste, and alumina. Use progressively finer
8.1 Ball Cratering:
polishingparticlestoobtainthedesiredsurfacefinish.Possible
8.1.1 First mount the specimen in a device where a rotating
limitations of the techniques include smearing of material
steel ball can be placed against its surface. Commercial
across the interface, surface roughness, and the
...


Questions, Comments and Discussion
Ask us and Technical Secretary will try to provide an answer. You can facilitate discussion about the standard in here.
Loading comments...