ASTM G49-85(2023)e1
(Practice)Standard Practice for Preparation and Use of Direct Tension Stress-Corrosion Test Specimens
Standard Practice for Preparation and Use of Direct Tension Stress-Corrosion Test Specimens
SIGNIFICANCE AND USE
4.1 Axially loaded tension specimens provide one of the most versatile methods of performing a stress-corrosion test because of the flexibility permitted in the choice of type and size of test specimen, stressing procedures, and range of stress levels.
4.2 The uniaxial stress system is simple; hence, this test method is often used for studies of stress-corrosion mechanisms. This type of test is amenable to the simultaneous exposure of unstressed specimens (no applied load) with stressed specimens and subsequent tension testing to distinguish between the effects of true stress corrosion and mechanical overload (2). Additional considerations in regard to the significance of the test results and their interpretation are given in Sections 6 and 10.
4.3 Wide variations in test results may be obtained for a given material and specimen orientation with different specimen sizes and stressing procedures. This consideration is significant especially in the standardization of a test procedure for interlaboratory comparisons or quality control.
SCOPE
1.1 This practice covers procedures for designing, preparing, and using ASTM standard tension test specimens for investigating susceptibility to stress-corrosion cracking. Axially loaded specimens may be stressed quantitatively with equipment for application of either a constant load, constant strain, or with a continuously increasing strain.
1.2 Tension test specimens are adaptable for testing a wide variety of product forms as well as parts joined by welding, riveting, or various other methods.
1.3 The exposure of specimens in a corrosive environment is treated only briefly because other standards are being prepared to deal with this aspect. Meanwhile, the investigator is referred to Practices G35, G36, G37, and G44, and to ASTM Special Technical Publication 425 (1).2
1.4 The values stated in SI units are to be regarded as standard. The values given in parentheses after SI units are provided for information only and are not considered standard.
1.5 This standard does not purport to address all of the safety concerns, if any, associated with its use. It is the responsibility of the user of this standard to establish appropriate safety, health, and environmental practices and determine the applicability of regulatory limitations prior to use.
1.6 This international standard was developed in accordance with internationally recognized principles on standardization established in the Decision on Principles for the Development of International Standards, Guides and Recommendations issued by the World Trade Organization Technical Barriers to Trade (TBT) Committee.
General Information
- Status
- Published
- Publication Date
- 31-Oct-2023
- Technical Committee
- G01 - Corrosion of Metals
- Drafting Committee
- G01.06 - Environmentally Assisted Cracking
Relations
- Effective Date
- 01-Nov-2023
- Effective Date
- 01-Jan-2024
- Effective Date
- 01-May-2022
- Effective Date
- 01-Nov-2023
- Effective Date
- 01-Nov-2023
- Effective Date
- 01-Nov-2023
- Effective Date
- 01-Nov-2023
- Effective Date
- 01-Nov-2023
- Effective Date
- 01-Nov-2023
- Effective Date
- 01-Nov-2023
- Effective Date
- 01-Nov-2023
- Effective Date
- 01-Nov-2023
- Referred By
ASTM G30-22 - Standard Practice for Making and Using U-Bend Stress-Corrosion Test Specimens - Effective Date
- 01-Nov-2023
- Effective Date
- 01-Nov-2023
Overview
ASTM G49-85(2023)e1 – Standard Practice for Preparation and Use of Direct Tension Stress-Corrosion Test Specimens is an internationally recognized standard issued by ASTM International. This document establishes procedures for designing, preparing, and utilizing standard tension test specimens for evaluating susceptibility to stress-corrosion cracking in metallic materials. Using axially loaded specimens, this standard offers a flexible and straightforward approach to stress-corrosion testing across a range of materials and product forms.
Testing for stress-corrosion cracking is essential in industries where material failure due to combined mechanical stress and corrosive environments can lead to significant safety, performance, and financial impacts. This practice describes methods that support both research studies and quality control, ensuring consistency and reliability in the evaluation of material behavior under stress and exposure to corrosive environments.
Key Topics
Specimen Design and Preparation
ASTM G49 outlines requirements for tension test specimens, including recommendations for sizing, machining tolerances, and surface preparation. The standard covers the choice of specimen dimensions, emphasizing the effects of cross-sectional size and the importance of standardization for reliable interlaboratory comparisons. Specimens can be machined to standard geometries or contain notches for specialized evaluations.Stressing Methods
The practice provides guidance on applying uniaxial stresses using constant load, constant strain, or continuously increasing strain methods. Stressing frames and experimental setups are discussed to reduce errors due to bending, torsion, or non-axial loading. The document explores the impacts of loading types on test outcomes and the resulting evaluation of stress-corrosion resistance.Exposure to Corrosive Environments
While environmental exposure procedures are briefly discussed, ASTM G49 refers users to other standards (e.g., ASTM G35, G36, G37, G44) for detailed methodologies. Key considerations include immediate exposure after stressing, avoidance of galvanic corrosion, and the use of protective coatings as necessary.Evaluation and Interpretation
The standard addresses inspection and reporting, recommending visual inspection, and, where needed, chemical and metallographic analysis to verify the presence of stress-corrosion cracking. It discusses the differences between true stress-corrosion fractures and failures due to mechanical overload or general corrosion.
Applications
ASTM G49 is widely used in:
- Material Qualification and Selection
Verifying the resistance of metals and alloys to stress-corrosion cracking under simulated service conditions. - Quality Control in Manufacturing
Ensuring that production materials meet necessary standards for durability and safety in corrosive environments. - Failure Analysis
Investigating the causes of material failure in existing installations by replicating service conditions in controlled laboratory tests. - Research and Mechanism Studies
Studying the mechanisms of stress-corrosion cracking to enhance material design, coatings, or treatments for improved corrosion resistance. - Testing of Joined Parts
Evaluating welded, riveted, or mechanically fastened components to assess the impact of joining processes on stress-corrosion susceptibility.
The flexible design and adaptable stressing procedures in ASTM G49 allow it to be applied to a broad range of metals and product forms, making it essential for laboratories, manufacturers, and engineers concerned with corrosion-resistant materials.
Related Standards
For comprehensive stress-corrosion evaluation, the following related ASTM standards provide additional methodologies and context:
- ASTM E8/E8M – Test Methods for Tension Testing of Metallic Materials
- ASTM G35 – Practice for Susceptibility of Stainless Steels to Stress-Corrosion Cracking in Polythionic Acids
- ASTM G36 – Practice for Evaluating Resistance of Metals in Boiling Magnesium Chloride Solution
- ASTM G37 – Practice for Evaluating Stress-Corrosion in Copper-Zinc Alloys Using Mattsson’s Solution
- ASTM G44 – Practice for Exposure of Metals and Alloys by Alternate Immersion in Sodium Chloride Solution
Adhering to ASTM G49 and its related standards ensures rigorous, reproducible assessment of stress-corrosion behavior, supporting reliability and safety in a wide range of engineering applications.
Buy Documents
ASTM G49-85(2023)e1 - Standard Practice for Preparation and Use of Direct Tension Stress-Corrosion Test Specimens
Get Certified
Connect with accredited certification bodies for this standard

Element Materials Technology
Materials testing and product certification.

Inštitut za kovinske materiale in tehnologije
Institute of Metals and Technology. Materials testing, metallurgical analysis, NDT.
Sponsored listings
Frequently Asked Questions
ASTM G49-85(2023)e1 is a standard published by ASTM International. Its full title is "Standard Practice for Preparation and Use of Direct Tension Stress-Corrosion Test Specimens". This standard covers: SIGNIFICANCE AND USE 4.1 Axially loaded tension specimens provide one of the most versatile methods of performing a stress-corrosion test because of the flexibility permitted in the choice of type and size of test specimen, stressing procedures, and range of stress levels. 4.2 The uniaxial stress system is simple; hence, this test method is often used for studies of stress-corrosion mechanisms. This type of test is amenable to the simultaneous exposure of unstressed specimens (no applied load) with stressed specimens and subsequent tension testing to distinguish between the effects of true stress corrosion and mechanical overload (2). Additional considerations in regard to the significance of the test results and their interpretation are given in Sections 6 and 10. 4.3 Wide variations in test results may be obtained for a given material and specimen orientation with different specimen sizes and stressing procedures. This consideration is significant especially in the standardization of a test procedure for interlaboratory comparisons or quality control. SCOPE 1.1 This practice covers procedures for designing, preparing, and using ASTM standard tension test specimens for investigating susceptibility to stress-corrosion cracking. Axially loaded specimens may be stressed quantitatively with equipment for application of either a constant load, constant strain, or with a continuously increasing strain. 1.2 Tension test specimens are adaptable for testing a wide variety of product forms as well as parts joined by welding, riveting, or various other methods. 1.3 The exposure of specimens in a corrosive environment is treated only briefly because other standards are being prepared to deal with this aspect. Meanwhile, the investigator is referred to Practices G35, G36, G37, and G44, and to ASTM Special Technical Publication 425 (1).2 1.4 The values stated in SI units are to be regarded as standard. The values given in parentheses after SI units are provided for information only and are not considered standard. 1.5 This standard does not purport to address all of the safety concerns, if any, associated with its use. It is the responsibility of the user of this standard to establish appropriate safety, health, and environmental practices and determine the applicability of regulatory limitations prior to use. 1.6 This international standard was developed in accordance with internationally recognized principles on standardization established in the Decision on Principles for the Development of International Standards, Guides and Recommendations issued by the World Trade Organization Technical Barriers to Trade (TBT) Committee.
SIGNIFICANCE AND USE 4.1 Axially loaded tension specimens provide one of the most versatile methods of performing a stress-corrosion test because of the flexibility permitted in the choice of type and size of test specimen, stressing procedures, and range of stress levels. 4.2 The uniaxial stress system is simple; hence, this test method is often used for studies of stress-corrosion mechanisms. This type of test is amenable to the simultaneous exposure of unstressed specimens (no applied load) with stressed specimens and subsequent tension testing to distinguish between the effects of true stress corrosion and mechanical overload (2). Additional considerations in regard to the significance of the test results and their interpretation are given in Sections 6 and 10. 4.3 Wide variations in test results may be obtained for a given material and specimen orientation with different specimen sizes and stressing procedures. This consideration is significant especially in the standardization of a test procedure for interlaboratory comparisons or quality control. SCOPE 1.1 This practice covers procedures for designing, preparing, and using ASTM standard tension test specimens for investigating susceptibility to stress-corrosion cracking. Axially loaded specimens may be stressed quantitatively with equipment for application of either a constant load, constant strain, or with a continuously increasing strain. 1.2 Tension test specimens are adaptable for testing a wide variety of product forms as well as parts joined by welding, riveting, or various other methods. 1.3 The exposure of specimens in a corrosive environment is treated only briefly because other standards are being prepared to deal with this aspect. Meanwhile, the investigator is referred to Practices G35, G36, G37, and G44, and to ASTM Special Technical Publication 425 (1).2 1.4 The values stated in SI units are to be regarded as standard. The values given in parentheses after SI units are provided for information only and are not considered standard. 1.5 This standard does not purport to address all of the safety concerns, if any, associated with its use. It is the responsibility of the user of this standard to establish appropriate safety, health, and environmental practices and determine the applicability of regulatory limitations prior to use. 1.6 This international standard was developed in accordance with internationally recognized principles on standardization established in the Decision on Principles for the Development of International Standards, Guides and Recommendations issued by the World Trade Organization Technical Barriers to Trade (TBT) Committee.
ASTM G49-85(2023)e1 is classified under the following ICS (International Classification for Standards) categories: 77.060 - Corrosion of metals. The ICS classification helps identify the subject area and facilitates finding related standards.
ASTM G49-85(2023)e1 has the following relationships with other standards: It is inter standard links to ASTM G49-85(2019), ASTM E8/E8M-24, ASTM E8/E8M-22, ASTM G58-85(2015), ASTM G139-05(2022), ASTM G168-17, ASTM G41-90(2018), ASTM G111-21a, ASTM G47-22, ASTM G103-97(2023)e1, ASTM G107-95(2020)e1, ASTM G129-21, ASTM G30-22, ASTM G123-00(2022)e1. Understanding these relationships helps ensure you are using the most current and applicable version of the standard.
ASTM G49-85(2023)e1 is available in PDF format for immediate download after purchase. The document can be added to your cart and obtained through the secure checkout process. Digital delivery ensures instant access to the complete standard document.
Standards Content (Sample)
This international standard was developed in accordance with internationally recognized principles on standardization established in the Decision on Principles for the
Development of International Standards, Guides and Recommendations issued by the World Trade Organization Technical Barriers to Trade (TBT) Committee.
´1
Designation: G49 − 85 (Reapproved 2023)
Standard Practice for
Preparation and Use of Direct Tension Stress-Corrosion
Test Specimens
This standard is issued under the fixed designation G49; the number immediately following the designation indicates the year of original
adoption or, in the case of revision, the year of last revision. A number in parentheses indicates the year of last reapproval. A superscript
epsilon (´) indicates an editorial change since the last revision or reapproval.
ε NOTE—Editorially updated units in November 2023.
1. Scope 2. Referenced Documents
2.1 ASTM Standards:
1.1 This practice covers procedures for designing,
E8/E8M Test Methods for Tension Testing of Metallic Ma-
preparing, and using ASTM standard tension test specimens for
terials
investigating susceptibility to stress-corrosion cracking. Axi-
G35 Practice for Determining the Susceptibility of Stainless
ally loaded specimens may be stressed quantitatively with
Steels and Related Nickel-Chromium-Iron Alloys to
equipment for application of either a constant load, constant
Stress-Corrosion Cracking in Polythionic Acids
strain, or with a continuously increasing strain.
G36 Practice for Evaluating Stress-Corrosion-Cracking Re-
1.2 Tension test specimens are adaptable for testing a wide
sistance of Metals and Alloys in a Boiling Magnesium
variety of product forms as well as parts joined by welding,
Chloride Solution
riveting, or various other methods.
G37 Practice for Use of Mattsson’s Solution of pH 7.2 to
Evaluate the Stress-Corrosion Cracking Susceptibility of
1.3 The exposure of specimens in a corrosive environment
Copper-Zinc Alloys
is treated only briefly because other standards are being
G44 Practice for Exposure of Metals and Alloys by Alternate
prepared to deal with this aspect. Meanwhile, the investigator
Immersion in Neutral 3.5 % Sodium Chloride Solution
is referred to Practices G35, G36, G37, and G44, and to ASTM
Special Technical Publication 425 (1).
3. Summary of Practice
1.4 The values stated in SI units are to be regarded as
3.1 This practice covers the use of axially loaded, quantita-
standard. The values given in parentheses after SI units are
tively stressed ASTM standard tension test specimens for
provided for information only and are not considered standard. investigating the resistance to stress-corrosion cracking of
metallic materials in all types of product forms. Consideration
1.5 This standard does not purport to address all of the
is given to important factors in the selection of appropriate
safety concerns, if any, associated with its use. It is the
specimens, the design of loading equipment, and the effects of
responsibility of the user of this standard to establish appro-
these factors on the state of stress in the specimen as corrosion
priate safety, health, and environmental practices and deter-
occurs.
mine the applicability of regulatory limitations prior to use.
1.6 This international standard was developed in accor-
4. Significance and Use
dance with internationally recognized principles on standard-
4.1 Axially loaded tension specimens provide one of the
ization established in the Decision on Principles for the
most versatile methods of performing a stress-corrosion test
Development of International Standards, Guides and Recom-
because of the flexibility permitted in the choice of type and
mendations issued by the World Trade Organization Technical
size of test specimen, stressing procedures, and range of stress
Barriers to Trade (TBT) Committee.
levels.
4.2 The uniaxial stress system is simple; hence, this test
method is often used for studies of stress-corrosion mecha-
This practice is under the jurisdiction of ASTM Committee G01 on Corrosion
nisms. This type of test is amenable to the simultaneous
of Metals and is the direct responsibility of Subcommittee G01.06 on Environmen-
tally Assisted Cracking.
Current edition approved Nov. 1, 2023. Published November 2023. Originally
approved in 1976. Last previous edition approved in 2019 as G49 – 85 (2019). DOI: For referenced ASTM standards, visit the ASTM website, www.astm.org, or
10.1520/G0049-85R23E01. contact ASTM Customer Service at service@astm.org. For Annual Book of ASTM
The boldface numbers in parentheses refer to a list of references at the end of Standards volume information, refer to the standard’s Document Summary page on
this standard. the ASTM website.
Copyright © ASTM International, 100 Barr Harbor Drive, PO Box C700, West Conshohocken, PA 19428-2959. United States
´1
G49 − 85 (2023)
exposure of unstressed specimens (no applied load) with 6. Stress Considerations
stressed specimens and subsequent tension testing to distin-
6.1 There are several factors that may introduce bending
guish between the effects of true stress corrosion and mechani-
moments on specimens, such as a longitudinal curvature,
cal overload (2). Additional considerations in regard to the
misalignment of threads on threaded-end round specimens, and
significance of the test results and their interpretation are given
the corners of sheet-type specimens. The significance of these
in Sections 6 and 10.
factors is greater for specimens with smaller cross sections.
Even though eccentricity in loading can be minimized to equal
4.3 Wide variations in test results may be obtained for a
the same standards accepted for tension testing machines,
given material and specimen orientation with different speci-
inevitably, there is some variation in the tensile stress around
men sizes and stressing procedures. This consideration is
the circumference of the test specimen which can be of such
significant especially in the standardization of a test procedure
magnitude that it will introduce considerable error in the
for interlaboratory comparisons or quality control.
desired stress. Tests should be made on specimens with strain
gauges affixed to the specimen surface (around the circumfer-
5. Test Specimens
ence in 90° or 120° intervals) to verify strain and stress
uniformity and determine if machining practices and stressing
5.1 Whenever possible, tension test specimens used in
jigs are of adequate tolerance and quality.
evaluating susceptibility to stress-corrosion cracking should
conform to the dimensions of standard tension test specimens
6.2 Another consideration is the possible increase in net
specified in Test Methods E8/E8M, which contain details for
section stress that will occur when corrosion develops during
specimens machined from various product forms.
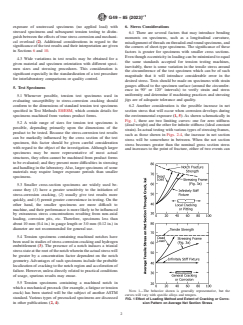
the environmental exposure (1, 5). As shown schematically in
Fig. 1, there are two limiting curves: one for zero stiffness
5.2 A wide range of sizes for tension test specimens is
(dead weight) and the other for infinite stiffness (ideal constant
possible, depending primarily upon the dimensions of the
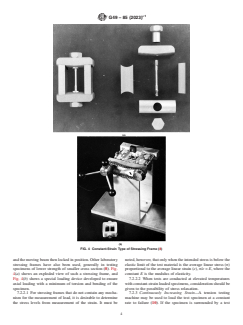
strain). In actual testing with various types of stressing frames,
product to be tested. Because the stress-corrosion test results
such as those shown in Figs. 2-4, the increase in net section
can be markedly influenced by the cross section of the test
stress will be somewhere in between. When the net section
specimen, this factor should be given careful consideration
stress becomes greater than the nominal gross section stress
with regard to the object of the investigation. Although larger
and increases to the point of fracture, either of two events can
specimens may be more representative of most actual
structures, they often cannot be machined from product forms
to be evaluated; and they present more difficulties in stressing
and handling in the laboratory. Also, larger specimens of some
materials may require longer exposure periods than smaller
specimens.
5.3 Smaller cross-section specimens are widely used be-
cause they (1) have a greater sensitivity to the initiation of
stress-corrosion cracking, (2) usually give test results more
quickly, and (3) permit greater convenience in testing. On the
other hand, the smaller specimens are more difficult to
machine, and their performance is more likely to be influenced
by extraneous stress concentrations resulting from non-axial
loading, corrosion pits, etc. Therefore, specimens less than
about 10 mm (0.4 in.) in gauge length or 3.0 mm (0.12 in.) in
diameter are not recommended for general use.
5.4 Tension specimens containing machined notches have
been used in studies of stress-corrosion cracking and hydrogen
embrittlement (3). The presence of a notch induces a triaxial
stress state at the root of the notch wherein the actual stress will
be greater by a concentration factor dependent on the notch
geometry. Advantages of such specimens include the probable
localization of cracking to the notch region and acceleration of
failure. However, unless directly related to practical conditions
of usage, spurious results may ensue.
5.5 Tension specimens containing a machined notch in
which a mechanical precrack (for example, a fatigue or tension
NOTE 1—The behavior shown is generally representative, but the
crack) has been started will be the subject of another ASTM
curves will vary with specific alloys and tempers.
standard. Various types of precracked specimens are discussed
FIG. 1 Effect of Loading Method and Extent of Cracking or Corro-
in other publications (2, 4). sion Pattern on Average Net Section Stress
´1
G49 − 85 (2023)
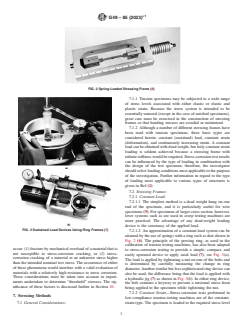
FIG. 2 Spring-Loaded Stressing Frame (6)
7.1.1 Tension specimens may be subjected to a wide range
of stress levels associated with either elastic or elastic and
plastic strain. Because the stress system is intended to be
essentially uniaxial (except in the case of notched specimens),
great care must be exercised in the construction of stressing
frames so that bending stresses are avoided or minimized.
7.1.2 Although a number of different stressing frames have
been used with tension specimens, three basic types are
considered herein: constant (sustained) load, constant strain
(deformation), and continuously increasing strain. A constant
load can be obtained with dead weight, but truly constant strain
loading is seldom achieved because a stressing frame with
infinite stiffness would be required. Stress-corrosion test results
can be influenced by the type of loading in combination with
the design of the test specimen; therefore, the investigator
should select loading conditions most applicable to the purpose
of the investigation. Further information in regard to the type
of loading most applicable to various types of structures is
given in Ref (2).
7.2 Stressing Frames:
7.2.1 Constant Load:
7.2.1.1 The simplest method is a dead weight hung on one
end of the specimen, and it is particularly useful for wire
specimens (9). For specimens of larger cross section, however,
lever systems such as are used in creep testing machines are
more practical. The advantage of any dead-weight loading
device is the constancy of the applied load.
FIG. 3 Sustained Load Devices Using Ring Frames (7)
7.2.1.2 An approximation of a constant-load system can be
attained by the use of springs with a ring such as that shown in
Fig. 2 (6). The principle of the proving ring, as used in the
calibration of tension testing machines, has also been adapted
occur: (1) fra
...


Questions, Comments and Discussion
Ask us and Technical Secretary will try to provide an answer. You can facilitate discussion about the standard in here.
Loading comments...