ASTM F1455-92(2022)
(Guide)Standard Guide for Selection of Structural Details for Ship Construction
Standard Guide for Selection of Structural Details for Ship Construction
ABSTRACT
This guide provides a recommended list of selected ship structure details for use in ship construction. Structural details which have failed in service and are not recommended for use in ship construction are included as well. This guide is intended to convey the lessons learned on different configurations of ship structure details, not the dimensions, thickness, or construction methods which would result from structural calculations. Details are shown for the ten families of structural details, which are: beam brackets, clearance cut-outs, gunwale connections, miscellaneous cut-outs, non-tight collars, panel stiffeners, stanchion ends, stiffener ends, tight collars, and tripping brackets. Evaluation of details is based on in-service experience as described in "Design Guide for Structural Details". Data for over 400 details is summarized and rated by observed relative successful performance. Each of the ten families of details includes configurations with no signs of failures. The details without failures within each family group are shown in descending order of numbers observed. Those details with failures are shown in ascending order of failures (percentages are indicated for each). Thus the first detail shown in each family group has the best observed service performance and is most highly recommended while the last has the highest failure rate and therefore least desirable. The details provide guidance in the selection of structural detail configurations in future design and repair of such details.
SCOPE
1.1 This guide provides a recommended list of selected ship structure details for use in ship construction.
1.2 Structural details which have failed in service and are not recommended for use in ship construction are included as well.
1.3 This guide is intended to convey the lessons learned on different configurations of ship structure details, not the dimensions, thickness, or construction methods which would result from structural calculations.4
1.4 This international standard was developed in accordance with internationally recognized principles on standardization established in the Decision on Principles for the Development of International Standards, Guides and Recommendations issued by the World Trade Organization Technical Barriers to Trade (TBT) Committee.
General Information
- Status
- Published
- Publication Date
- 30-Jun-2022
- Technical Committee
- F25 - Ships and Marine Technology
- Drafting Committee
- F25.01 - Structures
Overview
ASTM F1455-92(2022) – Standard Guide for Selection of Structural Details for Ship Construction provides comprehensive guidance on the selection of structural detail configurations for shipbuilding. Developed by ASTM International, this standard synthesizes lessons learned from extensive in-service performance data from over 400 detail types. It catalogs both recommended structural details-those that have performed well in service-and configurations with known performance issues, offering valuable insights to ship designers, builders, and maintenance teams. The focus is on the configuration and suitability of specific structural details, rather than prescriptive dimensions or thicknesses.
Key Topics
- Recommended Structural Details: Organized into ten families, including beam brackets, clearance cut-outs, gunwale connections, miscellaneous cut-outs, non-tight and tight collars, panel stiffeners, stanchion ends, stiffener ends, and tripping brackets.
- Service Performance Ratings: Details are evaluated and ranked based on in-service observations, with failure rates clearly indicated. This enables users to select configurations with proven reliability.
- Causes of Failure: Analysis is provided on common failure categories-design, fabrication, welding, maintenance, and operation. Practical guidance addresses how to minimize each type.
- Lessons Learned: The guide emphasizes known pitfalls in structural design-such as improper bracket or stiffener ends, poorly designed cut-outs, substandard welding techniques, and neglect of maintenance-all of which contribute to structural failures.
- Selection Process: Details best practice considerations to inform the future design and repair of ship structures.
Applications
This ASTM guide is an essential reference in various phases of the ship construction lifecycle:
- Ship Design: Assists naval architects and structural engineers in selecting detail configurations with a history of successful performance, optimizing for safety and longevity.
- Construction and Fabrication: Shipyards and constructors use the guide to adopt details that reduce risk of failure and control construction costs.
- Maintenance and Repair: Provides insights into detail vulnerabilities, helping maintenance teams prioritize inspections and retrofit less successful designs.
- Risk Reduction: By referencing service data and failure rates, ship operators and insurers can better assess structural risk and ensure compliance with industry best practices.
Related Standards
The following standards and guidance documents offer additional context or cover complementary aspects within ship construction:
- ASTM F25 series (various) – Covering ships and marine technology, including structural and fabrication aspects.
- Welding and Structural Detailing Standards – For further reading on construction, welding practice, and inspection requirements (referenced by classification societies and national navies).
- Ship Structure Committee Reports – Cited within this standard for in-depth background on in-service performance of structural details.
Key terms: ship construction, structural details, fabrication details, in-service performance, failure rates, beam brackets, stiffeners, cut-outs, ship design, marine structure standards.
Adhering to ASTM F1455-92(2022) helps ensure the structural integrity of ship hulls and supports cost-effective, reliable shipbuilding practices aligned with international standards. For more information, visit the ASTM website or consult related technical literature.
Buy Documents
ASTM F1455-92(2022) - Standard Guide for Selection of Structural Details for Ship Construction
Get Certified
Connect with accredited certification bodies for this standard

DNV
DNV is an independent assurance and risk management provider.

Lloyd's Register
Lloyd's Register is a global professional services organisation specialising in engineering and technology.

ABS Quality Evaluations Inc.
American Bureau of Shipping quality certification.
Sponsored listings
Frequently Asked Questions
ASTM F1455-92(2022) is a guide published by ASTM International. Its full title is "Standard Guide for Selection of Structural Details for Ship Construction". This standard covers: ABSTRACT This guide provides a recommended list of selected ship structure details for use in ship construction. Structural details which have failed in service and are not recommended for use in ship construction are included as well. This guide is intended to convey the lessons learned on different configurations of ship structure details, not the dimensions, thickness, or construction methods which would result from structural calculations. Details are shown for the ten families of structural details, which are: beam brackets, clearance cut-outs, gunwale connections, miscellaneous cut-outs, non-tight collars, panel stiffeners, stanchion ends, stiffener ends, tight collars, and tripping brackets. Evaluation of details is based on in-service experience as described in "Design Guide for Structural Details". Data for over 400 details is summarized and rated by observed relative successful performance. Each of the ten families of details includes configurations with no signs of failures. The details without failures within each family group are shown in descending order of numbers observed. Those details with failures are shown in ascending order of failures (percentages are indicated for each). Thus the first detail shown in each family group has the best observed service performance and is most highly recommended while the last has the highest failure rate and therefore least desirable. The details provide guidance in the selection of structural detail configurations in future design and repair of such details. SCOPE 1.1 This guide provides a recommended list of selected ship structure details for use in ship construction. 1.2 Structural details which have failed in service and are not recommended for use in ship construction are included as well. 1.3 This guide is intended to convey the lessons learned on different configurations of ship structure details, not the dimensions, thickness, or construction methods which would result from structural calculations.4 1.4 This international standard was developed in accordance with internationally recognized principles on standardization established in the Decision on Principles for the Development of International Standards, Guides and Recommendations issued by the World Trade Organization Technical Barriers to Trade (TBT) Committee.
ABSTRACT This guide provides a recommended list of selected ship structure details for use in ship construction. Structural details which have failed in service and are not recommended for use in ship construction are included as well. This guide is intended to convey the lessons learned on different configurations of ship structure details, not the dimensions, thickness, or construction methods which would result from structural calculations. Details are shown for the ten families of structural details, which are: beam brackets, clearance cut-outs, gunwale connections, miscellaneous cut-outs, non-tight collars, panel stiffeners, stanchion ends, stiffener ends, tight collars, and tripping brackets. Evaluation of details is based on in-service experience as described in "Design Guide for Structural Details". Data for over 400 details is summarized and rated by observed relative successful performance. Each of the ten families of details includes configurations with no signs of failures. The details without failures within each family group are shown in descending order of numbers observed. Those details with failures are shown in ascending order of failures (percentages are indicated for each). Thus the first detail shown in each family group has the best observed service performance and is most highly recommended while the last has the highest failure rate and therefore least desirable. The details provide guidance in the selection of structural detail configurations in future design and repair of such details. SCOPE 1.1 This guide provides a recommended list of selected ship structure details for use in ship construction. 1.2 Structural details which have failed in service and are not recommended for use in ship construction are included as well. 1.3 This guide is intended to convey the lessons learned on different configurations of ship structure details, not the dimensions, thickness, or construction methods which would result from structural calculations.4 1.4 This international standard was developed in accordance with internationally recognized principles on standardization established in the Decision on Principles for the Development of International Standards, Guides and Recommendations issued by the World Trade Organization Technical Barriers to Trade (TBT) Committee.
ASTM F1455-92(2022) is classified under the following ICS (International Classification for Standards) categories: 47.020.10 - Hulls and their structure elements. The ICS classification helps identify the subject area and facilitates finding related standards.
ASTM F1455-92(2022) is available in PDF format for immediate download after purchase. The document can be added to your cart and obtained through the secure checkout process. Digital delivery ensures instant access to the complete standard document.
Standards Content (Sample)
This international standard was developed in accordance with internationally recognized principles on standardization established in the Decision on Principles for the
Development of International Standards, Guides and Recommendations issued by the World Trade Organization Technical Barriers to Trade (TBT) Committee.
Designation: F1455 − 92 (Reapproved 2022) An American National Standard
Standard Guide for
Selection of Structural Details for Ship Construction
This standard is issued under the fixed designation F1455; the number immediately following the designation indicates the year of
original adoption or, in the case of revision, the year of last revision. A number in parentheses indicates the year of last reapproval. A
superscript epsilon (´) indicates an editorial change since the last revision or reapproval.
INTRODUCTION
The principal aim of this guide is to depict recommended practices related to the design of ship
structural details. The importance of structural details is clear:
(1) Their layout and fabrication represent a sizable fraction of hull construction costs.
(2) Details are often the source of cracks and other failures which, under certain circumstances,
could lead to serious damage to the ship hull girder.
(3) The trend toward decreasing ship hull scantlings (that is, increasing average hull stresses) has
the potential of increasing the damage to details.
(4) Researchers have largely neglected the analysis of structural details at least in part because the
configuration and purpose of these details vary greatly and are not commonly described or discussed
in the literature.
Due to lack of analytical and experimental effort devoted to structural details, their determination
has been left up to draftsmen and designers, with very little engineering input.
2,3
In two comprehensive reviews of the performance of structural details, 86 ships were surveyed.
These included naval and commercial ship types. The commercial ships included both U.S. and
foreign built. The vessels ranged from 428 to 847 feet in length, from 18 000 to 90 000 tons in
displacement, and from five to twenty-six years in age. The details obtained were grouped into 12
typicalfamilies.KnifeEdgeCrossings(FamilyNo.6)andStructuralDeckCutoutDetails(FamilyNo.
9) are shown but not covered in detail in this guide. The remaining ten detail families were further
categorized into 53 groups comprising a total of 611 detail configurations. A number of these
configurations are very similar to others in detail geometry and such duplicates have been excluded
from this guide.Anumber of others were eliminated because of relatively infrequent observed use.As
a result, a total of 414 details are included herein. However, all 611 details can be found in “Structural
Details,” if desired.
In total, 607 584 details were observed with a total of 6856 failures. Failures were attributed to one
or a combination of five categories: design, fabrication, welding, maintenance, and operation (see 4.1
through 4.1.5). This extensive, well documented research, together with engineering judgement,
provides the principal support for this guide.
1. Scope
1 1.1 This guide provides a recommended list of selected ship
This guide is under the jurisdiction of ASTM Committee F25 on Ships and
Marine Technology and is the direct responsibility of Subcommittee F25.01 on structure details for use in ship construction.
Structures.
Current edition approved July 1, 2022. Published July 2022. Originally approved 1.2 Structural details which have failed in service and are
in 1992. Last previous edition approved in 2017 as F1455 – 92 (2017). DOI:
not recommended for use in ship construction are included as
10.1520/F1455-92R22.
2 well.
Jordan, C. R., and Cochran, C. S., “In-service Performance of Structural
Details,” SSC-272, Ship Structure Committee Report, March 1977, available
1.3 This guide is intended to convey the lessons learned on
through the National Technical Information Service, Springfield, VA 22161.
Jordan, C. R., and Knight, L. T., “Further Survey of In-service Performance of different configurations of ship structure details, not the
Structural Details,” SSC-294, Ship Structure Committee Report, May 1979, avail-
dimensions, thickness, or construction methods which would
able through the National Technical Information Service, Springfield, VA 22161.
4 result from structural calculations.
Jordan, C. R., and Krumpen, P., Jr., “Structural Details,” American Welding
Society Welding Journal, Vol 63, No. 1, January 1984.
Copyright © ASTM International, 100 Barr Harbor Drive, PO Box C700, West Conshohocken, PA 19428-2959. United States
F1455 − 92 (2022)
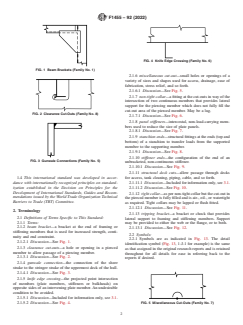
FIG. 4 Knife Edge Crossing (Family No. 6)
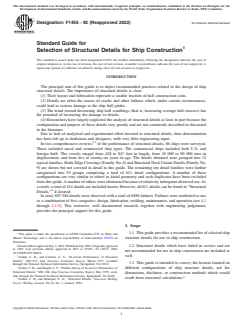
FIG. 1 Beam Brackets (Family No. 1)
2.1.6 miscellaneous cut-out—small holes or openings of a
variety of sizes and shapes used for access, drainage, ease of
fabrication, stress relief, and so forth.
2.1.6.1 Discussion—See Fig. 5.
2.1.7 non-tight collar—a fitting at the cut-outs in way of the
intersection of two continuous members that provides lateral
support for the piercing member which does not fully fill the
cut-out area of the pierced member. May be a lug.
FIG. 2 Clearance Cut-Outs (Family No. 8)
2.1.7.1 Discussion—See Fig. 6.
2.1.8 panel stiffeners—intercostal, non-load-carrying mem-
bers used to reduce the size of plate panels.
2.1.8.1 Discussion—See Fig. 7.
2.1.9 stanchion ends—structural fittings at the ends (top and
bottom) of a stanchion to transfer loads from the supported
member to the supporting member.
2.1.9.1 Discussion—See Fig. 8.
2.1.10 stiffener ends—the configuration of the end of an
FIG. 3 Gunwale Connections (Family No. 5)
unbracketed, non-continuous stiffener.
2.1.10.1 Discussion—See Fig. 9.
2.1.11 structural deck cuts—allow passage through decks
for access, tank cleaning, piping, cable, and so forth.
1.4 This international standard was developed in accor-
2.1.11.1 Discussion—Includedforinformationonly,see3.1.
dance with internationally recognized principles on standard-
2.1.11.2 Discussion—See Fig. 10.
ization established in the Decision on Principles for the
Development of International Standards, Guides and Recom-
2.1.12 tight collar—as per non-tight collar but the cut-out in
mendations issued by the World Trade Organization Technical
the pierced member is fully filled and is air-, oil-, or watertight
Barriers to Trade (TBT) Committee.
as required. Tight collars may be lapped or flush fitted.
2.1.12.1 Discussion—See Fig. 11.
2. Terminology
2.1.13 tripping bracket—a bracket or chock that provides
2.1 Definitions of Terms Specific to This Standard:
lateral support to framing and stiffening members. Support
2.1.1 Terms:
may be provided to either the web or the flange, or to both.
2.1.2 beam bracket—a bracket at the end of framing or
2.1.13.1 Discussion—See Fig. 12.
stiffening members that is used for increased strength, conti-
2.2 Symbols:
nuity and end constraint.
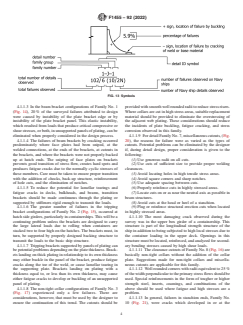
2.2.1 Symbols are as indicated in Fig. 13. The detail
2.1.2.1 Discussion—See Fig. 1.
identification symbol (Fig. 13, 1-J-1 for example) is the same
2.1.3 clearance cut-outs—a hole or opening in a pierced
as that assigned in the original research reports and is retained
member to allow passage of a piercing member.
throughout for all details for ease in referring back to the
2.1.3.1 Discussion—See Fig. 2.
reports if desired.
2.1.4 gunwale connection—the connection of the sheer
strake to the stringer strake of the uppermost deck of the hull.
2.1.4.1 Discussion—See Fig. 3.
2.1.5 knife edge crossing—the projected point intersection
of members (plate members, stiffeners or bulkheads) on
opposite sides of an intervening plate member.An undesirable
condition to be avoided.
2.1.5.1 Discussion—Included for information only, see 3.1.
2.1.5.2 Discussion—See Fig. 4. FIG. 5 Miscellaneous Cut-Outs (Family No. 7)
F1455 − 92 (2022)
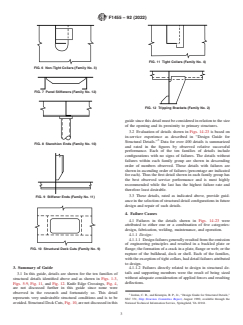
FIG. 11 Tight Collars (Family No. 4)
FIG. 6 Non-Tight Collars (Family No. 3)
FIG. 7 Panel Stiffeners (Family No. 12)
FIG. 12 Tripping Brackets (Family No. 2)
guide since this detail must be considered in relation to the size
of the opening and its proximity to primary structures.
3.2 Evaluation of details shown in Figs. 14-23 is based on
in-service experience as described in “Design Guide for
Structural Details.” Data for over 400 details is summarized
FIG. 8 Stanchion Ends (Family No. 10)
and rated in the figures by observed relative successful
performance. Each of the ten families of details include
configurations with no signs of failures. The details without
failures within each family group are shown in descending
order of numbers observed. Those details with failures are
shown in ascending order of failures (percentage are indicated
for each). Thus the first detail shown in each family group has
the best observed service performance and is most highly
recommended while the last has the highest failure rate and
therefore least desirable.
3.3 These details, rated as indicated above, provide guid-
FIG. 9 Stiffener Ends (Family No. 11)
anceintheselectionofstructuraldetailconfigurationsinfuture
design and repair of such details.
4. Failure Causes
4.1 Failures in the details shown in Figs. 14-23 were
attributed to either one or a combination of five categories:
design, fabrication, welding, maintenance, and operation.
4.1.1 Design:
4.1.1.1 Design failures generally resulted from the omission
of engineering principles and resulted in a buckled plate or
FIG. 10 Structural Deck Cuts (Family No. 9) flange; the formation of a crack in a plate, flange or web; or the
rupture of the bulkhead, deck or shell. Each of the families,
with the exception of tight collars, had detail failures attributed
to design.
3. Summary of Guide
4.1.1.2 Failures directly related to design in structural de-
tails and supporting members were the result of being sized
3.1 In this guide, details are shown for the ten families of
without adequate consideration of applied forces and resulting
structural details identified above and as shown in Figs. 1-3,
deflections.
Figs. 5-9, Fig. 11, and Fig. 12. Knife Edge Crossings, Fig. 4,
are not discussed further in this guide since none were
observed in the research and fortunately so. This detail
Jordan, C. R., and Krumpin, R. P., Jr., “Design Guide for Structural Details,”
represents very undesirable structural conditions and is to be
SSC 331, Ship Structure Committee Report, August 1990, available through the
avoided.StructuralDeckCuts,Fig.10,arenotdiscussedinthis National Technical Information Service, Springfield, VA 22161.
F1455 − 92 (2022)
FIG. 13 Symbols
4.1.1.3 In the beam bracket configurations of Family No. 1 providedwithsmoothwellroundedradiitoreducestressrisers.
(Fig. 14), 20 % of the surveyed failures attributed to design Where collars are cut in high stress areas, suitable replacement
were caused by instability of the plate bracket edge or by material should be provided to eliminate the overstressing of
instability of the plate bracket panel. This elastic instability, the adjacent web plating. These considerations should reduce
which resulted from loads that produce critical compressive or the incidents of plate buckling, fatigue cracking, and stress
shear stresses, or both, in unsupported panels of plating, can be corrosion observed in this family.
4.1.1.9 FordetailFamilyNo.7,miscellaneouscutouts,(
eliminated when properly considered in the design process. Fig.
4.1.1.4 The failures of beam brackets by cracking occurred 20), the reasons for failure were as varied as the types of
predominately where face plates had been sniped, at the cutouts. Potential problems can be eliminated by the designer
welded connections, at the ends of the brackets, at cutouts in if, during detail design, proper consideration is given to the
the brackets, and where the brackets were not properly backed following:
up at hatch ends. The sniping of face plates on brackets (1) Use generous radii on all cuts.
prevents good transition of stress flow, creates hard spots and (2) Use cuts of sufficient size to provide proper welding
produces fatigue cracks due to the normally cyclic stresses of clearances.
these members. Care must be taken to ensure proper transition (3) Avoid locating holes in high tensile stress areas.
with the addition of chocks, back-up structure, reinforcement (4) Avoid square corners and sharp notches.
of hole cuts, and the elimination of notches. (5) Use adequate spacing between cuts.
4.1.1.5 To reduce the potential for lamellar tearings and (6) Properly reinforce cuts in highly stressed areas.
fatigue cracks in decks, bulkheads, and beams, transition (7) Locate cuts on or as near the neutral axis as possible in
brackets should be made continuous through the plating or beam structures.
supported by stiffeners rigid enough to transmit the loads. (8) Avoid cuts at the head or heel of a stanchion.
4.1.1.6 The greater number of failures in the tripping (9) Plug or reinforce structural erection cuts when located
bracket configurations of Family No. 2 (Fig. 15), occurred at in highly stressed areas.
hatch side girders, particularly in containerships. This will be a 4.1.1.10 The most damaging crack observed during the
continuing problem unless the brackets are designed to carry survey was in the upper box girder of a containership. This
the large lateral loads due to rolling when containers are structure is part of the longitudinal strength structure of the
stacked two to four high on the hatches. The brackets must, in ship in addition to being subjected to high local stresses due to
turn, be supported by properly designed backing structure to the container loading in the upper deck. Openings in this
transmit the loads to the basic ship structure. structure must be located, reinforced, and analyzed for second-
4.1.1.7 Tripping brackets supported by panels of plating can ary bending stresses caused by high shear loads.
be potential problems depending on the plate thickness. Brack- 4.1.1.11 The clearance cutouts of Family No. 8 (Fig. 16) are
ets landing on thick plating in relationship to its own thickness basically non-tight collars without the addition of the collar
may either buckle in the panel of the brack
...


Questions, Comments and Discussion
Ask us and Technical Secretary will try to provide an answer. You can facilitate discussion about the standard in here.
Loading comments...