ASTM D4780-23
(Test Method)Standard Test Method for Determination of Low Surface Area of Catalysts and Catalyst Carriers by Multipoint Krypton Adsorption
Standard Test Method for Determination of Low Surface Area of Catalysts and Catalyst Carriers by Multipoint Krypton Adsorption
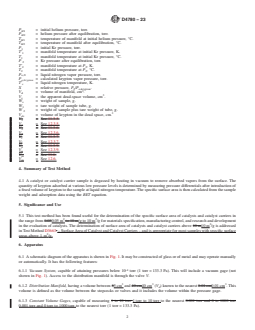
SIGNIFICANCE AND USE
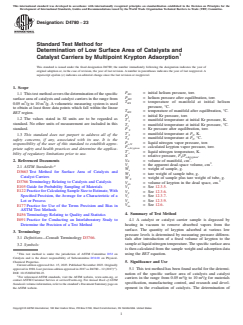
5.1 This test method has been found useful for the determination of the specific surface area of catalysts and catalyst carriers in the range from 0.05 m2/g to 10 m2/g for materials specification, manufacturing control, and research and development in the evaluation of catalysts. The determination of surface area of catalysts and catalyst carriers above 10 m2/g is addressed in Test Method D3663 – Surface Area of Catalyst and Catalyst Carriers – and is appropriate for most samples with specific surface areas above 1 m2/g.
SCOPE
1.1 This test method covers the determination of the specific surface area of catalysts and catalyst carriers in the range from 0.05 m2/g to 10 m2/g. A volumetric measuring system is used to obtain at least three data points which fall within the linear BET region.
1.2 The values stated in SI units are to be regarded as standard. No other units of measurement are included in this standard.
1.3 This standard does not purport to address all of the safety concerns, if any, associated with its use. It is the responsibility of the user of this standard to establish appropriate safety and health practices and determine the applicability of regulatory limitations prior to use.
General Information
- Status
- Published
- Publication Date
- 14-Oct-2023
- Technical Committee
- D32 - Catalysts
- Drafting Committee
- D32.01 - Physical-Chemical Properties
Relations
- Effective Date
- 15-Oct-2023
- Effective Date
- 01-Feb-2024
- Effective Date
- 01-Jan-2024
- Effective Date
- 01-Apr-2022
- Effective Date
- 01-Apr-2022
- Effective Date
- 01-Nov-2018
Overview
ASTM D4780-23 is the internationally recognized standard test method for the determination of low specific surface area in catalysts and catalyst carriers by multipoint krypton adsorption. Developed by ASTM International, this standard is essential in the quality control, material specification, and research and development of gas-solid catalysts and catalyst support materials. ASTM D4780-23 covers the surface area measurement for materials with specific surface area in the range of 0.05 m²/g to 10 m²/g, using a volumetric measuring system to generate data within the linear BET (Brunauer, Emmett, and Teller) region.
Keywords: ASTM D4780-23, catalyst surface area, krypton adsorption, specific surface area, catalyst carriers, BET method, material characterization, laboratory testing.
Key Topics
- Scope of Application: Focuses on catalysts and catalyst carriers with low specific surface area, specifically in the range where traditional nitrogen adsorption methods are not sensitive enough.
- Multipoint Krypton Adsorption: Utilizes krypton gas at liquid nitrogen temperature to measure adsorption isotherms, enabling high accuracy in the low-surface-area range.
- BET Surface Area Analysis: Applies the linear BET method with at least three adsorption points to calculate the specific surface area from collected data.
- Apparatus Requirements: Specifies essential laboratory equipment, including a vacuum system, distribution manifold, constant volume gauges, high-purity krypton and helium gases, liquid nitrogen Dewar flasks, and sensitive balances.
- Sample Preparation: Outlines strict procedures for sampling, degassing, and pretreatment to ensure accuracy and reproducibility.
- Calculation and Reporting: Details on data analysis (BET plots, calculation of vapor pressures, and monolayer capacity) and clear reporting requirements, including surface area, pretreatment conditions, and assumed krypton cross-sectional area.
- Precision and Quality Control: Includes guidelines for repeatability, reproducibility, and bias elimination through inter-laboratory studies.
Applications
The ASTM D4780-23 standard is widely applied in:
- Materials Specification: Verifying that catalyst and carrier materials meet required surface area specifications for industrial applications.
- Manufacturing Control: Monitoring consistent production quality of catalysts where surface area critically impacts reactivity, selectivity, or stability.
- Quality Assurance: Enforcing compliance in quality control laboratories by providing a repeatable and precise surface area measurement method.
- Research and Development: Supporting the development of new catalysts, catalyst carriers, and adsorbent materials by enabling accurate characterization of core material properties, even at low surface areas.
- Process Optimization: Guiding optimization of process parameters by correlating catalyst performance with specific surface areas.
This method is particularly valuable for materials where the surface area is too low for reliable measurement by nitrogen adsorption methods (typically less than 10 m²/g), such as some reforming catalysts, ceramic carriers, and specialty adsorbents.
Related Standards
For broader or alternate measurement needs, refer to these related ASTM standards:
- ASTM D3663 - Standard Test Method for Surface Area of Catalysts and Catalyst Carriers (suitable for specific surface areas above 1 m²/g, typically used for the majority of catalyst samples).
- ASTM D3766 - Terminology Relating to Catalysts and Catalysis.
- ASTM E105 - Guide for Probability Sampling of Materials.
- ASTM E122 - Practice for Calculating Sample Size to Estimate, With Specified Precision, the Average for a Characteristic of a Lot or Process.
- ASTM E177 - Practice for Use of the Terms Precision and Bias in ASTM Test Methods.
- ASTM E456 - Terminology Relating to Quality and Statistics.
- ASTM E691 - Practice for Conducting an Interlaboratory Study to Determine the Precision of a Test Method.
Conclusion
ASTM D4780-23 remains a vital standard for laboratories and industries that demand reliable measurement of low surface areas in catalysts and their carriers. Through precise krypton adsorption techniques and rigorous protocol, this standard supports robust material analysis, contributing to improved catalyst performance and material quality in chemical process industries.
Buy Documents
ASTM D4780-23 - Standard Test Method for Determination of Low Surface Area of Catalysts and Catalyst Carriers by Multipoint Krypton Adsorption
REDLINE ASTM D4780-23 - Standard Test Method for Determination of Low Surface Area of Catalysts and Catalyst Carriers by Multipoint Krypton Adsorption
Get Certified
Connect with accredited certification bodies for this standard

ECOCERT
Organic and sustainability certification.

Eurofins Food Testing Global
Global leader in food, environment, and pharmaceutical product testing.

Intertek Bangladesh
Intertek certification and testing services in Bangladesh.
Sponsored listings
Frequently Asked Questions
ASTM D4780-23 is a standard published by ASTM International. Its full title is "Standard Test Method for Determination of Low Surface Area of Catalysts and Catalyst Carriers by Multipoint Krypton Adsorption". This standard covers: SIGNIFICANCE AND USE 5.1 This test method has been found useful for the determination of the specific surface area of catalysts and catalyst carriers in the range from 0.05 m2/g to 10 m2/g for materials specification, manufacturing control, and research and development in the evaluation of catalysts. The determination of surface area of catalysts and catalyst carriers above 10 m2/g is addressed in Test Method D3663 – Surface Area of Catalyst and Catalyst Carriers – and is appropriate for most samples with specific surface areas above 1 m2/g. SCOPE 1.1 This test method covers the determination of the specific surface area of catalysts and catalyst carriers in the range from 0.05 m2/g to 10 m2/g. A volumetric measuring system is used to obtain at least three data points which fall within the linear BET region. 1.2 The values stated in SI units are to be regarded as standard. No other units of measurement are included in this standard. 1.3 This standard does not purport to address all of the safety concerns, if any, associated with its use. It is the responsibility of the user of this standard to establish appropriate safety and health practices and determine the applicability of regulatory limitations prior to use.
SIGNIFICANCE AND USE 5.1 This test method has been found useful for the determination of the specific surface area of catalysts and catalyst carriers in the range from 0.05 m2/g to 10 m2/g for materials specification, manufacturing control, and research and development in the evaluation of catalysts. The determination of surface area of catalysts and catalyst carriers above 10 m2/g is addressed in Test Method D3663 – Surface Area of Catalyst and Catalyst Carriers – and is appropriate for most samples with specific surface areas above 1 m2/g. SCOPE 1.1 This test method covers the determination of the specific surface area of catalysts and catalyst carriers in the range from 0.05 m2/g to 10 m2/g. A volumetric measuring system is used to obtain at least three data points which fall within the linear BET region. 1.2 The values stated in SI units are to be regarded as standard. No other units of measurement are included in this standard. 1.3 This standard does not purport to address all of the safety concerns, if any, associated with its use. It is the responsibility of the user of this standard to establish appropriate safety and health practices and determine the applicability of regulatory limitations prior to use.
ASTM D4780-23 is classified under the following ICS (International Classification for Standards) categories: 71.040.30 - Chemical reagents. The ICS classification helps identify the subject area and facilitates finding related standards.
ASTM D4780-23 has the following relationships with other standards: It is inter standard links to ASTM D4780-12(2017)e1, ASTM D3766-24a, ASTM D3766-24, ASTM E456-13a(2022)e1, ASTM E456-13a(2022), ASTM D3766-08(2018). Understanding these relationships helps ensure you are using the most current and applicable version of the standard.
ASTM D4780-23 is available in PDF format for immediate download after purchase. The document can be added to your cart and obtained through the secure checkout process. Digital delivery ensures instant access to the complete standard document.
Standards Content (Sample)
This international standard was developed in accordance with internationally recognized principles on standardization established in the Decision on Principles for the
Development of International Standards, Guides and Recommendations issued by the World Trade Organization Technical Barriers to Trade (TBT) Committee.
Designation: D4780 − 23
Standard Test Method for
Determination of Low Surface Area of Catalysts and
Catalyst Carriers by Multipoint Krypton Adsorption
This standard is issued under the fixed designation D4780; the number immediately following the designation indicates the year of
original adoption or, in the case of revision, the year of last revision. A number in parentheses indicates the year of last reapproval. A
superscript epsilon (´) indicates an editorial change since the last revision or reapproval.
1. Scope
P = initial helium pressure, torr.
1.1 This test method covers the determination of the specific
H1
P = helium pressure after equilibration, torr.
H2
surface area of catalysts and catalyst carriers in the range from
2 2
T = temperature of manifold at initial helium
H1
0.05 m /g to 10 m /g. A volumetric measuring system is used
pressure, °C.
to obtain at least three data points which fall within the linear
T = temperature of manifold after equilibration, °C.
H2
BET region.
P = initial Kr pressure, torr.
1.2 The values stated in SI units are to be regarded as
T' = manifold temperature at initial Kr pressure, K.
standard. No other units of measurement are included in this
T = manifold temperature at initial Kr pressure, °C.
standard.
P = Kr pressure after equilibration, torr.
T' = manifold temperature at P , K.
1.3 This standard does not purport to address all of the 2 2
T = manifold temperature at P , °C.
2 2
safety concerns, if any, associated with its use. It is the
P = liquid nitrogen vapor pressure, torr.
o,N
responsibility of the user of this standard to establish appro-
P = calculated krypton vapor pressure, torr.
o,krypton
priate safety and health practices and determine the applica-
T' = liquid nitrogen temperature, K.
s
bility of regulatory limitations prior to use.
X = relative pressure, P /P .
2 o,krypton
V = volume of manifold, cm .
2. Referenced Documents d
V = the apparent dead-space volume, cm .
s
2.1 ASTM Standards:
W = weight of sample, g.
s
D3663 Test Method for Surface Area of Catalysts and
W = tare weight of sample tube, g.
Catalyst Carriers
W = weight of sample plus tare weight of tube, g.
D3766 Terminology Relating to Catalysts and Catalysis
V = volume of krypton in the dead space, cm.
ds
E105 Guide for Probability Sampling of Materials
V = See 12.3.5.
E122 Practice for Calculating Sample Size to Estimate, With
V = See 12.3.6.
Specified Precision, the Average for a Characteristic of a V = See 12.3.7.
t
Lot or Process V = See 12.3.9.
a
V = See 12.6.
E177 Practice for Use of the Terms Precision and Bias in
m
ASTM Test Methods
4. Summary of Test Method
E456 Terminology Relating to Quality and Statistics
E691 Practice for Conducting an Interlaboratory Study to
4.1 A catalyst or catalyst carrier sample is degassed by
Determine the Precision of a Test Method
heating in vacuum to remove absorbed vapors from the
surface. The quantity of krypton adsorbed at various low
3. Terminology
pressure levels is determined by measuring pressure differen-
3.1 Definitions—Consult Terminology D3766.
tials after introduction of a fixed volume of krypton to the
sample at liquid nitrogen temperature. The specific surface area
3.2 Symbols:
is then calculated from the sample weight and adsorption data
using the BET equation.
This test method is under the jurisdiction of ASTM Committee D32 on
Catalysts and is the direct responsibility of Subcommittee D32.01 on Physical-
Chemical Properties.
5. Significance and Use
Current edition approved Oct. 15, 2023. Published November 2023. Originally
ɛ1
5.1 This test method has been found useful for the determi-
approved in 1988. Last previous edition approved in 2017 as D4780 – 12 (2017) ).
DOI: 10.1520/D4780-23.
nation of the specific surface area of catalysts and catalyst
For referenced ASTM standards, visit the ASTM website, www.astm.org, or 2 2
carriers in the range from 0.05 m /g to 10 m /g for materials
contact ASTM Customer Service at service@astm.org. For Annual Book of ASTM
specification, manufacturing control, and research and devel-
Standards volume information, refer to the standard’s Document Summary page on
the ASTM website. opment in the evaluation of catalysts. The determination of
Copyright © ASTM International, 100 Barr Harbor Drive, PO Box C700, West Conshohocken, PA 19428-2959. United States
D4780 − 23
2 −7
surface area of catalysts and catalyst carriers above 10 m /g is 6.1.10 Laboratory Balance with 0.1 mg (10 kg) sensitiv-
addressed in Test Method D3663 – Surface Area of Catalyst ity.
and Catalyst Carriers – and is appropriate for most samples 6.1.11 Thermometer for measuring the temperature of the
with specific surface areas above 1 m /g. liquid nitrogen bath (T' (i)) in kelvins. This will preferably be
s
a nitrogen vapor-pressure-thermometer that gives P (i) di-
o,N
6. Apparatus
rectly and has greater precision, or a resistance thermometer
from which P (i) values may be derived.
6.1 A schematic diagram of the apparatus is shown in Fig. 1.
o,N
It may be constructed of glass or of metal and may operate
7. Reagents
manually or automatically. It has the following features:
6.1.1 Vacuum System, capable of attaining pressures below
7.1 Purity of Reagents—Reagent grade chemicals shall be
-4
10 torr (1 torr = 133.3 Pa). This will include a vacuum gage
used in all tests. Unless otherwise indicated, it is intended that
(not shown in Fig. 1). Access to the distribution manifold is
all reagents shall conform to the specifications of the Commit-
through the valve V.
tee on Analytical Reagents of the American Chemical Society,
6.1.2 Distribution Manifold, having a volume between
where such specifications are available. Other grades may be
3 3 3
5 cm and 40 cm (V ) known to the nearest 0.01 cm . This
d
used, provided it is first ascertained that the reagent is of
volume is defined as the volume between the stopcocks or
sufficiently high purity to permit its use without lessening the
valves and it includes the volume within the pressure gage.
accuracy of the determination.
6.1.3 Constant Volume Gages, capable of measuring 1 torr
7.2 Helium Gas, at least 99.9 % pure.
to 10 torr to the nearest 0.001 torr and 0 torr to 1000 torr to the
nearest torr (1 torr = 133.3 Pa). 7.3 Krypton Gas, at least 99.9 % pure.
6.1.4 Valve (H), from the helium supply to the distribution
7.4 Liquid Nitrogen, of such purity that the saturation vapor
manifold.
pressure P is not more than 20 torr above barometric
o,N
6.1.5 Valve (K), from the krypton supply to the distribution
pressure. A fresh daily supply is recommended.
manifold.
6.1.6 Sample Tube(s), with volume between 5 cm and
8. Sampling
25 cm , depending on the application. The sample tube(s) may
8.1 A test sample shall be obtained from larger composites
be connected to the distribution manifold with standard taper
by riffling or splitting in accordance with subsection 5.12 of
joints, glass-to-glass seals, or compression fittings provided
STP 447A , with the aim of obtaining a representative sample
they are rated for vacuum service.
that represents shape and size distribution of the larger com-
NOTE 1—Modern commercial instruments may employ sample tubes
posite. Guide E105 can provide guidance on constructing a
with volumes outside of this range, and may be capable of testing multiple
sampling plan with the representative sample can be deter-
samples simultaneously rather than separately as stated in 10.1.
mined by Practice E122.
6.1.7 Dewar Flask(s) for immersion of the sample tube(s) in
liquid nitrogen. The nitrogen level should be fixed at a constant
9. Procedure—Sample Preparation and Degassing
height by means of an automatic level controller or manually
9.1 Select a sample tube of the desired size. A 5 cm tube is
refilled to a predetermined mark on the sample tube(s) about
preferred for small samples to minimize dead space. However,
30 mm to 50 mm below the distribution manifold connectors.
larger tubes may be required for larger samples or for finely
6.1.8 Thermometer for measuring the temperature of the
powdered samples, to avoid elutriation of the powder when
distribution manifold (T (i) or T (i)) in degrees Celsius.
1 2
degassing is started.
(Alternatively, the distribution manifold may be thermostatted
a few degrees above ambient to obviate the necessity of 9.2 Evacuate the sample tube and then fill to atmospheric
recording this temperature.) pressure with helium. This may be done on the surface area
6.1.9 Heating Mantle(s) or Small Furnace(s) for each unit, or on a separate piece of equipment.
sample tube to allow outgassing samples at elevated tempera-
9.3 Remove the sample tube, cap, and weigh. Record the
tures.
weight as W .
9.4 Place the sample, whose weight is known
approximately, into the sample tube. If possible, choose the
sample size to provide an estimated total surface area of 1 m
to 5 m .
Reagent Chemicals, American Chemical Society Specifications, American
Chemical Society, Washington, DC. For Suggestions on the testing of reagents not
listed by the American Chemical Society, see Annual Standards for Laboratory
Chemicals, BDH Ltd., Poole, Dorset, U.K., and the United States Pharmacopeia
and National Formulary, U.S. Pharmacopeial Convention, Inc. (USPC), Rockville,
MD.
Manual on Test Sieving Methods, ASTM STP 447A, ASTM International,
FIG. 1 Schematic Diagram of Surface Area Apparatus 2005.
D4780 − 23
9.5 Attach the sample tube to the apparatus. If other samples 10.5 Admit the helium gas into the system to a pressure of
are to be run, attach them at this time to the other ports. 600 torr to 900 torr by carefully opening the H valve. Record
this pressure, P , and the manifold temperature, T .
H1 H1
9.6 Open the S valves where there are samples.
10.6 Open the S valve to admit helium to the sample.
9.7 Slowly open the V valve, monitoring the rate of pressure
decrease to avoid too high a rate, which might lead to excessive
10.7 After about 5 min of equilibration, readjust the liquid
fluidization of powdered samples. nitrogen level (if needed), and record the pressure, P and
H2
9.7.1 If a diffusion pump is used, it may be necessary to manifold temperature, T .
H2
close the V valve system periodically to protect the diffusion
10.8 Repeat 10.5 – 10.7 for each sample cell attached to the
pump fluid from exposure to pressures above 0.1 torr for
manifold.
periods of more than 30 s. Close the valve off for 2 min each
10.9 Open all S valves, then slowly open the V valve to
time.
remove the helium gas.
9.8 Install a heating mantle or furnace around each sample
−3
10.10 Close the S valve when a pressure below 10 torr has
and raise the temperature to about 300 °C (573 K).
been attained. This should normally take 5 min to 10 min.
(Warning—Take special precautions if the moisture content
exceeds approximately 5 % to avoid “bumping” of powdered
11. Procedure—Krypton Adsorption
catalyst, and to avoid surface area loss by self-steaming. It is
recommended that the heating rate not exceed 100 K ⁄h under
...
This document is not an ASTM standard and is intended only to provide the user of an ASTM standard an indication of what changes have been made to the previous version. Because
it may not be technically possible to adequately depict all changes accurately, ASTM recommends that users consult prior editions as appropriate. In all cases only the current version
of the standard as published by ASTM is to be considered the official document.
´1
Designation: D4780 − 12 (Reapproved 2017) D4780 − 23
Standard Test Method for
Determination of Low Surface Area of Catalysts and
Catalyst Carriers by Multipoint Krypton Adsorption
This standard is issued under the fixed designation D4780; the number immediately following the designation indicates the year of
original adoption or, in the case of revision, the year of last revision. A number in parentheses indicates the year of last reapproval. A
superscript epsilon (´) indicates an editorial change since the last revision or reapproval.
ε NOTE—Subsesction 8.1 was corrected editorially in February 2017.
1. Scope
1.1 This test method covers the determination of the specific surface area of catalysts and catalyst carriers in the range from
2 2
0.050.05 m to 10 m/g to 10 m /g. A volumetric measuring system is used to obtain at least three data points which fall within the
linear BET region.
1.2 The values stated in SI units are to be regarded as standard. No other units of measurement are included in this standard.
1.3 This standard does not purport to address all of the safety concerns, if any, associated with its use. It is the responsibility
of the user of this standard to establish appropriate safety and health practices and determine the applicability of regulatory
limitations prior to use.
2. Referenced Documents
2.1 ASTM Standards:
D3663 Test Method for Surface Area of Catalysts and Catalyst Carriers
D3766 Terminology Relating to Catalysts and Catalysis
E105 Guide for Probability Sampling of Materials
E122 Practice for Calculating Sample Size to Estimate, With Specified Precision, the Average for a Characteristic of a Lot or
Process
E177 Practice for Use of the Terms Precision and Bias in ASTM Test Methods
E456 Terminology Relating to Quality and Statistics
E691 Practice for Conducting an Interlaboratory Study to Determine the Precision of a Test Method
3. Terminology
3.1 Definitions—Consult Terminology D3766.
3.2 Symbols:
This test method is under the jurisdiction of ASTM Committee D32 on Catalysts and is the direct responsibility of Subcommittee D32.01 on Physical-Chemical
Properties.
Current edition approved Feb. 1, 2017Oct. 15, 2023. Published February 2017November 2023. Originally approved in 1988. Last previous edition approved in 20122017
ɛ1
as D4780D4780 – 12 (2017) –12). DOI: 10.1520/D4780-12R17.). DOI: 10.1520/D4780-23.
For referenced ASTM standards, visit the ASTM website, www.astm.org, or contact ASTM Customer Service at service@astm.org. For Annual Book of ASTM Standards
volume information, refer to the standard’s Document Summary page on the ASTM website.
Copyright © ASTM International, 100 Barr Harbor Drive, PO Box C700, West Conshohocken, PA 19428-2959. United States
D4780 − 23
P = initial helium pressure, torr.
H1
P = helium pressure after equilibration, torr.
H2
T = temperature of manifold at initial helium pressure, °C.
H1
T = temperature of manifold after equilibration, °C.
H2
P = initial Kr pressure, torr.
T' = manifold temperature at initial Kr pressure, K.
T = manifold temperature at initial Kr pressure, °C.
P = Kr pressure after equilibration, torr.
T' = manifold temperature at P , K.
2 2
T = manifold temperature at P , °C.
2 2
P = liquid nitrogen vapor pressure, torr.
o,N
P = calculated krypton vapor pressure, torr.
o,krypton
T' = liquid nitrogen temperature, K.
s
X = relative pressure, P /P .
2 o,krypton
V = volume of manifold, cm .
d
V = the apparent dead-space volume, cm .
s
W = weight of sample, g.
s
W = tare weight of sample tube, g.
W = weight of sample plus tare weight of tube, g.
V = volume of krypton in the dead space, cm.
ds
V = See 11.3.5.
V = See 12.3.5.
V = See 11.3.6.
V = See 12.3.6.
V = See 11.3.7.
t
V = See 12.3.7.
t
V = See 11.3.9.
a
V = See 12.3.9.
a
V = See 11.6.
m
V = See 12.6.
m
4. Summary of Test Method
4.1 A catalyst or catalyst carrier sample is degassed by heating in vacuum to remove absorbed vapors from the surface. The
quantity of krypton adsorbed at various low pressure levels is determined by measuring pressure differentials after introduction of
a fixed volume of krypton to the sample at liquid nitrogen temperature. The specific surface area is then calculated from the sample
weight and adsorption data using the BET equation.
5. Significance and Use
5.1 This test method has been found useful for the determination of the specific surface area of catalysts and catalyst carriers in
2 2
the range from 0.050.05 m to 10 m/g to 10 m /g for materials specification, manufacturing control, and research and development
in the evaluation of catalysts. The determination of surface area of catalysts and catalyst carriers above 10 m10 m /g is addressed
in Test Method D3663. – Surface Area of Catalyst and Catalyst Carriers – and is appropriate for most samples with specific surface
areas above 1 m /g.
6. Apparatus
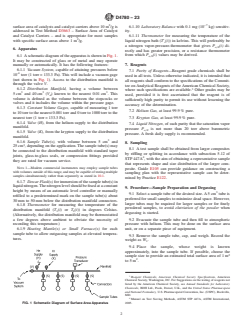
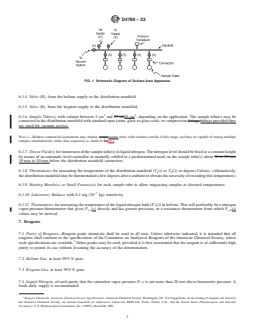
6.1 A schematic diagram of the apparatus is shown in Fig. 1. It may be constructed of glass or of metal and may operate manually
or automatically. It has the following features:
-4
6.1.1 Vacuum System, capable of attaining pressures below 10 torr (1 torr = 133.3 Pa). This will include a vacuum gage (not
shown in Fig. 1). Access to the distribution manifold is through the valve V.
3 3 3
6.1.2 Distribution Manifold, having a volume between 55 cm and 40 cm40 cm (V ) known to the nearest 0.01 cm0.01 cm . This
d
volume is defined as the volume between the stopcocks or valves and it includes the volume within the pressure gage.
6.1.3 Constant Volume Gages, capable of measuring 1 to 10 torr 1 torr to 10 torr to the nearest 0.001 torr and 0 to 1000 torr
0.001 torr and 0 torr to 1000 torr to the nearest torr (1 torr = 133.3 Pa).
D4780 − 23
FIG. 1 Schematic Diagram of Surface Area Apparatus
6.1.4 Valve (H), from the helium supply to the distribution manifold.
6.1.5 Valve (K), from the krypton supply to the distribution manifold.
3 3
6.1.6 Sample Tube(s), with volume between 5 cm and 25 cm25 cm , depending on the application. The sample tube(s) may be
connected to the distribution manifold with standard taper joints, glass-to-glass seals, or compression fittings.fittings provided they
are rated for vacuum service.
NOTE 1—Modern commercial instruments may employ simplesample tubes with volumes outside of this range, and may be capable of testing multiple
samples simultaneously rather than separately as stated in 9.110.1.
6.1.7 Dewar Flask(s) for immersion of the sample tube(s) in liquid nitrogen. The nitrogen level should be fixed at a constant height
by means of an automatic level controller or manually refilled to a predetermined mark on the sample tube(s) about 30 to 50 mm
30 mm to 50 mm below the distribution manifold connectors.
6.1.8 Thermometer for measuring the temperature of the distribution manifold (T (i) or T (i)) in degrees Celsius. (Alternatively,
1 2
the distribution manifold may be thermostatted a few degrees above ambient to obviate the necessity of recording this temperature.)
6.1.9 Heating Mantle(s) or Small Furnace(s) for each sample tube to allow outgassing samples at elevated temperatures.
−7
6.1.10 Laboratory Balance with 0.1 mg (10 kg) sensitivity.
6.1.11 Thermometer for measuring the temperature of the liquid nitrogen bath (T' (i)) in kelvins. This will preferably be a nitrogen
s
vapor-pressure-thermometer that gives P (i) directly and has greater precision, or a resistance thermometer from which P (i)
o,N o,N
values may be derived.
7. Reagents
7.1 Purity of Reagents—Reagent grade chemicals shall be used in all tests. Unless otherwise indicated, it is intended that all
reagents shall conform to the specifications of the Committee on Analytical Reagents of the American Chemical Society, where
such specifications are available. Other grades may be used, provided it is first ascertained that the reagent is of sufficiently high
purity to permit its use without lessening the accuracy of the determination.
7.2 Helium Gas, at least 99.9 % pure.
7.3 Krypton Gas, at least 99.9 % pure.
7.4 Liquid Nitrogen, of such purity that the saturation vapor pressure P is not more than 20 torr above barometric pressure. A
o,N
fresh daily supply is recommended.
Reagent Chemicals, American Chemical Society Specifications, American Chemical Society, Washington, DC. For Suggestions on the testing of reagents not listed by
the American Chemical Society, see Annual Standards for Laboratory Chemicals, BDH Ltd., Poole, Dorset, U.K., and the United States Pharmacopeia and National
Formulary, U.S. Pharmacopeial Convention, Inc. (USPC), Rockville, MD.
D4780 − 23
8. Sampling
8.1 A test sample shall be obtained from larger composites by riffling or splitting in accordance with subsection 5.12 of STP
447A , with the aim of obtaining a representative sample that represents shape and size distribution of the larger composite. Guide
E105 can provide guidance on constructing a sampling plan with the representative sample can be determined by Practice E122.
9. Procedure—Sample Preparation and Degassing
9.1 Select a sample tube of the desired size. A 5 cm tube is preferred for small samples to minimize dead space. However, larger
tubes may be required for larger samples or for finely powdered samples, to avoid elutriation of the powder when degassing is
started.
9.2 Evacuate the sample tube and then fill to atmospheric pressure with helium. This may be done on the surface area unit, or on
a separate piece of equipment.
9.3 Remove the sample tube, cap, and weigh. Record the weight as W .
9.4 Place the sample, whose weight is known approximately, into the sample tube. If possible, choose the sample size to provide
2 2
an estimated total surface area of 11 m to 5 m5 m .
9.5 Attach the sample tube to the apparatus. If other samples are to be run, attach them at this time to the other ports.
9.6 Open the S valves where there are samples.
9.7 Slowly open the V valve, monitoring the rate of pressure decrease to avoid too high a rate, which might lead to excessive
fluidization of powdered samples.
9.7.1 If a diffusion pump is used, it may be necessary to close the V valve system periodically to protect the diffusion pump fluid
from exposure to pressures above 0.1 torr for periods of more than 30 s. Close the valve off for 2 min each time.
9.8 Install a heating mantle or furnace around each sample and raise the temperature to about 300°C (573 K). 300 °C (573 K).
(Warning—Take special precautions if the moisture content exceeds approximately 5 % to avoid “bumping” of powdered catalyst,
and to avoid surface area loss by self-steaming. It is recommended that the heating rate not exceed 100100 K K/h ⁄h under these
circumstances.)
−3
9.9 Continue degassing at about 300°C (573 K) 300 °C (573 K) for a minimum of 3 h, 3 h, at a pressure not to exceed 10
torr. torr. Overnight degassing is permissible.
NOTE 2—Certain materials decompose or sinter at 300°C.300 °C. Lower degassing temperatures are permissible for such materials; however, the
degassing temperature should be specified when reporting the results.
9.10 Remove the heating mantles, and allow the samples to cool.
9.11 Close the S valves.
9.12 It is permissible to exercise the option of preliminary degassing on an external unit. In such a case, follow the procedures
of 8.49.4 – 8.119.11 and then repeat on the adsorption unit, except that the degassing on the
...
Questions, Comments and Discussion
Ask us and Technical Secretary will try to provide an answer. You can facilitate discussion about the standard in here.
Loading comments...