ASTM E1561-20
(Practice)Standard Practice for Analysis of Strain Gage Rosette Data
Standard Practice for Analysis of Strain Gage Rosette Data
ABSTRACT
This practice defines a reference axis for each of the two principal types of rosette configurations and the equations used for three-element strain gage rosette data analysis. The primary uses of this analysis procedure are to determine the directions and magnitudes of the principal surface strains, and to determine residual stresses. This is important for consistency in reporting results and for avoiding ambiguity in data analysis, especially when computers are used. There are several possible sets of equations, but the set presented herein is perhaps the most common.
SCOPE
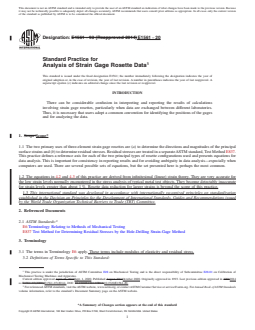
1.1 The two primary uses of three-element strain gage rosettes are (a) to determine the directions and magnitudes of the principal surface strains and (b) to determine residual stresses. Residual stresses are treated in a separate ASTM standard, Test Method E837. This practice defines a reference axis for each of the two principal types of rosette configurations used and presents equations for data analysis. This is important for consistency in reporting results and for avoiding ambiguity in data analysis—especially when computers are used. There are several possible sets of equations, but the set presented here is perhaps the most common.
1.2 The equations in 4.2 and 4.3 of this practice are derived from infinitesimal (linear) strain theory. They are very accurate for the low strain levels normally encountered in the stress analysis of typical metal test objects. They become detectably inaccurate for strain levels greater than about 1 %. Rosette data reduction for larger strains is beyond the scope of this practice.
1.3 This international standard was developed in accordance with internationally recognized principles on standardization established in the Decision on Principles for the Development of International Standards, Guides and Recommendations issued by the World Trade Organization Technical Barriers to Trade (TBT) Committee.
General Information
- Status
- Published
- Publication Date
- 31-Aug-2020
- Technical Committee
- E28 - Mechanical Testing
- Drafting Committee
- E28.01 - Calibration of Mechanical Testing Machines and Apparatus
Relations
- Effective Date
- 01-Apr-2013
- Effective Date
- 23-Jul-2009
- Effective Date
- 15-May-2009
- Effective Date
- 15-May-2009
- Effective Date
- 01-Apr-2009
- Effective Date
- 01-Jan-2009
- Effective Date
- 01-Oct-2008
- Effective Date
- 01-Feb-2008
- Effective Date
- 01-Feb-2008
- Effective Date
- 01-Nov-2007
- Effective Date
- 01-Jun-2007
- Effective Date
- 01-Mar-2007
- Effective Date
- 01-Apr-2006
- Effective Date
- 10-Jun-2003
- Effective Date
- 10-Jun-2003
Overview
ASTM E1561-20, Standard Practice for Analysis of Strain Gage Rosette Data, provides comprehensive guidance for the analysis of data acquired from three-element strain gage rosettes. Developed by ASTM, this international standard establishes a reference axis for the two main types of rosette configurations, ensures uniformity in data processing, and addresses common calculation methods. By promoting consistent reporting and minimizing ambiguity- especially when using computer-based analysis-ASTM E1561-20 is vital for professionals working with strain measurements, principal strain direction, and residual stress determination.
Key Topics
- Strain Gage Rosette Types: Covers 0°-45°-90° and 0°-60°-120° rosette configurations, defining their reference axes for standardized measurement.
- Data Analysis Procedures: Presents commonly used equations derived from linear strain theory for calculating principal surface strains and assessing residual stresses at low strain levels (less than 1%).
- Mohr’s Circle for Strain: Details the use of Mohr’s circle in visualizing and calculating principal strains and shear strains from measured data.
- Consistent Reporting: Emphasizes the importance of clear documentation concerning gage positioning and orientation, especially when data is shared between laboratories or analyzed using software.
- Application Scope: Focuses on metallic materials and structures under typical service strain levels; high-strain (greater than about 1%) scenarios are outside the scope.
- Back-to-Back Rosette Techniques: Provides labeling conventions and interpretation strategies for installations using rosettes on both sides of thin materials for separating membrane and bending strains.
Applications
ASTM E1561-20 is widely utilized in mechanical testing, structural analysis, and materials engineering fields where accurate strain measurement is critical:
- Stress Analysis of Metals: Used in laboratories and industry for determining the directions and magnitudes of principal strains in test objects.
- Quality Control in Manufacturing: Supports monitoring and verification of residual stresses in components, aiding in product reliability assessments.
- Structural Health Monitoring: Ensures that data collected from strain gage rosettes on bridges, aircraft, and pressure vessels are appropriately analyzed for maintenance and safety evaluations.
- Research and Development: Facilitates the comparison and exchange of strain data between different research institutions by providing a common reference and calculation practice.
- Education and Training: Used as a teaching tool for introducing strain measurement principles and real-world data analysis methods.
Related Standards
For comprehensive practice and compliance, consider the following ASTM standards alongside E1561-20:
- ASTM E6 - Terminology Relating to Methods of Mechanical Testing: Provides definitions for key terms such as modulus of elasticity and residual stress, ensuring clarity in interpretation across ASTM test methods.
- ASTM E837 - Test Method for Determining Residual Stresses by the Hole-Drilling Strain-Gage Method: Expands on residual stress analysis, specifically addressing procedures beyond the general approach presented in E1561-20.
Practical Value
The ASTM E1561-20 standard ensures reliable, repeatable, and standardized analysis of strain gage rosette data, underpinning essential practices in materials testing and engineering. Adopting this standard minimizes the risk of data misinterpretation, facilitates clear communication between users and organizations, and supports accurate assessment of structural performance and safety. With its focus on clarity, consistency, and best practices, ASTM E1561-20 is an indispensable resource for anyone engaged in the application of strain gage technology.
Buy Documents
ASTM E1561-20 - Standard Practice for Analysis of Strain Gage Rosette Data
REDLINE ASTM E1561-20 - Standard Practice for Analysis of Strain Gage Rosette Data
Get Certified
Connect with accredited certification bodies for this standard

Element Materials Technology
Materials testing and product certification.

Inštitut za kovinske materiale in tehnologije
Institute of Metals and Technology. Materials testing, metallurgical analysis, NDT.
Sponsored listings
Frequently Asked Questions
ASTM E1561-20 is a standard published by ASTM International. Its full title is "Standard Practice for Analysis of Strain Gage Rosette Data". This standard covers: ABSTRACT This practice defines a reference axis for each of the two principal types of rosette configurations and the equations used for three-element strain gage rosette data analysis. The primary uses of this analysis procedure are to determine the directions and magnitudes of the principal surface strains, and to determine residual stresses. This is important for consistency in reporting results and for avoiding ambiguity in data analysis, especially when computers are used. There are several possible sets of equations, but the set presented herein is perhaps the most common. SCOPE 1.1 The two primary uses of three-element strain gage rosettes are (a) to determine the directions and magnitudes of the principal surface strains and (b) to determine residual stresses. Residual stresses are treated in a separate ASTM standard, Test Method E837. This practice defines a reference axis for each of the two principal types of rosette configurations used and presents equations for data analysis. This is important for consistency in reporting results and for avoiding ambiguity in data analysis—especially when computers are used. There are several possible sets of equations, but the set presented here is perhaps the most common. 1.2 The equations in 4.2 and 4.3 of this practice are derived from infinitesimal (linear) strain theory. They are very accurate for the low strain levels normally encountered in the stress analysis of typical metal test objects. They become detectably inaccurate for strain levels greater than about 1 %. Rosette data reduction for larger strains is beyond the scope of this practice. 1.3 This international standard was developed in accordance with internationally recognized principles on standardization established in the Decision on Principles for the Development of International Standards, Guides and Recommendations issued by the World Trade Organization Technical Barriers to Trade (TBT) Committee.
ABSTRACT This practice defines a reference axis for each of the two principal types of rosette configurations and the equations used for three-element strain gage rosette data analysis. The primary uses of this analysis procedure are to determine the directions and magnitudes of the principal surface strains, and to determine residual stresses. This is important for consistency in reporting results and for avoiding ambiguity in data analysis, especially when computers are used. There are several possible sets of equations, but the set presented herein is perhaps the most common. SCOPE 1.1 The two primary uses of three-element strain gage rosettes are (a) to determine the directions and magnitudes of the principal surface strains and (b) to determine residual stresses. Residual stresses are treated in a separate ASTM standard, Test Method E837. This practice defines a reference axis for each of the two principal types of rosette configurations used and presents equations for data analysis. This is important for consistency in reporting results and for avoiding ambiguity in data analysis—especially when computers are used. There are several possible sets of equations, but the set presented here is perhaps the most common. 1.2 The equations in 4.2 and 4.3 of this practice are derived from infinitesimal (linear) strain theory. They are very accurate for the low strain levels normally encountered in the stress analysis of typical metal test objects. They become detectably inaccurate for strain levels greater than about 1 %. Rosette data reduction for larger strains is beyond the scope of this practice. 1.3 This international standard was developed in accordance with internationally recognized principles on standardization established in the Decision on Principles for the Development of International Standards, Guides and Recommendations issued by the World Trade Organization Technical Barriers to Trade (TBT) Committee.
ASTM E1561-20 is classified under the following ICS (International Classification for Standards) categories: 77.040.99 - Other methods of testing of metals. The ICS classification helps identify the subject area and facilitates finding related standards.
ASTM E1561-20 has the following relationships with other standards: It is inter standard links to ASTM E837-13, ASTM E837-08e2, ASTM E6-09be1, ASTM E6-09b, ASTM E6-09a, ASTM E6-09, ASTM E6-08a, ASTM E837-08, ASTM E6-08, ASTM E6-07b, ASTM E6-07a, ASTM E6-07, ASTM E6-06, ASTM E6-03, ASTM E6-03e1. Understanding these relationships helps ensure you are using the most current and applicable version of the standard.
ASTM E1561-20 is available in PDF format for immediate download after purchase. The document can be added to your cart and obtained through the secure checkout process. Digital delivery ensures instant access to the complete standard document.
Standards Content (Sample)
This international standard was developed in accordance with internationally recognized principles on standardization established in the Decision on Principles for the
Development of International Standards, Guides and Recommendations issued by the World Trade Organization Technical Barriers to Trade (TBT) Committee.
Designation: E1561 − 20
Standard Practice for
Analysis of Strain Gage Rosette Data
This standard is issued under the fixed designation E1561; the number immediately following the designation indicates the year of
original adoption or, in the case of revision, the year of last revision. A number in parentheses indicates the year of last reapproval. A
superscript epsilon (´) indicates an editorial change since the last revision or reapproval.
INTRODUCTION
There can be considerable confusion in interpreting and reporting the results of calculations
involving strain gage rosettes, particularly when data are exchanged between different laboratories.
Thus, it is necessary that users adopt a common convention for identifying the positions of the gages
and for analyzing the data.
1. Scope* 2. Referenced Documents
1.1 The two primary uses of three-element strain gage 2.1 ASTM Standards:
rosettes are (a) to determine the directions and magnitudes of E6 Terminology Relating to Methods of Mechanical Testing
the principal surface strains and (b) to determine residual E837 Test Method for Determining Residual Stresses by the
stresses. Residual stresses are treated in a separate ASTM Hole-Drilling Strain-Gage Method
standard, Test Method E837. This practice defines a reference
3. Terminology
axis for each of the two principal types of rosette configura-
tions used and presents equations for data analysis. This is
3.1 ThetermsinTerminologyE6apply.Thesetermsinclude
important for consistency in reporting results and for avoiding
modulus of elasticity and residual stress.
ambiguity in data analysis—especially when computers are
3.2 Definitions of Terms Specific to This Standard:
used. There are several possible sets of equations, but the set
3.2.1 reference line—the axis of the a gage.
presented here is perhaps the most common.
3.3 Symbols:
1.2 The equations in 4.2 and 4.3 of this practice are derived
3.3.1 a, b, c—the three-strain gages making up the rosette.
from infinitesimal (linear) strain theory.They are very accurate
3.3.1.1 Discussion—For the 0° – 45° – 90° rosette (Fig. 1)
for the low strain levels normally encountered in the stress
the axis of the b gage is located 45° counterclockwise from the
analysis of typical metal test objects. They become detectably
a (reference line) axis and the c gage is located 90° counter-
inaccurate for strain levels greater than about 1 %. Rosette data
clockwise from the a axis. For the 0° – 60° – 120° rosette (Fig.
reduction for larger strains is beyond the scope of this practice.
2) the axis of the b gage is located 60° counterclockwise from
1.3 This international standard was developed in accor-
thea axis and thec axis is located 120° counterclockwise from
dance with internationally recognized principles on standard-
the a axis.
ization established in the Decision on Principles for the
3.3.2 ε , ε , ε —the strains measured by gages a, b, and c,
a b c
Development of International Standards, Guides and Recom-
respectively, positive in tension and negative in compression.
mendations issued by the World Trade Organization Technical
3.3.2.1 Discussion—After corrections for thermal output
Barriers to Trade (TBT) Committee.
and transverse sensitivity have been made, the measured
strains represent the surface strains at the site of the rosette. It
This practice is under the jurisdiction ofASTM Committee E28 on Mechanical
Testing and is the direct responsibility of Subcommittee E28.01 on Calibration of
Mechanical Testing Machines and Apparatus. For referenced ASTM standards, visit the ASTM website, www.astm.org, or
Current edition approved Sept. 1, 2020. Published October 2020. Originally contact ASTM Customer Service at service@astm.org. For Annual Book of ASTM
approvedin1993.Lastpreviouseditionapprovedin2014asE1561–93(2014).DOI: Standards volume information, refer to the standard’s Document Summary page on
10.1520/E1561-20. the ASTM website.
*A Summary of Changes section appears at the end of this standard
Copyright © ASTM International, 100 Barr Harbor Drive, PO Box C700, West Conshohocken, PA 19428-2959. United States
E1561 − 20
axis. Similarly plot shear strains that appear to form a coun-
terclockwise couple on the lower half. With this convention,
angular directions on the circle are the same as angular
directions on the specimen. See Fig. 3.
4.2 Fig. 3 shows a typical Mohr’s circle of strain for a
0° – 45° – 90° rosette. The calculations when ε , ε , ε , are
a b c
given are:
ε 1ε
a c
C 5 (1)
2 2
R 5 = ε 2 C 1 ε 2 C (2)
~ ! ~ !
a b
FIG. 1 0° – 45° – 90° Rosette
γ 5 2R (3)
M
ε 5 C1R
ε 5 C 2 R
ε 2 C
~ !
b
tan 2θ 5 2 (4)
~ε 2 ε !
a c
4.2.1 If ε
b 1
reference line.
4.2.2 If ε >C,thenthe ε -axisiscounterclockwisefromthe
b 1
reference line.
4.3 Fig. 4 shows a typical Mohr’s circle of strain for a
0° – 60° – 120° rosette. The calculations when ε , ε , ε , are
a b c
given are:
FIG. 2 0° – 60° – 120° Rosette
ε 1ε 1ε
a b c
C 5 (5)
is assumed here that the modulus of elasticity and thickness of 2 2 2
R 5 =2/3 ε 2 C 1 ε 2 C 1 ε 2 C (6)
@~ ! ~ ! ~ ! #
a b c
the test specimen are such that mechanical reinforcement by
γ 5 2R (7)
M
the rosette is negligible. For test objects subjected to unknown
combinations of bending and direct (membrane) stresses, use
ε 5 C1R
4.5 to calculate the separate bending and membrane stresses
can be obtained as shown in 4.5.3.
ε 5 C 2 R
' ' '
3.3.3 ε , ε , ε —reduced membrane strain components (4.5).
a b c
" " "
3.3.4 ε , ε , ε —reduced bending strain components (4.5).
a b c
3.3.5 ε —the calculated maximum (more tensile or less
compressive) principal strain.
3.3.6 ε —the calculated minimum (less tensile or more
compressive) principal strain.
3.3.7 γ —the calculated maximum shear strain.
M
3.3.8 θ —the angle from the reference line to the direction
of ε .
3.3.8.1 Discussion—This angle is less than or equal to 180°
in magnitude.
3.3.9 C, R—values used in the calculations. C is the
location, along the ε-axis, of the center of the Mohr’s circle of
strain and R is the radius of that circle.
4. Procedure
4.1 Construct Mohr’s circle of strain in generally the same
manner as Mohr’s circle of stress. Plot normal strains, ε,as
abscissae—positive for elongation and negative for contrac-
tion. Plot one-half the shear strains, γ/2, as ordinates. If the
shear strains on opposite sides of an element of area appear to
FIG. 3 Typical Mohr’s Circle of Strain for a 0° – 45° – 90° Ro-
form a clockwise couple, then plot γ/2 on the upper half of the sette
E1561 − 20
4.3.1 If ε − ε < 0, then the ε -axis is counterclockwise
c b 1
from the reference line.
4.3.2 If ε − ε = 0, then θ = 0°.
c b 1
4.3.3 If ε − ε > 0, then the ε -axis is clockwise from the
c b 1
reference line.
4.4 Identification of the Maximum Principal Strain Direc-
tion:
4.4.1 Take care when
...
This document is not an ASTM standard and is intended only to provide the user of an ASTM standard an indication of what changes have been made to the previous version. Because
it may not be technically possible to adequately depict all changes accurately, ASTM recommends that users consult prior editions as appropriate. In all cases only the current version
of the standard as published by ASTM is to be considered the official document.
Designation: E1561 − 93 (Reapproved 2014) E1561 − 20
Standard Practice for
Analysis of Strain Gage Rosette Data
This standard is issued under the fixed designation E1561; the number immediately following the designation indicates the year of
original adoption or, in the case of revision, the year of last revision. A number in parentheses indicates the year of last reapproval. A
superscript epsilon (´) indicates an editorial change since the last revision or reapproval.
INTRODUCTION
There can be considerable confusion in interpreting and reporting the results of calculations
involving strain gage rosettes, particularly when data are exchanged between different laboratories.
Thus, it is necessary that users adopt a common convention for identifying the positions of the gages
and for analyzing the data.
1. Scope Scope*
1.1 The two primary uses of three-element strain gage rosettes are (a) to determine the directions and magnitudes of the principal
surface strains and (b) to determine residual stresses. Residual stresses are treated in a separate ASTM standard, Test Method E837.
This practice defines a reference axis for each of the two principal types of rosette configurations used and presents equations for
data analysis. This is important for consistency in reporting results and for avoiding ambiguity in data analysis—especially when
computers are used. There are several possible sets of equations, but the set presented here is perhaps the most common.
1.2 The equations in 4.2 and 4.3 of this practice are derived from infinitesimal (linear) strain theory. They are very accurate for
the low strain levels normally encountered in the stress analysis of typical metal test objects. They become detectably inaccurate
for strain levels greater than about 1 %. Rosette data reduction for larger strains is beyond the scope of this practice.
1.3 This international standard was developed in accordance with internationally recognized principles on standardization
established in the Decision on Principles for the Development of International Standards, Guides and Recommendations issued
by the World Trade Organization Technical Barriers to Trade (TBT) Committee.
2. Referenced Documents
2.1 ASTM Standards:
E6 Terminology Relating to Methods of Mechanical Testing
E837 Test Method for Determining Residual Stresses by the Hole-Drilling Strain-Gage Method
3. Terminology
3.1 The terms in Terminology E6 apply. These terms include modulus of elasticity and residual stress.
3.2 Definitions of Terms Specific to This Standard:
This practice is under the jurisdiction of ASTM Committee E28 on Mechanical Testing and is the direct responsibility of Subcommittee E28.01 on Calibration of
Mechanical Testing Machines and Apparatus.
Current edition approved April 15, 2014Sept. 1, 2020. Published August 2014October 2020. Originally approved in 1993. Last previous edition approved in 20092014
as E1561–93(2009).E1561–93(2014). DOI: 10.1520/E1561-93R14.10.1520/E1561-20.
For referenced ASTM standards, visit the ASTM website, www.astm.org, or contact ASTM Customer Service at service@astm.org. For Annual Book of ASTM Standards
volume information, refer to the standard’s Document Summary page on the ASTM website.
*A Summary of Changes section appears at the end of this standard
Copyright © ASTM International, 100 Barr Harbor Drive, PO Box C700, West Conshohocken, PA 19428-2959. United States
E1561 − 20
3.2.1 reference line—the axis of the a gage.
3.3 Symbols:
3.3.1 a, b, c—the three-strain gages making up the rosette.
3.3.1.1 Discussion—
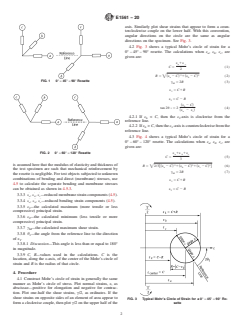
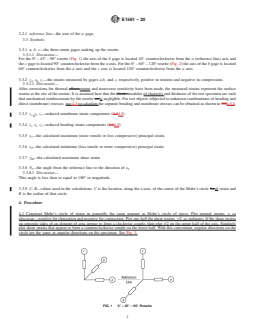
For the 0° – 45° – 90° rosette (Fig. 1) the axis of the b gage is located 45° counterclockwise from the a (reference line) axis and
the c gage is located 90° counterclockwise from the a axis. For the 0° – 60° – 120° rosette (Fig. 2) the axis of the b gage is located
60° counterclockwise from the a axis and the c axis is located 120° counterclockwise from the a axis.
3.3.2 ε , ε , ε —the strains measured by gages a,b, and c, respectively, positive in tension and negative in compression.
a b c
3.3.2.1 Discussion—
After corrections for thermal effectsoutput and transverse sensitivity have been made, the measured strains represent the surface
strains at the site of the rosette. It is assumed here that the elastic modulus of elasticity and thickness of the test specimen are such
that mechanical reinforcement by the rosette areis negligible. For test objects subjected to unknown combinations of bending and
direct (membrane) stresses, use 4.5 to calculate the separate bending and membrane stresses can be obtained as shown in 4.44.5.3.
' ' '
3.3.3 ε , ε , ε —reduced membrane strain components (4.44.5).
a b c
" " "
3.3.4 ε , ε , ε —reduced bending strain components (4.44.5).
a b c
3.3.5 ε —the calculated maximum (more tensile or less compressive) principal strain.
3.3.6 ε —the calculated minimum (less tensile or more compressive) principal strain.
3.3.7 γ —the calculated maximum shear strain.
M
3.3.8 θ —the angle from the reference line to the direction of ε .
1 1
3.3.8.1 Discussion—
This angle is less than or equal to 180° in magnitude.
3.3.9 C, R—values used in the calculations. C is the location, along the ε-axis, of the center of the Mohr’s circle forof strain and
R is the radius of that circle.
4. Procedure
4.1 Construct Mohr’s circle of strain in generally the same manner as Mohr’s circle of stress. Plot normal strains, ε, as
abscissae—positive for elongation and negative for contraction. Plot one-half the shear strains, γ/2, as ordinates. If the shear strains
on opposite sides of an element of area appear to form a clockwise couple, then plot γ/2 on the upper half of the axis. Similarly
plot shear strains that appear to form a counterclockwise couple on the lower half. With this convention, angular directions on the
circle are the same as angular directions on the specimen. See Fig. 3.
FIG. 1 0° – 45° – 90° Rosette
E1561 − 20
FIG. 2 0° – 60° – 120° Rosette
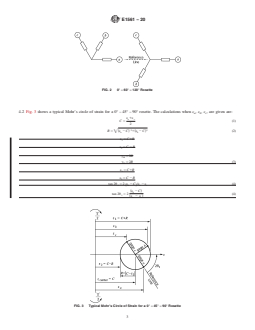
4.2 Fig. 3 shows a typical Mohr’s circle of strain for a 0° – 45° – 90° rosette. The calculations when ε , ε , ε , are given are:
a b c
ε 1ε
a c
C 5 (1)
2 2
R 5= ε 2 C 1 ε 2 C (2)
~ ! ~ !
a b
ε 5 C1R
ε 5 C 2 R
γ 5 2R
M
γ 5 2R (3)
M
ε 5 C1R
ε 5 C 2 R
tan 2θ 5 2 ~ε 2 C!/ε 2 ε (4)
1 b a c
ε 2 C
~ !
b
tan 2θ 5 2 (4)
ε 2 ε
~ !
a c
FIG. 3 Typical Mohr’s Circle of Strain for a 0° – 45° – 90° Rosette
E1561 − 20
4.2.1 If ε < C, then the ε -axis is clockwise from the reference line.
b 11
4.2.2 If ε > C, then the ε -axis is counterclockwise from the reference line.
b 11
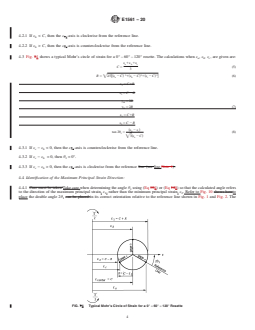
4.3 Fig. 74 shows a typical Mohr’s circle of strain for a 0° – 60° – 120° rosette. The calculations when ε , ε , ε , are given are:
a b c
ε 1ε 1ε
a b c
C 5 (5)
2 2 2
R 5=2/3@~ε 2 C! 1~ε 2 C! 1~ε 2 C! # (6)
a b c
ε 5 C1R
ε 5 C 2 R
γ 5 2R
M
γ 5 2R (7)
M
ε 5 C1R
ε 5 C 2 R
~ε 2 ε !
b c
tan 2θ 5 (8)
=3~ε 2 C!
a
4.3.1 If ε − ε < 0, then the ε -axis is counterclockwise from the reference line.
c b 11
4.3.2 If ε − ε = 0, then θ = 0°.
c b 1
4.3.3 If ε − ε > 0, then the ε -axis is clockwise from the reference line (see line.Note 1).
c b 11
4.4 Identification of the Maximum Principal Strain Direction:
4.4.1 Care must be taken Take care when determining the angle θ using (Eq 104) or (Eq 148) so that the calculated angle refers
to the direction of the maximum principal strain, ε , rather than the minimum principal strain, ε . Refer to Fig. 10 shows howto
1 2
place the double angle 2θ can be placed in its correct orientation relative to the reference line shown in Fig. 1 and Fig. 2. The
FIG. 74 Typical Mohr’s Circle of Strain for a 0° – 60° – 120° Rosette
E1561 − 20
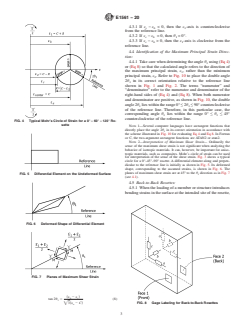
FIG. 45 Differential Element on the Undeformed Surface
FIG. 56 Deformed Shape of Differential Element
FIG. 67 Planes of Maximum Shear Strain
FIG. 8 Gage Labeling for Back-to-Back Rosettes
terms “numerator” and “denominator” refer to the numerator and denominator of the right-hand sides of (Eq 104) and (Eq 148).
When both numerator and denominator are positive, as shown in Fig. 10, the double angle 2θ lies within the range 0° ≤ 2θ ≤
1 1
90° counterclockwise of the reference line. Therefore, in this particular case, the corresponding angle θ lies within the range 0°
≤ θ ≤ 45° counterclockwise of the reference line.
E1561 − 20
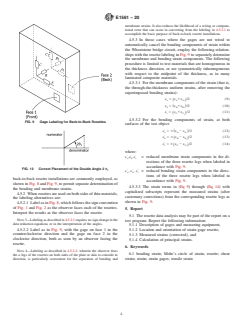
FIG. 9 Gage Labeling for Back-to-Back Rosettes
FIG. 10 Correct Placement of the Double Angle 2 θ
NOTE 1—Several computer languages have arctangent functions that directly place the angle 2θ in its correct orientation in accordance with the scheme
illustrated in Fig. 10 for evaluating Eq 4 and Eq 8. In Fortran or C, the two-argument arctangent functions are ATAN2 or atan2.
NOTE 2—Interpretation of Maximum Shear Strain— Ordinarily the sense of the maximum shear strain is not significant when analyzing the behavior of
isotropic materials. It can, however, be important for anisotropic materials, such as composites. Mohr’s circle of strain can be used for interpretation of
the sense of the shear strain. Fig. 3 shows a typical circle for a 0°–45°–90° rosette. A differential element along and perpendicular to the reference line
is initially as shown in Fig. 5. Its deformed shape, corresponding to the assumed strains, is shown in Fig. 6. The planes of maximum shear strain are at
45° to the θ direction as in F
...
Questions, Comments and Discussion
Ask us and Technical Secretary will try to provide an answer. You can facilitate discussion about the standard in here.
Loading comments...