ASTM D2540-93(2001)
(Test Method)Standard Test Method for Drop-Weight Sensitivity of Liquid Monopropellants (Withdrawn 2003)
Standard Test Method for Drop-Weight Sensitivity of Liquid Monopropellants (Withdrawn 2003)
SCOPE
1.1 This test method covers the determination of the sensitivity of liquid monopropellants to the impact of a drop weight.
1.2 This standard should be used to measure and describe the properties of materials, products, or assemblies in response to heat and flame under controlled laboratory conditions and should not be used to describe or appraise the fire hazard or fire risk of materials, products, or assemblies under actual fire conditions. However, results of this test may be used as elements of a fire risk assessment which takes into account all of the factors which are pertinent to an assessment of the fire hazard of a particular end use.
1.3 This standard does not purport to address all of the safety concerns, if any, associated with its use. It is the responsibility of the user of this standard to establish appropriate safety and health practices and determine the applicability of regulatory limitations prior to use.
1.4 The values stated in SI units are to be regarded as the standard. The values given in parentheses are for information only.
General Information
Relations
Standards Content (Sample)
NOTICE: This standard has either been superceded and replaced by a new version or discontinued.
Contact ASTM International (www.astm.org) for the latest information.
Designation: D 2540 – 93 (Reapproved 2001)
Standard Test Method for
Drop-Weight Sensitivity of Liquid Monopropellants
This standard is issued under the fixed designation D 2540; the number immediately following the designation indicates the year of
original adoption or, in the case of revision, the year of last revision. A number in parentheses indicates the year of last reapproval. A
superscript epsilon (e) indicates an editorial change since the last revision or reapproval.
1. Scope
1.1 This test method covers the determination of the
sensitivity of liquid monopropellants to the impact of a drop
weight.
1.2 This standard should be used to measure and describe
the properties of materials, products, or assemblies in response
to heat and flame under controlled laboratory conditions and
should not be used to describe or appraise the fire hazard or
fire risk of materials, products, or assemblies under actual fire
conditions. However, results of this test may be used as
elements of a fire risk assessment which takes into account all
of the factors which are pertinent to an assessment of the fire
hazard of a particular end use.
1.3 This standard does not purport to address all of the
safety concerns, if any, associated with its use. It is the
responsibility of the user of this standard to establish appro-
priate safety and health practices and determine the applica-
bility of regulatory limitations prior to use.
1.4 The values stated in SI units are to be regarded as the FIG. 1 Sample Cup Assembly
standard. The values given in parentheses are for information
3. Significance and Use
only.
3.1 In drop-weight testing of liquids, explosions are initi-
2. Summary of Test Method
ated in a complex compression process involving the degree
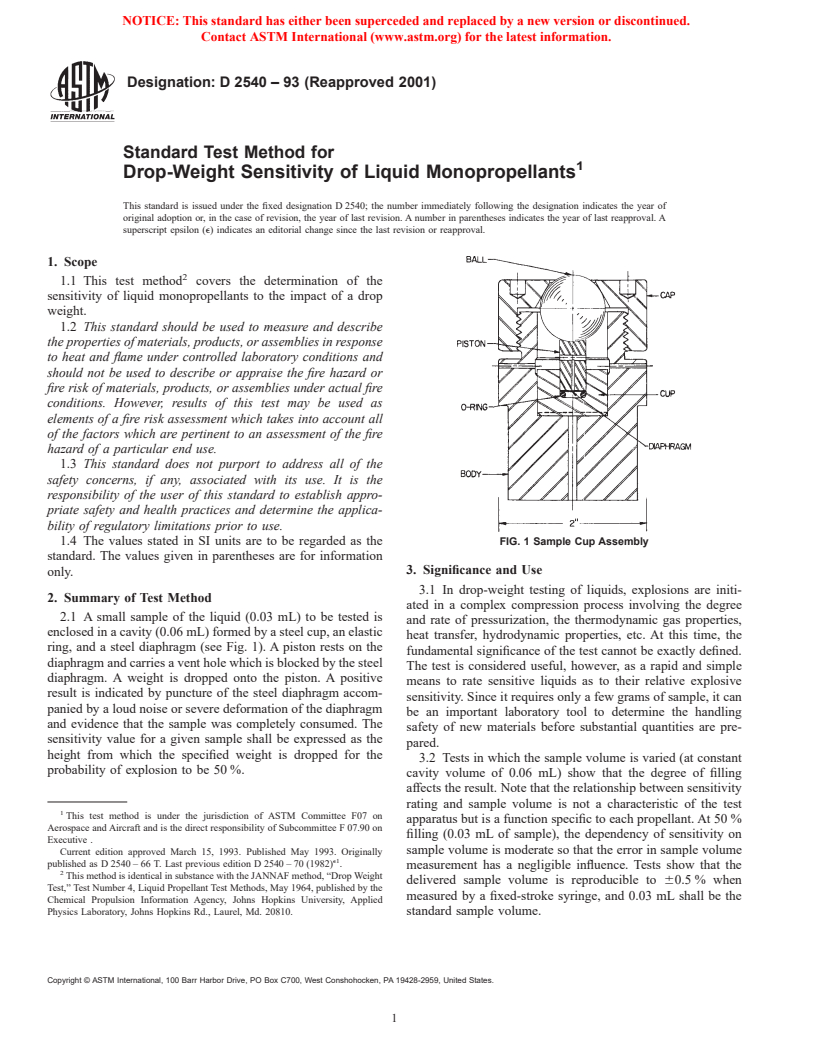
2.1 A small sample of the liquid (0.03 mL) to be tested is
and rate of pressurization, the thermodynamic gas properties,
enclosed in a cavity (0.06 mL) formed by a steel cup, an elastic
heat transfer, hydrodynamic properties, etc. At this time, the
ring, and a steel diaphragm (see Fig. 1). A piston rests on the
fundamental significance of the test cannot be exactly defined.
diaphragm and carries a vent hole which is blocked by the steel
The test is considered useful, however, as a rapid and simple
diaphragm. A weight is dropped onto the piston. A positive
means to rate sensitive liquids as to their relative explosive
result is indicated by puncture of the steel diaphragm accom-
sensitivity. Since it requires only a few grams of sample, it can
panied by a loud noise or severe deformation of the diaphragm
be an important laboratory tool to determine the handling
and evidence that the sample was completely consumed. The
safety of new materials before substantial quantities are pre-
sensitivity value for a given sample shall be expressed as the
pared.
height from which the specified weight is dropped for the
3.2 Tests in which the sample volume is varied (at constant
probability of explosion to be 50 %.
cavity volume of 0.06 mL) show that the degree of filling
affects the result. Note that the relationship between sensitivity
rating and sample volume is not a characteristic of the test
This test method is under the jurisdiction of ASTM Committee F07 on
apparatus but is a function specific to each propellant. At 50 %
Aerospace and Aircraft and is the direct responsibility of Subcommittee F 07.90 on
filling (0.03 mL of sample), the dependency of sensitivity on
Executive .
sample volume is moderate so that the error in sample volume
Current edition approved March 15, 1993. Published May 1993. Originally
e1
published as D 2540 – 66 T. Last previous edition D 2540 – 70 (1982) .
measurement has a negligible influence. Tests show that the
This method is identical in substance with the JANNAF method, “Drop Weight
delivered sample volume is reproducible to 60.5 % when
Test,” Test Number 4, Liquid Propellant Test Methods, May 1964, published by the
measured by a fixed-stroke syringe, and 0.03 mL shall be the
Chemical Propulsion Information Agency, Johns Hopkins University, Applied
Physics Laboratory, Johns Hopkins Rd., Laurel, Md. 20810. standard sample volume.
Copyright © ASTM International, 100 Barr Harbor Drive, PO Box C700, West Conshohocken, PA 19428-2959, United States.
NOTICE: This standard has either been superceded and replaced by a new version or discontinued.
Contact ASTM International (www.astm.org) for the latest information.
D 2540 – 93 (2001)
3.3 If the objective justifies the greater effort, the sample 4.4 Tools, consisting of a torque wrench, 0 to 1.7-N·m (0 to
volume is varied leading to a plot such as shown in Fig. 2 15-lb·in.) torque wrench adaptor to fit cap (part 7 of Fig. 4);
which represents the relationship between sensitivity rating and hypodermic syringe of fixed stroke; O-ring seating tool; brass
sample volume for the specific propellant n-propyl nitrate. pick; and spanner wrench.
4.5 Expandables, such as O-rings: either AN 6227B-5 or
4. Apparatus
6.07 6 0.13-mm (0.239 6 0.005-in.) inside diameter and
1.78-mm (0.070-in.) cross section width, made from MIL-P-
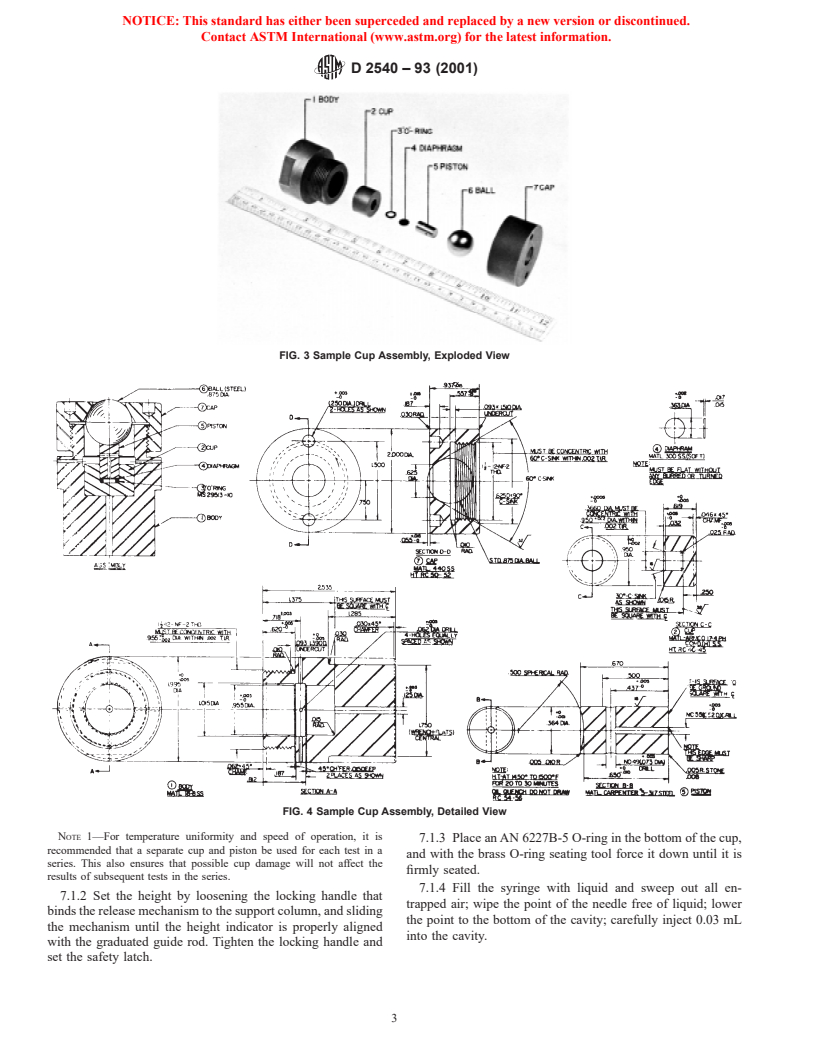
4.1 Sample Cup Assembly—The sample cup assembly is
5516 elastomer, or both; and diaphragms of Type 302 stainless
shown in Fig. 1, and an exploded view in Fig. 3. The assembly
shall consist of the following parts: steel 0.41 6 0.013 mm (0.016 6 0.0005 in.) thick, 9.22 mm
(0.363 in.) in diameter.
Part No. Name
1 body
2 cup
5. Safety Precautions
3 O-ring (expendable)
4 diaphragm (expendable)
5.1 A positive safety latch shall be provided to prevent
5 piston
injury resulting from the premature fall of the weight. It is
6 ball
realized that this test might be employed for the evaluation of
7 cap
ultra-high-energy materials. This fact, combined with the
Since the sample cup assembly is the critical part of the
possibility of faulty fabrication of components, could result in
drop-weight tester, detailed dimensions of its components are
the production of shrapnel. It is therefore recommended that
given in Fig. 4.
the apparatus be shielded (Fig. 7).
4.2 Weight—The weight shall be one integral assembly,
5.2 If the test apparatus is to be employed for the evaluation
weighing 2 kg 6 1 g (Fig. 5). The weight shall be held
of toxic materials, or if toxic products may be formed from the
suspended by an electromagnet. The electromagnet shall itself
decomposition of the sample, necessary steps shall be taken to
be held in the first version of the drop-weight tester by a stud
prevent the buildup of dangerous concentrations of these
at the top which fits in the recess formerly designed to hold and
materials.
release the weight. The release shall be tied down to hold the
magnet firmly in place. The present magnet plus weight shall
6. Preparation of Apparatus
be of such a length that the scale on the right hand post will
6.1 Experience has shown that an appreciable difference in
read the correct drop height.
the behavior of the apparatus can result from the manner in
4.2.1 In using this weight, constant vigilance shall be
which it is mounted. Therefore, the following conditions shall
maintained to see that the weight tip does not become
be met:
excessively worn or damaged. If excessive wear is indicated
6.1.1 The machine shall be mounted on and firmly attached
the apparatus should be rechecked on a standard sample.
to a solid concrete foundation, preferably anchored to the
Damaged weights should be discarded.
foundation of the building.
4.3 Drop-Weight Assembly (Fig. 6), consisting of a base
6.1.2 The machine shall be perfectly plumb with guides
plate with four leveling screws; column; two guide rods (one
lubricated to minimize friction during the fall of the weight.
graduated); body retainer; release mechanism, adjustable to
6.2 The drop-weight sensitivity of sensitive liquids is, or
retain magnet; and top plate.
course, dependent on the purity of the sample. The magnitude
of this dependency will vary with the material. If attempts are
being made to reproduce data obtained by other investigations,
care shall be taken to obtain samples having identical analyses.
Particular care shall be taken to keep the samples dry, as
moisture may have an adverse effect.
7. Procedure
7.1 Results of this test have been found to be temperature-
dependent. It is therefore very important to provide means to
thermostat the sample cups, pistons, body of the assembly, and
the liquid to be tested unless the whole equipment is kept in a
constant-temperature room. Make all tests at 21.1 6 1.1°C (70
6 2°F).
7.1.1 Clean and dry all components of the body assembly. It
is good practice to wash the metal parts in acetone and blow
out both the exhaust hole and the cup with clean dry air. Wipe
the cup clean with a tissue or soft cloth. After positive tests,
check the exhaust hole and ports of the piston to be sure they
are clear of the blown out section of the diaphragm. Note the
condition of the pistons and cups. Replace cracked, pitted, or
FIG. 2 Impact Sensitivity, H , of NPN versus Sample Volume at
70°F (21.1°C) Using a 2-kg Weight worn components.
NOTICE: This standard has either been superceded and replaced by a new version or discontinued.
Contact ASTM International (www.astm.org) for the latest information.
D 2540 – 93 (2001)
FIG. 3 Sample Cup Assembly, Exploded View
FIG. 4 Sample Cup Assembly, Detailed View
NOTE 1—For temperature uniformity and speed of operation, it is
7.1.3 Place an AN 6227B-5 O-ring in the bottom of the cup,
recommended that a separate cup and piston be used for each test in a
and with the brass O-ring seating tool force it down until it is
series. This also ensures that possible cup damage will not affect the
firmly seated.
results of subsequent tests in the series.
7.1.4 Fill the syringe with liquid and sweep out all en-
7.1.2 Set the height by loosening the locking handle that
trapped air; wipe the point of the needle free of liquid; lower
binds the release mechanism to the support column, and sliding
the point to the bottom of the cavity; carefully inject 0.03 mL
the mechanism until the height
...


Questions, Comments and Discussion
Ask us and Technical Secretary will try to provide an answer. You can facilitate discussion about the standard in here.