ASTM A126-95e1
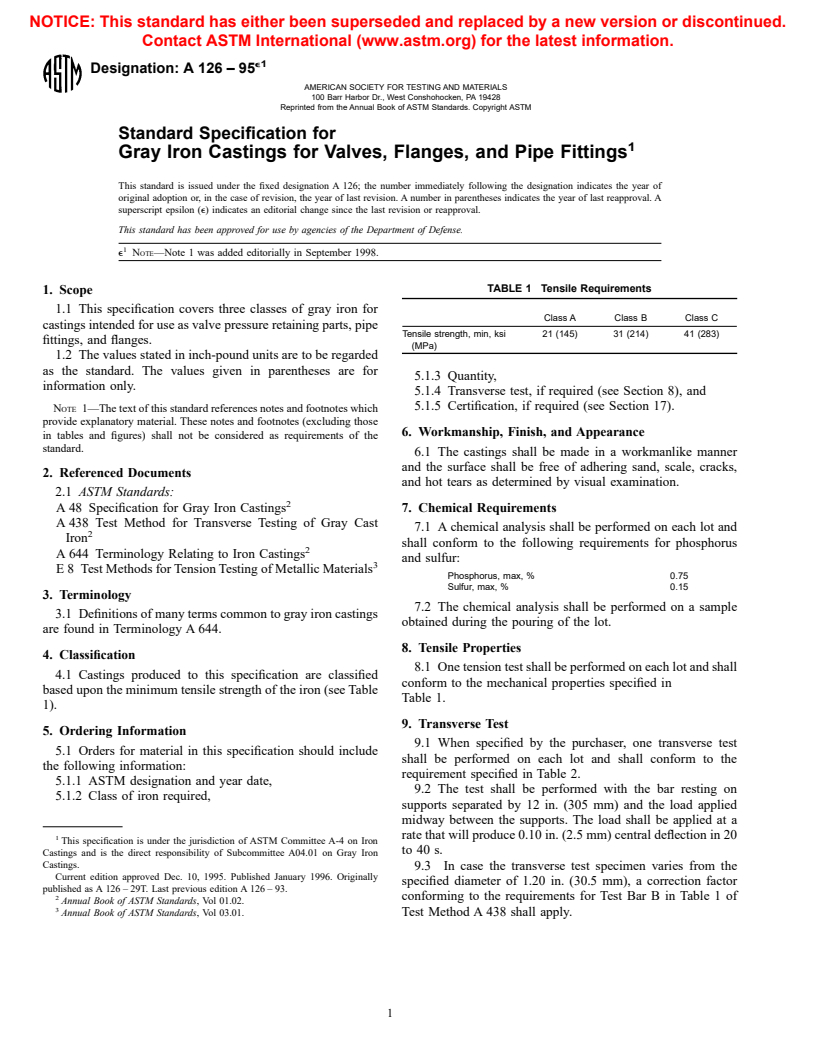
(Specification)Standard Specification for Gray Iron Castings for Valves, Flanges, and Pipe Fittings
Standard Specification for Gray Iron Castings for Valves, Flanges, and Pipe Fittings
SCOPE
1.1 This specification covers three classes of gray iron for castings intended for use as valve pressure retaining parts, pipe fittings, and flanges.
1.2 The values stated in inch-pound units are to be regarded as the standard. The values given in parentheses are for information only.
Note 1--The text of this standard references notes and footnotes which provide explanatory material. These notes and footnotes (excluding those in tables and figures) shall not be considered as requirements of the standard.
General Information
Relations
Standards Content (Sample)
NOTICE: This standard has either been superseded and replaced by a new version or discontinued.
Contact ASTM International (www.astm.org) for the latest information.
e1
Designation: A 126 – 95
AMERICAN SOCIETY FOR TESTING AND MATERIALS
100 Barr Harbor Dr., West Conshohocken, PA 19428
Reprinted from the Annual Book of ASTM Standards. Copyright ASTM
Standard Specification for
1
Gray Iron Castings for Valves, Flanges, and Pipe Fittings
This standard is issued under the fixed designation A 126; the number immediately following the designation indicates the year of
original adoption or, in the case of revision, the year of last revision. A number in parentheses indicates the year of last reapproval. A
superscript epsilon (e) indicates an editorial change since the last revision or reapproval.
This standard has been approved for use by agencies of the Department of Defense.
1
e NOTE—Note 1 was added editorially in September 1998.
TABLE 1 Tensile Requirements
1. Scope
1.1 This specification covers three classes of gray iron for
Class A Class B Class C
castings intended for use as valve pressure retaining parts, pipe
Tensile strength, min, ksi 21 (145) 31 (214) 41 (283)
fittings, and flanges.
(MPa)
1.2 The values stated in inch-pound units are to be regarded
as the standard. The values given in parentheses are for
5.1.3 Quantity,
information only.
5.1.4 Transverse test, if required (see Section 8), and
5.1.5 Certification, if required (see Section 17).
NOTE 1—The text of this standard references notes and footnotes which
provide explanatory material. These notes and footnotes (excluding those
6. Workmanship, Finish, and Appearance
in tables and figures) shall not be considered as requirements of the
standard.
6.1 The castings shall be made in a workmanlike manner
and the surface shall be free of adhering sand, scale, cracks,
2. Referenced Documents
and hot tears as determined by visual examination.
2.1 ASTM Standards:
2
A 48 Specification for Gray Iron Castings
7. Chemical Requirements
A 438 Test Method for Transverse Testing of Gray Cast
7.1 A chemical analysis shall be performed on each lot and
2
Iron
shall conform to the following requirements for phosphorus
2
A 644 Terminology Relating to Iron Castings
and sulfur:
3
E 8 Test Methods for Tension Testing of Metallic Materials
Phosphorus, max, % 0.75
Sulfur, max, % 0.15
3. Terminology
7.2 The chemical analysis shall be performed on a sample
3.1 Definitions of many terms common to gray iron castings
obtained during the pouring of the lot.
are found in Terminology A 644.
8. Tensile Properties
4. Classification
8.1 One tension test shall be performed on each lot and shall
4.1 Castings produced to this specification are classified
conform to the mechanical properties specified in
based upon the minimum tensile strength of the iron (see Table
Table 1.
1).
9. Transverse Test
5. Ordering Information
9.1 When specified by the purchaser, one transverse test
5.1 Orders for material in this specification should include
shall be performed on each lot and shall conform to the
the following information:
requirement specified in Table 2.
5.1.1 ASTM designation and year date,
9.2 The test shall be performed with the bar resting on
5.1.2 Class of iron required,
supports separated by 12 in. (305 mm) and the load applied
midway between the supports. The load shall be applied at a
1 rate that will produce 0.10 in. (2.5 mm) central deflection in 20
This specification is under the jurisdiction of ASTM Committee A-4 on Iron
to 40 s.
Castings and is the direct responsibility of Subcommittee A04.01 on Gray Iron
Castings.
9.3 In case the transverse test specimen varies from the
Current edition approved Dec. 10, 1995. Published January 1996. Originally
specified diameter of 1.20 in. (30.5 mm), a correction factor
published as A 126 – 29T. Last previous edition A 126 – 93.
2
conforming to the requirements for Test Bar B in Table 1 of
Annual Book of ASTM Standards, Vol 01.02.
3
Annual Book of ASTM Standards, Vol 03.01. Test Method A 438 shall apply.
1
---------------------- Page: 1 ----------------------
A 126
TABLE 2 Transverse Test Requirements
11.2 After reaching a stress of 15 000 psi (103 MPa), the
speed of the crosshead of the testing machine shall not exceed
Class A Class B Class C 1
⁄8 in. (3.2 mm)/min.
Force at center, min, lb (kN) 2200 3300 4000
(9.75) (14.65) (17.75)
12. Sampling
Deflection at center, min, in. 0.10 0.12 0.12
12.1 A lot shall consist of one of the following:
(mm) (2.5) (3.0) (3.0)
12.1.1 All the metal poured from a single heating in a batch
type melting furnace,
10. Cast Test Bars 12.1.2 All the metal from two or more batch type melting
furnaces poured into a single ladle or single casting, or
1
10.1 Separately cast 1 ⁄8 in. (28.6 mm) diameter test bars
12.1.3 All the metal poured from a continuous melting
shown in Fig. 1 shall be poured in sand molds from the same
furnace for a given period of time between changes in charge,
lot as the castings represented.
processing conditions,
...


Questions, Comments and Discussion
Ask us and Technical Secretary will try to provide an answer. You can facilitate discussion about the standard in here.