ASTM D2596-20
(Test Method)Standard Test Method for Measurement of Extreme-Pressure Properties of Lubricating Grease (Four-Ball Method)
Standard Test Method for Measurement of Extreme-Pressure Properties of Lubricating Grease (Four-Ball Method)
SIGNIFICANCE AND USE
5.1 This test method, used for specification purposes, differentiates between lubricating greases having low, medium, and high level of extreme-pressure properties. The results do not necessarily correlate with results from service.4
5.2 It is noted that lubricating greases that have as their fluid component a silicone, halogenated silicone, or a mixture comprising silicone fluid and petroleum oil, are not applicable to this method of test.
SCOPE
1.1 This test method covers the determination of the load-carrying properties of lubricating greases. Three determinations are made:
1.1.1 Load-Wear Index (formerly called Mean-Hertz Load),
1.1.2 Weld Point, by means of the Four-Ball Extreme-Pressure (EP) Tester, and
1.1.3 Last nonseizure load (LNSL).
1.2 The values stated in SI units are to be regarded as the standard. The values in parentheses are for information only.
1.3 This standard does not purport to address all of the safety concerns, if any, associated with its use. It is the responsibility of the user of this standard to establish appropriate safety, health, and environmental practices and determine the applicability of regulatory limitations prior to use.
1.4 This international standard was developed in accordance with internationally recognized principles on standardization established in the Decision on Principles for the Development of International Standards, Guides and Recommendations issued by the World Trade Organization Technical Barriers to Trade (TBT) Committee.
General Information
- Status
- Published
- Publication Date
- 30-Apr-2020
- Technical Committee
- D02 - Petroleum Products, Liquid Fuels, and Lubricants
- Drafting Committee
- D02.G0.04 - Functional Tests - Tribology
Relations
- Effective Date
- 01-May-2020
- Effective Date
- 01-Nov-2015
- Effective Date
- 01-Oct-2014
- Effective Date
- 01-Oct-2014
- Effective Date
- 01-Jun-2013
- Effective Date
- 01-May-2012
- Effective Date
- 01-Dec-2010
- Effective Date
- 01-Jul-2010
- Effective Date
- 01-Jan-2010
- Effective Date
- 15-Nov-2009
- Effective Date
- 01-May-2008
- Effective Date
- 01-May-2005
- Effective Date
- 01-Dec-2004
- Effective Date
- 10-May-2003
- Effective Date
- 10-Oct-2002
Overview
ASTM D2596-20: Standard Test Method for Measurement of Extreme-Pressure Properties of Lubricating Grease (Four-Ball Method) is an internationally recognized standard developed by ASTM. This test method determines the load-carrying or extreme-pressure (EP) properties of lubricating greases using the Four-Ball EP Tester. The evaluation distinguishes between greases with low, medium, or high levels of extreme-pressure capabilities, offering essential insights for product specification and quality control in grease formulation, testing, and purchasing.
Note: This method is not suitable for greases that use silicone or halogenated silicone fluids or mixtures containing both silicone and petroleum oil as their fluid components.
Key Topics
- Extreme-Pressure Properties: The method assesses greases’ ability to prevent metal-to-metal contact under harsh operating conditions, essential for demanding applications.
- Key Measurements:
- Load-Wear Index: Indicates a lubricant’s effectiveness in minimizing wear at different applied loads.
- Weld Point: The lowest load at which seizure and welding of metal surfaces occurs, defining the grease's EP limit.
- Last Nonseizure Load (LNSL): The maximum load at which the grease prevents metal seizure and excessive wear.
- Testing Procedure: A steel ball rotates against three stationary balls submerged in the test grease at controlled temperature and load increments until welding is observed.
- Specified Equipment: Details the use of a Four-Ball EP Tester, standard test balls, appropriate cleaning agents, and measurement tools.
- Precision and Repeatability: Outlines repeatability and reproducibility under defined laboratory settings, aiding inter-laboratory comparison.
Applications
- Product Specification & Quality Control: Widely used by lubricant manufacturers and users to specify and compare EP properties of lubricating grease, ensuring suitability for high-pressure applications.
- Industrial and Automotive Sectors: Helps select appropriate greases for heavy machinery, automotive components, bearings, gears, and other parts prone to high contact pressures.
- Research and Development: Supports the development and validation of new lubricating grease formulations by providing a standardized measure of EP performance.
- Regulatory Compliance: Recognized by industry and defense agencies for product certification and qualification.
- OEM and Aftermarket Use: Provides confidence in lubricant performance by identifying greases capable of withstanding predetermined pressures, reducing risk of component failure due to lubricant inadequacy.
Related Standards
- ASTM D2509 - Test Method for Measurement of Load-Carrying Capacity of Lubricating Grease (Timken Method), an alternative approach for assessing EP performance under different test configurations.
- ASTM G40 - Terminology Relating to Wear and Erosion, offering definitions relevant to tribology and lubricant testing.
- ANSI B3.12 - Metal Balls, specifying properties and tolerances for the precision balls used in test equipment.
- Industry Guidelines and OEM Specifications - May reference ASTM D2596 results for product acceptance and specification purposes.
By following ASTM D2596-20, organizations ensure reliable, repeatable measurement of the extreme-pressure properties of lubricating greases using the Four-Ball Method. This standard plays a vital role in lubricant development, procurement, and performance assurance within industries requiring robust solutions for high-pressure and high-load environments. For engineers, quality managers, and product developers, understanding and applying the requirements of ASTM D2596 strengthens confidence in grease selection and product durability.
Buy Documents
ASTM D2596-20 - Standard Test Method for Measurement of Extreme-Pressure Properties of Lubricating Grease (Four-Ball Method)
REDLINE ASTM D2596-20 - Standard Test Method for Measurement of Extreme-Pressure Properties of Lubricating Grease (Four-Ball Method)
Get Certified
Connect with accredited certification bodies for this standard

ABS Quality Evaluations Inc.
American Bureau of Shipping quality certification.

Element Materials Technology
Materials testing and product certification.

ABS Group Brazil
ABS Group certification services in Brazil.
Sponsored listings
Frequently Asked Questions
ASTM D2596-20 is a standard published by ASTM International. Its full title is "Standard Test Method for Measurement of Extreme-Pressure Properties of Lubricating Grease (Four-Ball Method)". This standard covers: SIGNIFICANCE AND USE 5.1 This test method, used for specification purposes, differentiates between lubricating greases having low, medium, and high level of extreme-pressure properties. The results do not necessarily correlate with results from service.4 5.2 It is noted that lubricating greases that have as their fluid component a silicone, halogenated silicone, or a mixture comprising silicone fluid and petroleum oil, are not applicable to this method of test. SCOPE 1.1 This test method covers the determination of the load-carrying properties of lubricating greases. Three determinations are made: 1.1.1 Load-Wear Index (formerly called Mean-Hertz Load), 1.1.2 Weld Point, by means of the Four-Ball Extreme-Pressure (EP) Tester, and 1.1.3 Last nonseizure load (LNSL). 1.2 The values stated in SI units are to be regarded as the standard. The values in parentheses are for information only. 1.3 This standard does not purport to address all of the safety concerns, if any, associated with its use. It is the responsibility of the user of this standard to establish appropriate safety, health, and environmental practices and determine the applicability of regulatory limitations prior to use. 1.4 This international standard was developed in accordance with internationally recognized principles on standardization established in the Decision on Principles for the Development of International Standards, Guides and Recommendations issued by the World Trade Organization Technical Barriers to Trade (TBT) Committee.
SIGNIFICANCE AND USE 5.1 This test method, used for specification purposes, differentiates between lubricating greases having low, medium, and high level of extreme-pressure properties. The results do not necessarily correlate with results from service.4 5.2 It is noted that lubricating greases that have as their fluid component a silicone, halogenated silicone, or a mixture comprising silicone fluid and petroleum oil, are not applicable to this method of test. SCOPE 1.1 This test method covers the determination of the load-carrying properties of lubricating greases. Three determinations are made: 1.1.1 Load-Wear Index (formerly called Mean-Hertz Load), 1.1.2 Weld Point, by means of the Four-Ball Extreme-Pressure (EP) Tester, and 1.1.3 Last nonseizure load (LNSL). 1.2 The values stated in SI units are to be regarded as the standard. The values in parentheses are for information only. 1.3 This standard does not purport to address all of the safety concerns, if any, associated with its use. It is the responsibility of the user of this standard to establish appropriate safety, health, and environmental practices and determine the applicability of regulatory limitations prior to use. 1.4 This international standard was developed in accordance with internationally recognized principles on standardization established in the Decision on Principles for the Development of International Standards, Guides and Recommendations issued by the World Trade Organization Technical Barriers to Trade (TBT) Committee.
ASTM D2596-20 is classified under the following ICS (International Classification for Standards) categories: 75.100 - Lubricants, industrial oils and related products. The ICS classification helps identify the subject area and facilitates finding related standards.
ASTM D2596-20 has the following relationships with other standards: It is inter standard links to ASTM D2596-15, ASTM G40-15, ASTM D2509-14e1, ASTM D2509-14, ASTM G40-13, ASTM G40-12, ASTM G40-10b, ASTM G40-10a, ASTM G40-10, ASTM G40-09, ASTM D2509-03(2008), ASTM G40-05, ASTM G40-04, ASTM D2509-03, ASTM G40-02. Understanding these relationships helps ensure you are using the most current and applicable version of the standard.
ASTM D2596-20 is available in PDF format for immediate download after purchase. The document can be added to your cart and obtained through the secure checkout process. Digital delivery ensures instant access to the complete standard document.
Standards Content (Sample)
This international standard was developed in accordance with internationally recognized principles on standardization established in the Decision on Principles for the
Development of International Standards, Guides and Recommendations issued by the World Trade Organization Technical Barriers to Trade (TBT) Committee.
Designation: D2596 − 20
Standard Test Method for
Measurement of Extreme-Pressure Properties of Lubricating
Grease (Four-Ball Method)
This standard is issued under the fixed designation D2596; the number immediately following the designation indicates the year of
original adoption or, in the case of revision, the year of last revision. A number in parentheses indicates the year of last reapproval. A
superscript epsilon (´) indicates an editorial change since the last revision or reapproval.
This standard has been approved for use by agencies of the U.S. Department of Defense.
1. Scope* 3. Terminology
1.1 This test method covers the determination of the load- 3.1 Definitions:
carrying properties of lubricating greases. Three determina-
3.1.1 compensation line, n—a line of plot on log-log paper
tions are made:
where the coordinates are scar diameter in millimetres and
1.1.1 Load-Wear Index (formerly called Mean-Hertz Load),
applied load in kilograms-force (or Newtons) obtained under
1.1.2 Weld Point, by means of the Four-Ball Extreme-
dynamic conditions.
Pressure (EP) Tester, and
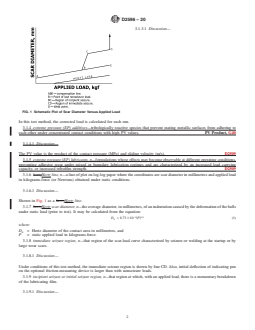
3.1.1.1 Discussion—Shown in Fig. 1 as line ABE.
1.1.3 Last nonseizure load (LNSL).
3.1.2 compensation scar diameter—the average diameter, in
1.2 The values stated in SI units are to be regarded as the
millimetres, of the wear scar on the stationary balls caused by
standard. The values in parentheses are for information only.
the rotating ball under an applied load in the presence of a
lubricant, but without causing either seizure or welding.
1.3 This standard does not purport to address all of the
safety concerns, if any, associated with its use. It is the
3.1.3 corrected load, n—the load in kilograms-force (or
responsibility of the user of this standard to establish appro-
Newtons) obtained by multiplying the applied load by the ratio
priate safety, health, and environmental practices and deter-
of the Hertz scar diameter to the measured scar diameter at that
mine the applicability of regulatory limitations prior to use.
load.
1.4 This international standard was developed in accor-
3.1.3.1 Discussion—In this test method, the corrected load
dance with internationally recognized principles on standard-
is calculated for each run.
ization established in the Decision on Principles for the
3.1.4 extreme pressure (EP) additives—tribologically reac-
Development of International Standards, Guides and Recom-
tive species that prevent mating metallic surfaces from adher-
mendations issued by the World Trade Organization Technical
ing to each other under concentrated contact conditions with
Barriers to Trade (TBT) Committee.
high PV values. PV Product, G40
3.1.4.1 Discussion—The PV value is the product of the
2. Referenced Documents
contact pressure (MPa) and sliding velocity (m/s). D2509
2.1 ASTM Standards:
3.1.5 extreme pressure (EP) lubricants, n—formulations
D2509 Test Method for Measurement of Load-Carrying
whose effects may become observable at different operating
Capacity of Lubricating Grease (Timken Method)
conditions, preventing adhesive wear under mixed or boundary
G40 Terminology Relating to Wear and Erosion
lubrication regimes and are characterized by an increased load
2.2 American National Standard:
carrying capacity, or increased tribofilm strength. D2509
B3.12 Metal Balls
3.1.6 Hertz line, n—alineofplotonlog-logpaperwherethe
coordinatesarescardiameterinmillimetresandappliedloadin
This test method is under the jurisdiction of ASTM Committee D02 on
kilograms-force (or Newtons) obtained under static conditions.
Petroleum Products, Liquid Fuels, and Lubricantsand is the direct responsibility of
3.1.6.1 Discussion—Shown in Fig. 1 as a Hertz line.
Subcommittee D02.G0.04 on Functional Tests - Tribology.
Current edition approved May 1, 2020. Published June 2020. Originally
3.1.7 Hertz scar diameter, n—the average diameter, in
approved in 1967. Last previous edition approved in 2015 as D2596 – 15. DOI:
millimetres, of an indentation caused by the deformation of the
10.1520/D2596-20.
For referenced ASTM standards, visit the ASTM website, www.astm.org, or
balls under static load (prior to test). It may be calculated from
contact ASTM Customer Service at service@astm.org. For Annual Book of ASTM
the equation:
Standards volume information, refer to the standard’s Document Summary page on
22 1/3
the ASTM website.
D 5 8.73 310 P (1)
~ !
h
Available from American National Standards Institute (ANSI), 25 W. 43rd St.,
4th Floor, New York, NY 10036, http://www.ansi.org. where:
*A Summary of Changes section appears at the end of this standard
Copyright © ASTM International, 100 Barr Harbor Drive, PO Box C700, West Conshohocken, PA 19428-2959. United States
D2596 − 20
3.1.13 weld point, n—the lowest applied load at which
sliding surfaces seize and then weld.
3.1.13.1 Discussion—Under the conditions of this test, the
lowest applied load in kilograms-force (or Newtons) at which
the rotating ball seizes and then welds to the three stationary
balls, indicating the extreme-pressure level of the lubricating
grease has been exceeded. See Fig. 1, Point D.
3.1.13.2 Discussion—Some lubricating greases do not allow
true welding, and extreme scoring of the three stationary balls
results. In such cases, the applied load which produces a
maximum scar diameter of 4 mm is reported as the weld point.
4. Summary of Test Method
4.1 The tester is operated with one steel ball under load
rotating against three steel balls held stationary in the form of
a cradle. The rotating speed is 1770 r⁄min 6 60 r⁄min. Lubri-
cating greases are brought to 27 °C 6 8 °C (80 °F 6 15 °F)
and then subjected to a series of tests of 10 s duration at
FIG. 1 Schematic Plot of Scar Diameter Versus Applied Load
increasing loads until welding occurs.
5. Significance and Use
D = Hertz diameter of the contact area in millimetres, and
h
5.1 This test method, used for specification purposes, dif-
P = static applied load in kilograms-force.
ferentiates between lubricating greases having low, medium,
3.1.8 immediate seizure region, n—that region of the scar-
and high level of extreme-pressure properties. The results do
load curve characterized by seizure or welding at the startup or
not necessarily correlate with results from service.
by large wear scars.
3.1.8.1 Discussion—Under conditions of this test method, 5.2 Itisnotedthatlubricatinggreasesthathaveastheirfluid
component a silicone, halogenated silicone, or a mixture
the immediate seizure region is shown by line CD.Also, initial
deflection of indicating pen on the optional friction-measuring comprising silicone fluid and petroleum oil, are not applicable
to this method of test.
device is larger than with nonseizure loads.
3.1.9 incipient seizure or initial seizure region, n—that
6. Apparatus
region at which, with an applied load, there is a momentary
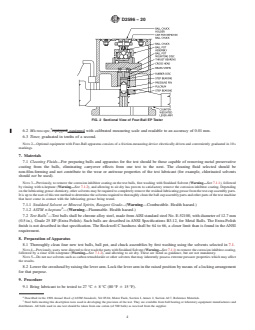
6.1 Four-Ball Extreme-Pressure Lubricant Tester, illus-
breakdown of the lubricating film.
trated in Fig. 2.
3.1.9.1 Discussion—This breakdown is noted by a sudden
increase in the measured scar diameter, shown in Fig. 1 as line
NOTE 1—It is important to distinguish between the Four-Ball EPTester
BC, and a momentary deflection of the indicating pen of the
and the Four-Ball Wear Tester. The Four-Ball Wear Tester can be used
optional friction-measuring device. under a variety of test conditions at loads up to 490 N (50 kgf). The
Four-Ball EP Tester is designed for testing under more severe conditions
3.1.10 last nonseizure load, n—the last load at which the
and lacks the sensitivity necessary for the Four-Ball Wear Test.
measured scar diameter is not more than 5 % greater than the
6.2 Microscope, equipped with calibrated measuring scale
compenation value at that load.
and readable to an accuracy of 0.01 mm.
3.1.10.1 Discussion—Shown in Fig. 1 as Point B.
6.3 Timer, graduated in tenths of a second.
3.1.11 load carrying capacity, n—of a lubricant, the maxi-
mum PV value [PV Limit, G40] that can be sustained by the
NOTE 2—Optional equipment with Four-Ball apparatus consists of a
lubricant at a reported temperature without failure of the friction-measuring device electrically driven and conveniently graduated
in 10 s markings.
sliding contact surfaces as evidenced by adhesive wear or
localized welding. D2509
7. Materials
3.1.11.1 Discussion—The PV value is the product of the
contact pressure (MPa) and sliding velocity (m/s). 7.1 Cleaning Fluids—For preparing balls and apparatus for
thetestshouldbethosecapableofremovingmetalpreservative
3.1.12 load-wear index (or the load-carrying property of a
coating from the balls, eliminating carryover effects from one
lubricant), n—an index of the ability of a lubricant to minimize
wear at applied loads.
3.1.12.1 Discussion—Under the conditions of this test, spe-
Furtherdetailsonthistestmethodmaybefoundin:Sayles,F.S.,etal, National
cific loadings in kilograms-force (or Newtons) having intervals
Lubricating Grease Institute Spokesman, Vol 32, No. 5,August 1968, pp. 162–167.
of approximately 0.1 logarithmic units, are applied to the three
The sole source of supply of the apparatus (microscopes 103.10 A and 103.10
B) known to the committee at this time is Falex Corporation, 1020 Airpark Dr.,
stationary balls for ten runs prior to welding. The load-wear
Sugar Grove, IL, 60554-9585. If you are aware of alternative suppliers, please
index is the average of the sum of the corrected loads
provide this information to ASTM International Headquarters. Your comments will
determined for the ten applied loads immediately preceding the
receive careful consideration at a meeting of the responsible technical committee,
weld point. which you may attend.
D2596 − 20
coating, followed by a rinse with n-heptane (Warning—See 7.1.2), and
allowing to air dry. These are listed as guidance, but are not mandatory.
NOTE 5—Do not use solvents such as carbon tetrachloride or other
solvents that may inherently possess extreme pressure properties which
may affect the results.
8.2 Lower the crosshead by raising the lever arm. Lock the
lever arm in the raised position by means of a locking
arrangement for that purpose.
9. Procedure
9.1 Bring lubricant to be tested to 27 °C 6 8 °C (80 °F 6
15 °F).
9.2 Completelyfilltheballpotwiththelubricatinggreaseto
betested,avoidingtheinclusionofairpockets.Imbedthethree
steel test balls in the grease. Place the lock ring carefully over
thethreeballsandscrewdownthelocknutsecurely.Scrapeoff
the excess grease pushed onto the lock nut.
NOTE 6—Subsequent independent investigations reported in 1971 by
several laboratories indicate that optimum test repeatability is obtained
FIG. 2 Sectional View of Four-Ball EP Tester
when the force on the lock-down nut is maintained within the range
50 ft·lbf 6 5 ft·lbf (68 N·m 6 7 N·m), applied and measured by means of
a torque wrench. Significantly lower weld points were obtained when the
test to the next.The cleaning fluid selected should be non-film-
force applied was approximately 100 ft·lbf (136 N·m).
forming and not contribute to the wear or antiwear properties
of the test lubricant (for example, chlorinated solvents should 9.3 Press one ball into the ball chuck and mount the chuck
not be used). into chuck-holder.
9.4 Examine the ball chuck carefully before each run. The
NOTE 3—Previously, to remove the corrosion inhibitor coating on the
test balls, first washing with Stoddard Solvent (Warning—See 7.1.1),
chuck is continually subjected to wear and seizure and should
followed by rinsing with n-heptane (Warning—See 7.1.2), and allowing
be replaced when it will not fit into the ball chuck-holder tight
to air dry has proven to satisfactory remove the corrosion inhibitor
enough to support its own weight, or if the ball seat shows
coating. Depending on the lubricating grease chemistry, other solvents
signs of seizure.
mayberequiredtocompletelyremovetheresiduallubricatinggreasefrom
the test cup assembly parts. It is up to the user of this test method to
9.5 Install the ball pot assembly on the test apparatus in
determine the solvents required to thoroughly clean the ball cup assembly
contact with the fourth ball. Place the mounting disk between
partsandotherpartsofthetestmachinethathavecomeincontactwiththe
ball pot and thrust bearing.
lubricating grease being tested.
7.1.1 Stoddard Solvent or Mineral Spirits, Reagent Grade— 9.6 Place the weight tray and weights on the horizontal arm
(Warning—Combustible. Health hazard.) in the correct notch for a base test load of 784 N (80 kgf).
7.1.2 ASTM n-heptane —(Warning—Flammable. Health Release the lever arm and gently apply (Note 7) the test load to
hazard.) the balls, making certain the ball pot assembly and mounting
7 disk are centered. If the optional friction-measuring device is
7.2 Test Balls —Test balls shall be chrome alloy steel, made
used, connect the calibrated arm on the ball pot to the indicator
from AISI
...
This document is not an ASTM standard and is intended only to provide the user of an ASTM standard an indication of what changes have been made to the previous version. Because
it may not be technically possible to adequately depict all changes accurately, ASTM recommends that users consult prior editions as appropriate. In all cases only the current version
of the standard as published by ASTM is to be considered the official document.
Designation: D2596 − 15 D2596 − 20
Standard Test Method for
Measurement of Extreme-Pressure Properties of Lubricating
Grease (Four-Ball Method)
This standard is issued under the fixed designation D2596; the number immediately following the designation indicates the year of
original adoption or, in the case of revision, the year of last revision. A number in parentheses indicates the year of last reapproval. A
superscript epsilon (´) indicates an editorial change since the last revision or reapproval.
This standard has been approved for use by agencies of the U.S. Department of Defense.
1. Scope*
1.1 This test method covers the determination of the load-carrying properties of lubricating greases. Three determinations are
made:
1.1.1 Load-Wear Index (formerly called Mean-Hertz Load),
1.1.2 Weld Point, by means of the Four-Ball Extreme-Pressure (EP) Tester, and
1.1.3 Last nonseizure load (LNSL).
1.2 The values stated in SI units are to be regarded as the standard. The values in parentheses are for information only.
1.3 This standard does not purport to address all of the safety concerns, if any, associated with its use. It is the responsibility
of the user of this standard to establish appropriate safety safety, health, and healthenvironmental practices and determine the
applicability of regulatory limitations prior to use.
1.4 This international standard was developed in accordance with internationally recognized principles on standardization
established in the Decision on Principles for the Development of International Standards, Guides and Recommendations issued
by the World Trade Organization Technical Barriers to Trade (TBT) Committee.
2. Referenced Documents
2.1 ASTM Standards:
D2509 Test Method for Measurement of Load-Carrying Capacity of Lubricating Grease (Timken Method)
G40 Terminology Relating to Wear and Erosion
2.2 American National Standard:
B3.12 Metal Balls
3. Terminology
3.1 Definitions:
3.1.1 compensation line, n—a line of plot on log-log paper where the coordinates are scar diameter in millimetres and applied
load in kilograms-force (or Newtons) obtained under dynamic conditions.
This test method is under the jurisdiction of ASTM Committee D02 on Petroleum Products, Liquid Fuels, and Lubricantsand is the direct responsibility of Subcommittee
D02.G0.04 on Functional Tests - Tribology.
Current edition approved July 1, 2015May 1, 2020. Published September 2015June 2020. Originally approved in 1967. Last previous edition approved in 20142015 as
D2596 – 14.D2596 – 15. DOI: 10.1520/D2596-15.10.1520/D2596-20.
For referenced ASTM standards, visit the ASTM website, www.astm.org, or contact ASTM Customer Service at service@astm.org. For Annual Book of ASTM Standards
volume information, refer to the standard’s Document Summary page on the ASTM website.
Available from American National Standards Institute (ANSI), 25 W. 43rd St., 4th Floor, New York, NY 10036, http://www.ansi.org.
3.1.1.1 Discussion—
Shown in Fig. 1 as line ABE.
3.1.2 compensation scar diameter—the average diameter, in millimetres, of the wear scar on the stationary balls caused by the
rotating ball under an applied load in the presence of a lubricant, but without causing either seizure or welding.
3.1.3 corrected load, n—the load in kilograms-force (or Newtons) obtained by multiplying the applied load by the ratio of the
Hertz scar diameter to the measured scar diameter at that load.
*A Summary of Changes section appears at the end of this standard
Copyright © ASTM International, 100 Barr Harbor Drive, PO Box C700, West Conshohocken, PA 19428-2959. United States
D2596 − 20
3.1.3.1 Discussion—
FIG. 1 Schematic Plot of Scar Diameter Versus Applied Load
In this test method, the corrected load is calculated for each run.
3.1.4 extreme pressure (EP) additives—tribologically reactive species that prevent mating metallic surfaces from adhering to
each other under concentrated contact conditions with high PV values. PV Product, G40
3.1.4.1 Discussion—
The PV value is the product of the contact pressure (MPa) and sliding velocity (m/s). D2509
3.1.5 extreme pressure (EP) lubricants, n—formulations whose effects may become observable at different operating conditions,
preventing adhesive wear under mixed or boundary lubrication regimes and are characterized by an increased load carrying
capacity, or increased tribofilm strength. D2509
3.1.6 hertzHertz line, n—a line of plot on log-log paper where the coordinates are scar diameter in millimetres and applied load
in kilograms-force (or Newtons) obtained under static conditions.
3.1.6.1 Discussion—
Shown in Fig. 1 as a hertzHertz line.
3.1.7 hertzHertz scar diameter, n—the average diameter, in millimetres, of an indentation caused by the deformation of the balls
under static load (prior to test). It may be calculated from the equation:
22 1/3
D 5 8.73 310 P (1)
~ !
h
where:
D = Hertz diameter of the contact area in millimetres, and
h
P = static applied load in kilograms-force.
3.1.8 immediate seizure region, n—that region of the scar-load curve characterized by seizure or welding at the startup or by
large wear scars.
3.1.8.1 Discussion—
Under conditions of this test method, the immediate seizure region is shown by line CD. Also, initial deflection of indicating pen
on the optional friction-measuring device is larger than with nonseizure loads.
3.1.9 incipient seizure or initial seizure region, n—that region at which, with an applied load, there is a momentary breakdown
of the lubricating film.
3.1.9.1 Discussion—
D2596 − 20
This breakdown is noted by a sudden increase in the measured scar diameter, shown in Fig. 1 as line BC, and a momentary
deflection of the indicating pen of the optional friction-measuring device.
3.1.10 last nonseizure load, n—the last load at which the measured scar diameter is not more than 5 % greater than the
compenation value at that load.
3.1.10.1 Discussion—
Shown in Fig. 1 as Point B.
3.1.11 load carrying capacity, n—of a lubricant, the maximum PV value [PV Limit, G40] that can be sustained by the lubricant
at a reported temperature without failure of the sliding contact surfaces as evidenced by adhesive wear or localized welding. D2509
3.1.11.1 Discussion—
The PV value is the product of the contact pressure (MPa) and sliding velocity (m/s).
3.1.12 load-wear index (or the load-carrying property of a lubricant), n—an index of the ability of a lubricant to minimize wear
at applied loads.
3.1.12.1 Discussion—
Under the conditions of this test, specific loadings in kilograms-force (or Newtons) having intervals of approximately 0.1
logarithmic units, are applied to the three stationary balls for ten runs prior to welding. The load-wear index is the average of the
sum of the corrected loads determined for the ten applied loads immediately preceding the weld point.
3.1.13 weld point, n—the lowest applied load at which sliding surfaces seize and then weld.
3.1.13.1 Discussion—
Under the conditions of this test, the lowest applied load in kilograms-force (or Newtons) at which the rotating ball seizes and then
welds to the three stationary balls, indicating the extreme-pressure level of the lubricating grease has been exceeded. See Fig. 1,
Point D.
3.1.13.2 Discussion—
Some lubricating greases do not allow true welding, and extreme scoring of the three stationary balls results. In such cases, the
applied load which produces a maximum scar diameter of 4 mm is reported as the weld point.
4. Summary of Test Method
4.1 The tester is operated with one steel ball under load rotating against three steel balls held stationary in the form of a cradle.
The rotating speed is 1770 r ⁄min 6 60 r ⁄min. Lubricating greases are brought to 27 °C 6 8 °C (80 °F 6 15 °F) and then subjected
to a series of tests of 10 s duration at increasing loads until welding occurs.
5. Significance and Use
5.1 This test method, used for specification purposes, differentiates between lubricating greases having low, medium, and high
level of extreme-pressure properties. The results do not necessarily correlate with results from service.
5.2 It is noted that lubricating greases that have as their fluid component a silicone, halogenated silicone, or a mixture
comprising silicone fluid and petroleum oil, are not applicable to this method of test.
6. Apparatus
6.1 Four-Ball Extreme-Pressure Lubricant Tester, illustrated illustrated in Fig. 2.
NOTE 1—It is important to distinguish between the Four-Ball EP Tester and the Four-Ball Wear Tester. The Four-Ball Wear Tester can be used under
a variety of test conditions at loads up to 490 N (50 kgf). The Four-Ball EP Tester is designed for testing under more severe conditions and lacks the
sensitivity necessary for the Four-Ball Wear Test.
Further details on this test method may be found in: Sayles, F. S., et al, National Lubricating Grease Institute Spokesman, Vol 32, No. 5, August 1968, pp. 162–167.
The sole source of supply of the apparatus (microscopes 103.10 A and 103.10 B) known to the committee at this time is Falex Corporation, 1020 Airpark Dr., Sugar
Grove, IL, 60554-9585. If you are aware of alternative suppliers, please provide this information to ASTM International Headquarters. Your comments will receive careful
consideration at a meeting of the responsible technical committee, which you may attend.
D2596 − 20
FIG. 2 Sectional View of Four-Ball EP Tester
6.2 Microscope, equipped equipped with calibrated measuring scale and readable to an accuracy of 0.01 mm.
6.3 Timer, graduated in tenths of a second.
NOTE 2—Optional equipment with Four-Ball apparatus consists of a friction-measuring device electrically driven and conveniently graduated in 10 s
markings.
7. Materials
7.1 Cleaning Fluids—For preparing balls and apparatus for the test should be those capable of removing metal preservative
coating from the balls, eliminating carryover effects from one test to the next. The cleaning fluid selected should be
non-film-forming and not contribute to the wear or antiwear properties of the test lubricant (for example, chlorinated solvents
should not be used).
NOTE 3—Previously, to remove the corrosion inhibitor coating on the test balls, first washing with Stoddard Solvent (Warning—See 7.1.1), followed
by rinsing with n-heptane (Warning—See 7.1.2), and allowing to air dry has proven to satisfactory remove the corrosion inhibitor coating. Depending
on the lubricating grease chemistry, other solvents may be required to completely remove the residual lubricating grease from the test cup assembly parts.
It is up to the user of this test method to determine the solvents required to thoroughly clean the ball cup assembly parts and other parts of the test machine
that have come in contact with the lubricating grease being tested.
7.1.1 Stoddard Solvent or Mineral Spirits, Reagent Grade—(Warning—Combustible. Health hazard.)
7.1.2 ASTM n-heptane —(Warning—Flammable. Health hazard.)
7.2 Test Balls —Test balls shall be chrome alloy steel, made from AISI standard steel No. E-52100, with diameter of 12.7 mm
(0.5 in.), Grade 25 EP (Extra Polish). Such balls are described in ANSI Specifications B3.12, for Metal Balls. The Extra-Polish
finish is not described in that specification. The Rockwell C hardness shall be 64 to 66, a closer limit than is found in the ANSI
requirement.
8. Preparation of Apparatus
8.1 Thoroughly clean four new test balls, ball pot, and chuck assemblies by first washing using the solvents selected in 7.1.
NOTE 4—Previously, users were directed to first wash the parts with Stoddard Solvent (Warning—See 7.1.1) to remove the corrosion inhibitor coating,
followed by a rinse with n-heptane (Warning—See 7.1.2), and allowing to air dry. These are listed as guidance, but are not mandatory.
NOTE 5—Do not use solvents such as carbon tetrachloride or other solvents that may inherently possess extreme pressure properties which may affect
the results.
8.2 Lower the crosshead by raising the lever arm. Lock the lever arm in the raised position by means of a locking arrangement
for that purpose.
9. Procedure
9.1 Bring lubricant to be tested to 27 °C 6 8 °C (80 °F 6 15 °F).
Described in the 1998 Annual Book of ASTM Standards, Vol 05.04, Motor Fuels, Section I, Annex 2, Section A2.7, Reference Materials.
Steel balls meeting this description were used in developing the precision of the test. They are available from ball bearing or laboratory equipment manufacturers and
distributors. All balls used in one test should be taken from one carton (of 500 balls) as received from the supplier.
D2596 − 20
TABLE 1 Suggested Form for Recording Test Results
Column 6 Column 7
Column 1 Column 2 Scar Column 3 Scar Column 4 Scar Column 5 Average Column 9
Compensation Compensation Column 8 LD
n
Applied Load, Diameter Ball 1, Diameter Ball 2, Diameter Ball 3, Scar Diameter, Corrected Load,
Scar Diameter, Scar Diameter, Factor
A
kgf (L) mm mm mm mm (X¯) kgf LD / X¯
n
mm +5 % mm
6 . . . . . . 0.95 .
8 . . . . . . 1.40 .
10 . . . . . . 1.88 .
13 . . .
...
Questions, Comments and Discussion
Ask us and Technical Secretary will try to provide an answer. You can facilitate discussion about the standard in here.
Loading comments...