ASTM A683-16(2023)
(Specification)Standard Specification for Nonoriented Electrical Steel, Semiprocessed Types
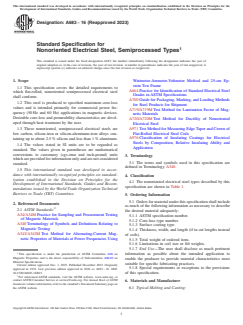
Standard Specification for Nonoriented Electrical Steel, Semiprocessed Types
ABSTRACT
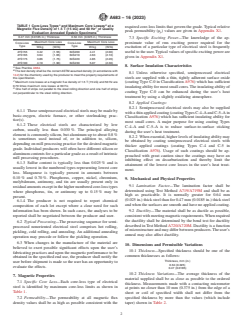
This specification covers the standard requirements for flat-rolled, nonoriented semiprocessed electrical steel intended primarily for commercial power frequency applications in magnetic devices. These electrical steels are low carbon, silicon-iron, or silicon-aluminum-iron alloys, and are classified according to core-loss. Unlike the fully processed electrical steels covered by ASTM A 677, the electrical steels in this specification require heat treatment by the user to develop the specified magnetic properties. The steels covered by this specification have a thickness of either 0.0185 in. (0.47 mm) or 0.025 in. (0.64 mm). For each thickness there are four core loss types. The core loss shall be determined following the use of a quality evaluation anneal listed in the specification. The core loss is determined using the Epstein test method at a test frequency of 60 Hz and a maximum flux density of 15 kG (1.5 T). Test methods to determine other required physical and mechanical properties are listed. Other typical magnetic and physical properties are listed for reference.
SCOPE
1.1 This specification covers the detailed requirements to which flat-rolled, nonoriented semiprocessed electrical steel shall conform.
1.2 This steel is produced to specified maximum core-loss values and is intended primarily for commercial power frequency (50 Hz and 60 Hz) applications in magnetic devices. Desirable core-loss and permeability characteristics are developed through heat treatment by the user.
1.3 These nonoriented, semiprocessed electrical steels are low carbon, silicon-iron or silicon-aluminum-iron alloys containing up to about 2.5 % silicon and less than 1 % aluminum.
1.4 The values stated in SI units are to be regarded as standard. The values given in parentheses are mathematical conversions to customary (cgs-emu and inch-pound) units which are provided for information only and are not considered standard.
1.5 This international standard was developed in accordance with internationally recognized principles on standardization established in the Decision on Principles for the Development of International Standards, Guides and Recommendations issued by the World Trade Organization Technical Barriers to Trade (TBT) Committee.
General Information
- Status
- Published
- Publication Date
- 30-Nov-2023
- Technical Committee
- A06 - Magnetic Properties
- Drafting Committee
- A06.02 - Material Specifications
Relations
- Effective Date
- 01-Dec-2023
- Effective Date
- 01-Dec-2023
- Effective Date
- 01-Dec-2023
- Referred By
ASTM A345-19 - Standard Specification for Flat-Rolled Electrical Steels for Magnetic Applications - Effective Date
- 01-Dec-2023
- Effective Date
- 01-Dec-2023
- Effective Date
- 01-Dec-2023
- Referred By
ASTM A720/A720M-02(2021) - Standard Test Method for Ductility of Nonoriented Electrical Steel - Effective Date
- 01-Dec-2023
- Effective Date
- 01-Dec-2023
- Effective Date
- 01-Dec-2023
Overview
ASTM A683-16(2023) is the internationally recognized standard specification for flat-rolled, nonoriented semiprocessed electrical steel, primarily used in commercial power frequency applications such as magnetic devices. This standard, developed by ASTM International, defines the requirements for low-carbon, silicon-iron, or silicon-aluminum-iron steel alloys. These materials require additional heat treatment by the user to achieve the desired magnetic properties, distinguishing them from fully processed grades. The specification covers two primary thicknesses: 0.0185 in. (0.47 mm) and 0.025 in. (0.64 mm), with multiple core-loss types for each thickness. Compliance ensures the steel's suitability for applications where core loss and magnetic performance are critical.
Key Topics
- Material Specification: Defines the chemical composition, thickness, core-loss limits, and physical requirements for semiprocessed, nonoriented electrical steel.
- Core Loss Types: Classification based on maximum core loss values as measured by the Epstein test at 60 Hz and 1.5 T, supporting various efficiency requirements.
- Heat Treatment: User-applied heat treatment is necessary to develop the optimal core-loss and permeability characteristics.
- Surface Coating and Finishes: Provides for standard and optional insulating coatings to prevent sticking and enhance electrical insulation during fabrication and service.
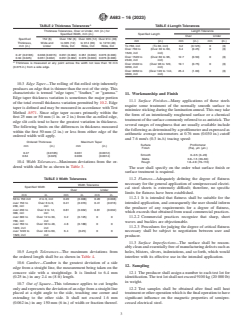
- Physical and Mechanical Properties: Addresses ductility, lamination factor, and thickness tolerances, ensuring the steel can be reliably processed and used in electrical applications.
- Testing and Certification: Outlines standardized test methods (such as ASTM A343/A343M for magnetic properties and A719/A719M for lamination factor), specimen preparation, sampling, and marking requirements for shipment and traceability.
Applications
ASTM A683-compliant electrical steel is most commonly used in:
- Magnetic Devices: Such as transformers, ballasts, and small motors requiring reliable magnetic performance at commercial power frequencies (50 Hz and 60 Hz).
- Power Distribution Equipment: Construction of cores and laminations in power transformers and inductors.
- Electrical Machine Manufacturing: Production of rotating machines where isotropic magnetic properties are advantageous due to the nonoriented nature of the steel.
- Energy-Efficient Designs: Applications aiming to minimize core loss for greater energy efficiency in electrical systems.
Key practical benefits include:
- Versatile Processing: The semiprocessed nature allows users flexibility in final heat treatment, tailoring magnetic properties for specific end uses.
- Consistent Quality: Defined tolerances and robust testing ensure uniform performance, essential for demanding electrical applications.
- Customizable Dimensions and Coatings: Availability in standard thicknesses and a variety of insulating coatings supports a wide range of manufacturing needs.
Related Standards
ASTM A683 references and aligns with several other critical ASTM standards, including:
- ASTM A677: For fully processed nonoriented electrical steel.
- ASTM A343/A343M: Test methods for magnetic properties at power frequencies.
- ASTM A340: Terminology and symbols for magnetic testing.
- ASTM A664: Practice for identification of standard electrical steel grades.
- ASTM A700: Guide for packaging, marking, and loading methods for steel products.
- ASTM A719/A719M and A720/A720M: Test methods for lamination factor and ductility, respectively.
- ASTM A971: Methods for measuring edge taper and crown.
- ASTM A976: Classification of insulating coatings by composition and application.
These related standards collectively ensure comprehensive coverage of material properties, testing procedures, and quality assurance for electrical steel products.
Keywords: ASTM A683, nonoriented electrical steel, semiprocessed electrical steel, core loss, magnetic properties, silicon steel, electrical steel specification, transformer steel, power frequency applications.
Buy Documents
ASTM A683-16(2023) - Standard Specification for Nonoriented Electrical Steel, Semiprocessed Types
Get Certified
Connect with accredited certification bodies for this standard

Element Materials Technology
Materials testing and product certification.

Inštitut za kovinske materiale in tehnologije
Institute of Metals and Technology. Materials testing, metallurgical analysis, NDT.
Sponsored listings
Frequently Asked Questions
ASTM A683-16(2023) is a technical specification published by ASTM International. Its full title is "Standard Specification for Nonoriented Electrical Steel, Semiprocessed Types". This standard covers: ABSTRACT This specification covers the standard requirements for flat-rolled, nonoriented semiprocessed electrical steel intended primarily for commercial power frequency applications in magnetic devices. These electrical steels are low carbon, silicon-iron, or silicon-aluminum-iron alloys, and are classified according to core-loss. Unlike the fully processed electrical steels covered by ASTM A 677, the electrical steels in this specification require heat treatment by the user to develop the specified magnetic properties. The steels covered by this specification have a thickness of either 0.0185 in. (0.47 mm) or 0.025 in. (0.64 mm). For each thickness there are four core loss types. The core loss shall be determined following the use of a quality evaluation anneal listed in the specification. The core loss is determined using the Epstein test method at a test frequency of 60 Hz and a maximum flux density of 15 kG (1.5 T). Test methods to determine other required physical and mechanical properties are listed. Other typical magnetic and physical properties are listed for reference. SCOPE 1.1 This specification covers the detailed requirements to which flat-rolled, nonoriented semiprocessed electrical steel shall conform. 1.2 This steel is produced to specified maximum core-loss values and is intended primarily for commercial power frequency (50 Hz and 60 Hz) applications in magnetic devices. Desirable core-loss and permeability characteristics are developed through heat treatment by the user. 1.3 These nonoriented, semiprocessed electrical steels are low carbon, silicon-iron or silicon-aluminum-iron alloys containing up to about 2.5 % silicon and less than 1 % aluminum. 1.4 The values stated in SI units are to be regarded as standard. The values given in parentheses are mathematical conversions to customary (cgs-emu and inch-pound) units which are provided for information only and are not considered standard. 1.5 This international standard was developed in accordance with internationally recognized principles on standardization established in the Decision on Principles for the Development of International Standards, Guides and Recommendations issued by the World Trade Organization Technical Barriers to Trade (TBT) Committee.
ABSTRACT This specification covers the standard requirements for flat-rolled, nonoriented semiprocessed electrical steel intended primarily for commercial power frequency applications in magnetic devices. These electrical steels are low carbon, silicon-iron, or silicon-aluminum-iron alloys, and are classified according to core-loss. Unlike the fully processed electrical steels covered by ASTM A 677, the electrical steels in this specification require heat treatment by the user to develop the specified magnetic properties. The steels covered by this specification have a thickness of either 0.0185 in. (0.47 mm) or 0.025 in. (0.64 mm). For each thickness there are four core loss types. The core loss shall be determined following the use of a quality evaluation anneal listed in the specification. The core loss is determined using the Epstein test method at a test frequency of 60 Hz and a maximum flux density of 15 kG (1.5 T). Test methods to determine other required physical and mechanical properties are listed. Other typical magnetic and physical properties are listed for reference. SCOPE 1.1 This specification covers the detailed requirements to which flat-rolled, nonoriented semiprocessed electrical steel shall conform. 1.2 This steel is produced to specified maximum core-loss values and is intended primarily for commercial power frequency (50 Hz and 60 Hz) applications in magnetic devices. Desirable core-loss and permeability characteristics are developed through heat treatment by the user. 1.3 These nonoriented, semiprocessed electrical steels are low carbon, silicon-iron or silicon-aluminum-iron alloys containing up to about 2.5 % silicon and less than 1 % aluminum. 1.4 The values stated in SI units are to be regarded as standard. The values given in parentheses are mathematical conversions to customary (cgs-emu and inch-pound) units which are provided for information only and are not considered standard. 1.5 This international standard was developed in accordance with internationally recognized principles on standardization established in the Decision on Principles for the Development of International Standards, Guides and Recommendations issued by the World Trade Organization Technical Barriers to Trade (TBT) Committee.
ASTM A683-16(2023) is classified under the following ICS (International Classification for Standards) categories: 77.140.50 - Flat steel products and semi-products. The ICS classification helps identify the subject area and facilitates finding related standards.
ASTM A683-16(2023) has the following relationships with other standards: It is inter standard links to ASTM A683-16, ASTM A976-18, ASTM A343/A343M-14(2019), ASTM A345-19, ASTM A804/A804M-04(2021), ASTM A971/A971M-17(2022), ASTM A720/A720M-02(2021), ASTM A867-19, ASTM A664-15(2022). Understanding these relationships helps ensure you are using the most current and applicable version of the standard.
ASTM A683-16(2023) is available in PDF format for immediate download after purchase. The document can be added to your cart and obtained through the secure checkout process. Digital delivery ensures instant access to the complete standard document.
Standards Content (Sample)
This international standard was developed in accordance with internationally recognized principles on standardization established in the Decision on Principles for the
Development of International Standards, Guides and Recommendations issued by the World Trade Organization Technical Barriers to Trade (TBT) Committee.
Designation: A683 − 16 (Reapproved 2023)
Standard Specification for
Nonoriented Electrical Steel, Semiprocessed Types
This standard is issued under the fixed designation A683; the number immediately following the designation indicates the year of
original adoption or, in the case of revision, the year of last revision. A number in parentheses indicates the year of last reapproval. A
superscript epsilon (´) indicates an editorial change since the last revision or reapproval.
1. Scope Wattmeter-Ammeter-Voltmeter Method and 25-cm Ep-
stein Test Frame
1.1 This specification covers the detailed requirements to
A664 Practice for Identification of Standard Electrical Steel
which flat-rolled, nonoriented semiprocessed electrical steel
Grades in ASTM Specifications
shall conform.
A700 Guide for Packaging, Marking, and Loading Methods
1.2 This steel is produced to specified maximum core-loss
for Steel Products for Shipment
values and is intended primarily for commercial power fre-
A719/A719M Test Method for Lamination Factor of Mag-
quency (50 Hz and 60 Hz) applications in magnetic devices.
netic Materials
Desirable core-loss and permeability characteristics are devel-
A720/A720M Test Method for Ductility of Nonoriented
oped through heat treatment by the user.
Electrical Steel
1.3 These nonoriented, semiprocessed electrical steels are A971 Test Method for Measuring Edge Taper and Crown of
Flat-Rolled Electrical Steel Coils
low carbon, silicon-iron or silicon-aluminum-iron alloys con-
taining up to about 2.5 % silicon and less than 1 % aluminum. A976 Classification of Insulating Coatings for Electrical
Steels by Composition, Relative Insulating Ability and
1.4 The values stated in SI units are to be regarded as
Application
standard. The values given in parentheses are mathematical
conversions to customary (cgs-emu and inch-pound) units
3. Terminology
which are provided for information only and are not considered
3.1 The terms and symbols used in this specification are
standard.
defined in Terminology A340.
1.5 This international standard was developed in accor-
dance with internationally recognized principles on standard-
4. Classification
ization established in the Decision on Principles for the
4.1 The nonoriented electrical steel types described by this
Development of International Standards, Guides and Recom-
specification are shown in Table 1.
mendations issued by the World Trade Organization Technical
Barriers to Trade (TBT) Committee.
5. Ordering Information
5.1 Orders for material under this specification shall include
2. Referenced Documents
as much of the following information as necessary to describe
2.1 ASTM Standards:
the desired material adequately:
A34/A34M Practice for Sampling and Procurement Testing
5.1.1 ASTM specification number.
of Magnetic Materials
5.1.2 Core-loss type number.
A340 Terminology of Symbols and Definitions Relating to
5.1.3 Surface coating type.
Magnetic Testing
5.1.4 Thickness, width, and length (if in cut lengths instead
A343/A343M Test Method for Alternating-Current Mag-
of coils).
netic Properties of Materials at Power Frequencies Using
5.1.5 Total weight of ordered item.
5.1.6 Limitations in coil size or lift weights.
5.1.7 End Use—The user shall disclose as much pertinent
This specification is under the jurisdiction of ASTM Committee A06 on information as possible about the intended application to
Magnetic Properties and is the direct responsibility of Subcommittee A06.02 on
enable the producer to provide material characteristics most
Material Specifications.
suitable for specific fabricating practices.
Current edition approved Dec. 1, 2023. Published December 2023. Originally
5.1.8 Special requirements or exceptions to the provisions
approved in 1974. Last previous edition approved in 2016 as A683 – 16. DOI:
10.1520/A0683-16R23.
of this specification.
For referenced ASTM standards, visit the ASTM website, www.astm.org, or
contact ASTM Customer Service at service@astm.org. For Annual Book of ASTM
6. Materials and Manufacture
Standards volume information, refer to the standard’s Document Summary page on
the ASTM website. 6.1 Typical Melting and Casting:
Copyright © ASTM International, 100 Barr Harbor Drive, PO Box C700, West Conshohocken, PA 19428-2959. United States
A683 − 16 (2023)
A B
TABLE 1 Core-Loss Types and Maximum Core Losses at a
required core-loss limits that govern the grade. Typical relative
C
Magnetic Flux Density of 1.5 T (15 kG) and 60 Hz of Quality
D peak permeability (μ ) values are given in Appendix X1.
p
Evaluation Annealed Epstein Specimens
0.47 mm (0.0185 in.) Thickness 0.64 mm (0.025 in.) Thickness
7.3 Specific Exciting Power—The knowledge of the ap-
Maximum Core Loss Maximum Core Loss
Core-Loss Core-Loss proximate value of rms exciting power required for the
Type Type
W/kg (W/lb) W/kg (W/lb)
excitation of a particular type of electrical steel is frequently
47S155 3.42 (1.55) 64S200 4.41 (2.00)
useful to the user. Typical values of specific exciting power are
47S165 3.64 (1.65) 64S210 4.63 (2.10)
given in Appendix X1.
47S175 3.86 (1.75) 64S220 4.85 (2.20)
47S190 4.19 (1.90) 64S230 5.07 (2.30)
8. Surface Insulation Characteristics
A
See Practice A664.
B
The test density shall be the correct ASTM assumed density (in accordance with
8.1 Unless otherwise specified, semiprocessed electrical
14.2) for the chemistry used by the producer to meet the property requirements of
steels are supplied with a thin, tightly adherent surface oxide
this specification.
C
Maximum core losses at a magnetic flux density of 1.5 T (15 kG) and 50 Hz are
(coating Type C-0 in Classification A976) which has sufficient
0.79 times maximum core losses at 60 Hz.
insulating ability for most small cores. The insulating ability of
D
One half of strips cut parallel to the steel rolling direction and one half of strips
coating Type C-0 can be enhanced during the user’s heat
cut perpendicular to the steel rolling direction.
treatment by using a slightly oxidizing atmosphere.
8.2 Applied Coatings:
8.2.1 Semiprocessed electrical steels may also be supplied
6.1.1 These semiprocessed electrical steels may be made by
with a thin applied coating (coating Types C-4–A and C-5–A in
basic-oxygen, electric furnace, or other steelmaking prac-
Classification A976) which has sufficient insulating ability for
tice(s).
most small cores. A major purpose for using coating Types
6.1.2 These electrical steels are characterized by low
C-4–A and C-5–A is to reduce surface-to-surface sticking
carbon, usually less than 0.030 %. The principal alloying
during the user’s heat treatment.
element is commonly silicon, but aluminum up to about 0.8 %
8.2.2 When essential, higher levels of insulating ability may
is sometimes used instead of, or in addition to, silicon,
be obtained by coating semiprocessed electrical steels with
depending on mill processing practice for the desired magnetic
thicker applied coatings (coating Types C-4 and C-5 in
grade. Individual producers will often have different silicon or
Classification A976). Usage of such coatings should be ap-
aluminum contents for a particular grade as a result of intrinsic
proached with great caution since the coatings may have an
mill processing procedures.
inhibiting effect on decarburization and thereby limit the
6.1.3 Sulfur content is typically less than 0.025 % and is
attainment of the lowest core losses in the user’s heat treat-
usually lowest in the numbered types representing lowest core
ment.
loss. Manganese is typically present in amounts between
0.10 % and 0.70 %. Phosphorus, copper, nickel, chromium,
9. Mechanical and Physical Properties
molybdenum, antimony, and tin are usually present only in
9.1 Lamination Factor—The lamination factor shall be
residual amounts except in the higher numbered core-loss types
determined using Test Method A719/A719M and shall be as
where phosphorus, tin, or antimony up to 0.15 % may be
high as practicable. It is normally greater for 0.64 mm
present.
(0.025 in.) thick steel than for 0.47 mm (0.0185 in.) thick steel
6.1.4 The producer is not required to report chemical
and when the surfaces are smooth and have no applied coating.
composition of each lot except where a clear need for such
information has been shown. In such cases, the analyses to be
9.2 Ductility—The material shall be as ductile as possible,
reported shall be negotiated between the producer and user. consistent with meeting magnetic requirements. When required
the ductility shall be determined by the bend test for ductility
6.2 Typical Processing—The processing sequence for semi-
described in Test Method A720/A720M. Ductility is a function
processed nonoriented electrical steel comprises hot rolling,
of microstructure and may differ between producers. The user’s
pickling, cold rolling, and annealing. An additional annealing
anneal may also affect ductility.
operation may precede or follow the pickling operation.
6.3 When changes in the manufacture of the material are
10. Dimensions and Permissible Variations
believed to exert possible significant effects upon the user’s
10.1 Thickness—Specified thickness should be one of the
fabricating practices and upon the magnetic performance to be
common thicknesses as follows:
obtained in the specified end use, the producer shall notify the
Thickness, mm (in.)
user before shipment is made so the user has an opportunity to
0.64 (0.025)
evaluate the effects.
0.47 (0.0185)
10.2 Thickness Variations—The average thickness of the
7. Magnetic Properties
material supplied shall be as close as possible to the ordered
7.1 Specific Core Loss—Each core-loss type of electrical
thickness. Measurements made with a contacting micrometer
steel is identified by maximum core-loss limits as shown in
at points no closer than 10 mm (0.375 in.) from the edge of a
Table 1.
sheet or coil of specified width shall not differ from the
7.2 Permeability—The permeability at all magnetic flux specified thickness by more than the values (which include
density values shall be as high as possible consistent with the taper) shown in Table 2.
A683 − 16 (2023)
A
TABLE 2 Thickness Tolerances TABLE 4 Length Tolerances
Thickness Tolerances, Over or Under, mm (in.) for
Length Tolerance
Specified Length
Specified Width, mm (in.)
Over Under
Specified 152 (6) Over 152 (6) Over 305 (12) Over 914 (36)
mm (in.) mm (in.) mm (in.)
Thickness, Wide and to 305 (12) to 914 (36) to 1219 (48)
To 760, incl (To 30, incl) 3.2 (0.125) 0 (0)
mm (in.) Under Wide, Incl Wide, Incl Wide, Incl
Over 760 to (Over 30 to 60, 6.4 (0.25) 0 (0)
1520, incl incl)
0.47 (0.0185) 0.038 (0.0015) 0.051 (0.002) 0.051 (0.002) 0.076 (0.003)
Over 1520 to (Over 60 to 96, 12.7 (0.50) 0 (0)
0.64 (0.025) 0.051 (0.002) 0.051 (0.002) 0.076 (0.003) 0.076 (0.003)
2340, incl incl)
A
Thickness is measured at any point across the width not less than 10 mm Over 2340 to (Over 96 to 120, 19.1 (0.75) 0 (0)
(0.375 in.) from a side edge.
3050, incl incl)
Over 3050 to (Over 120 to 144, 25.4 (1.00) 0 (0)
3660, incl incl)
10.3 Edge Taper—The rolling of flat-rolled strip inherently
produces an edge that is thinner than the rest of the strip. This
characteris
...


Questions, Comments and Discussion
Ask us and Technical Secretary will try to provide an answer. You can facilitate discussion about the standard in here.
Loading comments...