ASTM E915-21
(Practice)Standard Practice for Verifying the Alignment of X-Ray Diffraction Instruments for Residual Stress Measurement
Standard Practice for Verifying the Alignment of X-Ray Diffraction Instruments for Residual Stress Measurement
SIGNIFICANCE AND USE
4.1 This practice provides a means of verifying the alignment of an X-ray diffraction instrument so as to quantify and minimize systematic experimental error in residual stress measurements. This practice is suitable for application to conventional X-ray diffraction instruments or to X-ray diffraction residual stress measurement instruments of either the diverging or parallel beam types3,4
4.2 Application of this practice requires the use of a flat stress-free specimen that diffracts X-rays within the angular range of the diffraction peak to be used for subsequent residual stress measurements. The specimen shall have sufficiently small coherent domains or grains, be quasi-homogeneous, quasi-isotropic, and be of sufficient thickness such that incident X-rays interact with and diffract from an adequate number of individual coherent domains or grains such that a near-random grain orientation distribution is sampled. The crystals shall provide intense diffraction at all tilt angles ψ that will be employed.
Note 1: A major bias in crystal structure orientation is undesirable, but complete freedom from preferred orientation in the stress-free specimen is not critical in the application of the technique.
SCOPE
1.1 This practice describes the procedure for verifying the alignment of X-ray diffraction instruments used for residual stress measurements.
1.2 This practice further describes the use of iron powder for fabrication of a stress-free test specimen to be used to quantify the systematic error that can occur in residual stress measurement of ferritic or martensitic steels. This practice is easily adapted to other alloys and ceramics by the use of a powder having a similar diffraction angle to the material to be measured.
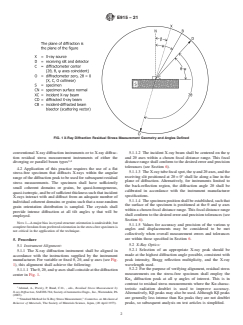
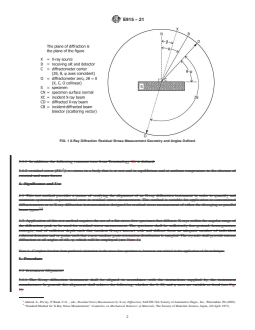
1.3 This practice is applicable to all X-ray diffraction instruments that measure diffracted X-rays from the crystal structure of a polycrystalline specimen. It is applicable to the acceptable multiple exposure techniques of residual stress measurement as defined in Test Method E2860. Through measurement of a high-angle back-reflection set of planes, these techniques are used to derive the interatomic spacing (d-spacing) and the crystallographic strain, and then calculate residual stress in which the θ, 2θ, and ψ rotation axes can be made to coincide (see Fig. 1).
FIG. 1 X-Ray Diffraction Residual Stress Measurement Geometry and Angles Defined
1.4 Units—The values stated in SI units are to be regarded as standard. The values given in parentheses after SI units are provided for information only and are not considered standard.
1.5 This standard does not purport to address all of the safety concerns, if any, associated with its use. It is the responsibility of the user of this standard to establish appropriate safety, health, and environmental practices and determine the applicability of regulatory limitations prior to use.
1.6 This international standard was developed in accordance with internationally recognized principles on standardization established in the Decision on Principles for the Development of International Standards, Guides and Recommendations issued by the World Trade Organization Technical Barriers to Trade (TBT) Committee.
General Information
- Status
- Published
- Publication Date
- 31-Oct-2021
- Technical Committee
- E28 - Mechanical Testing
- Drafting Committee
- E28.13 - Residual Stress Measurement
Relations
- Effective Date
- 01-Oct-2019
- Effective Date
- 01-Dec-2014
- Effective Date
- 01-May-2014
- Effective Date
- 01-May-2013
- Effective Date
- 01-Oct-2010
- Effective Date
- 01-Jun-2009
- Effective Date
- 15-May-2009
- Effective Date
- 15-May-2009
- Effective Date
- 01-Apr-2009
- Effective Date
- 01-Jan-2009
- Effective Date
- 01-Oct-2008
- Effective Date
- 01-Oct-2008
- Effective Date
- 01-Feb-2008
- Effective Date
- 01-Nov-2007
- Effective Date
- 01-Jun-2007
Overview
ASTM E915-21: Standard Practice for Verifying the Alignment of X-Ray Diffraction Instruments for Residual Stress Measurement establishes procedures to ensure accurate and reliable residual stress measurements using X-ray diffraction (XRD) instruments. Proper alignment of X-ray diffraction systems is critical for quantifying and minimizing systematic experimental errors. This practice applies to conventional X-ray diffractometers and specialized residual stress XRD instruments, using both diverging and parallel beam configurations.
The standard outlines the use of stress-free specimens (often prepared from iron powder for steel measurements) to assess the instrument's alignment. By following this guidance, laboratories can verify the performance of their X-ray diffraction instrumentation and improve the confidence in residual stress data.
Key Topics
- Instrument Alignment Verification: Procedures for aligning X-ray diffraction systems to ensure accurate measurement of residual stress by minimizing systematic errors related to instrument misalignment or sample positioning.
- Stress-Free Specimen Preparation: Guidance on preparing flat, quasi-isotropic, stress-free specimens (commonly from iron powder) that diffract X-rays within the required angular range, ensuring near-random grain orientation.
- Systematic and Random Error Assessment: Methods for checking both systematic and random error sources, including how to interpret the variation of d-spacing versus tilt angle and the precision of repeated measurements.
- Reporting Requirements: Key test parameters to be recorded, such as specimen details, instrument setup, measurement settings, analysis methods, and full result statistics for transparency and traceability.
- Adaptability: Instructions for adapting the practice to a variety of alloys and ceramics by selecting suitable powders with matching diffraction characteristics to the target material.
- Precision and Bias Control: Outlines acceptable limits for stress measurement deviations (e.g., mean values within specified tolerances) to confirm proper instrument performance.
Applications
ASTM E915-21 is instrumental for laboratories and facilities that employ X-ray diffraction for residual stress analysis, including:
- Quality Assurance in Manufacturing: Frequent verification of XRD alignment supports reliable monitoring and control of residual stress in critical parts, such as automotive, aerospace, and heavy machinery components.
- Materials Development and Research: Reliable residual stress data informs material selection, heat treatment optimization, and lifecycle assessment in R&D environments.
- Service Life Assessment: Accurate residual stress measurements help assess structural integrity and predict the performance or failure of components subjected to mechanical or thermal loads.
- Accreditation and Compliance: Satisfies requirements for documented instrument verification routines demanded by ISO/IEC 17025 accredited laboratories and QA systems.
Proper use of this standard helps ensure that residual stress values derived from X-ray diffraction are both precise and free from instrument-induced bias, providing higher confidence in results critical for engineering applications.
Related Standards
The practice references and complements several standards in the field of residual stress measurement and X-ray diffraction, including:
- ASTM E6 - Terminology Relating to Methods of Mechanical Testing
- ASTM E177 - Practice for Use of the Terms Precision and Bias in ASTM Test Methods
- ASTM E1426 - Test Method for Determining the X-Ray Elastic Constants for Use in the Measurement of Residual Stress Using X-Ray Diffraction Techniques
- ASTM E2860 - Test Method for Residual Stress Measurement by X-Ray Diffraction for Bearing Steels
These standards provide foundational terminology, detailed methods for elastic constant determination, and additional practices for ensuring high-quality and comparable residual stress data across industries.
Keywords: ASTM E915-21, X-ray diffraction, residual stress measurement, instrument alignment, stress-free specimen, systematic error, quality assurance, XRD calibration, materials testing, precision and bias.
Buy Documents
ASTM E915-21 - Standard Practice for Verifying the Alignment of X-Ray Diffraction Instruments for Residual Stress Measurement
REDLINE ASTM E915-21 - Standard Practice for Verifying the Alignment of X-Ray Diffraction Instruments for Residual Stress Measurement
Get Certified
Connect with accredited certification bodies for this standard

IMP NDT d.o.o.
Non-destructive testing services. Radiography, ultrasonic, magnetic particle, penetrant, visual inspection.

Inštitut za kovinske materiale in tehnologije
Institute of Metals and Technology. Materials testing, metallurgical analysis, NDT.

Q Techna d.o.o.
NDT and quality assurance specialist. 30+ years experience. NDT personnel certification per ISO 9712, nuclear and thermal power plant inspections, QA/
Sponsored listings
Frequently Asked Questions
ASTM E915-21 is a standard published by ASTM International. Its full title is "Standard Practice for Verifying the Alignment of X-Ray Diffraction Instruments for Residual Stress Measurement". This standard covers: SIGNIFICANCE AND USE 4.1 This practice provides a means of verifying the alignment of an X-ray diffraction instrument so as to quantify and minimize systematic experimental error in residual stress measurements. This practice is suitable for application to conventional X-ray diffraction instruments or to X-ray diffraction residual stress measurement instruments of either the diverging or parallel beam types3,4 4.2 Application of this practice requires the use of a flat stress-free specimen that diffracts X-rays within the angular range of the diffraction peak to be used for subsequent residual stress measurements. The specimen shall have sufficiently small coherent domains or grains, be quasi-homogeneous, quasi-isotropic, and be of sufficient thickness such that incident X-rays interact with and diffract from an adequate number of individual coherent domains or grains such that a near-random grain orientation distribution is sampled. The crystals shall provide intense diffraction at all tilt angles ψ that will be employed. Note 1: A major bias in crystal structure orientation is undesirable, but complete freedom from preferred orientation in the stress-free specimen is not critical in the application of the technique. SCOPE 1.1 This practice describes the procedure for verifying the alignment of X-ray diffraction instruments used for residual stress measurements. 1.2 This practice further describes the use of iron powder for fabrication of a stress-free test specimen to be used to quantify the systematic error that can occur in residual stress measurement of ferritic or martensitic steels. This practice is easily adapted to other alloys and ceramics by the use of a powder having a similar diffraction angle to the material to be measured. 1.3 This practice is applicable to all X-ray diffraction instruments that measure diffracted X-rays from the crystal structure of a polycrystalline specimen. It is applicable to the acceptable multiple exposure techniques of residual stress measurement as defined in Test Method E2860. Through measurement of a high-angle back-reflection set of planes, these techniques are used to derive the interatomic spacing (d-spacing) and the crystallographic strain, and then calculate residual stress in which the θ, 2θ, and ψ rotation axes can be made to coincide (see Fig. 1). FIG. 1 X-Ray Diffraction Residual Stress Measurement Geometry and Angles Defined 1.4 Units—The values stated in SI units are to be regarded as standard. The values given in parentheses after SI units are provided for information only and are not considered standard. 1.5 This standard does not purport to address all of the safety concerns, if any, associated with its use. It is the responsibility of the user of this standard to establish appropriate safety, health, and environmental practices and determine the applicability of regulatory limitations prior to use. 1.6 This international standard was developed in accordance with internationally recognized principles on standardization established in the Decision on Principles for the Development of International Standards, Guides and Recommendations issued by the World Trade Organization Technical Barriers to Trade (TBT) Committee.
SIGNIFICANCE AND USE 4.1 This practice provides a means of verifying the alignment of an X-ray diffraction instrument so as to quantify and minimize systematic experimental error in residual stress measurements. This practice is suitable for application to conventional X-ray diffraction instruments or to X-ray diffraction residual stress measurement instruments of either the diverging or parallel beam types3,4 4.2 Application of this practice requires the use of a flat stress-free specimen that diffracts X-rays within the angular range of the diffraction peak to be used for subsequent residual stress measurements. The specimen shall have sufficiently small coherent domains or grains, be quasi-homogeneous, quasi-isotropic, and be of sufficient thickness such that incident X-rays interact with and diffract from an adequate number of individual coherent domains or grains such that a near-random grain orientation distribution is sampled. The crystals shall provide intense diffraction at all tilt angles ψ that will be employed. Note 1: A major bias in crystal structure orientation is undesirable, but complete freedom from preferred orientation in the stress-free specimen is not critical in the application of the technique. SCOPE 1.1 This practice describes the procedure for verifying the alignment of X-ray diffraction instruments used for residual stress measurements. 1.2 This practice further describes the use of iron powder for fabrication of a stress-free test specimen to be used to quantify the systematic error that can occur in residual stress measurement of ferritic or martensitic steels. This practice is easily adapted to other alloys and ceramics by the use of a powder having a similar diffraction angle to the material to be measured. 1.3 This practice is applicable to all X-ray diffraction instruments that measure diffracted X-rays from the crystal structure of a polycrystalline specimen. It is applicable to the acceptable multiple exposure techniques of residual stress measurement as defined in Test Method E2860. Through measurement of a high-angle back-reflection set of planes, these techniques are used to derive the interatomic spacing (d-spacing) and the crystallographic strain, and then calculate residual stress in which the θ, 2θ, and ψ rotation axes can be made to coincide (see Fig. 1). FIG. 1 X-Ray Diffraction Residual Stress Measurement Geometry and Angles Defined 1.4 Units—The values stated in SI units are to be regarded as standard. The values given in parentheses after SI units are provided for information only and are not considered standard. 1.5 This standard does not purport to address all of the safety concerns, if any, associated with its use. It is the responsibility of the user of this standard to establish appropriate safety, health, and environmental practices and determine the applicability of regulatory limitations prior to use. 1.6 This international standard was developed in accordance with internationally recognized principles on standardization established in the Decision on Principles for the Development of International Standards, Guides and Recommendations issued by the World Trade Organization Technical Barriers to Trade (TBT) Committee.
ASTM E915-21 is classified under the following ICS (International Classification for Standards) categories: 19.100 - Non-destructive testing. The ICS classification helps identify the subject area and facilitates finding related standards.
ASTM E915-21 has the following relationships with other standards: It is inter standard links to ASTM E1426-14(2019)e1, ASTM E1426-14, ASTM E177-14, ASTM E177-13, ASTM E177-10, ASTM E1426-98(2009)e1, ASTM E6-09be1, ASTM E6-09b, ASTM E6-09a, ASTM E6-09, ASTM E6-08a, ASTM E177-08, ASTM E6-08, ASTM E6-07b, ASTM E6-07a. Understanding these relationships helps ensure you are using the most current and applicable version of the standard.
ASTM E915-21 is available in PDF format for immediate download after purchase. The document can be added to your cart and obtained through the secure checkout process. Digital delivery ensures instant access to the complete standard document.
Standards Content (Sample)
This international standard was developed in accordance with internationally recognized principles on standardization established in the Decision on Principles for the
Development of International Standards, Guides and Recommendations issued by the World Trade Organization Technical Barriers to Trade (TBT) Committee.
Designation: E915 −21
Standard Practice for
Verifying the Alignment of X-Ray Diffraction Instruments for
Residual Stress Measurement
This standard is issued under the fixed designation E915; the number immediately following the designation indicates the year of
original adoption or, in the case of revision, the year of last revision.Anumber in parentheses indicates the year of last reapproval.A
superscript epsilon (´) indicates an editorial change since the last revision or reapproval.
1. Scope 2. Referenced Documents
1.1 This practice describes the procedure for verifying the
2.1 ASTM Standards:
alignment of X-ray diffraction instruments used for residual
E6Terminology Relating to Methods of Mechanical Testing
stress measurements.
E177Practice for Use of the Terms Precision and Bias in
1.2 This practice further describes the use of iron powder ASTM Test Methods
for fabrication of a stress-free test specimen to be used to
E1426Test Method for Determining the X-Ray Elastic
quantify the systematic error that can occur in residual stress
Constants for Use in the Measurement of Residual Stress
measurement of ferritic or martensitic steels. This practice is
Using X-Ray Diffraction Techniques
easily adapted to other alloys and ceramics by the use of a
E2860Test Method for Residual Stress Measurement by
powder having a similar diffraction angle to the material to be
X-Ray Diffraction for Bearing Steels
measured.
1.3 This practice is applicable to all X-ray diffraction 3. Terminology
instruments that measure diffracted X-rays from the crystal
3.1 The definitions of calibration and verification that ap-
structure of a polycrystalline specimen. It is applicable to the
pear in Terminology E6 apply to this practice.
acceptable multiple exposure techniques of residual stress
3.1.1 In addition, the following common terms fromTermi-
measurement as defined in Test Method E2860. Through
nology E6 are defined:
measurement of a high-angle back-reflection set of planes,
these techniques are used to derive the interatomic spacing
3.1.2 error, n—for a measurement or reading, the amount it
(d-spacing) and the crystallographic strain, and then calculate
deviates from a known or reference value represented by a
residual stress in which the θ,2θ, and ψ rotation axes can be
measurement standard.
made to coincide (see Fig. 1).
3.1.2.1 Discussion—Mathematically, the error is calculated
1.4 Units—The values stated in SI units are to be regarded
by subtracting the accepted value from the measurement or
as standard. The values given in parentheses after SI units are
reading.
-2
provided for informationonlyandarenotconsideredstandard.
3.1.3 residual stress [FL ], n—stressinabodythatisatrest
1.5 This standard does not purport to address all of the
and in equilibrium and at uniform temperature in the absence
safety concerns, if any, associated with its use. It is the
of external and mass forces.
responsibility of the user of this standard to establish appro-
3.2 The terms accuracy, bias, and precision are used as
priate safety, health, and environmental practices and deter-
defined in Practice E177.
mine the applicability of regulatory limitations prior to use.
1.6 This international standard was developed in accor-
4. Significance and Use
dance with internationally recognized principles on standard-
ization established in the Decision on Principles for the
4.1 This practice provides a means of verifying the align-
Development of International Standards, Guides and Recom-
ment of an X-ray diffraction instrument so as to quantify and
mendations issued by the World Trade Organization Technical
minimize systematic experimental error in residual stress
Barriers to Trade (TBT) Committee.
measurements. This practice is suitable for application to
ThispracticeisunderthejurisdictionofASTMCommitteeE28onMechanical
Testing and is the direct responsibility of Subcommittee E28.13 on Residual Stress
Measurement. For referenced ASTM standards, visit the ASTM website, www.astm.org, or
Current edition approved Nov. 1, 2021. Published January 2022. Originally contact ASTM Customer Service at service@astm.org. For Annual Book of ASTM
approved in 1983. Last previous edition approved in 2016 as E915–16. DOI: Standards volume information, refer to the standard’s Document Summary page on
10.1520/E0915-21. the ASTM website.
Copyright © ASTM International, 100 Barr Harbor Drive, PO Box C700, West Conshohocken, PA 19428-2959. United States
E915 − 21
FIG. 1 X-Ray Diffraction Residual Stress Measurement Geometry and Angles Defined
conventional X-ray diffraction instruments or to X-ray diffrac- 5.1.1.2 The incident X-ray beam shall be centered on the ψ
tion residual stress measurement instruments of either the and 2θ axes within a chosen focal distance range. This focal
3,4
diverging or parallel beam types distance range shall conform to the desired error and precision
tolerances (see Section 6).
4.2 Application of this practice requires the use of a flat
5.1.1.3 TheX-raytubefocalspot,theψand2θaxes,andthe
stress-free specimen that diffracts X-rays within the angular
receiving slit positioned at 2θ = 0° shall lie along a line in the
rangeofthediffractionpeaktobeusedforsubsequentresidual
plane of diffraction. Alternatively, for instruments limited to
stress measurements. The specimen shall have sufficiently
the back-reflection region, the diffraction angle 2θ shall be
small coherent domains or grains, be quasi-homogeneous,
calibrated in accordance with the instrument manufacturer
quasi-isotropic,andbeofsufficientthicknesssuchthatincident
specifications.
X-rays interact with and diffract from an adequate number of
5.1.1.4 Thespecimenpositionshallbeestablished,suchthat
individual coherent domains or grains such that a near-random
the surface of the specimen is positioned at the θ and ψ axes
grain orientation distribution is sampled. The crystals shall
within a chosen focal distance range.This focal distance range
provide intense diffraction at all tilt angles ψ that will be
shallconformtothedesirederrorandprecisiontolerances(see
employed.
Section 6).
NOTE1—Amajorbiasincrystalstructureorientationisundesirable,but
5.1.1.5 Values for accuracy and precision of the various ψ
completefreedomfrompreferredorientationinthestress-freespecimenis
angles and displacements may be considered to be met
not critical in the application of the technique.
collectively when overall measurement errors and tolerances
are within those specified in Section 6.
5. Procedure
5.2 X-Ray Optics:
5.1 Instrument Alignment:
5.2.1 Selection of an appropriate X-ray peak should be
5.1.1 The X-ray diffraction instrument shall be aligned in
made at the highest diffraction angle possible, consistent with
accordance with the instructions supplied by the instrument
peak intensity, Bragg reflection multiplicity, and the X-ray
manufacturer. For variable or fixed θ,2θ, and ψ axes (see Fig.
wavelength used.
1), this alignment shall achieve the following:
5.2.2 For the purpose of verifying alignment, residual stress
5.1.1.1 Theθ,2θ,andψaxesshallcoincideatthediffraction
measurements on the stress-free specimen shall employ the
center in Fig. 1.
Kα diffraction peak at all ψ angles of interest. This is in
contrast to residual stress measurements where the Kα charac-
Ahmad, A., Prevéy, P, Ruud, C.O., , eds., Residual Stress Measurement by
teristic radiation doublet is used to improve accuracy.
X-ray Diffraction,SAEHS-784,SocietyofAutomotiveEngrs.,Inc.,Warrendale,PA
Alternatively, Kβ peaks may also be used.Although Kβ peaks
(2003).
are generally less intense than Kα peaks they are not doublet
“Standard Method for X-Ray Stress Measurement,” Committee on Mechanical
Behavior of Materials, The Society of Materials Science, Japan, (20 April 1973). peaks, so subsequent analysis on test articles is simplified.
E915 − 21
5.2.3 The incident and receiving X-ray beam optics should that no residual stress (strain) is sustained in the binder that
be selected to produce maximum separation of the Kα –Kα may be used to hold the crystalline particles together.
1 2
doublet. Because resolution of the Kα doublet can vary with 5.4.1 Apermanent stress-free specimen may be prepared by
the angle ψ, and because some instruments can be incapable mounting the chosen powder on the face of a microscope slide
(due to fixed X-ray optics) of obtaining resolution of the or in a shallow powder tray (of the type used for powder
doublet, care shall be taken not to resolve the doublet at some diffraction work ) using a binder.
ψ angles while blending the doublet into a single peak at other
NOTE 5—A commonly suitable choice of binder is a 10% solution of
ψ angles.
nitrocellulose cement diluted with acetone.
5.2.4 To avoid systematic error in the verification process
5.4.1.1 Place several drops of the binder solution on a clean
when Kα radiation is being used, care shall be taken either to
microscope slide or in a powder tray, and sprinkle the powder
split completely or to blend the Kα –Kα doublet (see 5.2.3
1 2
into the binder solution.
and 5.3.7), or consistently define the peak position by fitting to
5.4.1.2 The binder shall not diffract in the high-angle
a single equation summing the Kα andKα contributions.
1 2
back-reflectionregionsuchthatitinterfereswiththediffraction
peaks of interest. If peak interference occurs, another binder
5.3 Selection of Powder for a Stress-Free Iron Specimen:
shall be chosen such that it does not interfere with the
5.3.1 Iron powder with a particle size greater than 1 µm
−
diffraction peaks of interest.
(4×10 in.) shall be used whenever possible.
5.4.1.3 Spread and level the powder with a second micro-
NOTE 2—Annealed iron powder of <45 µm (325 mesh) has been found
scope slide.When a uniform flat surface has been produced by
suitable when using Cr Kα X-ray radiation.
alternately wetting with the binder solution and wiping with a
5.3.2 This practice may be applied to other metallic alloys
second slide, set the specimen aside and allow it to dry for
and ceramics (see 1.3).
several hours.
5.3.3 Crystallographic strain may be reported instead of
NOTE 6—Excess amounts of the binder solution can cause the powder
stress to circumvent the necessity of establishing applicable
layer to peel away from the surface of the microscope slide. Rewetting of
elastic constants and thereby eliminate a source of uncertainty.
the surface with acetone and redrying often eliminates this difficulty
5.4.1.4 Make the surface of the specimen as flat as possible
NOTE 3—Crystallographic strains differ from macroscopic strains in
most materials since the single crystal elastic properties in most materials so that the specimen surface is clearly defined and consi
...
This document is not an ASTM standard and is intended only to provide the user of an ASTM standard an indication of what changes have been made to the previous version. Because
it may not be technically possible to adequately depict all changes accurately, ASTM recommends that users consult prior editions as appropriate. In all cases only the current version
of the standard as published by ASTM is to be considered the official document.
Designation: E915 − 19 E915 − 21
Standard Test Method Practice for
Verifying the Alignment of X-Ray Diffraction
InstrumentationInstruments for Residual Stress
Measurement
This standard is issued under the fixed designation E915; the number immediately following the designation indicates the year of
original adoption or, in the case of revision, the year of last revision. A number in parentheses indicates the year of last reapproval. A
superscript epsilon (´) indicates an editorial change since the last revision or reapproval.
1. Scope
1.1 This test method covers the procedure for preparation and usage of a stress-free test specimen for the purpose of verifying the
systematic error caused by instrument misalignment and/or sample positioning during X-ray diffraction residual stress
measurement.
1.2 This test method is applicable to all X-ray diffraction instruments that measure diffracted X-rays from the crystal structure
of a polycrystalline specimen and is applicable to single, double, and multiple exposure techniques. Through measurement of a
high-angle back-reflection, these techniques are used to derive the interatomic spacing (d-spacing) and the macroscopic strain and
to then calculate residual stress in which the θ, 2θ, and ψ rotation axes can be made to coincide (see Fig. 1).
1.3 This test method describes the use of iron powder for fabrication of the stress-free test specimen that is used to verify the
systematic error for residual stress measurement of ferritic or martensitic steels. This test method is easily adapted to other alloys
and ceramics through use of powder having a similar diffraction angle as the material to be measured.
1.4 This standard does not purport to address all of the safety concerns, if any, associated with its use. It is the responsibility
of the user of this standard to establish appropriate safety, health, and environmental practices and determine the applicability of
regulatory limitations prior to use.
1.5 This international standard was developed in accordance with internationally recognized principles on standardization
established in the Decision on Principles for the Development of International Standards, Guides and Recommendations issued
by the World Trade Organization Technical Barriers to Trade (TBT) Committee.
2. Referenced Documents
2.1 ASTM Standards:
E6 Terminology Relating to Methods of Mechanical Testing
3. Terminology
3.1 The definitions of mechanical testing terms that appear in Terminology E6 apply to this test method.
This test method practice is under the jurisdiction of ASTM Committee E28 on Mechanical Testing and is the direct responsibility of Subcommittee E28.13 on Residual
Stress Measurement.
Current edition approved Oct. 15, 2019Nov. 1, 2021. Published December 2019January 2022. Originally approved in 1983. Last previous edition approved in 2016 as
E915 – 16. DOI: 10.1520/E0915-19.10.1520/E0915-21.
For referenced ASTM standards, visit the ASTM website, www.astm.org, or contact ASTM Customer Service at service@astm.org. For Annual Book of ASTM Standards
volume information, refer to the standard’s Document Summary page on the ASTM website.
Copyright © ASTM International, 100 Barr Harbor Drive, PO Box C700, West Conshohocken, PA 19428-2959. United States
E915 − 21
FIG. 1 X-Ray Diffraction Residual Stress Measurement Geometry and Angles Defined
3.1.1 In addition, the following common term from Terminology E6 is defined:
-2
3.1.2 residual stress [FL ], n—stress in a body that is at rest and in equilibrium and at uniform temperature in the absence of
external and mass forces.
4. Significance and Use
4.1 This test method provides a means of verifying the alignment of an X-ray diffraction instrument in order to quantify and
minimize systematic experimental error in residual stress measurement. This method is suitable for application to conventional
diffractometers or to X-ray diffraction instrumentation designed for residual stress measurement of either the diverging or parallel
3,4
beam types.
4.2 Application of this test method requires the use of a flat stress-free specimen that diffracts X-rays within the angular range of
the diffraction peak to be used for residual stress measurement. The specimen shall be sufficiently fine-grained, homogeneous,
isotropic, and of sufficient depth such that incident X-rays interact with and diffract from an adequate number of individual
coherent domains and or grains such that a near random grain orientation distribution is sampled. The crystals shall provide intense
diffraction at all angles of tilt, ψ, which will be employed (see Note 1).
NOTE 1—Complete freedom from preferred orientation in the stress free specimen is, however, not critical in the application of the technique.
5. Procedure
5.1 Instrument Alignment:
5.1.1 The X-ray diffraction instrument shall be aligned in accordance with the instructions supplied by the instrument
manufacturer. In general, this alignment shall achieve the following, whether the θ, 2θ, and ψ axes are variable or fixed (see Fig.
1):
Ahmad, A., Prevéy, P, Ruud, C.O., , eds., Residual Stress Measurement by X-ray Diffraction, SAE HS-784, Society of Automotive Engrs., Inc., Warrendale, PA (2003).
“Standard Method for X-Ray Stress Measurement,” Committee on Mechanical Behavior of Materials, The Society of Materials Science, Japan, (20 April 1973).
E915 − 21
5.1.1.1 The θ, 2θ, and ψ axes shall coincide.
5.1.1.2 The incident X-ray beam shall be centered on the ψ and 2θ axes, within a focusing range, which will conform to the desired
error and precision tolerances (see Sections 6 and 7).
5.1.1.3 The X-ray tube focal spot, the ψ and 2θ axes, and the receiving slit positioned at 2θ equals zero degrees shall be on a line
in the plane of diffraction. Alternatively, for instrumentation limited to the back reflection region, the diffraction angle 2θ shall be
calibrated.
5.1.1.4 The proper sample position shall be established, such that the surface of the sample is positioned at the θ and ψ axes, within
the focal distance range which will conform to the desired error and precision tolerances (see Sections 6 and 7).
5.1.1.5 The angle ψ shall be determined accurately. Values for accuracy and precision of the various angles and displacements are
not specified herein. These may be considered to be met collectively when overall measurement errors and tolerances are within
those specified in Sections 6 and 7.
5.2 X-Ray Optics:
5.2.1 Selection of the appropriate X-ray peak should be made at the highest diffraction angle possible, consistent with peak
intensity, and the X-ray wavelength used.
5.2.2 For the purpose of verifying systematic errors, residual stress measurements on the stress-free specimen shall employ the
Kα diffraction peak at all ψ angles of interest. This is in contrast to actual stress measurements where the Kα characteristic
radiation doublet is used to improve accuracy. Kβ peaks may also be used; although they are generally less intense than Kα lines
they are not doublet peaks, so subsequent analysis on test articles is simplified.
5.2.3 It is desirable to select incident and receiving X-ray beam optics that will produce maximum separation of the Kα – Kα
1 2
doublet. Because resolution of the Kα doublet may vary with the angle ψ, and because some instrumentation may be incapable
(due to fixed X-ray optics) of obtaining resolution of the doublet, care shall be taken not to resolve the doublet at some ψ angles
while blending the doublet into a single peak at other ψ angles.
5.3 Selection of Powder for a Stress-Free Iron Specimen:
− 5
5.3.1 Use iron powder with a particle size greater than 1 μm (4 × 10 in.) (See Note 2.)
NOTE 2—Annealed iron powder of <45 μm (325 mesh) has been found suitable when using Cr Kα X-radiation.
5.3.2 This standard may be applied to other metallic alloys and ceramics (see 1.3).
5.3.3 The reporting of crystallographic strain instead of stress circumvents the necessity of establishing applicable elastic constants
and serves to eliminate a source of uncertainty. It should be noted that crystallographic strains differ from macroscopic strains in
most materials since the single crystal elastic properties in most materials are anisotropic.
5.3.4 The iron (or other) powder under vacuum may be annealed so as to reduce the diffraction peak width, and thereby increase
the diffracted intensity and subsequently, the peak position resolution. This is generally desirable (see Note 3). Powders in the form
of filings may be used, but may produce broader diffraction peaks due to plastic deformation; the broadening can persist even after
annealing.
NOTE 3—It can be advantageous to anneal an oxide-forming powder in a reducing atmosphere rather than in vacuum to avoid problems from surface
contamination. I may not be necessary to anneal ceramic powders since these materials do not tend to exhibit line broadening due to plastic deformation.
5.3.5 In the event that an instrument is incapable of resolving the Kα – Kα doublet being employed, it may be desirable to
1 2
deliberately obtain plastically deformed powders which ensure that partial resolution of the Kα doublet does not occur.
5.3.6 Extremely fine powders have also been shown to produce line broadening, sufficient to suppress resolution of the Kα doublet.
E915 − 21
5.3.7 The need for broader peaks or full resolution may be eliminated by fitting the observed, either fully resolved or partially
resolved or unresolved, doublet to a single equation defined by the sum of the Kα and Kα contributions; then the peak position
1 2
is given by that of the fitted Kα position.
5.4 Stress-Free Specimen Preparation—Preparation methods other than those described below may be used providing that no
residual stress (strain) is sustained in the binder that may be used to hold the crystalline particles together.
5.4.1 A permanent stress-free (strain-free) specimen may be prepared by mounting the powder on the face of a microscope slide
or in a shallow powder tray (of the type used for powder diffraction work on a diffractometer) using a 10 % solution of
nitrocellulose cement diluted with acetone. The binder should not diffract in the high-angle back-reflection region and interfere
with the diffraction peaks of interest. Place several drops of the solution on a clean microscope slide or in a sample tray, and
sprinkle the powder into the binder. The powder may be spread and leveled with a second microscope slide. When a uniform flat
surface has been produced by alternately wetting with the binder solution and wiping with a second slide, set the specimen aside
and allow it to dry for several hours. Excess amounts of the binder may cause it to peel away from the surface of the microscope
slide. Rewetting of the surface with acetone and redrying may eliminate this difficulty. Make the surface of the specimen as flat
as possible so that the specimen surface is clearly defined and consistent across the surface.
5.4.2 A temporary specimen may be rapidly prepared using petroleum jelly as an amorphous binder. Place a small quantity of
petroleum jelly on the face of one microscope slide and press it against a second slide to extrude the petroleum jelly into a uniform
flat film. Remove the second microscope slide with a wiping action taking care to keep the surface layer of petroleum jelly thin
and flat. Holding the petroleum jelly-coated slide at a steep angle to a vertical line, sprinkle the iron powder from a sufficient height
above the slide so that the powder strikes the coated surface and either adheres or is deflected away. Do not allow the powder to
pack and build up on the surface. For instruments that do not tilt or rapidly rotate the sample during the measurement of residual
stress, a binder may not be necessary.
5.4.3 The surface area of the powder shall be of sufficient size to intersect the entire incident X-ray beam at all ψ angles to be used
during the measurement of residual stress.
5.5 X-ray Diffraction Instrument Alignment Verification:
5.5.1 The X-ray diffraction instrument shall be aligned in accordance with the instructions supplied by the instrument
manufacturer. Position the stress-free (strain-free) specimen in line with the X-ray aperture of the X-ray diffraction instrument (see
5.1.1.4). (See Note 4.)
NOTE 4—Failure to place the powder surface on the center of rotation of the ψ and 2θ axes induces a systematic specimen displacement error.
5.5.2 In the event that a mechanical gage which contacts the surface of the specimen is used for specimen positioning, a thin metal
shim may be placed in front of the powder surface to protect it. Place this gage against the face of the metal shim, and adjust the
positioning to account for the inclusion of the shim in front of the gage such that the surface of the powder is at the correct distance
from the reference point of the gage for residual stress measurement.
5.5.3 Without adjusting the specimen position, perform five successive residual stress measurements using the method and
correction procedures normally employed for the instrument, including positive and negative ψ tilts when applicable, where ψ is
the angle between the specimen surface normal and the diffracting plane normal. ψ splitting is a symptom of misalignment.
5.5.4 The differential between the split portions of the least squares fit d-spacing versus sin (ψ) data shall result in a shear stress
equivalent to or less than 614 MPa (62.0 ksi). To avoid systematic error in the verification process when Kα radiation is being
used, care shall be taken to either completely split or blend the Kα – Kα doublet (see 5.2), or consistently define the peak position
1 2
by fitting to a single equation summing the Kα and Kα contributions.
1 2
6. Calculations and Interpretation of Results
6.1 Systematic Error—All methods leading to the calculation of both in-plane and shear stresses may be employed. These methods
are based on the calculation of the slope and the opening of the d-spacing versus sin (ψ) values or fitting to an ellipse.
6.1.1 Reduce the X-ray diffraction data obtained from the five measurements in whatever manner is normally employed for the
E915 − 21
X-ray diffraction instrument in use, and include all corrections normally applied to raw X-ray diffraction data. Application of the
X-ray elastic constants appropriate for the stressed material to be measured is important. It can be advantageous to report strain
values, rather than stress, to avoid the uncertainty of specifying elastic constants. Calculate the simple arithmetic mean and
standard deviation about the mean for the five measurements. If the mean value is within 614 MPa (62.0 ksi) of zero, the
instrument is properly aligned. In the event that the mean differs from zero by more than 614 MPa (62.0 ksi), repeat 5.1 and 5.5.
6.1.2 Alternatively, strain values may be used. This avoids error due to selection of inappropriate elastic constants. The acceptable
mean normal strain 6100 ppm and the acceptable mean shear strain is 650 ppm with respect to the stress-free (strain-free)
d-spacing.
6.2 Random Error:
6.2.1 Experience has shown that the standard deviation of the five measurements using a well aligned goniometer is ≤ 7MPa (61.0
ksi). In the event that the standard deviation of the five measurements exceeds 614 MPa (62.0 ksi), the stress-measurement
technique employed and the instrumentation shall be investigated for other sources of error affecting the measurement precision.
Error due to counting statistics can result from a failure to take sufficient time during the measurement to obtain precise intensity
information, and to subsequently determine the precise diffraction peak positions
6.2.2 Methods are available for estimating the standard deviation of the measured stress that is related to counting statistics, and
fitted peak positions. Mechanical sources of error such as loose bearings and ways within the X-ray diffraction instrument can
result in significant random error
6.2.3 When strain values are reported, the standard deviation of the five measurements shall be ≤100 ppm and ≤50 ppm for shear
stress.
7. Precision and Bias
7.1 The precision of this method will be dependent upon the type of X-ray diffraction instrumentation employed and the methods
of data reduction used in residual stress measurement. The preliminary results of round-robin investigations using this method
indicate that instrument alignment resulting in measured stress of stress-free powders of zero 614 MPa (62.0 ksi) (see 6.1) was
achieved for both standard diffractometers and X-ray diffraction instrumentation designed for residual stress measurement in the
back reflection region only. Instrumental precision measured by this method (see 6.2) has been found to be less than 67 MPa (61.0
ksi).
7.2 The accuracy of this method is considered to be absolute because the specimen is stress-free. Deviation of results obtained
when using this method, provided the specimen has been properly prepared and maintained, are attributed to the instrumentation
under investigation.
7.3 Additional sources of error may be related to other factors, including the quality of the diffracted X-ray peaks (background
and noise). They may be classified as either instrumental/equipment or specimen-related factors. If other errors are suspected, the
use of a high-strain standard is recommended.
7.4 In some cases, depending on the material being used, the specified average stress (strain) precision may not be achievable.
Thus, users should investigate the issue or choose a different stress-free (strain-free) material.
E915 − 21
8. Keywords
8.1 alignment; residual stress; stress-free specimen; systematic error; x-ray diffraction
ASTM International takes no position respecting the validity of any patent rights asserted in connection with any item mentioned
in this standard. Users of this standard are expressly advised that determination of the validity of any such patent rights, and the risk
of infringement of such rights, are entirely their own responsibility.
This standard is subject to revision at any time by the responsible technical committee and must be reviewed every five years and
if not revised, either reapproved or withdrawn. Your comments are invited either for revision of this standard or for additional standards
and should be addressed to ASTM International Headquarters. Your comments will receive careful consideration at a meeting of the
responsible technical committee, which you may attend. If you feel that your comments have not received a fair hearing you should
make your views known to the ASTM Committee on Standards, at the address shown below.
This standard is copyrighted by ASTM International, 100 Barr Harbor Drive, PO Box C700, West Conshohocken, PA 19428-2959,
United States. Individual reprints (single or multiple copies) of this standard may be obtained by contacting ASTM at the above
address or at 610-832-9585 (phone), 610-832-9555 (fax), or service@astm.org (e-mail); or through the ASTM website
(www.astm.org). Permission rights to photocopy the standard may also be secured from the Copyright Clearance Center, 222
Rosewood Drive, Danvers, MA 01923, Tel: (978) 646-2600; http://www.copyright.com/
1. Scope
1.1 This practice describes the procedure for verifying the alignment of X-ray diffraction instruments used for residual stress
measurements.
1.2 This practice further describes the use of iron powder for fabrication of a stress-free test specimen to be used to quantify the
systematic error that can occur in residual stress measurement of ferritic or martensitic steels. This practice is easily adapted to
other alloys and ceramics by
...
Questions, Comments and Discussion
Ask us and Technical Secretary will try to provide an answer. You can facilitate discussion about the standard in here.
Loading comments...