ASTM D7682-17(2022)
(Test Method)Standard Test Method for Replication and Measurement of Concrete Surface Profiles Using Replica Putty
Standard Test Method for Replication and Measurement of Concrete Surface Profiles Using Replica Putty
SIGNIFICANCE AND USE
5.1 For proper bonding of overlays and coatings, it is important that a concrete surface have the correct surface profile. This test method allows one to obtain a permanent replica of the concrete surface, which can then be compared to visual profile standards, or evaluated quantitatively for profile depth. The permanent replica may also prove useful in resolving future disputes.
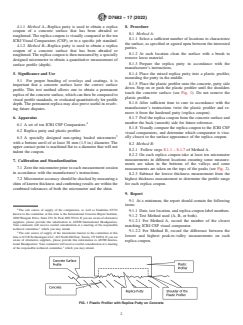
FIG. 1 Plastic Profiler with Replica Putty on Concrete
SCOPE
1.1 This test method is suitable for both field and laboratory use to obtain a permanent record of concrete surface profile using replica putty and to determine the depth of that surface profile.
Note 1: The procedure in this standard was developed for concrete substrates but may be appropriate for other rigid substrates.
1.2 A profile can be imparted to concrete by various methods such as blast cleaning and acid etching. The depth of the surface profile has been shown to be a factor in coating adhesion and performance.
1.3 The International Concrete Repair Institute (ICRI) provides a means of visually judging a concrete surface by use of ten different visual comparators called Concrete Surface Profiles (CSP). This standard compliments the use of these visual comparators.
1.4 The values stated in SI units are to be regarded as standard. The values given in parentheses are for information only.
1.5 This standard does not purport to address all of the safety concerns, if any, associated with its use. It is the responsibility of the user of this standard to establish appropriate safety, health, and environmental practices and determine the applicability of regulatory limitations prior to use.
1.6 This international standard was developed in accordance with internationally recognized principles on standardization established in the Decision on Principles for the Development of International Standards, Guides and Recommendations issued by the World Trade Organization Technical Barriers to Trade (TBT) Committee.
General Information
- Status
- Published
- Publication Date
- 31-May-2022
- Technical Committee
- D01 - Paint and Related Coatings, Materials, and Applications
- Drafting Committee
- D01.46 - Industrial Protective Coatings
Relations
- Effective Date
- 01-May-2014
- Effective Date
- 01-May-2013
- Effective Date
- 01-May-2013
- Effective Date
- 01-Nov-2011
- Effective Date
- 01-Oct-2010
- Effective Date
- 01-Oct-2008
- Effective Date
- 01-Oct-2008
- Refers
ASTM E177-06b - Standard Practice for Use of the Terms Precision and Bias in ASTM Test Methods - Effective Date
- 15-Nov-2006
- Refers
ASTM E177-06a - Standard Practice for Use of the Terms Precision and Bias in ASTM Test Methods - Effective Date
- 01-Nov-2006
- Effective Date
- 01-Nov-2005
- Refers
ASTM E177-04e1 - Standard Practice for Use of the Terms Precision and Bias in ASTM Test Methods - Effective Date
- 01-Nov-2004
- Effective Date
- 01-Nov-2004
- Effective Date
- 01-Nov-2004
- Refers
ASTM E177-90a(2002) - Standard Practice for Use of the Terms Precision and Bias in ASTM Test Methods - Effective Date
- 10-Jan-2002
- Effective Date
- 10-May-1999
Overview
ASTM D7682-17(2022) is the internationally recognized Standard Test Method for Replication and Measurement of Concrete Surface Profiles Using Replica Putty. Published by ASTM International, this test method is a vital tool for professionals in concrete repair, coating, and overlay applications. It provides a standardized approach to accurately replicate and measure the surface profile of concrete substrates. By capturing a permanent replica of the concrete surface, this method ensures that overlays and coatings adhere properly, optimizing long-term performance and minimizing the risk of failure.
Key Topics
- Purpose and Significance: Ensures that concrete surfaces have the correct texture and profile required for effective bonding of overlays, sealers, and coatings.
- Permanent Replication: Uses two-part replica putty to capture a detailed, reverse image of the concrete surface, which can be used for future reference.
- Profile Measurement: Supports both qualitative and quantitative evaluation of surface roughness, either by visual comparison to standardized comparators or by precise thickness measurement.
- Field and Laboratory Use: Suitable for both on-site and lab environments, offering flexibility for a range of project needs.
- Dispute Resolution: The permanent nature of the replica provides valuable evidence in cases of disputes over surface preparation or coating adhesion.
Applications
ASTM D7682-17(2022) is widely implemented across industries that require reliable surface preparation and quality control:
- Coating and Overlay Installation: Essential for verifying that concrete substrates are properly prepared prior to the application of protective coatings, polymer overlays, or sealers.
- Quality Assurance and Inspection: Allows contractors, inspectors, and quality control professionals to document and verify the extent of surface preparation.
- Project Documentation: Replicas offer permanent records that can be referenced for warranty claims, dispute resolution, or performance investigation.
- Comparative Analysis: Used in conjunction with ICRI Concrete Surface Profile (CSP) comparators to visually or quantitatively determine surface profile depth.
- Research and Development: Supports product development and substrate testing by quantifying the effect of different preparation techniques such as blast cleaning or acid etching.
Related Standards
The following standards and guidelines are frequently referenced in conjunction with ASTM D7682-17(2022):
- ASTM E177: Practice for Use of the Terms Precision and Bias in ASTM Test Methods
- ASTM E691: Practice for Conducting an Interlaboratory Study to Determine the Precision of a Test Method
- ICRI Technical Guideline 310.2: Selecting and Specifying Concrete Surface Preparation for Sealers, Coatings, and Polymer Overlays
- ICRI CSP Visual Comparators: A key visual tool for judging surface profiles, these comparators are integral for qualitative assessment under this standard.
Practical Value
By establishing a repeatable and objective method for concrete surface profile measurement using replica putty, ASTM D7682-17(2022) helps:
- Ensure long-lasting coating and overlay performance by verifying surface profile requirements
- Provide evidence for compliance and quality control
- Reduce costly rework due to improper surface preparation
- Enable consistent communication and expectations between contractors, owners, and inspectors
For organizations and professionals involved in concrete surface preparation and coating applications, ASTM D7682-17(2022) is an indispensable resource for surface roughness measurement and ensuring the durability of concrete repairs and coatings.
Keywords: ASTM D7682, concrete surface profile, replica putty, permanent replica, coating adhesion, ICRI CSP comparator, surface roughness measurement, surface preparation standard, quality control, concrete repair.
Buy Documents
ASTM D7682-17(2022) - Standard Test Method for Replication and Measurement of Concrete Surface Profiles Using Replica Putty
Get Certified
Connect with accredited certification bodies for this standard

ICC Evaluation Service
Building products evaluation and certification.

QAI Laboratories
Building and construction product testing and certification.

Aboma Certification B.V.
Specialized in construction, metal, and transport sectors.
Sponsored listings
Frequently Asked Questions
ASTM D7682-17(2022) is a standard published by ASTM International. Its full title is "Standard Test Method for Replication and Measurement of Concrete Surface Profiles Using Replica Putty". This standard covers: SIGNIFICANCE AND USE 5.1 For proper bonding of overlays and coatings, it is important that a concrete surface have the correct surface profile. This test method allows one to obtain a permanent replica of the concrete surface, which can then be compared to visual profile standards, or evaluated quantitatively for profile depth. The permanent replica may also prove useful in resolving future disputes. FIG. 1 Plastic Profiler with Replica Putty on Concrete SCOPE 1.1 This test method is suitable for both field and laboratory use to obtain a permanent record of concrete surface profile using replica putty and to determine the depth of that surface profile. Note 1: The procedure in this standard was developed for concrete substrates but may be appropriate for other rigid substrates. 1.2 A profile can be imparted to concrete by various methods such as blast cleaning and acid etching. The depth of the surface profile has been shown to be a factor in coating adhesion and performance. 1.3 The International Concrete Repair Institute (ICRI) provides a means of visually judging a concrete surface by use of ten different visual comparators called Concrete Surface Profiles (CSP). This standard compliments the use of these visual comparators. 1.4 The values stated in SI units are to be regarded as standard. The values given in parentheses are for information only. 1.5 This standard does not purport to address all of the safety concerns, if any, associated with its use. It is the responsibility of the user of this standard to establish appropriate safety, health, and environmental practices and determine the applicability of regulatory limitations prior to use. 1.6 This international standard was developed in accordance with internationally recognized principles on standardization established in the Decision on Principles for the Development of International Standards, Guides and Recommendations issued by the World Trade Organization Technical Barriers to Trade (TBT) Committee.
SIGNIFICANCE AND USE 5.1 For proper bonding of overlays and coatings, it is important that a concrete surface have the correct surface profile. This test method allows one to obtain a permanent replica of the concrete surface, which can then be compared to visual profile standards, or evaluated quantitatively for profile depth. The permanent replica may also prove useful in resolving future disputes. FIG. 1 Plastic Profiler with Replica Putty on Concrete SCOPE 1.1 This test method is suitable for both field and laboratory use to obtain a permanent record of concrete surface profile using replica putty and to determine the depth of that surface profile. Note 1: The procedure in this standard was developed for concrete substrates but may be appropriate for other rigid substrates. 1.2 A profile can be imparted to concrete by various methods such as blast cleaning and acid etching. The depth of the surface profile has been shown to be a factor in coating adhesion and performance. 1.3 The International Concrete Repair Institute (ICRI) provides a means of visually judging a concrete surface by use of ten different visual comparators called Concrete Surface Profiles (CSP). This standard compliments the use of these visual comparators. 1.4 The values stated in SI units are to be regarded as standard. The values given in parentheses are for information only. 1.5 This standard does not purport to address all of the safety concerns, if any, associated with its use. It is the responsibility of the user of this standard to establish appropriate safety, health, and environmental practices and determine the applicability of regulatory limitations prior to use. 1.6 This international standard was developed in accordance with internationally recognized principles on standardization established in the Decision on Principles for the Development of International Standards, Guides and Recommendations issued by the World Trade Organization Technical Barriers to Trade (TBT) Committee.
ASTM D7682-17(2022) is classified under the following ICS (International Classification for Standards) categories: 91.080.40 - Concrete structures. The ICS classification helps identify the subject area and facilitates finding related standards.
ASTM D7682-17(2022) has the following relationships with other standards: It is inter standard links to ASTM E177-14, ASTM E691-13, ASTM E177-13, ASTM E691-11, ASTM E177-10, ASTM E691-08, ASTM E177-08, ASTM E177-06b, ASTM E177-06a, ASTM E691-05, ASTM E177-04e1, ASTM E177-04, ASTM E177-06, ASTM E177-90a(2002), ASTM E691-99. Understanding these relationships helps ensure you are using the most current and applicable version of the standard.
ASTM D7682-17(2022) is available in PDF format for immediate download after purchase. The document can be added to your cart and obtained through the secure checkout process. Digital delivery ensures instant access to the complete standard document.
Standards Content (Sample)
This international standard was developed in accordance with internationally recognized principles on standardization established in the Decision on Principles for the
Development of International Standards, Guides and Recommendations issued by the World Trade Organization Technical Barriers to Trade (TBT) Committee.
Designation:D7682 −17 (Reapproved 2022)
Standard Test Method for
Replication and Measurement of Concrete Surface Profiles
Using Replica Putty
This standard is issued under the fixed designation D7682; the number immediately following the designation indicates the year of
original adoption or, in the case of revision, the year of last revision. A number in parentheses indicates the year of last reapproval. A
superscript epsilon (´) indicates an editorial change since the last revision or reapproval.
1. Scope 2. Referenced Documents
1.1 This test method is suitable for both field and laboratory 2.1 ASTM Standards:
use to obtain a permanent record of concrete surface profile E177 Practice for Use of the Terms Precision and Bias in
using replica putty and to determine the depth of that surface ASTM Test Methods
profile. E691 Practice for Conducting an Interlaboratory Study to
NOTE 1—The procedure in this standard was developed for concrete
Determine the Precision of a Test Method
substrates but may be appropriate for other rigid substrates.
2.2 ICRI Document:
1.2 A profile can be imparted to concrete by various
Technical Guideline 310.2 Selecting and Specifying Con-
methods such as blast cleaning and acid etching. The depth of
crete Surface Preparation for Sealers, Coatings, and Poly-
the surface profile has been shown to be a factor in coating
mer Overlays
adhesion and performance.
3. Terminology
1.3 The International Concrete Repair Institute (ICRI) pro-
3.1 Definitions of Terms Specific to This Standard:
vides a means of visually judging a concrete surface by use of
ten different visual comparators called Concrete Surface Pro- 3.1.1 plastic profiler, n—a device that provides a controlled
means for holding and confining replica putty for placement
files (CSP). This standard compliments the use of these visual
comparators. onto a concrete surface.
3.1.2 replica coupon, n—hardened replica putty containing
1.4 The values stated in SI units are to be regarded as
a reverse image replica of a concrete surface.
standard. The values given in parentheses are for information
only.
3.1.3 replica putty, n—a two-part, anti-stick, rapid harden-
ing putty used to conform to a concrete surface and replicate
1.5 This standard does not purport to address all of the
surface profile.
safety concerns, if any, associated with its use. It is the
responsibility of the user of this standard to establish appro-
3.1.4 surface profile, n—the height of the major peaks
priate safety, health, and environmental practices and deter-
relative to the major valleys.
mine the applicability of regulatory limitations prior to use.
3.1.5 visual comparator, n—an ICRI molded replica of a
1.6 This international standard was developed in accor-
concrete surface profile that allows visual comparison to an
dance with internationally recognized principles on standard-
actual concrete surface.
ization established in the Decision on Principles for the
Development of International Standards, Guides and Recom-
4. Summary of Test Method
mendations issued by the World Trade Organization Technical
4.1 The methods are:
Barriers to Trade (TBT) Committee.
1 2
This test method is under the jurisdiction of ASTM Committee D01 on Paint For referenced ASTM standards, visit the ASTM website, www.astm.org, or
and Related Coatings, Materials, andApplications and is the direct responsibility of contact ASTM Customer Service at service@astm.org. For Annual Book of ASTM
Subcommittee D01.46 on Industrial Protective Coatings. Standards volume information, refer to the standard’s Document Summary page on
CurrenteditionapprovedJune1,2022.PublishedJuly2022.Originallyapproved the ASTM website.
in 2010. Last previous edition approved in 2017 as D7682 – 17. DOI: 10.1520/ Available from International Concrete Repair Institute (ICRI), 1000 Westgate
D7682-17R22. Drive, Suite 252, St. Paul, MN 55114, http//www.icri.org.
Copyright © ASTM International, 100 Barr Harbor Drive, PO Box C700, West Conshohocken, PA 19428-2959. United States
D7682−17 (2022)
4.1.1 Method A—Replica putty is used to obtain a replica 8. Procedure
coupon of a concrete surface that has been abraded or
8.1 Method A:
roughened. The replica coupon is visually compared to the ten
8.1.1 Select a sufficient number of locations to characterize
ICRI Visual Comparators (CSP), or to a specific job standard.
the surface, as specified or agreed upon between the interested
4.1.2 Method B—Replica putty is used to obtain a replica
parties.
coupon of a concrete surface that has been abraded or
8.1.2 At each location clean the surface with a brush to
roughened.The replica coupon is then measured by a specially
remove loose material.
designed micrometer to obtain a quantitative measurement of
8.1.3 Prepare the replica putty in accordance with the
surface profile (depth).
manufacturer’s instructions.
8.1.4 Place the mixed replica putty into a plastic profiler,
5. Significance and Use
mounding the putty in the middle.
5.1 For proper bonding of overlays and coatings, it is
8.1.5 Place the plastic profiler onto the concrete, putty side
important that a concrete surface have the correct surface
down. Step on or push the plastic profiler until the shoulders
profile. This test method allows one to obtain a permanent
touch the concrete surface (see Fig. 1). Do not remove the
replica of the concrete surface, which can then be compared to
plastic profiler.
visual profile standards, or evaluated quantitatively for profile
8.1.6 After sufficient time to cure in accordance with the
depth. The permanent replica may also prove useful in resolv-
manufacturer’s instructions twist the plastic profiler and re-
ing future disputes.
move it from the hardened putty (replica coupon).
8.1.7 Peel the replica coupon from the concrete surface and
6. Apparatus
number the back (smooth) side for future reference.
6.1 A set of ten ICRI CSP Comparators.
8.1.8 Visually compare the replica coupon to the ICRI CSP
6.2 Replica putty and plastic profiler.
visual comparators, and determine which comparator is visu-
6.3 A specially designed non-spring loaded micrometer ally closest to the surface appearance of the replica coupon.
with a bottom anvil of at least 38 mm (1.5 in.) diameter. The
8.2 Method B:
upper contact point is machined flat to a diameter that will not
8.2.1 Follow steps 8.1.1 – 8.1.7 of Method A.
indent the coupon.
8.2.2 On each replica coupon take at least ten micrometer
measurements in different locations ensuring some
...


Questions, Comments and Discussion
Ask us and Technical Secretary will try to provide an answer. You can facilitate discussion about the standard in here.
Loading comments...