Standard Specification for Stainless Steel Bolts, Hex Cap Screws, and Studs

SIGNIFICANCE AND USE
For the purposes of determining compliance with the specified limits for properties listed in this specification, an observed value or calculated value shall be rounded in accordance with Practice E 29.
SCOPE
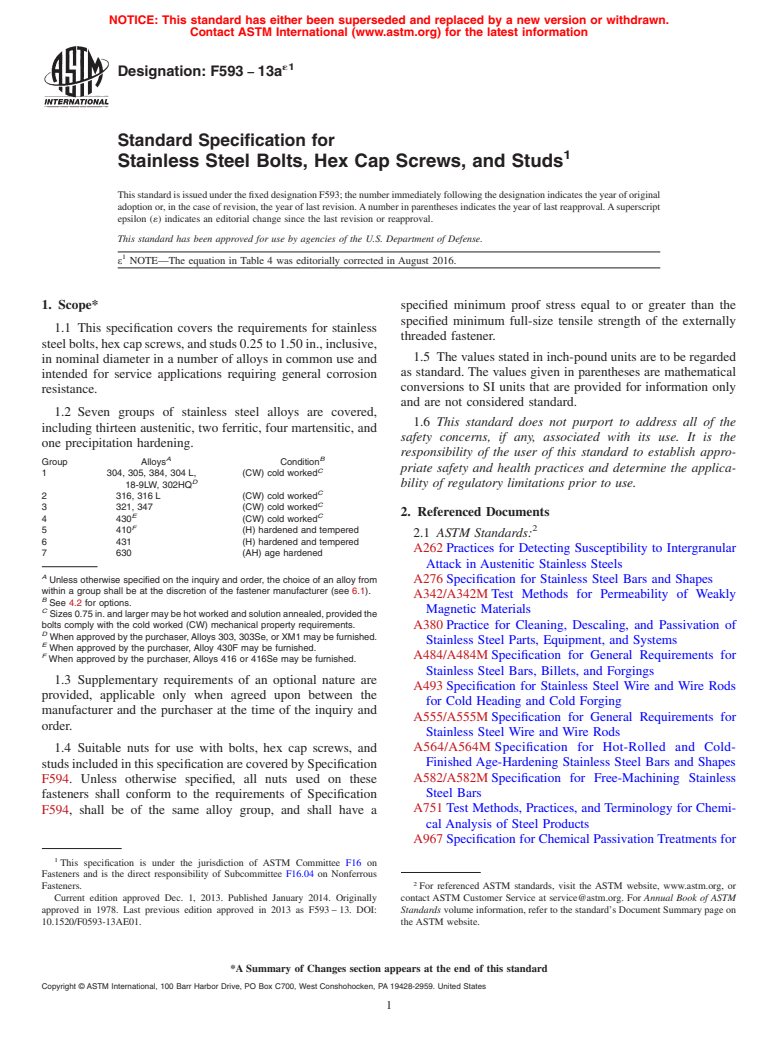
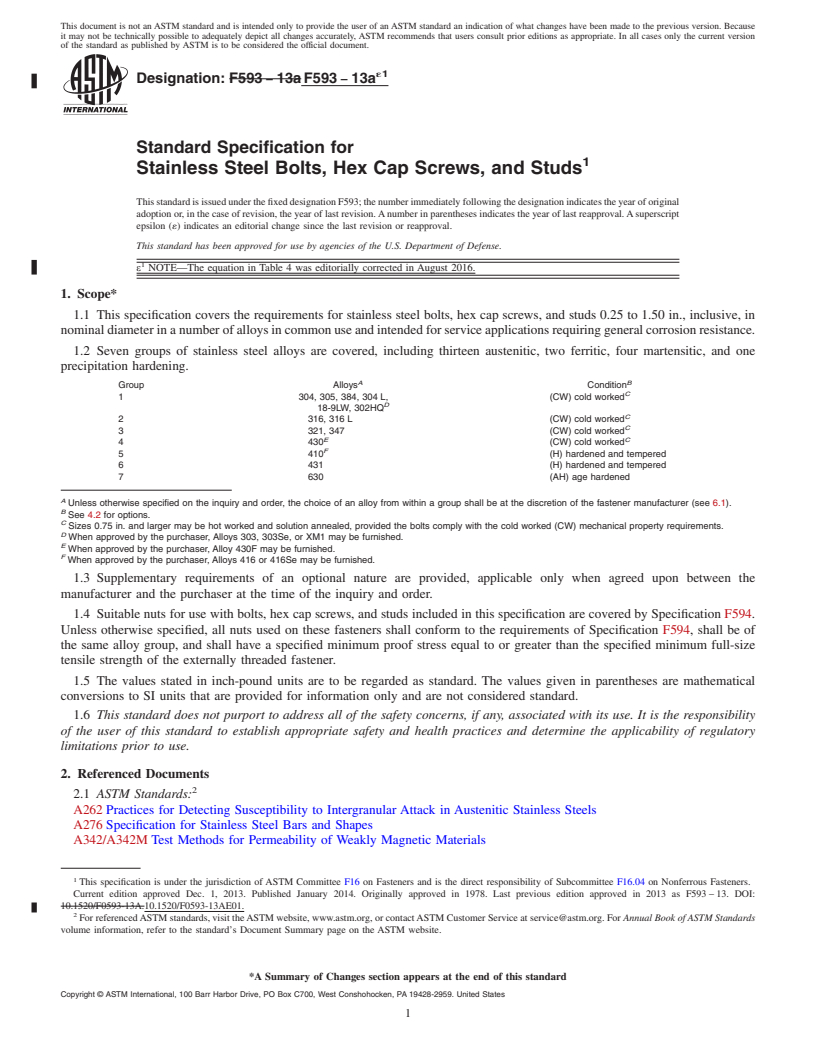
1.1 This specification covers the requirements for stainless steel bolts, hex cap screws, and studs 0.25 to 1.50 in., inclusive, in nominal diameter in a number of alloys in common use and intended for service applications requiring general corrosion resistance.  
1.2 Seven groups of stainless steel alloys are covered, including twelve austenitic, two ferritic, four martensitic, and one precipitation hardening.
Group
AlloysA
ConditionB
  1 304, 305, 384, 304 L, (CW) cold workedC   18-9LW, 302HQD  2 316, 316 L (CW) cold workedC 3 321, 347 (CW) cold workedC 4 430E (CW) cold workedC 5 410F (H) hardened and tempered 6 431 (H) hardened and tempered 7 630 (AH) age hardened
A Unless otherwise specified on the inquiry and order, the choice of an alloy from within a group shall be at the discretion of the fastener manufacturer (see 6.1).  
B See 4.2 for options.  
C Sizes 0.75 in. and larger may be hot worked and solution annealed.  
D When approved by the purchaser, Alloys 303, 303Se, or XM1 may be furnished.  
E When approved by the purchaser, Alloy 430F may be furnished.  
F When approved by the purchaser, Alloys 416 or 416Se may be furnished.  
1.3 Supplementary requirements of an optional nature are provided, applicable only when agreed upon between the manufacturer and the purchaser at the time of the inquiry and order.  
1.4 Suitable nuts for use with bolts, hex cap screws, and studs included in this specification are covered by Specification F 594. Unless otherwise specified, all nuts used on these fasteners shall conform to the requirements of Specification F 594, shall be of the same alloy group, and shall have a specified minimum proof stress equal to or greater than the specified minimum full-size tensile strength of the externally threaded fastener.
1.5 The values stated in inch-pound units are to be regarded as standard. The values given in parentheses are mathematical conversions to SI units that are provided for information only and are not considered standard.
1.6 This standard does not purport to address all of the safety concerns, if any, associated with its use. It is the responsibility of the user of this standard to establish appropriate safety and health practices and determine the applicability of regulatory limitations prior to use.

General Information

Status
Historical
Publication Date
30-Apr-2008
Technical Committee
Current Stage
Ref Project

Relations

Buy Standard

Technical specification
ASTM F593-02(2008) - Standard Specification for Stainless Steel Bolts, Hex Cap Screws, and Studs
English language
8 pages
sale 15% off
Preview
sale 15% off
Preview
Technical specification
REDLINE ASTM F593-02(2008) - Standard Specification for Stainless Steel Bolts, Hex Cap Screws, and Studs
English language
8 pages
sale 15% off
Preview
sale 15% off
Preview

Standards Content (Sample)


NOTICE: This standard has either been superseded and replaced by a new version or withdrawn.
Contact ASTM International (www.astm.org) for the latest information
Designation: F593 – 02 (Reapproved 2008)
Standard Specification for
Stainless Steel Bolts, Hex Cap Screws, and Studs
ThisstandardisissuedunderthefixeddesignationF593;thenumberimmediatelyfollowingthedesignationindicatestheyearoforiginal
adoptionor,inthecaseofrevision,theyearoflastrevision.Anumberinparenthesesindicatestheyearoflastreapproval.Asuperscript
epsilon (´) indicates an editorial change since the last revision or reapproval.
This standard has been approved for use by agencies of the Department of Defense.
1. Scope conversions to SI units that are provided for information only
and are not considered standard.
1.1 This specification covers the requirements for stainless
1.6 This standard does not purport to address all of the
steelbolts,hexcapscrews,andstuds0.25to1.50in.,inclusive,
safety concerns, if any, associated with its use. It is the
in nominal diameter in a number of alloys in common use and
responsibility of the user of this standard to establish appro-
intended for service applications requiring general corrosion
priate safety and health practices and determine the applica-
resistance.
bility of regulatory limitations prior to use.
1.2 Seven groups of stainless steel alloys are covered,
including twelve austenitic, two ferritic, four martensitic, and
2. Referenced Documents
one precipitation hardening.
2.1 ASTM Standards:
A B
Group Alloys Condition
C
A262 Practices for Detecting Susceptibility to Intergranular
1 304, 305, 384, 304 L, (CW) cold worked
D
18-9LW, 302HQ
Attack in Austenitic Stainless Steels
C
2 316, 316 L (CW) cold worked
A276 Specification for Stainless Steel Bars and Shapes
C
3 321, 347 (CW) cold worked
E C
A342/A342M Test Methods for Permeability of Feebly
4 430 (CW) cold worked
F
5 410 (H) hardened and tempered
Magnetic Materials
6 431 (H) hardened and tempered
A380 Practice for Cleaning, Descaling, and Passivation of
7 630 (AH) age hardened
Stainless Steel Parts, Equipment, and Systems
A
Unlessotherwisespecifiedontheinquiryandorder,thechoiceofanalloyfrom
A484/A484M Specification for General Requirements for
within a group shall be at the discretion of the fastener manufacturer (see 6.1).
B
See 4.2 for options. Stainless Steel Bars, Billets, and Forgings
C
Sizes 0.75 in. and larger may be hot worked and solution annealed.
A493 Specification for Stainless Steel Wire and Wire Rods
D
When approved by the purchaser, Alloys 303, 303Se, or XM1 may be
for Cold Heading and Cold Forging
furnished.
E
A555/A555M Specification for General Requirements for
When approved by the purchaser, Alloy 430F may be furnished.
F
When approved by the purchaser, Alloys 416 or 416Se may be furnished.
Stainless Steel Wire and Wire Rods
1.3 Supplementary requirements of an optional nature are
A564/A564M Specification for Hot-Rolled and Cold-
provided, applicable only when agreed upon between the
Finished Age-Hardening Stainless Steel Bars and Shapes
manufacturer and the purchaser at the time of the inquiry and
A582/A582M Specification for Free-Machining Stainless
order.
Steel Bars
1.4 Suitable nuts for use with bolts, hex cap screws, and
A751 TestMethods,Practices,andTerminologyforChemi-
studsincludedinthisspecificationarecoveredbySpecification
cal Analysis of Steel Products
E594. Unless otherwise specified, all nuts used on these
A967 Specification for Chemical Passivation Treatments
fasteners shall conform to the requirements of Specification
for Stainless Steel Parts
E594, shall be of the same alloy group, and shall have a
D3951 Practice for Commercial Packaging
specified minimum proof stress equal to or greater than the
E29 Practice for Using Significant Digits in Test Data to
specified minimum full-size tensile strength of the externally
Determine Conformance with Specifications
threaded fastener.
E594 Practice for Testing Flame Ionization Detectors Used
1.5 The values stated in inch-pound units are to be regarded
in Gas or Supercritical Fluid Chromatography
as standard. The values given in parentheses are mathematical
F606 Test Methods for Determining the Mechanical Prop-
erties of Externally and Internally Threaded Fasteners,
This specification is under the jurisdiction of ASTM Committee F16 on
Fasteners and is the direct responsibility of Subcommittee F16.04 on Nonferrous
Fasteners. For referenced ASTM standards, visit the ASTM website, www.astm.org, or
Current edition approved May 1, 2008. Published August 2008. Originally contact ASTM Customer Service at service@astm.org. For Annual Book of ASTM
´2
approved in 1978. Last previous edition approved in 2002 as F593–02 . DOI: Standards volume information, refer to the standard’s Document Summary page on
10.1520/F0593-02R08. the ASTM website.
Copyright © ASTM International, 100 Barr Harbor Drive, PO Box C700, West Conshohocken, PA 19428-2959, United States.
F593 – 02 (2008)
Washers, Direct Tension Indicators, and Rivets
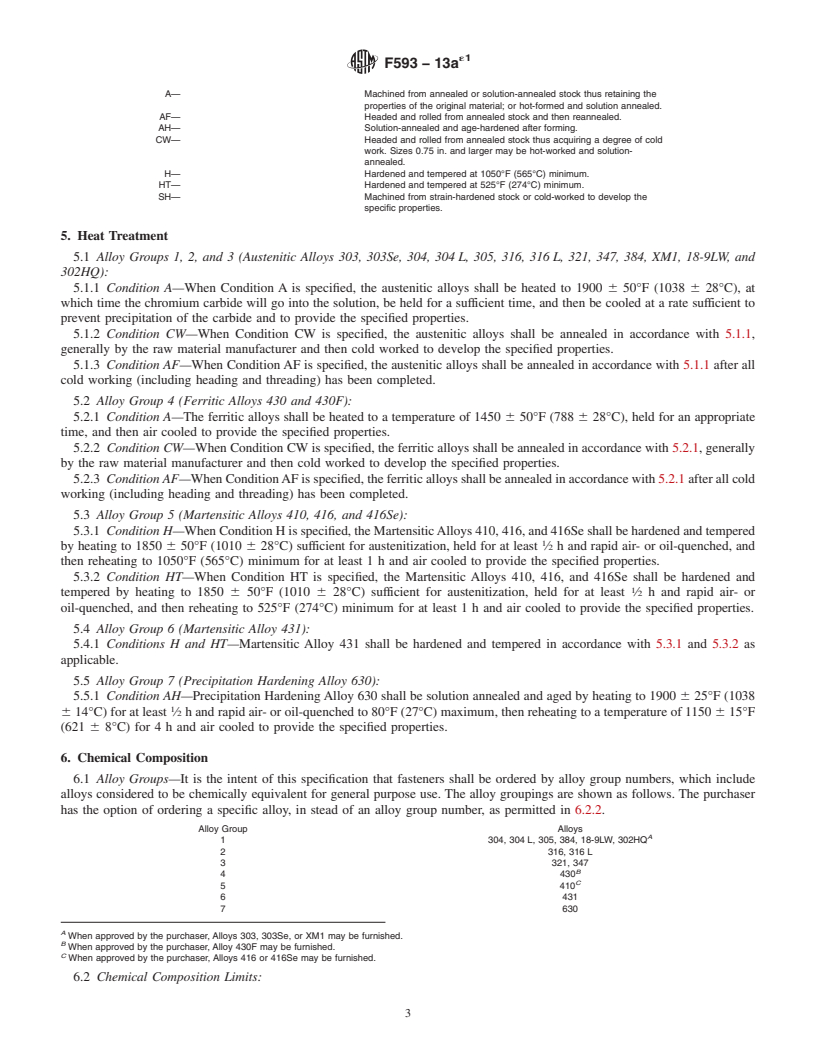
A— Machined from annealed or solution-annealed stock thus retaining the
properties of the original material; or hot-formed and solution annealed.
F1470 Practice for Fastener Sampling for Specified Me-
AF— Headed and rolled from annealed stock and then reannealed.
chanical Properties and Performance Inspection
AH— Solution-annealed and age-hardened after forming.
2.2 ASME Standards: CW— Headed and rolled from annealed stock thus acquiring a degree of cold
work. Sizes 0.75 in. and larger may be hot-worked and solution-
B1.1 Unified Inch Screw Threads
annealed.
B18.2.1 Square and Hex Bolts and Screws, Including Hex
H— Hardened and tempered at 1050°F (565°C) minimum.
Cap Screws
HT— Hardened and tempered at 525°F (274°C) minimum.
SH— Machined from strain-hardened stock or cold-worked to develop the
specific properties.
3. Ordering Information
3.1 Orders for bolts, hex cap screws, and studs under this
5. Heat Treatment
specification shall include the following:
5.1 Alloy Groups 1, 2, and 3 (Austenitic Alloys 303, 303Se,
3.1.1 Quantity (number of pieces of each item and size),
304, 304 L, 305, 316, 316 L, 321, 347, 384, XM1, 18-9LW, and
3.1.2 Name of item (bolt, hex cap screw, stud, etc.),
302HQ):
3.1.3 Size (nominal diameter, threads per inch, length; see
Section 9), 5.1.1 Condition A—When Condition A is specified, the
austenitic alloys shall be heated to 1900 6 50°F (1038 6
3.1.4 Alloy group number (see 6.1), and
3.1.5 Condition (see 4.2). 28°C), at which time the chromium carbide will go into the
solution, be held for a sufficient time, and then be cooled at a
3.2 Orders for bolts, hex cap screws, and studs under this
specification may include the following optional requirements: rate sufficient to prevent precipitation of the carbide and to
3.2.1 Forming (see 4.1.2), provide the specified properties.
3.2.2 Rolled or cut threads (see 4.1.3),
5.1.2 Condition CW—When Condition CWis specified, the
3.2.3 Composition (see 6.2),
austenitic alloys shall be annealed in accordance with 5.1.1,
3.2.4 Corrosion Resistance (see 8.1),
generally by the raw material manufacturer and then cold
3.2.5 Finish (see 10.3),
worked to develop the specified properties.
3.2.6 Rejection (see 16.1), and
5.1.3 Condition AF—When Condition AF is specified, the
3.2.7 Test report (see 17.2).
austenitic alloys shall be annealed in accordance with 5.1.1
3.2.8 Supplementaryrequirements,ifany,tobespecifiedon
after all cold working (including heading and threading) has
the order (see S1 through S8), and
been completed.
3.2.9 ASTM specification and year of issue. When year of
5.2 Alloy Group 4 (Ferritic Alloys 430 and 430F):
issue is not specified, fasteners shall be furnished to the latest
5.2.1 Condition A—The ferritic alloys shall be heated to a
issue.
temperature of 1450 6 50°F (788 6 28°C), held for an
NOTE 1—Example10000pieces,HexCapScrew,0.250in.−20 33.00
appropriate time, and then air cooled to provide the specified
in., Alloy Group 1, Condition CW, Furnish Test Report, Supplementary
properties.
Requirement S3.
5.2.2 Condition CW—When Condition CWis specified, the
4. Manufacture
ferritic alloys shall be annealed in accordance with 5.2.1,
generally by the raw material manufacturer and then cold
4.1 Manufacture:
worked to develop the specified properties.
4.1.1 Specifications A276, A493, A564/A564M, and A582/
5.2.3 Condition AF—When Condition AF is specified, the
A582M are noted for information only as suitable sources of
materialforthemanufactureofbolts,hexcapscrews,andstuds ferritic alloys shall be annealed in accordance with 5.2.1 after
all cold working (including heading and threading) has been
to this specification.
4.1.2 Forming—Unless otherwise specified, the fasteners completed.
shall be cold formed, hot formed, or machined from suitable
5.3 Alloy Group 5 (MartensiticAlloys 410, 416, and 416Se):
material at the option of the manufacturer.
5.3.1 Condition H—When Condition H is specified, the
4.1.3 Threads—Unlessotherwisespecified,thethreadsshall
MartensiticAlloys 410, 416, and 416Se shall be hardened and
be rolled or cut at the option of the manufacturer.
tempered by heating to 1850 6 50°F (1010 6 28°C) sufficient
4.2 Condition—The fasteners shall be furnished in the 1
for austenitization, held for at least ⁄2 h and rapid air- or
followingconditions,unlessspecifiedtobefurnishedinoneof
oil-quenched, and then reheating to 1050°F (565°C) minimum
the optional conditions:
for at least 1 h and air cooled to provide the specified
Condition Furnished Unless Optional Conditions (must
properties.
Alloy Group Otherwise Specified be specified)
5.3.2 Condition HT—When Condition HT is specified, the
1, 2, 3 CW AF, A, SH
4CW A
MartensiticAlloys 410, 416, and 416Se shall be hardened and
5H HT
tempered by heating to 1850 6 50°F (1010 6 28°C) sufficient
6H HT
for austenitization, held for at least ⁄2 h and rapid air- or
7 AH none
oil-quenched, and then reheating to 525°F (274°C) minimum
for at least 1 h and air cooled to provide the specified
properties.
Available from Global Engineering Documents, 15 Inverness Way, East
Englewood, CO 80112-5704, http://www.global.ihs.com. 5.4 Alloy Group 6 (Martensitic Alloy 431):
F593 – 02 (2008)
5.4.1 Conditions H and HT—MartensiticAlloy431shallbe the choice of an alloy from within a group shall be at the
hardened and tempered in accordance with 5.3.1 and 5.3.2 as discretion of the fastener manufacturer as required by his
applicable. method of fastener fabrication and material availability. The
5.5 Alloy Group 7 (Precipitation Hardening Alloy 630): specificalloyusedbythefastenermanufacturershallbeclearly
5.5.1 Condition AH—Precipitation Hardening Alloy 630 identified on any certification required by the order and shall
shallbesolutionannealedandagedbyheatingto1900 625°F have a chemical composition conforming to the requirements
(1038 6 14°C) for at least ⁄2 h and rapidair- or oil-quenched of Table 1 for the specific alloy.
to 80°F (27°C) maximum, then reheating to a temperature of
6.2.2 Ordering by Specific Alloy—When ordered by a spe-
1150 615°F(621 68°C)for4handaircooledtoprovidethe
cific alloy number, the fasteners shall conform to the chemical
specified properties.
composition limits of Table 1 for the specific alloy.
6.3 Product Analysis:
6. Chemical Composition
6.3.1 When performed, product analysis to determine
6.1 Alloy Groups—It is the intent of this specification that
chemical composition shall be performed on at least one fully
fasteners shall be ordered by alloy group numbers, which
manufactured finished fastener representing each lot. The
include alloys considered to be chemically equivalent for
chemical composition thus determined shall conform to the
generalpurposeuse.Thealloygroupingsareshownasfollows.
requirementsofTable1forthespecifiedalloyoralloygroupas
The purchaser has the option of ordering a specific alloy, in
appropriate, subject to the Product Analysis Tolerance in
stead of an alloy group number, as permitted in 6.2.2.
Specifications A484/A484M and A555/A555M.
Alloy Group Alloys
6.3.2 In the event of discrepancy, a referee chemical analy-
A
1 304, 304 L, 305, 384, 18-9LW, 302HQ
sis of samples from each lot shall be made in accordance with
2 316, 316 L
3 321, 347 14.1.
B
4 430
C
5 410
7. Mechanical Properties
6 431
7 630
7.1 The finished fasteners shall meet the applicable me-
A
When approved by the purchaser, Alloys 303, 303Se, or XM1 may be
chanical property and test requirements of Table 2 and Table 3
furnished.
as appropriate for the specified alloy group and condition and
B
When approved by the purchaser, Alloy 430F may be furnished.
C shall be tested for conformance to the mechanical property
When approved by the purchaser, Alloys 416 or 416Se may be furnished.
requirements as specified herein.
6.2 Chemical Composition Limits:
6.2.1 Ordering by Alloy Group—Unless otherwise specified 7.2 Fastenershavinganominalthreaddiameter-lengthcom-
on the inquiry and order (see Supplementary Requirement S4), bination as follows:
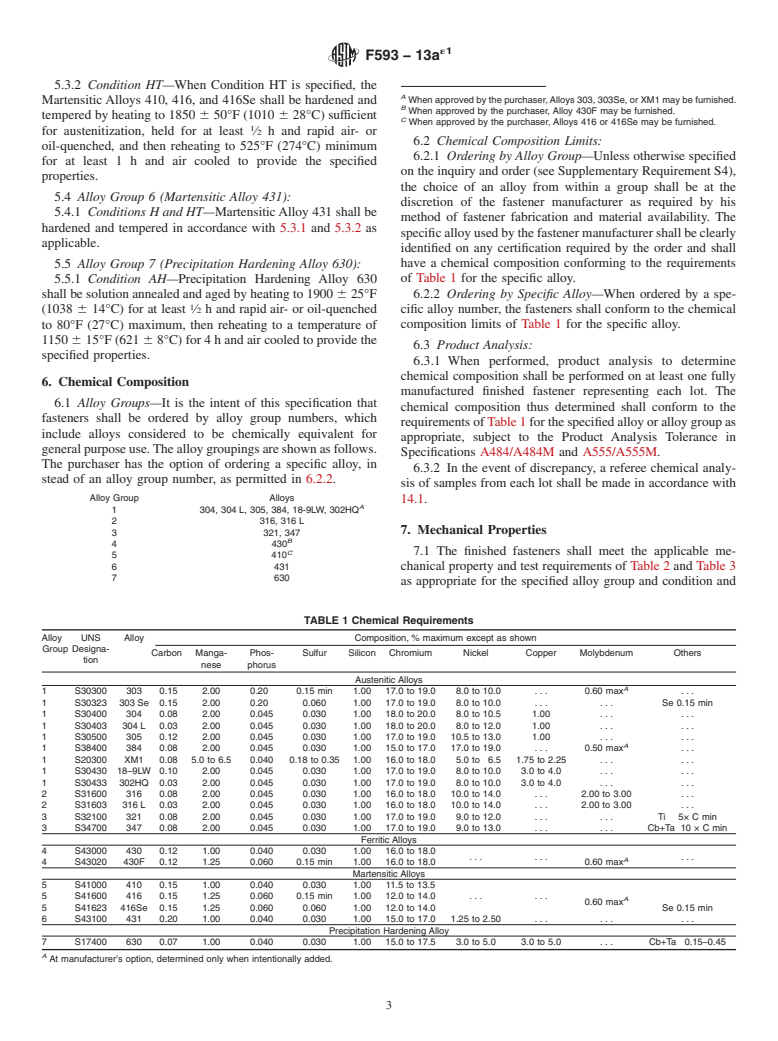
TABLE 1 Chemical Requirements
Alloy UNS Alloy Composition, % maximum except as shown
Group Designa-
Carbon Manga- Phos- Sulfur Silicon Chromium Nickel Copper Molybdenum Others
tion
nese phorus
Austenitic Alloys
A
1 S30300 303 0.15 2.00 0.20 0.15 min 1.00 17.0 to 19.0 8.0 to 10.0 . . . 0.60 max .
1 S30323 303 Se 0.15 2.00 0.20 0.060 1.00 17.0 to 19.0 8.0 to 10.0 . . . . . . Se 0.15 min
1 S30400 304 0.08 2.00 0.045 0.030 1.00 18.0 to 20.0 8.0 to 10.5 1.00 . . . . . .
1 S30403 304 L 0.03 2.00 0.045 0.030 1.00 18.0 to 20.0 8.0 to 12.0 1.00 . . . . . .
1 S30500 305 0.12 2.00 0.045 0.030 1.00 17.0 to 19.0 10.5 to 13.0 1.00 . . . . . .
A
1 S38400 384 0.08 2.00 0.045 0.030 1.00 15.0 to 17.0 17.0 to 19.0 . . . 0.50 max .
1 S20300 XM1 0.08 5.0 to 6.5 0.040 0.18 to 0.35 1.00 16.0 to 18.0 5.0 to 6.5 1.75 to 2.25 . . . . . .
1 S30430 18–9LW 0.10 2.00 0.045 0.030 1.00 17.0 to 19.0 8.0 to 10.0 3.0 to 4.0 . . . . . .
1 S30433 302HQ 0.03 2.00 0.045 0.030 1.00 17.0 to 19.0 8.0 to 10.0 3.0 to 4.0 . . . . . .
2 S31600 316 0.08 2.00 0.045 0.030 1.00 16.0 to 18.0 10.0 to 14.0 . . . 2.00 to 3.00 . . .
2 S31603 316 L 0.03 2.00 0.045 0.030 1.00 16.0 to 18.0 10.0 to 14.0 . . . 2.00 to 3.00 . . .
3 S32100 321 0.08 2.00 0.045 0.030 1.00 17.0 to 19.0 9.0 to 12.0 . . . . . . Ti 53Cmin
3 S34700 347 0.08 2.00 0.045 0.030 1.00 17.0 to 19.0 9.0 to 13.0 . . . . . . Cb+Ta 10 3Cmin
Ferritic Alloys
4 S43000 430 0.12 1.00 0.040 0.030 1.00 16.0 to 18.0 . . .
A
4 S43020 430F 0.12 1.25 0.060 0.15 min 1.00 16.0 to 18.0 0.60 max
Martensitic Alloys
5 S41000 410 0.15 1.00 0.040 0.030 1.00 11.5 to 13.5 . .
A
5 S41600 416 0.15 1.25 0.060 0.15 min 1.00 12.0 to 14.0 0.60 max
5 S41623 416Se 0.15 1.25 0.060 0.060 1.00 12.0 to 14.0 Se 0.15 min
6 S43100 431 0.20 1.00 0.040 0.030 1.00 15.0 to 17.0 1.25 to 2.50 . . . . . . . . .
Precipitation Hardening Alloy
7 S17400 630 0.07 1.00 0.040 0.030 1.00 15.0 to 17.5 3.0 to 5.
...


This document is not anASTM standard and is intended only to provide the user of anASTM standard an indication of what changes have been made to the previous version. Because
it may not be technically possible to adequately depict all changes accurately, ASTM recommends that users consult prior editions as appropriate. In all cases only the current version
of the standard as published by ASTM is to be considered the official document.
Designation:F 593–01 Designation: F 593 – 02 (Reapproved 2008)
Standard Specification for
Stainless Steel Bolts, Hex Cap Screws, and Studs
This standard is issued under the fixed designation F 593; the number immediately following the designation indicates the year of
original adoption or, in the case of revision, the year of last revision.Anumber in parentheses indicates the year of last reapproval.A
superscript epsilon (´) indicates an editorial change since the last revision or reapproval.
This standard has been approved for use by agencies of the Department of Defense.
1. Scope
1.1 This specification covers the requirements for stainless steel bolts, hex cap screws, and studs 0.25 to 1.50- in., . inclusive,
in nominal diameter in a number of alloys in common use and intended for service applications requiring general corrosion
resistance.
1.2 Seven groups of stainless steel alloys are covered, including twelve austenitic, two ferritic, four martensitic, and one
precipitation hardening.
A B
Group Alloys Condition
C
1 304, 305, 384, 304 L, (CW) cold worked
D
XM7
D
18-9LW, 302HQ
C
2 316, 316 L (CW) cold worked
C
3 321, 347 (CW) cold worked
E C
4 430 (CW) cold worked
F
5 410 (H) hardened and tempered
6 431 (H) hardened and tempered
7 630 (AH) age hardened
A
Unless otherwise specified on the inquiry and order, the choice of an alloy from within a group shall be at the discretion of the fastener manufacturer (see 6.1).
B
See 4.2 for options.
C
Sizes 0.75 in. and larger may be hot worked and solution annealed.
D
When approved by the purchaser, Alloys 303, 303Se, or XM1 may be furnished.
E
When approved by the purchaser, Alloy 430F may be furnished.
F
When approved by the purchaser, Alloys 416 or 416Se may be furnished.
1.3 Supplementary requirements of an optional nature are provided, applicable only when agreed upon between the
manufacturer and the purchaser at the time of the inquiry and order.
1.4 Suitablenutsforusewithbolts,hexcapscrews,andstudsincludedinthisspecificationarecoveredbySpecificationF594.
Unless otherwise specified, all nuts used on these fasteners shall conform to the requirements of Specification F594, shall be of
the same alloy group, and shall have a specified minimum proof stress equal to or greater than the specified minimum full-size
tensile strength of the externally threaded fastener.
1.5 The values stated in inch-pound units are to be regarded as standard. The values given in parentheses are mathematical
conversions to SI units that are provided for information only and are not considered standard.
1.6 This standard does not purport to address all of the safety concerns, if any, associated with its use. It is the responsibility
of the user of this standard to establish appropriate safety and health practices and determine the applicability of regulatory
limitations prior to use.
2. Referenced Documents
2.1 ASTM Standards:
A262 Practices for Detecting Susceptibility to Intergranular Attack in Austenitic Stainless Steels
A276 Specification for Stainless Steel Bars and Shapes
A342342/A342M Test Methods for Permeability of Feebly Magnetic Materials
A380 Practice for Cleaning, Descaling, and Passivation of Stainless Steel Parts, Equipment, and Systems
A484/A484M Specification for General Requirements for Stainless Steel Bars, Billets, and Forgings
A493 Specification for Stainless Steel Wire and Wire Rods for Cold Heading and Cold Forging
This specification is under the jurisdiction of ASTM Committee F16 on Fasteners and is the direct responsibility of Subcommittee F16.04 on Nonferrous Fasteners.
Current edition approved Oct. 10, 2001. Published December 2001. Originally published as F593–78. Last previous edition F593–98.
´2
Current edition approved May 1, 2008. Published August 2008. Originally approved in 1978. Last previous edition approved in 2002 as F593–02 .
ForreferencedASTMstandards,visittheASTMwebsite,www.astm.org,orcontactASTMCustomerServiceatservice@astm.org.For Annual Book of ASTM Standards
, Vol 01.03.volume information, refer to the standard’s Document Summary page on the ASTM website.
Copyright © ASTM International, 100 Barr Harbor Drive, PO Box C700, West Conshohocken, PA 19428-2959, United States.
F 593 – 02 (2008)
A555/A555M Specification for General Requirements for Stainless Steel Wire and Wire Rods
A564/A564M Specification for Hot-Rolled and Cold-Finished Age-Hardening Stainless Steel Bars and Shapes
A582/A582M Specification for Free-Machining Stainless Steel Bars
A751 Test Methods, Practices, and Terminology for Chemical Analysis of Steel Products
A967 Specification for Chemical Passivation Treatments for Stainless Steel Parts
D3951 Practice for Commercial Packaging
E29 Practice for Using Significant Digits in Test Data to Determine Conformance with Specifications
E353Test Methods for Chemical Analysis of Stainless, Heat-Resisting, Maraging, and Other Similar Chromium-Nickel-Iron
Alloys
F594Specification for Stainless Steel Nuts
E594 Practice for Testing Flame Ionization Detectors Used in Gas or Supercritical Fluid Chromatography
F606 Test Methods for Determining the Mechanical Properties of Externally and Internally Threaded Fasteners, Washers,
Direct Tension Indicators, and Rivets
F1470 Guide for Fastener Sampling for Specified Mechanical Properties and Performance Inspection
2.2 ASME Standards:
B1.1 Unified Inch Screw Threads
B18.2.1 Square and Hex Bolts and Screws, Including Hex Cap Screws
3. Ordering Information
3.1 Orders for bolts, hex cap screws, and studs under this specification shall include the following:
3.1.1 Quantity (number of pieces of each item and size),
3.1.2 Name of item (bolt, hex cap screw, stud, etc.),
3.1.3 Size (nominal diameter, threads per inch, length; see Section 9),
3.1.4 Alloy group number (see 6.1), and
3.1.5 Condition (see 4.2).
3.2 Orders for bolts, hex cap screws, and studs under this specification may include the following optional requirements:
3.2.1 Forming (see 4.1.2),
3.2.2 Rolled or cut threads (see 4.1.3),
3.2.3 Composition (see 6.2),
3.2.4 Corrosion Resistance (see 8.1),
3.2.5 Finish (see 10.3),
3.2.6 Rejection (see 16.1), and
3.2.7 Test report (see 17.2).
3.2.8 Supplementary requirements, if any, to be specified on the order (see S1 through S8), and
3.2.9 ASTM specification and year of issue.When year of issue is not specified, fasteners shall be furnished to the latest issue.
NOTE 1—Example 10000 pieces, Hex Cap Screw, 0.250 in. −20 3 3.00 in., Alloy Group 1, Condition CW, Furnish Test Report, Supplementary
Requirement S3.
4. Manufacture
4.1 Manufacture:
4.1.1 Specifications A276, A493, A564/A564M, and A582/A582M are noted for information only as suitable sources of
material for the manufacture of bolts, hex cap screws, and studs to this specification.
4.1.2 Forming—Unless otherwise specified, the fasteners shall be cold formed, hot formed, or machined from suitable material
at the option of the manufacturer.
4.1.3 Threads—Unless otherwise specified, the threads shall be rolled or cut at the option of the manufacturer.
4.2 Condition—The fasteners shall be furnished in the following conditions, unless specified to be furnished in one of the
optional conditions:
Condition Furnished Unless Optional Conditions (must
Alloy Group Otherwise Specified be specified)
1, 2, 3 CW AF, A, SH
4CW A
5H HT
6H HT
7 AH none
Annual Book of ASTM Standards, Vol 01.05.
Available from Global Engineering Documents, 15 Inverness Way, East Englewood, CO 80112-5704, http://www.global.ihs.com.
F 593 – 02 (2008)
A— Machined from annealed or solution-annealed stock thus retaining the
properties of the original material; or hot-formed annealed or solution
annealed.
A— Machined from annealed or solution-annealed stock thus retaining the
properties of the original material; or hot-formed and solution annealed.
AF— Headed and rolled from annealed stock and then reannealed.
AH— Solution-annealed and age-hardened after forming.
CW— Headed and rolled from annealed stock thus acquiring a degree of cold
work. Sizes 0.75 in. and larger may be hot-worked and solution-
annealed.
H— Hardened and tempered at 1050°F (565°C) minimum.
HT— Hardened and tempered at 525°F (274°C) minimum.
SH— Machined from strain-hardened stock or cold-worked to develop the
specific properties.
5. Heat Treatment
5.1 Alloy Groups 1, 2, and 3 (Austenitic Alloys 303, 303Se, 304, 304 L, 305, 316, 316 L, 321, 347, 384, XM1, 18-9LW, and
XM7)302HQ):
5.1.1 Condition A—When Condition A is specified, the austenitic alloys shall be heated to 1900 6 50°F (1038 6 28°C), at
which time the chromium carbide will go into the solution, be held for a sufficient time, and then be cooled at a rate sufficient to
prevent precipitation of the carbide and to provide the specified properties.
5.1.2 Condition CW—When Condition CW is specified, the austenitic alloys shall be annealed in accordance with 5.1.1,
generally by the raw material manufacturer and then cold worked to develop the specified properties.
5.1.3 Condition AF—When ConditionAF is specified, the austenitic alloys shall be annealed in accordance with 5.1.1 after all
cold working (including heading and threading) has been completed.
5.2 Alloy Group 4 (Ferritic Alloys 430 and 430F):
5.2.1 Condition A—The ferritic alloys shall be heated to a temperature of 1450 6 50°F (788 6 28°C), held for an appropriate
time, and then air cooled to provide the specified properties.
5.2.2 Condition CW—WhenConditionCWisspecified,theferriticalloysshallbeannealedinaccordancewith5.2.1,generally
by the raw material manufacturer and then cold worked to develop the specified properties.
5.2.3 ConditionAF—WhenConditionAFisspecified,theferriticalloysshallbeannealedinaccordancewith5.2.1afterallcold
working (including heading and threading) has been completed.
5.3 Alloy Group 5 (Martensitic Alloys 410, 416, and 416Se):
5.3.1 Condition H—WhenConditionHisspecified,theMartensiticAlloys410,416,and416Seshallbehardenedandtempered
by heating to 1850 6 50°F (1010 6 28°C) sufficient for austenitization, held for at least ⁄2 h and rapid air- or oil-quenched, and
then reheating to 1050°F (565°C) minimum for at least 1 h and air cooled to provide the specified properties.
5.3.2 Condition HT—When Condition HT is specified, the Martensitic Alloys 410, 416, and 416Se shall be hardened and
tempered by heating to 1850 6 50°F (1010 6 28°C) sufficient for austenitization, held for at least ⁄2 h and rapid air- or
oil-quenched, and then reheating to 525°F (274°C) minimum for at least 1 h and air cooled to provide the specified properties.
5.4 Alloy Group 6 (Martensitic Alloy 431):
5.4.1 Conditions H and HT—Martensitic Alloy 431 shall be hardened and tempered in accordance with 5.3.1 and 5.3.2 as
applicable.
5.5 Alloy Group 7 (Precipitation Hardening Alloy 630):
5.5.1 Condition AH—Precipitation HardeningAlloy 630 shall be solution annealed and aged by heating to 1900 6 25°F (1038
6 14°C) for at least ½ ⁄2 h and rapidair- or oil-quenched to 80°F (27°C) maximum, then reheating to a temperature of 1150 6
15°F (621 6 8°C) for 4 h and air cooled to provide the specified properties.
6. Chemical Composition
6.1 Alloy Groups—It is the intent of this specification that fasteners shall be ordered by alloy group numbers, which include
alloys considered to be chemically equivalent for general purpose use. The alloy groupings are shown as follows. The purchaser
has the option of ordering a specific alloy, in stead of an alloy group number, as permitted in 6.2.2.
Alloy Group Alloys
A
1 304, 304 L, 305, 384, XM7
A
1 304, 304 L, 305, 384, 18-9LW, 302HQ
2 316, 316 L
3 321, 347
B
4 430
C
5 410
6 431
7 630
A
When approved by the purchaser, Alloys 303, 303Se, or XM1 may be furnished.
B
When approved by the purchaser, Alloy 430F may be furnished.
C
When approved by the purchaser, Alloys 416 or 416Se may be furnished.
6.2 Chemical Composition Limits :
6.2.1 Ordering by Alloy Group—Unless otherwise specified on the inquiry and order (see Supplementary Requirement S4), the
F 593 – 02 (2008)
choiceofanalloyfromwithinagroupshallbeatthediscretionofthefastenermanufacturerasrequiredbyhismethodoffastener
fabrication and material availability. The specific alloy used by the fastener manufacturer shall be clearly identified on any
certificationrequiredbytheorderandshallhaveachemicalcompositionconformingtotherequirementsofTable1forthespecific
alloy.
6.2.2 Ordering by Specific Alloy—When ordered by a specific alloy number, the fasteners shall conform to the chemical
composition limits of Table 1 for the specific alloy.
6.3 Product Analysis:
6.3.1 When performed, product analysis to determine chemical composition shall be performed on at least one fully
manufacturedfinishedfastenerrepresentingeachlot.Thechemicalcompositionthusdeterminedshallconformtotherequirements
of Table 1 for the specified alloy or alloy group as appropriate, subject to the Product Analysis Tolerance in Specifications
A484/A484M and A555/A555M.
6.3.2 In the event of discrepancy, a referee chemical analysis of samples from each lot shall be made in accordance with 14.1.
7. Mechanical Properties
7.1 The finished fasteners shall meet the applicable mechanical property and test requirements of Table 2 and Table 3 as
appropriateforthespecifiedalloygroupandconditionandshallbetestedforconformancetothemechanicalpropertyrequirements
as specified herein.
7.2 Fasteners having a nominal thread diameter-length combination as follows:
Thread Diameter, in. Thread Length, in.
0.75 or less 2.25 D or longer
Over 0.75 3 D or longer
and a breaking load of 120 000 lbf (535 kN) or less shall be tested full size and shall meet the full-size tensile (minimum and maximum) and yield strength require-
ments in Table 2 for the specified alloy.
7.3 Fasteners having a nominal thread diameter-length combination in accordance with 7.2 and a breaking load exceeding
120000 lbf (535 kN) shall be tested full-size and shall meet the full size tensile (minimum and maximum) and yield strength
properties in Table 2. When equipment of sufficient capacity for such tests is not available, or if excessive length of the fasteners
makes full-size testing impractical, use of standard or round specimens that meet the “machined specimen test tensile properties”
in Table 2 is permitted. In the event of discrepancy or dispute between test results obtained from full-size finished fasteners and
standard or round specimens, the referee method shall be tests per
...

Questions, Comments and Discussion

Ask us and Technical Secretary will try to provide an answer. You can facilitate discussion about the standard in here.