ASTM F722-18(2022)
(Specification)Standard Specification for Welded Joints for Shipboard Piping Systems
Standard Specification for Welded Joints for Shipboard Piping Systems
ABSTRACT
This specification covers typical details of welded joints commonly used in shipboard piping systems. These joints and other joints may be used provided the welding procedures used have been qualified in accordance with the applicable regulatory rules and regulations. The maximum butt weld reinforcement of differnet nominal wall thicknesses of pipe or tube shall be discussed.
SCOPE
1.1 This specification covers typical details of welded joints commonly used in shipboard piping systems. These joints and other joints may be used provided the welding procedures used have been qualified in accordance with the applicable regulatory rules and regulations.
1.2 The values stated in inch-pound units are to be regarded as standard. The values given in parentheses are mathematical conversions to SI units that are provided for information only and are not considered standard.
1.3 This international standard was developed in accordance with internationally recognized principles on standardization established in the Decision on Principles for the Development of International Standards, Guides and Recommendations issued by the World Trade Organization Technical Barriers to Trade (TBT) Committee.
General Information
- Status
- Published
- Publication Date
- 30-Sep-2022
- Technical Committee
- F25 - Ships and Marine Technology
- Drafting Committee
- F25.11 - Machinery and Piping Systems
Overview
ASTM F722-18(2022): Standard Specification for Welded Joints for Shipboard Piping Systems establishes requirements for the design and construction of welded joints commonly used in shipboard piping systems. Published by ASTM International, this standard provides detailed guidelines for butt welds, fillet welds, backing rings, and reinforcement limitations, ensuring robust and safe piping connections on board ships. ASTM F722-18(2022) refers to applicable regulatory rules and integrates well with other international and federal shipping standards to ensure compliance for marine piping systems.
Key Topics
- Welded Joint Types: Covers details for various welded joint configurations such as butt-welded joints, fillet welded joints, fabricated joints, outlet and boss connections, and the use of backing rings and insert rings.
- Qualification Requirements: Stipulates that all welding procedures must be qualified according to relevant regulatory authorities to ensure safety and structural integrity.
- Reinforcement Limitations: Specifies maximum allowable butt weld reinforcement based on nominal wall thickness and service temperature, as outlined in related regulatory tables.
- Measurement Units: Inch-pound units are the standard; SI units are included for reference only.
- Piping Classifications: Applies mainly to Class I and Class II shipboard piping, referencing U.S. Coast Guard (USCG) regulations for classification and application limits.
- Service Considerations: Provides notes on specific service conditions where certain joint configurations are suitable or restricted, such as high-pressure steam lines, hydraulic systems, and gravity drain systems.
Applications
This standard is essential for professionals involved in the design, construction, inspection, and maintenance of shipboard piping systems, including:
- Naval and Commercial Shipyards: Ensures consistent quality and safety across all welded joints in marine piping systems.
- Marine Engineers and Designers: Assists in the selection of appropriate welded joint types and reinforcement based on pipe size, service conditions, and regulatory requirements.
- Regulatory Compliance: Helps ship owners, operators, and contractors conform to international and federal codes such as USCG regulations and the ASME B31.1 Power Piping Code.
- Inspection and Quality Assurance: Supplies detailed joint designs and notes for inspectors to verify that joints are constructed and reinforced correctly.
- Piping Renovation and Repair: Offers guidance for repairing or retrofitting existing systems with compliant welded joints, improving long-term reliability and safety.
Related Standards
- ASME B31.1 - Power Piping: Referenced for detailed piping fabrication and weld requirements.
- CFR Title 46, Parts 41-69: Cited for U.S. federal regulations governing shipboard piping and welded joint standards.
- Other ASTM Standards: May be used in conjunction for materials specifications, fabrication requirements, and welding approvals.
- WTO TBT Principles: Developed according to the internationally recognized principles for standardization under the WTO Technical Barriers to Trade Committee.
Keywords: welded joints, shipboard piping systems, ASTM F722, marine piping welds, butt welds, fillet welds, piping reinforcement, shipbuilding standards, marine welding, regulatory compliance
By adhering to ASTM F722-18(2022), shipbuilders and marine engineers help ensure the safety, reliability, and regulatory compliance of piping systems aboard ships, supporting both day-to-day operations and long-term vessel integrity.
Buy Documents
ASTM F722-18(2022) - Standard Specification for Welded Joints for Shipboard Piping Systems
Get Certified
Connect with accredited certification bodies for this standard

DVS-ZERT GmbH
German welding certification society.

CARES (UK Certification Authority for Reinforcing Steels)
UK certification for reinforcing steels and construction.

EWF/IIW (European/International Welding Federation)
International welding personnel certification.
Sponsored listings
Frequently Asked Questions
ASTM F722-18(2022) is a technical specification published by ASTM International. Its full title is "Standard Specification for Welded Joints for Shipboard Piping Systems". This standard covers: ABSTRACT This specification covers typical details of welded joints commonly used in shipboard piping systems. These joints and other joints may be used provided the welding procedures used have been qualified in accordance with the applicable regulatory rules and regulations. The maximum butt weld reinforcement of differnet nominal wall thicknesses of pipe or tube shall be discussed. SCOPE 1.1 This specification covers typical details of welded joints commonly used in shipboard piping systems. These joints and other joints may be used provided the welding procedures used have been qualified in accordance with the applicable regulatory rules and regulations. 1.2 The values stated in inch-pound units are to be regarded as standard. The values given in parentheses are mathematical conversions to SI units that are provided for information only and are not considered standard. 1.3 This international standard was developed in accordance with internationally recognized principles on standardization established in the Decision on Principles for the Development of International Standards, Guides and Recommendations issued by the World Trade Organization Technical Barriers to Trade (TBT) Committee.
ABSTRACT This specification covers typical details of welded joints commonly used in shipboard piping systems. These joints and other joints may be used provided the welding procedures used have been qualified in accordance with the applicable regulatory rules and regulations. The maximum butt weld reinforcement of differnet nominal wall thicknesses of pipe or tube shall be discussed. SCOPE 1.1 This specification covers typical details of welded joints commonly used in shipboard piping systems. These joints and other joints may be used provided the welding procedures used have been qualified in accordance with the applicable regulatory rules and regulations. 1.2 The values stated in inch-pound units are to be regarded as standard. The values given in parentheses are mathematical conversions to SI units that are provided for information only and are not considered standard. 1.3 This international standard was developed in accordance with internationally recognized principles on standardization established in the Decision on Principles for the Development of International Standards, Guides and Recommendations issued by the World Trade Organization Technical Barriers to Trade (TBT) Committee.
ASTM F722-18(2022) is classified under the following ICS (International Classification for Standards) categories: 25.160.40 - Welded joints and welds. The ICS classification helps identify the subject area and facilitates finding related standards.
ASTM F722-18(2022) is available in PDF format for immediate download after purchase. The document can be added to your cart and obtained through the secure checkout process. Digital delivery ensures instant access to the complete standard document.
Standards Content (Sample)
This international standard was developed in accordance with internationally recognized principles on standardization established in the Decision on Principles for the
Development of International Standards, Guides and Recommendations issued by the World Trade Organization Technical Barriers to Trade (TBT) Committee.
Designation:F722 −18 (Reapproved 2022) An American National Standard
Standard Specification for
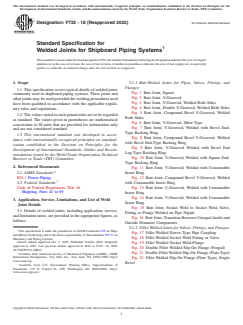
Welded Joints for Shipboard Piping Systems
ThisstandardisissuedunderthefixeddesignationF722;thenumberimmediatelyfollowingthedesignationindicatestheyearoforiginal
adoption or, in the case of revision, the year of last revision.Anumber in parentheses indicates the year of last reapproval.Asuperscript
epsilon (´) indicates an editorial change since the last revision or reapproval.
1. Scope 3.1.1 Butt-Welded Joints for Pipes, Valves, Fittings, and
Flanges:
1.1 This specification covers typical details of welded joints
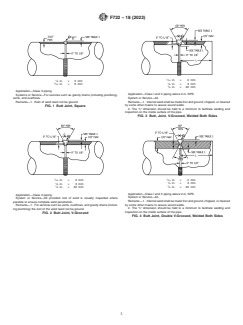
Fig. 1 Butt Joint, Square
commonly used in shipboard piping systems. These joints and
Fig. 2 Butt Joint, V-Grooved
other joints may be used provided the welding procedures used
Fig. 3 Butt Joint, V-Grooved, Welded Both Sides
have been qualified in accordance with the applicable regula-
Fig. 4 Butt Joint, Double V-Grooved, Welded Both Sides
tory rules and regulations.
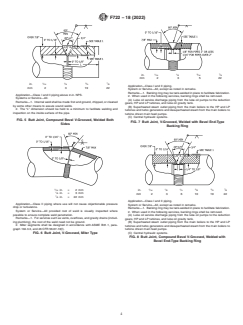
Fig. 5 Butt Joint, Compound Bevel V-Grooved, Welded
1.2 The values stated in inch-pound units are to be regarded
Both Sides
as standard. The values given in parentheses are mathematical
Fig. 6 Butt Joint, V-Grooved, Miter Type
conversions to SI units that are provided for information only
Fig. 7 Butt Joint, V-Grooved, Welded with Bevel End-
and are not considered standard.
Type Backing Ring
1.3 This international standard was developed in accor-
Fig. 8 Butt Joint, Compound Bevel V-Grooved, Welded
dance with internationally recognized principles on standard-
with Bevel End-Type Backing Ring
ization established in the Decision on Principles for the
Fig. 9 Butt Joint, V-Grooved Welded with Bevel End
Development of International Standards, Guides and Recom-
Lug-Type Backing Ring
mendations issued by the World Trade Organization Technical
Fig. 10 Butt Joint, V-Grooved, Welded with Square End-
Barriers to Trade (TBT) Committee.
Type Backing Ring
2. Referenced Documents
Fig. 11 Butt Joint, V-Grooved, Welded with Consumable
Insert Ring
2.1 ASME Standards:
Fig. 12 Butt Joint, Compound Bevel V-Grooved, Welded
B31.1 Power Piping
with Consumable Insert Ring
2.2 Federal Standards:
Code of Federal Regulations Title 46 Fig. 13 Butt Joint, U-Grooved, Welded with Consumable
Shipping, Parts 41 to 69 Insert Ring
Fig. 14 Butt Joint, V-Grooved, Welded with Consumable
3. Application, Service, Limitations, and List of Weld
Insert Ring
Joint Details
Fig. 15 Butt Joint, Socket Weld to Socket Weld Valve,
3.1 Details of welded joints, including application, service,
Fitting or Flange Welded on Pipe Nipple
and limitation notes, are provided in the appropriate figures, as
Fig. 16 Butt Joint, Transition Between Unequal Inside and
follows:
Outside Diameter Components
3.1.2 Fillet Welded Joints for Valves, Fittings, and Flanges:
This specification is under the jurisdiction of ASTM Committee F25 on Ships
Fig. 17 Fillet Welded Sleeve-Type Pipe Coupling
and Marine Technology and is the direct responsibility of Subcommittee F25.11 on
Fig. 18 Fillet Welded Socket Weld Fitting or Valve
Machinery and Piping Systems.
Current edition approved Oct. 1, 2022. Published October 2022. Originally
Fig. 19 Fillet Welded Socket Weld-Flange
approved in 1981. Last previous edition approved in 2018 as F722 – 18. DOI:
Fig. 20 Double Fillet Welded Slip-On Flange (Forged)
10.1520/F0722-18R22.
Fig. 21 Double Fillet Welded Slip-On Flange (Plate Type)
Available from American Society of Mechanical Engineers (ASME), ASME
International Headquarters, Two Park Ave., New York, NY 10016-5990, http://
Fig. 22 Fillet Welded Slip-On Flange (Plate Type), Single
www.asme.org.
Bevel
Available from U.S. Government Printing Office, Superintendent of
Documents, 732 N. Capitol St., NW, Washington, DC 20401-0001, http://
www.access.gpo.gov.
Copyright © ASTM International, 100 Barr Harbor Drive, PO Box C700, West Conshohocken, PA 19428-2959. United States
F722−18 (2022)
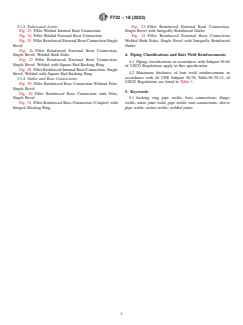
3.1.3 Fabricated Joints: Fig. 32 Fillet Reinforced External Root Connection,
Fig. 23 Fillet Welded Internal Root Connection Single Bevel with Integrally Reinforced Outlet
Fig. 24 Fillet Welded External Root Connection Fig. 33 Fillet Reinforced External Root Connection
Fig. 25 Fillet Reinforced External Root Connection Single Welded Both Sides, Single Bevel with Integrally Reinforced
Bevel Outlet
Fig. 26 Fillet Reinforced External Root Connection,
Single Bevel, Welded Both Sides 4. Piping Classifications and Butt Weld Reinforcements
Fig. 27 Fillet Reinforced External Root Connection,
4.1 Piping classifications in accordance with Subpart 56.04
Single Bevel, Welded with Square End Backing Ring
of USCG Regulations apply to this specification.
Fig. 28 Fillet Reinforced Internal Root Connection, Single
4.2 Maximum thickness of butt weld reinforcements in
Bevel, Welded with Square End Backing Ring
accordance with 46 CFR Subpart 56.70, Table 56.70-15, of
3.1.4 Outlet and Boss Connections:
USCG Regulations are listed in Table 1.
Fig. 29 Fillet Reinforced Boss Connection Without Pilot,
Single Bevel
5. Keywords
Fig. 30 Fillet Reinforced Boss Connection with Pilot,
Single Bevel 5.1 backing ring pipe welds; boss connections; flange
Fig. 31 Fillet Reinforced Boss Connection (Couplet) with welds; miter joint weld; pipe welds; root connections; sleeve
Integral Backing Ring pipe welds; socket welds; welded joints
F722−18 (2022)
⁄16 in. = 2 mm
⁄8 in. = 3 mm
⁄8 in. = 3 mm
⁄16 in. = 5 mm
⁄8 in. = 22 mm
Application—Class II piping.
Application—Class I and II piping above 2-in. NPS.
Systems or Service—For services such as gravity drains (including plumbing),
System or Service—All.
vents, and overflows.
Remarks—1. Internal weld shall be made first and ground, chipped, or cleaned
Remarks—1. Root of weld need not be ground.
by some other means to assure sound welds.
FIG. 1 Butt Joint, Square
2. The “L” dimension should be held to a minimum to facilitate welding and
inspection on the inside surface of the pipe.
FIG. 3 Butt, Joint, V-Grooved, Welded Both Sides
⁄16 in. = 2 mm
⁄16 in. = 2 mm
1 ⁄8 in. = 3 mm
⁄8 in. = 3 mm
⁄8 in. = 22 mm
⁄8 in. = 22 mm
Application—Class I and II piping above 2-in. NPS.
Application—Class II piping.
System or Service—All.
System or Service—All provided root of weld is visually inspected where
Remarks—1. Internal weld shall be made first and ground, chipped, or cleaned
possible to ensure complete weld penetration.
by some other means to assure sound welds.
Remarks—1. For services such as vents, overflows, and gravity drains (includ-
2. The “L” dimension should be held to a minimum to facilitate welding and
ing plumbing) the root of the weld need not be ground.
inspection on the inside surface of the pipe.
FIG. 2 Butt Joint, V-Grooved
FIG. 4 Butt Joint, Double V-Grooved, Welded Both Sides
F722−18 (2022)
1 1 3 7
in. ⁄16 ⁄8 ⁄16 ⁄8
mm 2 3 5 22
1 1 3 7
in. ⁄16 ⁄8 ⁄4 ⁄8
Application—Class I and II piping.
mm 2 3 19 22
System or Service—All, except as noted in remarks.
Remarks—1. Backing ring may be tack-welded in place to facilitate fabrication.
Application—Class I and II piping above 2-in. NPS.
2. When used in the following services, backing rings shall be removed.
Systems or Service—All.
(A) Lube oil service discharge piping from the lube oil pumps to the reduction
Remarks—1. Internal weld shall be made first and ground, chipped, or cleaned
gears, HP and LP turbines, and lube oil gravity tank.
by some other means to assure sound welds.
(B) Superheated steam outlet piping from the main boilers to the HP and LP
2. The “L” dimension should be held to a minimum to facilitate welding and
turbines and turbo generators and desuperheated steam from the main boilers to
inspection on the inside surface of the pipe.
turbine driven main feed pumps.
(C) Central hydraulic systems.
FIG. 5 Butt Joint, Compound Bevel V-Grooved, Welded Both
FIG. 7 Butt Joint, V-Grooved, Welded with Bevel End-Type
Sides
Backing Ring
1 1 1 3 3 7
⁄16 in. = 2 mm
in. ⁄16 ⁄8 ⁄4 ⁄8 ⁄4 ⁄8
⁄8 in. = 3 mm
mm 2 3 6 10 19 22
⁄8 in. = 22 mm
Application—Class I and II piping.
Application—Class II piping where use will not cause objectionable pressure
System or Service—All, except as noted in remarks.
drop or turbulence.
Remarks—1. Backing ring may be tack-welded in place to facilitate fabrication.
System or Service—All provided root of weld is visually inspected where
2. When used in the following services, backing rings shall be removed.
possible to ensure complete weld penetration.
(A) Lube oil service discharge piping from the lube oil pumps to the reduction
Remarks—1. For services such as vents, overflows, and gravity drains (includ-
gears, HP and LP turbines, and lube oil gravity tank.
ing plumbing), the root of the weld need not be ground.
(B) Superheated steam outlet piping from the main boilers to the HP and LP
2. Miter segments shall be designed in accordance with ASME B31.1, para-
turbines and turbo generators and desuperheated steam from the main boilers to
graph 104.3.3, and 46 CFR 56.07-10(f).
turbine driven main feed pumps.
FIG. 6 Butt Joint, V-Grooved, Miter Type (C) Central hydraulic systems.
FIG. 8 Butt Joint, Compound Bevel V-Grooved, Welded with
Bevel End-Type Backing Ring
F722−18 (2022)
1 1 1 3 7
in. ⁄64 ⁄32 ⁄16 ⁄4 ⁄8
⁄8 in. = 22 mm
mm 0.4 1 2 19 22
Application—Class I and II piping.
Application—Class I and II piping.
Systems or Service—All, except as noted in remarks.
System or Service—All.
Remarks—1. Backing ring may be tack-welded in place to facilitate fabrication. 1
Remarks—1. Internal misalignment of pipes shall not exceed ⁄16 in. (2 mm).
2. When used in the following services, backing rings shall be removed.
2. Consumable insert ring shall be centered before welding.
(A) Lube oil service discharge piping from the lube oil pumps to the reduction
FIG. 12 Butt Joint, Compound Bevel V-Grooved, Welded with
gears, HP and LP turbines, and lube oil gravity tank.
Consumable Insert Ring
(B) Superheated steam outlet piping from the main boilers to the HP and LP
turbines and turbo generators and desuperheated steam from the main boilers to
turbine driven main feed pumps.
(C) Central hydraulic systems.
FIG. 9 Butt Joint, V-Grooved Welded with Bevel End Lug-Type
Backing Ring
1 1 1 3
in. ⁄64 ⁄32 ⁄16 ⁄16
mm 0.4 1 2 5
Application—Class I and II Piping.
System or Service—All.
1 1 3 7
Remarks—1. Internal misalignment of pipes shall not exceed ⁄16 in. (2 mm).
in. ⁄16 ⁄8 ⁄16 ⁄8
2. Consumable insert ring shall be centered before welding.
mm 2 3 5 22
FIG. 13 Butt Joint, U-Grooved, Welded with Consumable Insert
Application—Class I and II piping.
Ring
Systems or Service—All.
Remarks—1. After welding, backing ring shall be machined flush with inside
diameter of pipe or fitting.
FIG. 10 Butt Joint, V-Grooved, Welded with Square End-Type
Backing Ring
0.020 in. = 0.51 mm
Application—Class I and II piping.
System or Service—All.
Remarks—1. Internal misalignment of pipes shall not exceed ⁄32 in. (1 mm).
1 1 1 7
in. ⁄64 ⁄32 ⁄16 ⁄8
2. Consumable insert ring shall be centered before welding.
mm 0.4 1 2 22
FIG. 14 Butt Joint, V-Grooved, Welded with Consumable Insert
Ring
Application—Class I and II piping.
System or Service—All.
Remarks—1. I
...


Questions, Comments and Discussion
Ask us and Technical Secretary will try to provide an answer. You can facilitate discussion about the standard in here.
Loading comments...