Standard Hardness Conversion Tables for Metals Relationship Among Brinell Hardness, Vickers Hardness, Rockwell Hardness, Superficial Hardness, Knoop Hardness, and Scleroscope Hardness

SCOPE
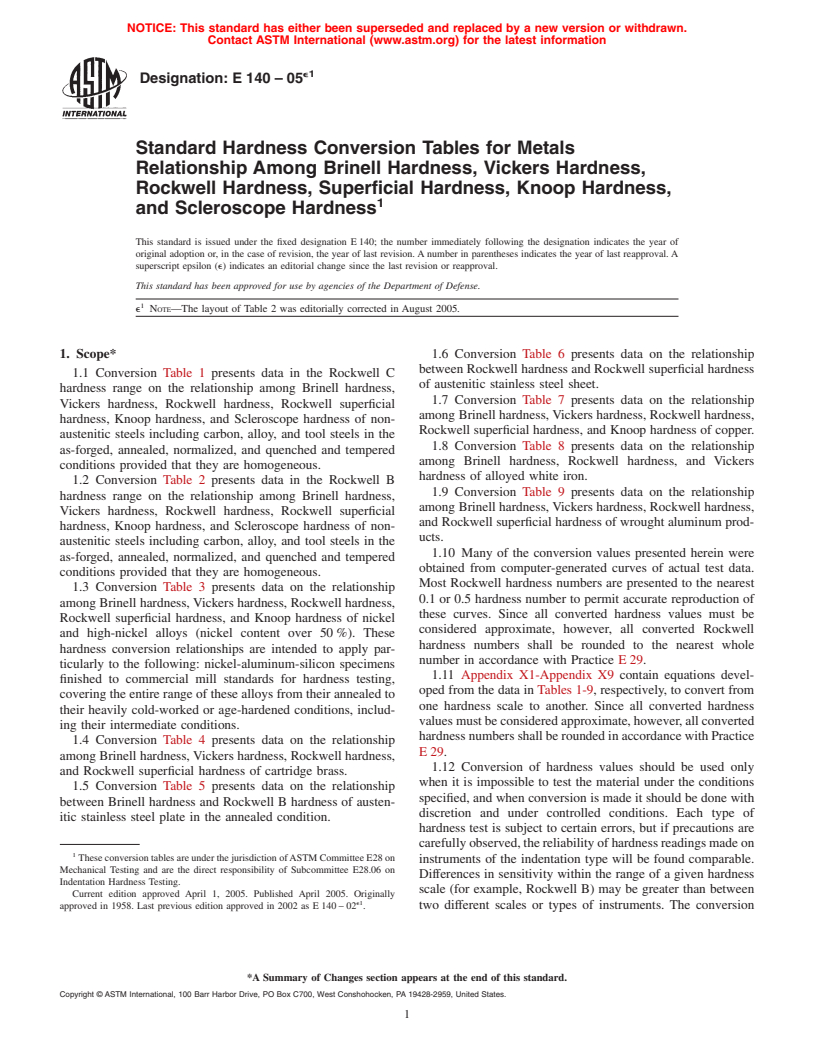
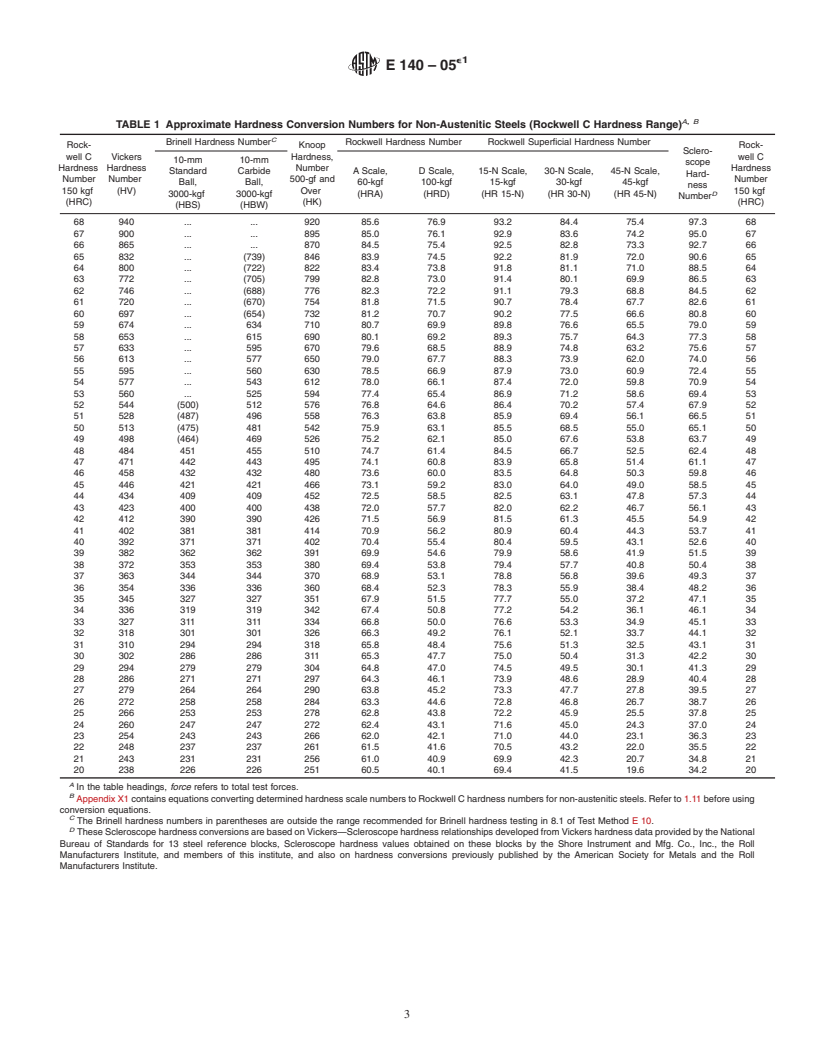
1.1 Conversion presents data in the Rockwell C hardness range on the relationship among Brinell hardness, Vickers hardness, Rockwell hardness, Rockwell superficial hardness, Knoop hardness, and Scleroscope hardness of non-austenitic steels including carbon, alloy, and tool steels in the as-forged, annealed, normalized, and quenched and tempered conditions provided that they are homogeneous.
1.2 Conversion Table 2 presents data in the Rockwell B hardness range on the relationship among Brinell hardness, Vickers hardness, Rockwell hardness, Rockwell superficial hardness, Knoop hardness, and Scleroscope hardness of non-austenitic steels including carbon, alloy, and tool steels in the as-forged, annealed, normalized, and quenched and tempered conditions provided that they are homogeneous.
1.3 Conversion Table 3 presents data on the relationship among Brinell hardness, Vickers hardness, Rockwell hardness, Rockwell superficial hardness, and Knoop hardness of nickel and high-nickel alloys (nickel content over 50 %). These hardness conversion relationships are intended to apply particularly to the following: nickel-aluminum-silicon specimens finished to commercial mill standards for hardness testing, covering the entire range of these alloys from their annealed to their heavily cold-worked or age-hardened conditions, including their intermediate conditions.
1.4 Conversion Table 4 presents data on the relationship among Brinell hardness, Vickers hardness, Rockwell hardness, and Rockwell superficial hardness of cartridge brass.
1.5 Conversion Table 5 presents data on the relationship between Brinell hardness and Rockwell B hardness of austenitic stainless steel plate in the annealed condition.
1.6 Conversion Table 6 presents data on the relationship between Rockwell hardness and Rockwell superficial hardness of austenitic stainless steel sheet.
1.7 Conversion Table 7 presents data on the relationship among Brinell hardness, Vickers hardness, Rockwell hardness, Rockwell superficial hardness, and Knoop hardness of copper.
1.8 Conversion Table 8 presents data on the relationship among Brinell hardness, Rockwell hardness, and Vickers hardness of alloyed white iron.
1.9 Conversion Table 9 presents data on the relationship among Brinell hardness, Vickers hardness, Rockwell hardness, and Rockwell superficial hardness of wrought aluminum products.
1.10 Many of the conversion values presented herein were obtained from computer-generated curves of actual test data. Most Rockwell hardness numbers are presented to the nearest 0.1 or 0.5 hardness number to permit accurate reproduction of these curves. Since all converted hardness values must be considered approximate, however, all converted Rockwell hardness numbers shall be rounded to the nearest whole number in accordance with Practice E 29.
1.11 Appendix X1-Appendix X9 contain equations developed from the data in Tables 1-9, respectively, to convert from one hardness scale to another. Since all converted hardness values must be considered approximate, however, all converted hardness numbers shall be rounded in accordance with Practice E 29.
1.12 Conversion of hardness values should be used only when it is impossible to test the material under the conditions specified, and when conversion is made it should be done with discretion and under controlled conditions. Each type of hardness test is subject to certain errors, but if precautions are carefully observed, the reliability of hardness readings made on instruments of the indentation type will be found comparable. Differences in sensitivity within the range of a given hardness scale (for example, Rockwell B) may be greater than between two different scales or types of instruments. The conversion values, whether from the tables or calculated from the equations, are only approximate and may be inaccurate for specific application.

General Information

Status
Historical
Publication Date
09-Jan-2002
Current Stage
Ref Project

Relations

Buy Standard

Guide
ASTM E140-97e2 - Standard Hardness Conversion Tables for Metals Relationship Among Brinell Hardness, Vickers Hardness, Rockwell Hardness, Superficial Hardness, Knoop Hardness, and Scleroscope Hardness
English language
21 pages
sale 15% off
Preview
sale 15% off
Preview

Standards Content (Sample)


NOTICE: This standard has either been superseded and replaced by a new version or discontinued.
Contact ASTM International (www.astm.org) for the latest information.
e2
Designation: E 140 – 97 An American National Standard
Standard Hardness Conversion Tables for Metals
RELATIONSHIP AMONG BRINELL HARDNESS,
VICKERS HARDNESS, ROCKWELL HARDNESS, ROCKWELL
SUPERFICIAL HARDNESS, KNOOP HARDNESS, AND
SCLEROSCOPE HARDNESS
This standard is issued under the fixed designation E 140; the number immediately following the designation indicates the year of
original adoption or, in the case of revision, the year of last revision. A number in parentheses indicates the year of last reapproval. A
superscript epsilon (e) indicates an editorial change since the last revision or reapproval.
This standard has been approved for use by agencies of the Department of Defense.
e NOTE—Equation X3.16 was corrected editorially in September 1999.
e NOTE—Table 3 was editorially revised in April 2000. Equations X2.8 and X5.1 were editorially revised in May 2000.
1. Scope 1.6 Conversion Table 6 presents data on the relationship
between Rockwell hardness and Rockwell superficial hardness
1.1 Conversion Table 1 presents data in the Rockwell C
of austenitic stainless steel sheet.
hardness range on the relationship among Brinell hardness,
1.7 Conversion Table 7 presents data on the relationship
Vickers hardness, Rockwell hardness, Rockwell superficial
among Brinell hardness, Vickers hardness, Rockwell hardness,
hardness, Knoop hardness, and Scleroscope hardness of non-
Rockwell superficial hardness, and Knoop hardness of copper.
austenitic steels including carbon, alloy, and tool steels in the
1.8 Conversion Table 8 presents data on the relationship
as-forged, annealed, normalized, and quenched and tempered
among Brinell hardness, Rockwell hardness, and Vickers
conditions provided that they are homogeneous.
hardness of alloyed white iron.
1.2 Conversion Table 2 presents data in the Rockwell B
1.9 Conversion Table 9 presents data on the relationship
hardness range on the relationship among Brinell hardness,
among Brinell hardness, Vickers hardness, Rockwell hardness,
Vickers hardness, Rockwell hardness, Rockwell superficial
and Rockwell superficial hardness of wrought aluminum prod-
hardness, Knoop hardness, and Scleroscope hardness of non-
ucts.
austenitic steels including carbon, alloy, and tool steels in the
1.10 Many of the conversion values presented herein were
as-forged, annealed, normalized, and quenched and tempered
obtained from computer-generated curves of actual test data.
conditions provided that they are homogeneous.
Most Rockwell hardness numbers are presented to the nearest
1.3 Conversion Table 3 presents data on the relationship
0.1 or 0.5 hardness number to permit accurate reproduction of
among Brinell hardness, Vickers hardness, Rockwell hardness,
these curves. Since all converted hardness values must be
Rockwell superficial hardness, and Knoop hardness of nickel
considered approximate, however, all converted Rockwell
and high-nickel alloys (nickel content over 50 %). These
hardness numbers shall be rounded to the nearest whole
hardness conversion relationships are intended to apply par-
number in accordance with Practice E 29.
ticularly to the following: nickel-aluminum-silicon specimens
1.11 Appendix X1-Appendix X9 contain equations devel-
finished to commercial mill standards for hardness testing,
oped from the data in Tables 1-9, respectively, to convert from
covering the entire range of these alloys from their annealed to
one hardness scale to another. Since all converted hardness
their heavily cold-worked or age-hardened conditions, includ-
values must be considered approximate, however, all converted
ing their intermediate conditions.
hardness numbers shall be rounded in accordance with Practice
1.4 Conversion Table 4 presents data on the relationship
E 29.
among Brinell hardness, Vickers hardness, Rockwell hardness,
1.12 Conversion of hardness values should be used only
and Rockwell superficial hardness of cartridge brass.
when it is impossible to test the material under the conditions
1.5 Conversion Table 5 presents data on the relationship
specified, and when conversion is made it should be done with
between Brinell hardness and Rockwell B hardness of austen-
discretion and under controlled conditions. Each type of
itic stainless steel plate in the annealed condition.
hardness test is subject to certain errors, but if precautions are
carefully observed, the reliability of hardness readings made on
These conversion tables are under the jurisdiction of ASTM Committee E-28
instruments of the indentation type will be found comparable.
on Mechanical Testing and are the direct responsibility of Subcommittee E28.06 on
Differences in sensitivity within the range of a given hardness
Indentation Hardness Testing.
scale (for example, Rockwell B) may be greater than between
Current edition approved Oct. 10, 1997. Published December 1997. Originally
published as E 140 – 58. Last previous edition E 140 – 95. two different scales or types of instruments. The conversion
Copyright © ASTM, 100 Barr Harbor Drive, West Conshohocken, PA 19428-2959, United States.
E 140
values, whether from the tables or calculated from the equa- cannot be fitted to a single conversion relationship for all
tions, are only approximate and may be inaccurate for specific metals. Indentation hardness is not a single fundamental
application. property but a combination of properties, and the contribution
of each to the hardness number varies with the type of test. The
2. Referenced Documents
modulus of elasticity has been shown to influence conversions
2.1 ASTM Standards:
at high hardness levels; and at low hardness levels conversions
E 10 Test Method for Brinell Hardness of Metallic Materi-
between hardness scales measuring depth and those measuring
als
diameter are likewise influenced by differences in the modulus
E 18 Test Method for Rockwell Hardness and Rockwell
of elasticity. Therefore separate conversion tables are necessary
Superficial Hardness of Metallic Materials
for different materials.
E 29 Practice for Using Significant Digits in Test Data to
NOTE 1—Hardness conversion values for other metals based on com-
Determine Conformance with Specifications
parative test on similar materials having similar mechanical properties will
E 92 Test Method for Vickers Hardness of Metallic Mate-
be added to this standard as the need arises.
rials
6. Significance and Use
E 384 Test Method for Microhardness of Materials
E 448 Practice for Scleroscope Hardness Testing of Metallic
6.1 Since the various types of hardness tests do not all
Materials
measure the same combination of material properties, conver-
sion from one hardness scale to another is only an approximate
3. Methods for Hardness Determinations
process. Because of the wide range of variation among
3.1 The hardness readings used with these conversion tables
different materials, it is not possible to state confidence limits
shall be determined in accordance with one of the following
for the errors in using a conversion chart. Even in the case of
ASTM test methods:
a table established for a single material, such as the table for
3.1.1 Vickers Hardness—Test Method E 92.
cartridge brass, some error is involved depending on compo-
3.1.2 Brinell Hardness—Test Method E 10.
sition and methods of processing (see Appendix X1).
3.1.3 Rockwell Hardness—Test Method E 18 Scales A, B,
6.2 Because of their approximate nature, conversion tables
C, D, E, F, G, H, K, 15-N, 30-N, 45-N, 15-T, 30-T, 45-T, 15-W.
must be regarded as only an estimate of comparative values. It
3.1.4 Knoop Hardness—Test Method E 384.
is recommended that hardness conversions be applied prima-
3.1.5 Scleroscope Hardness—Practice E 448.
rily to values such as specification limits, which are established
by agreement or mandate, and that the conversion of test data
4. Apparatus and Reference Standards
be avoided whenever possible.
4.1 The apparatus and reference standards shall conform to
7. Reporting of Hardness Numbers
the description in Test Methods E 92, E 10, E 18, E 384, and
Practice E 448.
7.1 When reporting converted hardness numbers the mea-
sured hardness and test scale shall be indicated in parentheses
5. Principle of Method of Conversion
as in the following example:
5.1 Tests have proved that even the most reliable data
353 HBW ~38 HRC!
(1)
Annual Book of ASTM Standards, Vol 03.01.
8. Keywords
Annual Book of ASTM Standards, Vol 14.02.
Registered trademark of the Shore Instrument and Manufacturing Co., Inc. 8.1 conversion; hardness scale; metallic
E 140
A, B
TABLE 1 Approximate Hardness Conversion Numbers for Non-Austenitic Steels (Rockwell C Hardness Range)
C
Brinell Hardness Number Rockwell Hardness Number Rockwell Superficial Hardness Number
Rock- Knoop Rock-
Sclero-
well C Vickers Hardness, well C
10-mm 10-mm
scope
Hardness Hardness Number Hardness
Standard Carbide A Scale, D Scale, 15-N Scale, 30-N Scale, 45-N Scale,
Hard-
Number Number 500-gf and Number
Ball, Ball, 60-kgf 100-kgf 15-kgf 30-kgf 45-kgf
ness
150 kgf (HV) Over 150 kgf
D
3000-kgf 3000-kgf (HRA) (HRD) (HR 15-N) (HR 30-N) (HR 45-N)
Number
(HRC) (HK) (HRC)
(HBS) (HBW)
68 940 . . 920 85.6 76.9 93.2 84.4 75.4 97.3 68
67 900 . . 895 85.0 76.1 92.9 83.6 74.2 95.0 67
66 865 . . 870 84.5 75.4 92.5 82.8 73.3 92.7 66
65 832 . (739) 846 83.9 74.5 92.2 81.9 72.0 90.6 65
64 800 . (722) 822 83.4 73.8 91.8 81.1 71.0 88.5 64
63 772 . (705) 799 82.8 73.0 91.4 80.1 69.9 86.5 63
62 746 . (688) 776 82.3 72.2 91.1 79.3 68.8 84.5 62
61 720 . (670) 754 81.8 71.5 90.7 78.4 67.7 82.6 61
60 697 . (654) 732 81.2 70.7 90.2 77.5 66.6 80.8 60
59 674 . 634 710 80.7 69.9 89.8 76.6 65.5 79.0 59
58 653 . 615 690 80.1 69.2 89.3 75.7 64.3 77.3 58
57 633 . 595 670 79.6 68.5 88.9 74.8 63.2 75.6 57
56 613 . 577 650 79.0 67.7 88.3 73.9 62.0 74.0 56
55 595 . 560 630 78.5 66.9 87.9 73.0 60.9 72.4 55
54 577 . 543 612 78.0 66.1 87.4 72.0 59.8 70.9 54
53 560 . 525 594 77.4 65.4 86.9 71.2 58.6 69.4 53
52 544 (500) 512 576 76.8 64.6 86.4 70.2 57.4 67.9 52
51 528 (487) 496 558 76.3 63.8 85.9 69.4 56.1 66.5 51
50 513 (475) 481 542 75.9 63.1 85.5 68.5 55.0 65.1 50
49 498 (464) 469 526 75.2 62.1 85.0 67.6 53.8 63.7 49
48 484 451 455 510 74.7 61.4 84.5 66.7 52.5 62.4 48
47 471 442 443 495 74.1 60.8 83.9 65.8 51.4 61.1 47
46 458 432 432 480 73.6 60.0 83.5 64.8 50.3 59.8 46
45 446 421 421 466 73.1 59.2 83.0 64.0 49.0 58.5 45
44 434 409 409 452 72.5 58.5 82.5 63.1 47.8 57.3 44
43 423 400 400 438 72.0 57.7 82.0 62.2 46.7 56.1 43
42 412 390 390 426 71.5 56.9 81.5 61.3 45.5 54.9 42
41 402 381 381 414 70.9 56.2 80.9 60.4 44.3 53.7 41
40 392 371 371 402 70.4 55.4 80.4 59.5 43.1 52.6 40
39 382 362 362 391 69.9 54.6 79.9 58.6 41.9 51.5 39
38 372 353 353 380 69.4 53.8 79.4 57.7 40.8 50.4 38
37 363 344 344 370 68.9 53.1 78.8 56.8 39.6 49.3 37
36 354 336 336 360 68.4 52.3 78.3 55.9 38.4 48.2 36
35 345 327 327 351 67.9 51.5 77.7 55.0 37.2 47.1 35
34 336 319 319 342 67.4 50.8 77.2 54.2 36.1 46.1 34
33 327 311 311 334 66.8 50.0 76.6 53.3 34.9 45.1 33
32 318 301 301 326 66.3 49.2 76.1 52.1 33.7 44.1 32
31 310 294 294 318 65.8 48.4 75.6 51.3 32.5 43.1 31
30 302 286 286 311 65.3 47.7 75.0 50.4 31.3 42.2 30
29 294 279 279 304 64.8 47.0 74.5 49.5 30.1 41.3 29
28 286 271 271 297 64.3 46.1 73.9 48.6 28.9 40.4 28
27 279 264 264 290 63.8 45.2 73.3 47.7 27.8 39.5 27
26 272 258 258 284 63.3 44.6 72.8 46.8 26.7 38.7 26
25 266 253 253 278 62.8 43.8 72.2 45.9 25.5 37.8 25
24 260 247 247 272 62.4 43.1 71.6 45.0 24.3 37.0 24
23 254 243 243 266 62.0 42.1 71.0 44.0 23.1 36.3 23
22 248 237 237 261 61.5 41.6 70.5 43.2 22.0 35.5 22
21 243 231 231 256 61.0 40.9 69.9 42.3 20.7 34.8 21
20 238 226 226 251 60.5 40.1 69.4 41.5 19.6 34.2 20
A
In the table headings, force refers to total test forces.
B
Appendix X1 contains equations converting determined hardness scale numbers to Rockwell C hardness numbers for non-austenitic steels. Refer to 1.11 before using
conversion equations.
C
The Brinell hardness numbers in parentheses are outside the range recommended for Brinell hardness testing in 8.1 of Test Method E 10.
D
These Scleroscope hardness conversions are based on Vickers—Scleroscope hardness relationships developed from Vickers hardness data provided by the National
Bureau of Standards for 13 steel reference blocks, Scleroscope hardness values obtained on these blocks by the Shore Instrument and Mfg. Co., Inc., the Roll
Manufacturers Institute, and members of this institute, and also on hardness conversions previously published by the American Society for Metals and the Roll
Manufacturers Institute.
E 140
A, B
TABLE 2 Approximate Hardness Conversion Numbers for Non-Austenitic Steels (Rockwell B Hardness Range)
Rockwell B Knoop Hard- Rockwell A Rockwell F Rockwell B
Rockwell Superficial Hardness Number
Vickers Brinell Hard-
Hardness ness Number, Hardness Hardness Hardness
Hardness ness Number,
15-T Scale, 30-T Scale, 45-T Scale,
Number, 500-gf, and Number, Number, Number,
Number 3000-kgf,
15-kgf, 30-kgf, 45-kgf,
100-kgf Over 60-kgf, 60-kgf, 100-kgf,
(HV) (HBS)
(HR 15-T) (HR 30-T) (HR 45-T)
(HRB) (HK) (HRA) (HRF) (HRB)
100 240 240 251 61.5 . 93.1 83.1 72.9 100
99 234 234 246 60.9 . 92.8 82.5 71.9 99
98 228 228 241 60.2 . 92.5 81.8 70.9 98
97 222 222 236 59.5 . 92.1 81.1 69.9 97
96 216 216 231 58.9 . 91.8 80.4 68.9 96
95 210 210 226 58.3 . 91.5 79.8 67.9 95
94 205 205 221 57.6 . 91.2 79.1 66.9 94
93 200 200 216 57.0 . 90.8 78.4 65.9 93
92 195 195 211 56.4 . 90.5 77.8 64.8 92
91 190 190 206 55.8 . 90.2 77.1 63.8 91
90 185 185 201 55.2 . 89.9 76.4 62.8 90
89 180 180 196 54.6 . 89.5 75.8 61.8 89
88 176 176 192 54.0 . 89.2 75.1 60.8 88
87 172 172 188 53.4 . 88.9 74.4 59.8 87
86 169 169 184 52.8 . 88.6 73.8 58.8 86
85 165 165 180 52.3 . 88.2 73.1 57.8 85
84 162 162 176 51.7 . 87.9 72.4 56.8 84
83 159 159 173 51.1 . 87.6 71.8 55.8 83
82 156 156 170 50.6 . 87.3 71.1 54.8 82
81 153 153 167 50.0 . 86.9 70.4 53.8 81
80 150 150 164 49.5 . 86.6 69.7 52.8 80
79 147 147 161 48.9 . 86.3 69.1 51.8 79
78 144 144 158 48.4 . 86.0 68.4 50.8 78
77 141 141 155 47.9 . 85.6 67.7 49.8 77
76 139 139 152 47.3 . 85.3 67.1 48.8 76
75 137 137 150 46.8 99.6 85.0 66.4 47.8 75
74 135 135 147 46.3 99.1 84.7 65.7 46.8 74
73 132 132 145 45.8 98.5 84.3 65.1 45.8 73
72 130 130 143 45.3 98.0 84.0 64.4 44.8 72
71 127 127 141 44.8 97.4 83.7 63.7 43.8 71
70 125 125 139 44.3 96.8 83.4 63.1 42.8 70
69 123 123 137 43.8 96.2 83.0 62.4 41.8 69
68 121 121 135 43.3 95.6 82.7 61.7 40.8 68
67 119 119 133 42.8 95.1 82.4 61.0 39.8 67
66 117 117 131 42.3 94.5 82.1 60.4 38.7 66
65 116 116 129 41.8 93.9 81.8 59.7 37.7 65
64 114 114 127 41.4 93.4 81.4 59.0 36.7 64
...

Questions, Comments and Discussion

Ask us and Technical Secretary will try to provide an answer. You can facilitate discussion about the standard in here.