Standard Specification for Welded Stainless Steel Mechanical Tubing

ABSTRACT
This guide covers standard specification for welded stainless steel tubing for mechanical applications where appearance, mechanical properties, or corrosion resistance is needed. The tubes shall be made from flat-rolled steel by an automatic welding process without the addition of filler metal. Tubes shall be furnished in one of the following shapes - round, square, rectangular, or special. Heat analysis shall be performed wherein several grades of steel shall conform to the required chemical composition for carbon, manganese, phosphorus, sulfur, silicon, nickel, chromium, molybdenum, titanium, columbium, and tantalum.
SCOPE
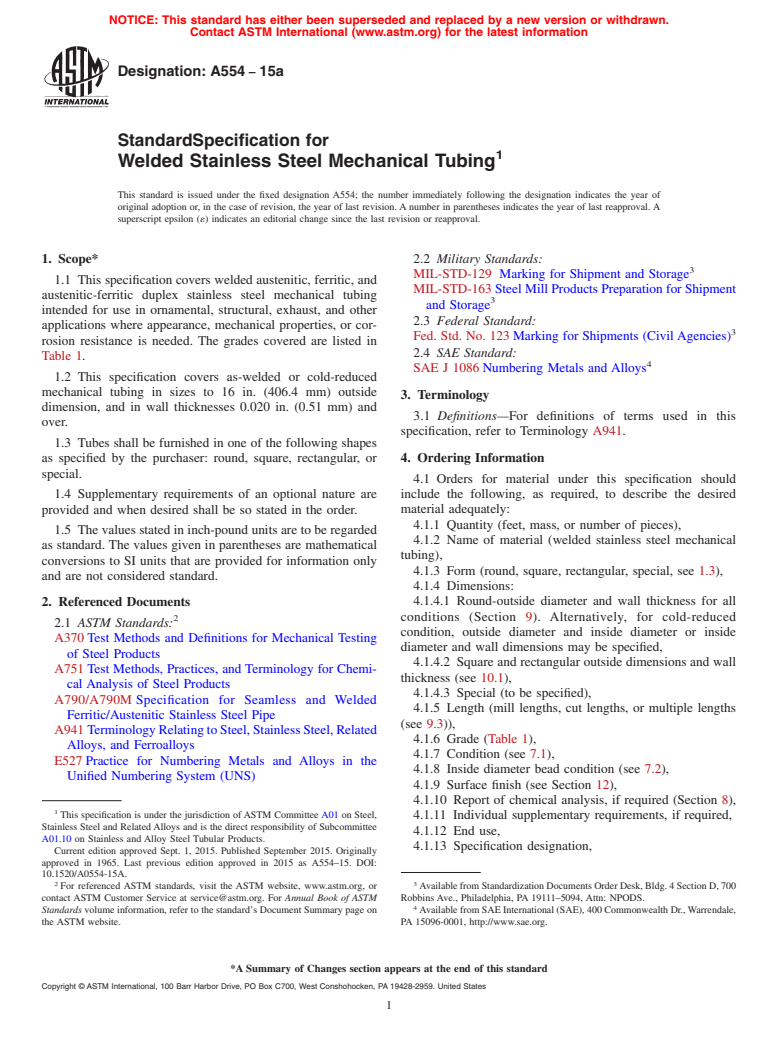
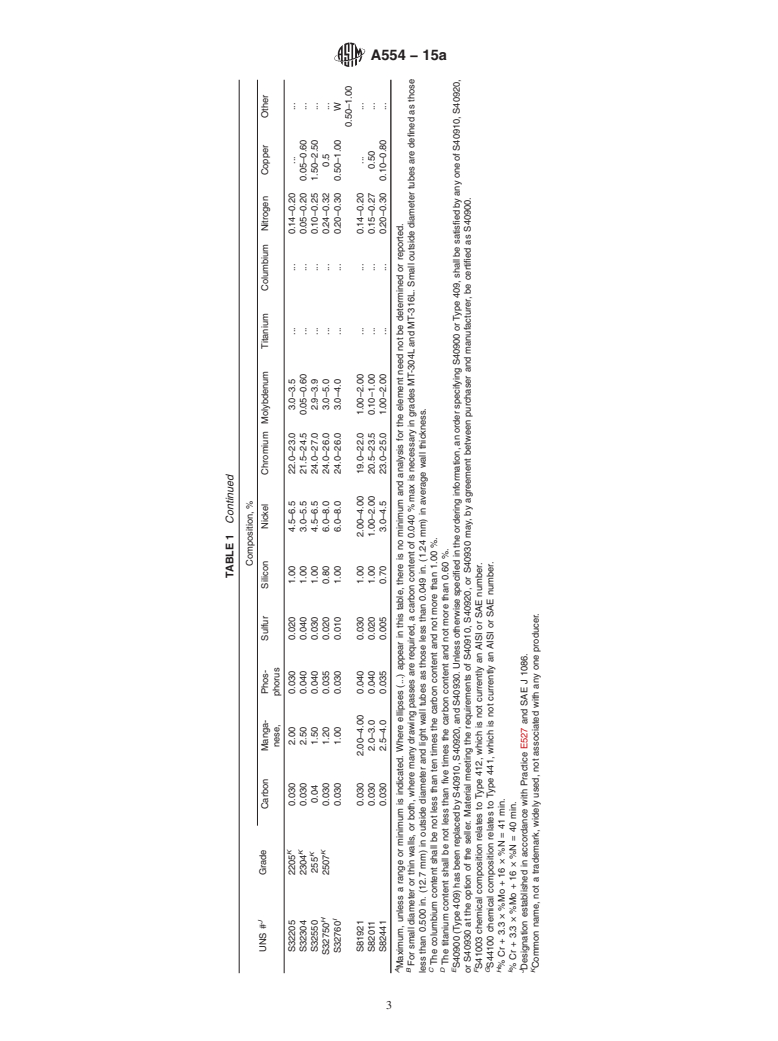
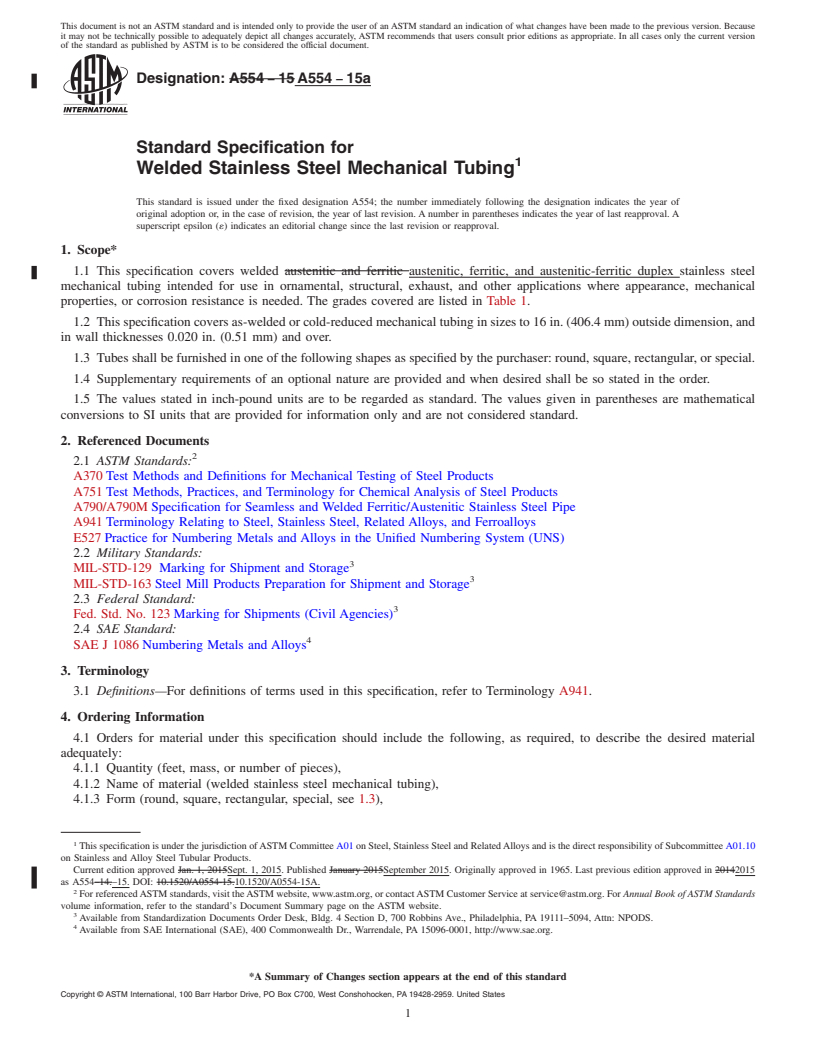
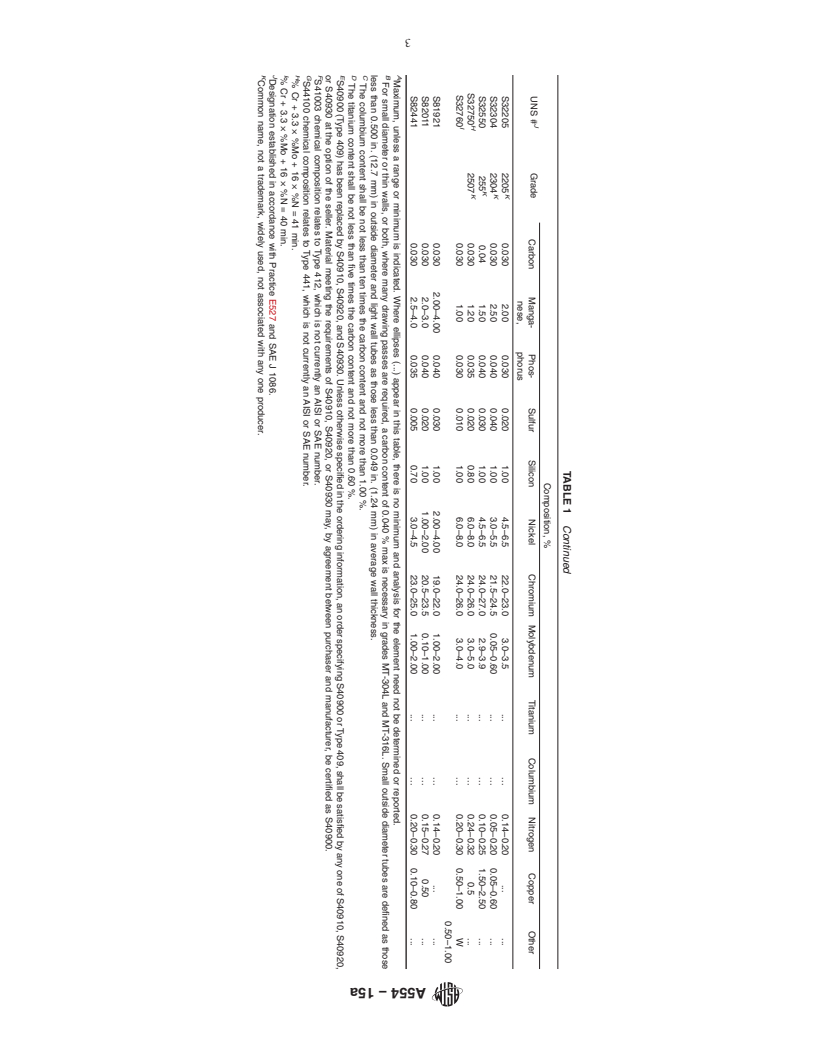
1.1 This specification covers welded austenitic and ferritic stainless steel mechanical tubing intended for use in ornamental, structural, exhaust, and other applications where appearance, mechanical properties, or corrosion resistance is needed. The grades covered are listed in Table 1. (A) Maximum, unless a range or minimum is indicated. Where ellipses (...) appear in this table, there is no minimum and analysis for the element need not be determined or reported.(B) For small diameter or thin walls, or both, where many drawing passes are required, a carbon content of 0.040 % max is necessary in grades MT-304L and MT-316L. Small outside diameter tubes are defined as those less than 0.500 in. (12.7 mm) in outside diameter and light wall tubes as those less than 0.049 in. (1.24 mm) in average wall thickness.(C) The columbium content shall be not less than ten times the carbon content and not more than 1.00 %.(D) The titanium content shall be not less than five times the carbon content and not more than 0.60 %.(E) S40900 (Type 409) has been replaced by S40910, S40920, and S40930. Unless otherwise specified in the ordering information, an order specifying S40900 or Type 409, shall be satisfied by any one of S40910, S40920, or S40930 at the option of the seller. Material meeting the requirements of S40910, S40920, or S40930 may, by agreement between purchaser and manufacturer, be certified as S40900.(F) S41003 chemical composition relates to Type 412, which is not currently an AISI or SAE number.(G) S44100 chemical composition relates to Type 441, which is not currently an AISI or SAE number.(H) % Cr + 3.3 × %Mo + 16 × %N = 41 min.(I) % Cr + 3.3 × %Mo + 16 × %N = 40 min.(J) Designation established in accordance with Practice E527 and SAE J 1086.(K) Common name, not a trademark, widely used, not associated with any one producer.  
1.2 This specification covers as-welded or cold-reduced mechanical tubing in sizes to 16 in. (406.4 mm) outside dimension, and in wall thicknesses 0.020 in. (0.51 mm) and over.  
1.3 Tubes shall be furnished in one of the following shapes as specified by the purchaser: round, square, rectangular, or special.  
1.4 Supplementary requirements of an optional nature are provided and when desired shall be so stated in the order.  
1.5 The values stated in inch-pound units are to be regarded as standard. The values given in parentheses are mathematical conversions to SI units that are provided for information only and are not considered standard.

General Information

Status
Historical
Publication Date
31-Dec-2014
Current Stage
Ref Project

Relations

Buy Standard

Technical specification
ASTM A554-15 - Standard Specification for Welded Stainless Steel Mechanical Tubing
English language
8 pages
sale 15% off
Preview
sale 15% off
Preview
Technical specification
REDLINE ASTM A554-15 - Standard Specification for Welded Stainless Steel Mechanical Tubing
English language
8 pages
sale 15% off
Preview
sale 15% off
Preview

Standards Content (Sample)


NOTICE: This standard has either been superseded and replaced by a new version or withdrawn.
Contact ASTM International (www.astm.org) for the latest information
Designation:A554 −15
StandardSpecification for
Welded Stainless Steel Mechanical Tubing
This standard is issued under the fixed designation A554; the number immediately following the designation indicates the year of
original adoption or, in the case of revision, the year of last revision. A number in parentheses indicates the year of last reapproval. A
superscript epsilon (´) indicates an editorial change since the last revision or reapproval.
1. Scope* 2.2 Military Standards:
MIL-STD-129 Marking for Shipment and Storage
1.1 This specification covers welded austenitic and ferritic
MIL-STD-163 Steel Mill Products Preparation for Shipment
stainless steel mechanical tubing intended for use in
and Storage
ornamental, structural, exhaust, and other applications where
2.3 Federal Standard:
appearance, mechanical properties, or corrosion resistance is
Fed. Std. No. 123 Marking for Shipments (Civil Agencies)
needed. The grades covered are listed in Table 1.
2.4 SAE Standard:
1.2 This specification covers as-welded or cold-reduced
SAE J 1086 Numbering Metals and Alloys
mechanical tubing in sizes to 16 in. (406.4 mm) outside
dimension, and in wall thicknesses 0.020 in. (0.51 mm) and
3. Terminology
over.
3.1 Definitions—For definitions of terms used in this
1.3 Tubes shall be furnished in one of the following shapes
specification, refer to Terminology A941.
as specified by the purchaser: round, square, rectangular, or
special. 4. Ordering Information
1.4 Supplementary requirements of an optional nature are 4.1 Orders for material under this specification should
provided and when desired shall be so stated in the order. include the following, as required, to describe the desired
material adequately:
1.5 The values stated in inch-pound units are to be regarded
4.1.1 Quantity (feet, mass, or number of pieces),
as standard. The values given in parentheses are mathematical
4.1.2 Name of material (welded stainless steel mechanical
conversions to SI units that are provided for information only
tubing),
and are not considered standard.
4.1.3 Form (round, square, rectangular, special, see 1.3),
4.1.4 Dimensions:
2. Referenced Documents
4.1.4.1 Round-outside diameter and wall thickness for all
2.1 ASTM Standards:
conditions (Section 9). Alternatively, for cold-reduced
A370 Test Methods and Definitions for Mechanical Testing
condition, outside diameter and inside diameter or inside
of Steel Products
diameter and wall dimensions may be specified,
A751 Test Methods, Practices, and Terminology for Chemi-
4.1.4.2 Square and rectangular outside dimensions and wall
cal Analysis of Steel Products
thickness (see 10.1),
A790/A790M Specification for Seamless and Welded
4.1.4.3 Special (to be specified),
Ferritic/Austenitic Stainless Steel Pipe
4.1.5 Length (mill lengths, cut lengths, or multiple lengths
A941 TerminologyRelatingtoSteel,StainlessSteel,Related
(see 9.3)),
Alloys, and Ferroalloys
4.1.6 Grade (Table 1),
E527 Practice for Numbering Metals and Alloys in the
4.1.7 Condition (see 7.1),
Unified Numbering System (UNS)
4.1.8 Inside diameter bead condition (see 7.2),
4.1.9 Surface finish (see Section 12),
4.1.10 Report of chemical analysis, if required (Section 8),
This specification is under the jurisdiction ofASTM Committee A01 on Steel,
4.1.11 Individual supplementary requirements, if required,
Stainless Steel and Related Alloys and is the direct responsibility of Subcommittee
4.1.12 End use,
A01.10 on Stainless and Alloy Steel Tubular Products.
4.1.13 Specification designation,
Current edition approved Jan. 1, 2015. Published January 2015. Originally
approved in 1965. Last previous edition approved in 2014 as A554–14. DOI:
10.1520/A0554-15.
2 3
For referenced ASTM standards, visit the ASTM website, www.astm.org, or AvailablefromStandardizationDocumentsOrderDesk,Bldg.4SectionD,700
contact ASTM Customer Service at service@astm.org. For Annual Book of ASTM Robbins Ave., Philadelphia, PA 19111–5094, Attn: NPODS.
Standards volume information, refer to the standard’s Document Summary page on Available from SAE International (SAE), 400 Commonwealth Dr.,Warrendale,
the ASTM website. PA 15096-0001, http://www.sae.org.
*A Summary of Changes section appears at the end of this standard
Copyright © ASTM International, 100 Barr Harbor Drive, PO Box C700, West Conshohocken, PA 19428-2959. United States
A554−15
A
TABLE 1 Chemical Requirements
Composition, %
J
UNS # Grade
Carbon Manga- Phos- Sulfur Silicon Nickel Chromium Molybdenum Titanium Columbium Nitrogen Copper Other
nese, phorus
Austenitic
MT-301 0.15 2.00 0.045 0.030 1.00 6.0–8.0 16.0–18.0 . . .
MT-302 0.15 2.00 0.045 0.030 1.00 8.0–10.0 17.0–19.0 . . .
MT-304 0.08 2.00 0.045 0.030 1.00 8.0–11.0 18.0–20.0 . . .
B
MT-304L 0.035 2.00 0.045 0.030 1.00 8.0–13.0 18.0–20.0 . . .
MT-305 0.12 2.00 0.045 0.030 1.00 10.0–13.0 17.0–19.0 . . .
MT-309S 0.08 2.00 0.045 0.030 1.00 12.0–15.0 22.0–24.0 . . . . .
C
MT-309S-Cb 0.08 2.00 0.045 0.030 1.00 12.0–15.0 22.0–24.0 . .
MT-310S 0.08 2.00 0.045 0.030 1.00 19.0–22.0 24.0–26.0 . . .
MT-316 0.08 2.00 0.045 0.030 1.00 10.0–14.0 16.0–18.0 2.0–3.0 . .
B
MT-316L 0.035 2.00 0.045 0.030 1.00 10.0–15.0 16.0–18.0 2.0–3.0 . .
MT-317 0.08 2.00 0.045 0.030 1.00 11.0–14.0 18.0–20.0 3.0–4.0 . .
D
MT-321 0.08 2.00 0.045 0.030 1.00 9.0–13.0 17.0–20.0 . .
MT-330 0.15 2.00 0.040 0.030 1.00 33.0–36.0 14.0–16.0 . . .
C
MT-347 0.08 2.00 0.045 0.030 1.00 9.0–13.0 17.0–20.0 . .
Ferritic
MT-429 0.12 1.00 0.040 0.030 1.00 0.50 max 14.0–16.0 . . .
MT-430 0.12 1.00 0.040 0.030 1.00 0.50 max 16.0–18.0 . . .
MT-430-Ti 0.10 1.00 0.040 0.030 1.00 0.075 max 16.0–19.5 . 5×Cmin, .
0.75 max
E
S40900 409
S40910 0.030 1.00 0.040 0.020 1.00 0.50 10.5–11.7 . Ti 6X (C+N) Cb 0.17 0.030
min,
0.050 max
S40920 0.030 1.00 0.040 0.020 1.00 0.50 10.5–11.7 . Ti 8X (C+N) Cb 0.10 0.030
min,
Ti 0.15–0.50
S40930 0.030 1.00 0.040 0.020 1.00 0.50 10.5–11.7 . (Ti+Cb) [0.08+8 . 0.030
× (C+N)] min,
0.75 max;
Ti 0.05 min
S43400 434 0.120 1.00 0.040 0.030 1.00 . 16.0–18.0 0.75–1.25 . . .
S43600 436 0.120 1.00 0.040 0.030 1.00 . 16.0–18.0 0.75–1.25 . Cb5×C .
min
0.080 max
S43035 439 0.030 1.00 0.040 0.030 1.00 0.50 17.0–19.0 . Ti . 0.030
[0.20+4(C+N)]
min,
1.10 max;
Al 0.015
F
S41003 0.030 1.50 0.040 0.030 1.00 1.50 10.5–12.5 . . . 0.030
S44400 444 0.025 1.00 0.040 0.030 1.00 1.00 17.5–19.5 1.75–2.50 (Ti+Cb) 0.035
[0.20+4(C+N)]
min
0.80 max
S41008 410S 0.080 1.00 0.040 0.030 1.00 0.60 11.5–13.5 . . . .
G
S44100 0.030 1.00 0.040 0.030 1.00 1.00 17.5–19.5 . 0.1–0.5 Cb 0.3+ .
(9× C) min,
0.9 max
Austenitic-Ferritic
S31803 0.030 2.00 0.030 0.020 1.00 4.5–6.5 21.0–23.0 2.5–3.5 . . 0.08–0.20 . .
S32003 0.030 2.00 0.030 0.020 1.00 3.0–4.0 19.5–22.5 1.50–2.00 . . 0.14–0.20 . .
S32101 0.040 4.0–6.0 0.040 0.030 1.00 1.35–1.70 21.0–22.0 0.10–0.80 . . 0.20–0.25 0.10–0.80 .
S32202 0.030 2.00 0.040 0.010 1.00 1.00–2.80 21.5–24.0 0.45 max . . 0.18–0.26 . .
K
S32205 2205 0.030 2.00 0.030 0.020 1.00 4.5–6.5 22.0–23.0 3.0–3.5 . . 0.14–0.20 . .

A554−15
TABLE1 Continued
Composition, %
J
UNS # Grade
Carbon Manga- Phos- Sulfur Silicon Nickel Chromium Molybdenum Titanium Columbium Nitrogen Copper Other
nese, phorus
K
S32304 2304 0.030 2.50 0.040 0.040 1.00 3.0–5.5 21.5–24.5 0.05–0.60 . . 0.05–0.20 0.05–0.60 .
K
S32550 255 0.04 1.50 0.040 0.030 1.00 4.5–6.5 24.0–27.0 2.9–3.9 . . 0.10–0.25 1.50–2.50 .
H K
S32750 2507 0.030 1.20 0.035 0.020 0.80 6.0–8.0 24.0–26.0 3.0–5.0 . . 0.24–0.32 0.5 .
I
S32760 0.030 1.00 0.030 0.010 1.00 6.0–8.0 24.0–26.0 3.0–4.0 . . 0.20–0.30 0.50–1.00 W
0.50–1.00
S81921 0.030 2.00–4.00 0.040 0.030 1.00 2.00–4.00 19.0–22.0 1.00–2.00 . . 0.14–0.20 . .
S82011 0.030 2.0–3.0 0.040 0.020 1.00 1.00–2.00 20.5–23.5 0.10–1.00 . . 0.15–0.27 0.50 .
S82441 0.030 2.5–4.0 0.035 0.005 0.70 3.0–4.5 23.0–25.0 1.00–2.00 . . 0.20–0.30 0.10–0.80 .
A
Maximum, unless a range or minimum is indicated. Where ellipses (.) appear in this table, there is no minimum and analysis for the element need not be determined or reported.
B
For small diameter or thin walls, or both, where many drawing passes are required, a carbon content of 0.040 % max is necessary in grades MT-304L and MT-316L. Small outside diameter tubes are defined as those
less than 0.500 in. (12.7 mm) in outside diameter and light wall tubes as those less than 0.049 in. (1.24 mm) in average wall thickness.
C
The columbium content shall be not less than ten times the carbon content and not more than 1.00 %.
D
The titanium content shall be not less than five times the carbon content and not more than 0.60 %.
E
S40900 (Type 409) has been replaced by S40910, S40920, and S40930. Unless otherwise specified in the ordering information, an order specifying S40900 or Type 409, shall be satisfied by any one of S40910, S40920,
or S40930 at the option of the seller. Material meeting the requirements of S40910, S40920, or S40930 may, by agreement between purchaser and manufacturer, be certified as S40900.
F
S41003 chemical composition relates to Type 412, which is not currently an AISI or SAE number.
G
S44100 chemical composition relates to Type 441, which is not currently an AISI or SAE number.
H
%Cr+3.3×%Mo+16×%N=41min.
I
%Cr+3.3×%Mo+16×%N=40min.
J
Designation established in accordance with Practice E527 and SAE J 1086.
K
Common name, not a trademark, widely used, not associated with any one producer.

A554−15
4.1.14 Special requirements, 7.2 Theinsidediameterbeadshallbefurnishedinanyofthe
4.1.15 Special marking (Section 15), and following conditions as specified:
4.1.16 Special packing (Section 16). 7.2.1 Bead not removed,
7.2.2 Bead controlled to 0.005 in. (0.13 mm) or 15 % of the
5. Process
specified wall thickness, whichever is greater, and
7.2.3 Bead removed.
5.1 The steel may be made by any process.
7.3 Square and rectangular welded stainless tubing is sup-
5.2 If a specific type of melting is required by the purchaser,
plied as cold worked unless otherwise specified.
it shall be stated on the purchase order.
5.3 The primary melting may incorporate separate degas-
8. Heat Analysis
sing or refining and may be followed by secondary melting,
8.1 An analysis of each heat of steel shall be made by the
such as electroslag remelting or vacuum-arc remelting. If
steel manufacturer to determine the percentages of the ele-
secondary melting is employed, the heat shall be defined as all
ments specified. If secondary melting processes are employed,
of the ingots remelted from a single primary heat.
the heat analysis shall be obtained from one remelted ingot or
5.4 Steel may be cast in ingots or may be strand cast. When
the product of one remelted ingot of each primary melt. The
steel of different grades are sequentially strand cast, identifi-
chemical composition thus determined, or that determined
cation of the resultant transition material is required. The
from a product analysis made by the tubular product
producer shall remove the transition material by an established
manufacturer, shall conform to requirements specified. When
procedure that positively separates the grades.
requested in the order or contract, a report of this analysis shall
be furnished to the purchaser. (See Test Methods, Practices,
6. Materials and Manufacture
and Terminology A751.)
6.1 The tubes shall be made from flat-rolled steel by an
automatic welding process without the addition of filler metal.
9. Permissible Variations in Dimensions—Round Tubing
9.1 For all conditions except tubing with bead removed,
7. Condition
Table 2 shall apply.
7.1 The tubes shall be furnished in any of the following
9.2 For tubing with bead removed, Table 3 shall apply.
conditions as specified:
7.1.1 As welded, 9.3 Lengths—Tubing is normally furnished in mill lengths 5
7.1.2 Welded and annealed, ft (1.5 m) and over. Definite cut lengths are furnished when
7.1.3 Cold reduced, specified, to the length tolerances shown in Table 4. For tubing
7.1.4 Cold reduced and annealed. ordered in multiple lengths, it is common practice to allow a
A
TABLE 2 Diameter, Wall, and Ovality Tolerances (All Conditions Except Tubing with Bead Removed)
NOTE 1—Ovality is the difference between maximum and minimum outside diameters measured at any one cross section. There is no additional
tolerance for ovality on tubes having a specified wall thickness of more than 3 % of the outside diameter.
NOTE 2—For sizes up to and including 5-in. (127.0-mm) outside diameter, an ovality tolerance of twice the tabular outside diameter tolerance spread
shown is applied one half plus and one half minus to tubes having a specified wall thickness of 3 % or less of the specified outside diameter. The average
of the maximum and minimum outside diameter readings should fall within the outside diameter tolerances as shown in this table.
NOTE 3—For sizes over 5-in. (127.0-mm) to and including 16-in. (406.4-mm) outside diameter, when the specified wall thickness is 3 % or less of the
outside diameter, the ovality shall not exceed 1.5 % of the specified outside diameter.
Wall Thickness OD, ±
OD Size, in. (mm)
in. mm in. mm
Under ⁄2 (12.7) 0.020 to 0.049 0.51 to 1.24 0.004 0.10
⁄2 to 1 (12.7 to 25.4) 0.020 to 0.065 0.51 to 1.65 0.005 0.13
⁄2 to 1 (12.7 to 25.4) over 0.065 to 0.134 over 1.65 to 3.40 0.010 0.25
Over 1 to 1 ⁄2 (25.4 to 38.1), incl 0.025 to 0.065 0.64 to 1.65 0.008 0.20
Over 1 to 1 ⁄2 (25.4 to 38.1), incl over 0.065 to 0.134 over 1.65 to 3.40 0.010 0.25
Over 1 ⁄2 to 2 (38.1 to 50.8), incl 0.025 to 0.049 0.64 to 1.24 0.010 0.25
Over 1 ⁄2 to 2 (38.1 to 50.8), incl over 0.049 to 0.083 over 1.24 to 2.11 0.011 0.28
Over 1 ⁄2 to 2 (38.1 to 50.8), incl over 0.083 to 0.149 over 2.11 to 3.78 0.012 0.30
Over 2 to 2 ⁄2 (50.8 to 63.5), incl 0.032 to 0.065 0.81 to 1.65 0.012 0.30
Over 2 to 2 ⁄2 (50.8 to 63.5), incl over 0.065 to 0.109 over 1.65 to 2.77 0.013 0.33
Over 2 to 2 ⁄2 (50.8 to 63.5), incl over 0.109 to 0.165 over 2.77 to 4.19 0.014 0.36
1 1
Over 2 ⁄2 to 3 ⁄2 (63.5 to 88.9), incl 0.032 to 0.165 0.81 to 4.19 0.014 0.36
1 1
Over 2 ⁄2 to 3 ⁄2 (63.5 to 88.9), incl over 0.165 over 4.19 0.020 0.51
Over 3 ⁄2 to 5 (88.9 to 127.0), incl 0.035 to 0.165 0.89 to 4.19 0.020 0.51
Over 3 ⁄2 to 5 (88.9 to 127.0), incl over 0.165 over 4.19 0.025 0.64
Over5to7 ⁄2 (127.0 to 190.5), incl 0.049 to 0.250 1.24 to 6.35 0.025 0.64
Over5to7 ⁄2 (127.0 to 190.5), incl over 0.250 over 6.35 0.030 0.76
Over 7 ⁄2 to 16 (190.5 to 406.4), incl all all 0.00125 in./in. or mm/mm of circumference
A
Wall tolerance ±10 % of specified wall thickness.
----------------------
...


This document is not an ASTM standard and is intended only to provide the user of an ASTM standard an indication of what changes have been made to the previous version. Because
it may not be technically possible to adequately depict all changes accurately, ASTM recommends that users consult prior editions as appropriate. In all cases only the current version
of the standard as published by ASTM is to be considered the official document.
Designation: A554 − 14 A554 − 15
Standard Specification for
Welded Stainless Steel Mechanical Tubing
This standard is issued under the fixed designation A554; the number immediately following the designation indicates the year of
original adoption or, in the case of revision, the year of last revision. A number in parentheses indicates the year of last reapproval. A
superscript epsilon (´) indicates an editorial change since the last revision or reapproval.
1. Scope*
1.1 This specification covers welded austenitic and ferritic stainless steel mechanical tubing intended for use in ornamental,
structural, exhaust, and other applications where appearance, mechanical properties, or corrosion resistance is needed. The grades
covered are listed in Table 1.
1.2 This specification covers as-welded or cold-reduced mechanical tubing in sizes to 16 in. (406.4 mm) outside dimension, and
in wall thicknesses 0.020 in. (0.51 mm) and over.
1.3 Tubes shall be furnished in one of the following shapes as specified by the purchaser: round, square, rectangular, or special.
1.4 Supplementary requirements of an optional nature are provided and when desired shall be so stated in the order.
1.5 The values stated in inch-pound units are to be regarded as standard. The values given in parentheses are mathematical
conversions to SI units that are provided for information only and are not considered standard.
2. Referenced Documents
2.1 ASTM Standards:
A370 Test Methods and Definitions for Mechanical Testing of Steel Products
A751 Test Methods, Practices, and Terminology for Chemical Analysis of Steel Products
A790/A790M Specification for Seamless and Welded Ferritic/Austenitic Stainless Steel Pipe
A941 Terminology Relating to Steel, Stainless Steel, Related Alloys, and Ferroalloys
E527 Practice for Numbering Metals and Alloys in the Unified Numbering System (UNS)
2.2 Military Standards:
MIL-STD-129 Marking for Shipment and Storage
MIL-STD-163 Steel Mill Products Preparation for Shipment and Storage
2.3 Federal Standard:
Fed. Std. No. 123 Marking for Shipments (Civil Agencies)
2.4 SAE Standard:
SAE J 1086 Numbering Metals and Alloys
3. Terminology
3.1 Definitions—For definitions of terms used in this specification, refer to Terminology A941.
4. Ordering Information
4.1 Orders for material under this specification should include the following, as required, to describe the desired material
adequately:
4.1.1 Quantity (feet, mass, or number of pieces),
4.1.2 Name of material (welded stainless steel mechanical tubing),
4.1.3 Form (round, square, rectangular, special, see 1.3),
This specification is under the jurisdiction of ASTM Committee A01 on Steel, Stainless Steel and Related Alloys and is the direct responsibility of Subcommittee A01.10
on Stainless and Alloy Steel Tubular Products.
Current edition approved July 1, 2014Jan. 1, 2015. Published July 2014January 2015. Originally approved in 1965. Last previous edition approved in 20132014 as
A554–13.–14. DOI: 10.1520/A0554-14.10.1520/A0554-15.
For referenced ASTM standards, visit the ASTM website, www.astm.org, or contact ASTM Customer Service at service@astm.org. For Annual Book of ASTM Standards
volume information, refer to the standard’s Document Summary page on the ASTM website.
Available from Standardization Documents Order Desk, Bldg. 4 Section D, 700 Robbins Ave., Philadelphia, PA 19111–5094, Attn: NPODS.
Available from SAE International (SAE), 400 Commonwealth Dr., Warrendale, PA 15096-0001, http://www.sae.org.
*A Summary of Changes section appears at the end of this standard
Copyright © ASTM International, 100 Barr Harbor Drive, PO Box C700, West Conshohocken, PA 19428-2959. United States
A554 − 15
TABLE 1 Chemical Requirements
Composition, %
Carbon, Manga- Phos- Sulfur, Silicon, Nickel Chromium Molybdenum Titanium Columbium Nitrogen
UNS # Grade
max nese, phorus, max max + Tantalum
max max
Austenitic
MT-301 0.15 2.00 0.045 0.030 1.00 6.0–8.0 16.0–18.0 . . .
MT-302 0.15 2.00 0.045 0.030 1.00 8.0–10.0 17.0–19.0 . . .
MT-304 0.08 2.00 0.045 0.030 1.00 8.0–11.0 18.0–20.0 . . .
A
MT-304L 0.035 2.00 0.045 0.030 1.00 8.0–13.0 18.0–20.0 . . .
MT-305 0.12 2.00 0.045 0.030 1.00 10.0–13.0 17.0–19.0 . . .
MT-309S 0.08 2.00 0.045 0.030 1.00 12.0–15.0 22.0–24.0 . . . . .
B
MT-309S-Cb 0.08 2.00 0.045 0.030 1.00 12.0–15.0 22.0–24.0 . .
MT-310S 0.08 2.00 0.045 0.030 1.00 19.0–22.0 24.0–26.0 . . .
MT-316 0.08 2.00 0.045 0.030 1.00 10.0–14.0 16.0–18.0 2.0–3.0 . .
A
MT-316L 0.035 2.00 0.045 0.030 1.00 10.0–15.0 16.0–18.0 2.0–3.0 . .
MT-317 0.08 2.00 0.045 0.030 1.00 11.0–14.0 18.0–20.0 3.0–4.0 . .
C
MT-321 0.08 2.00 0.045 0.030 1.00 9.0–13.0 17.0–20.0 . .
MT-330 0.15 2.00 0.040 0.030 1.00 33.0–36.0 14.0–16.0 . . .
B
MT-347 0.08 2.00 0.045 0.030 1.00 9.0–13.0 17.0–20.0 . .
Ferritic
MT-429 0.12 1.00 0.040 0.030 1.00 0.50 max 14.0–16.0 . . .
MT-430 0.12 1.00 0.040 0.030 1.00 0.50 max 16.0–18.0 . . .
MT-430-Ti 0.10 1.00 0.040 0.030 1.00 0.075 max 16.0–19.5 . 5 × C min, .
0.75 max
D
S40900 409
S40910 0.030 1.00 0.040 0.020 1.00 0.50 10.5–11.7 . Ti 6X (C+N) Cb 0.17 0.030
min,
0.050 max
S40920 0.030 1.00 0.040 0.020 1.00 0.50 10.5–11.7 . Ti 8X (C+N) Cb 0.10 0.030
min,
Ti 0.15–0.50
S40930 0.030 1.00 0.040 0.020 1.00 0.50 10.5–11.7 . (Ti+Cb) [0.08+8 . 0.030
× (C+N)] min,
0.75 max;
Ti 0.05 min
S43400 434 0.120 1.00 0.040 0.030 1.00 . 16.0–18.0 0.75–1.25 . . .
S43600 436 0.120 1.00 0.040 0.030 1.00 . 16.0–18.0 0.75–1.25 . Cb 5 × C .
min
0.080 max
S43035 439 0.030 1.00 0.040 0.030 1.00 0.50 17.0–19.0 . Ti . 0.030
[0.20+4(C+N)]
min,
1.10 max;
Al 0.015
E
S41003 0.030 1.50 0.040 0.030 1.00 1.50 10.5–12.5 . . . 0.030
S44400 444 0.025 1.00 0.040 0.030 1.00 1.00 17.5–19.5 1.75–2.50 (Ti+Cb) 0.035
[0.20+4(C+N)]
min
0.80 max
S41008 410S 0.080 1.00 0.040 0.030 1.00 0.60 11.5–13.5 . . . .
F
S44100 0.030 1.00 0.040 0.030 1.00 1.00 17.5–19.5 . 0.1–0.5 Cb 0.3+ .
(9× C) min,
0.9 max
A554 − 15
A
TABLE 1 Chemical Requirements
Composition, %
J
UNS # Grade
Carbon Manga- Phos- Sulfur Silicon Nickel Chromium Molybdenum Titanium Columbium Nitrogen Copper Other
nese, phorus
Austenitic
MT-301 0.15 2.00 0.045 0.030 1.00 6.0–8.0 16.0–18.0 . . .
MT-302 0.15 2.00 0.045 0.030 1.00 8.0–10.0 17.0–19.0 . . .
MT-304 0.08 2.00 0.045 0.030 1.00 8.0–11.0 18.0–20.0 . . .
B
MT-304L 0.035 2.00 0.045 0.030 1.00 8.0–13.0 18.0–20.0 . . .
MT-305 0.12 2.00 0.045 0.030 1.00 10.0–13.0 17.0–19.0 . . .
MT-309S 0.08 2.00 0.045 0.030 1.00 12.0–15.0 22.0–24.0 . . . . .
C
MT-309S-Cb 0.08 2.00 0.045 0.030 1.00 12.0–15.0 22.0–24.0 . .
MT-310S 0.08 2.00 0.045 0.030 1.00 19.0–22.0 24.0–26.0 . . .
MT-316 0.08 2.00 0.045 0.030 1.00 10.0–14.0 16.0–18.0 2.0–3.0 . .
B
MT-316L 0.035 2.00 0.045 0.030 1.00 10.0–15.0 16.0–18.0 2.0–3.0 . .
MT-317 0.08 2.00 0.045 0.030 1.00 11.0–14.0 18.0–20.0 3.0–4.0 . .
D
MT-321 0.08 2.00 0.045 0.030 1.00 9.0–13.0 17.0–20.0 . .
MT-330 0.15 2.00 0.040 0.030 1.00 33.0–36.0 14.0–16.0 . . .
C
MT-347 0.08 2.00 0.045 0.030 1.00 9.0–13.0 17.0–20.0 . .
Ferritic
MT-429 0.12 1.00 0.040 0.030 1.00 0.50 max 14.0–16.0 . . .
MT-430 0.12 1.00 0.040 0.030 1.00 0.50 max 16.0–18.0 . . .
MT-430-Ti 0.10 1.00 0.040 0.030 1.00 0.075 max 16.0–19.5 . 5 × C min, .
0.75 max
E
S40900 409
S40910 0.030 1.00 0.040 0.020 1.00 0.50 10.5–11.7 . Ti 6X (C+N) Cb 0.17 0.030
min,
0.050 max
S40920 0.030 1.00 0.040 0.020 1.00 0.50 10.5–11.7 . Ti 8X (C+N) Cb 0.10 0.030
min,
Ti 0.15–0.50
S40930 0.030 1.00 0.040 0.020 1.00 0.50 10.5–11.7 . (Ti+Cb) [0.08+8 . 0.030
× (C+N)] min,
0.75 max;
Ti 0.05 min
S43400 434 0.120 1.00 0.040 0.030 1.00 . 16.0–18.0 0.75–1.25 . . .
S43600 436 0.120 1.00 0.040 0.030 1.00 . 16.0–18.0 0.75–1.25 . Cb 5 × C .
min
0.080 max
S43035 439 0.030 1.00 0.040 0.030 1.00 0.50 17.0–19.0 . Ti . 0.030
[0.20+4(C+N)]
min,
1.10 max;
Al 0.015
F
S41003 0.030 1.50 0.040 0.030 1.00 1.50 10.5–12.5 . . . 0.030
S44400 444 0.025 1.00 0.040 0.030 1.00 1.00 17.5–19.5 1.75–2.50 (Ti+Cb) 0.035
[0.20+4(C+N)]
min
0.80 max
S41008 410S 0.080 1.00 0.040 0.030 1.00 0.60 11.5–13.5 . . . .
G
S44100 0.030 1.00 0.040 0.030 1.00 1.00 17.5–19.5 . 0.1–0.5 Cb 0.3+ .
(9× C) min,
0.9 max
Austenitic-Ferritic
S31803 0.030 2.00 0.030 0.020 1.00 4.5–6.5 21.0–23.0 2.5–3.5 . . 0.08–0.20 . .
S32003 0.030 2.00 0.030 0.020 1.00 3.0–4.0 19.5–22.5 1.50–2.00 . . 0.14–0.20 . .
S32101 0.040 4.0–6.0 0.040 0.030 1.00 1.35–1.70 21.0–22.0 0.10–0.80 . . 0.20–0.25 0.10–0.80 .
S32202 0.030 2.00 0.040 0.010 1.00 1.00–2.80 21.5–24.0 0.45 max . . 0.18–0.26 . .
K
S32205 2205 0.030 2.00 0.030 0.020 1.00 4.5–6.5 22.0–23.0 3.0–3.5 . . 0.14–0.20 . .

A554 − 15
TABLE 1 Continued
Composition, %
J
UNS # Grade
Carbon Manga- Phos- Sulfur Silicon Nickel Chromium Molybdenum Titanium Columbium Nitrogen Copper Other
nese, phorus
K
S32304 2304 0.030 2.50 0.040 0.040 1.00 3.0–5.5 21.5–24.5 0.05–0.60 . . 0.05–0.20 0.05–0.60 .
K
S32550 255 0.04 1.50 0.040 0.030 1.00 4.5–6.5 24.0–27.0 2.9–3.9 . . 0.10–0.25 1.50–2.50 .
H K
S32750 2507 0.030 1.20 0.035 0.020 0.80 6.0–8.0 24.0–26.0 3.0–5.0 . . 0.24–0.32 0.5 .
I
S32760 0.030 1.00 0.030 0.010 1.00 6.0–8.0 24.0–26.0 3.0–4.0 . . 0.20–0.30 0.50–1.00 W
0.50–1.00
S81921 0.030 2.00–4.00 0.040 0.030 1.00 2.00–4.00 19.0–22.0 1.00–2.00 . . 0.14–0.20 . .
S82011 0.030 2.0–3.0 0.040 0.020 1.00 1.00–2.00 20.5–23.5 0.10–1.00 . . 0.15–0.27 0.50 .
S82441 0.030 2.5–4.0 0.035 0.005 0.70 3.0–4.5 23.0–25.0 1.00–2.00 . . 0.20–0.30 0.10–0.80 .
A
Maximum, unless a range or minimum is indicated. Where ellipses (.) appear in this table, there is no minimum and analysis for the element need not be determined or reported.
B
For small diameter or thin walls, or both, where many drawing passes are required, a carbon content of 0.040 % max is necessary in grades MT-304L and MT-316L. Small outside diameter tubes are defined as those
less than 0.500 in. (12.7 mm) in outside diameter and light wall tubes as those less than 0.049 in. (1.24 mm) in average wall thickness.
C
The columbium plus tantalum content shall be not less than ten times the carbon content and not more than 1.00 %.
D
The titanium content shall be not less than five times the carbon content and not more than 0.60 %.
E
S40900 (Type 409) has been replaced by S40910, S40920, and S40930. Unless otherwise specified in the ordering information, an order specifying S40900 or Type 409, shall be satisfied by any one of S40910, S40920,
or S40930 at the option of the seller. Material meeting the requirements of S40910, S40920, or S40930 may, by agreement between purchaser and manufacturer, be certified as S40900.
F
S41003 chemical composition relates to Type 412, which is not currently an AISI or SAE number.
G
S44100 chemical composition relates to Type 441, which is not currently an AISI or SAE number.
H
% Cr + 3.3 × %Mo + 16 × %N = 41 min.
I
% Cr + 3.3 × %Mo + 16 × %N = 40 min.
J
Designation established in accordance with Practice E527 and SAE J 1086.
K
Common name, not a trademark, widely used, not associated with any one producer.

A554 − 15
4.1.4 Dimensions:
4.1.4.1 Round-outside diameter and wall thickness for all conditions (Section 9). Alternatively, for cold-reduced condition,
outside diameter and inside diameter or inside diameter and wall dimensions may be specified,
4.1.4.2 Square and rectangular outside dimensions and wall thickness (see 10.1),
4.1.4.3 Special (to be specified),
4.1.5 Length (mill lengths, cut lengths, or multiple lengths (see 9.3)),
4.1.6 Grade (Table 1),
4.1.7 Condition (see 7.1),
4.1.8 Inside diameter bead condition (see 7.2),
4.1.9 Surface finish (see Section 12),
4.1.10 Report of chemical analysis, if required (Section 8),
4.1.11 Individual supplementary requirements, if required,
4.1.12 End use,
4.1.13 Specification designation,
4.1.14 Special requirements,
4.1.15 Special marking (Section 15), and
4.1.16 Special packing (Section 16).
5. Process
5.1 The steel may be made by any process.
5.2 If a specific type of melting is required by the purchaser, it shall be stated on the purchase order.
5.3 The primary melting may incorporate separate degassing or refining and may be followed by secondary melting, such as
electroslag remelting or vacuum-arc remelting. If secondary melting is employed, the heat shall be defined as all of the ingots
remelted from a single primary heat.
5.4 Steel may be cast in ingots or may be strand cast. When steel of different grades are sequentially strand cast, identification
of the resultant transition material is required. The producer shall remove the transition material by an established procedure that
positively separates the grades.
6. Materials and Manufacture
6.1 The tubes shall be made from flat-rolled steel by an automatic welding process without the addition of filler metal.
7. Condition
7.1 The tubes shall be furnished in any of the following conditions as specified:
7.1.1 As welded,
7.1.2 Welded and annealed,
7.1.3 Cold reduced,
7.1.4 Cold reduced and annealed.
7.2 The inside diameter bead shall be furnished in any of the following conditions as specified:
7.2.1 Bead not removed,
7.2.2 Bead controlled to 0.005 in. (0.13 mm) or 15 % of the specified wall thickness, whichever is greater, and
7.2.3 Bead removed.
7.3 Square and rectangular welded stainless tubing is supplied as cold worked unless otherwise specified.
8. Heat Analysis
8.1 An analysis of each heat of steel shall be made by the steel manufacturer to determine the percentages of the elements
specified. If secondary melting processes are employed, the heat analysis shall be obtained from one remelted ingot or the product
of one remelted ingot of each primary melt. The chemical composition thus determined, or that determined from a product analysis
made by the tubular product manufacturer, shall conform to requirements specified. When requested in the order or contract, a
report of this analysis shall be furnished to the purchaser. (See Test Methods, Practices, and Terminology A751.)
9. Permissible Variations in Dimensions—Round Tubing
9.1 For all conditions except tubing with bead removed, Table 2 shall apply.
9.2 For tubing with bead removed, Table 3 shall app
...

Questions, Comments and Discussion

Ask us and Technical Secretary will try to provide an answer. You can facilitate discussion about the standard in here.