ASTM B150/B150M-19
(Specification)Standard Specification for Aluminum Bronze Rod, Bar, and Shapes
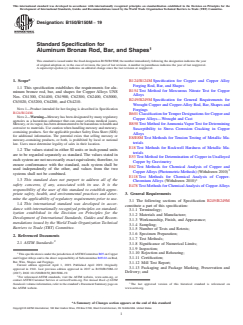
Standard Specification for Aluminum Bronze Rod, Bar, and Shapes
ABSTRACT
This specification establishes the requirements for rods, bars, and shapes of aluminum bronze with Copper Alloy UNS Nos. C61300, C61400, C61900, C62300, C62400, C63000, C63020, C63200, C64200, and C64210. Products shall be produced in tempers HR50, M10, M20, M30, O20, O25, O30, O32, TQ30, TQ50 and TQ55. Products shall be tested and shall conform to dimensional (mass, diameter, length, thickness, straightness, and edge contour), mechanical (tensile and yield strength, Rockwell hardness, and elongation), and chemical composition requirements. Products should also meet requirements under mercurous nitrate test, ammonia test, and piston finish.
SCOPE
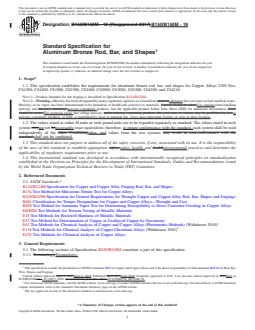
1.1 This specification establishes the requirements for aluminum bronze rod, bar, and shapes for Copper Alloys UNS Nos. C61300, C61400, C61900, C62300, C62400, C63000, C63020, C63200, C64200, and C64210.
Note 1: Product intended for hot forging is described in Specification B124/B124M.
Note 2: Warning—Mercury has been designated by many regulatory agencies as a hazardous substance that can cause serious medical issues. Mercury, or its vapor, has been demonstrated to be hazardous to health and corrosive to materials. Use caution when handling mercury and mercury-containing products. See the applicable product Safety Data Sheet (SDS) for additional information. The potential exists that selling mercury or mercury-containing products, or both, is prohibited by local or national law. Users must determine legality of sales in their location.
1.2 The values stated in either SI units or inch-pound units are to be regarded separately as standard. The values stated in each system are not necessarily exact equivalents; therefore, to ensure conformance with the standard, each system shall be used independently of the other, and values from the two systems shall not be combined.
1.3 This standard does not purport to address all of the safety concerns, if any, associated with its use. It is the responsibility of the user of this standard to establish appropriate safety, health, and environmental practices and determine the applicability of regulatory requirements prior to use.
1.4 This international standard was developed in accordance with internationally recognized principles on standardization established in the Decision on Principles for the Development of International Standards, Guides and Recommendations issued by the World Trade Organization Technical Barriers to Trade (TBT) Committee.
General Information
- Status
- Published
- Publication Date
- 31-Mar-2019
- Technical Committee
- B05 - Copper and Copper Alloys
- Drafting Committee
- B05.02 - Rod, Bar, Wire, Shapes and Forgings
Relations
- Effective Date
- 01-Apr-2019
- Effective Date
- 10-May-2003
- Effective Date
- 10-Apr-2002
- Effective Date
- 01-Jan-1995
- Effective Date
- 01-Jan-2024
- Effective Date
- 01-Oct-2023
- Refers
ASTM B124/B124M-20 - Standard Specification for Copper and Copper Alloy Forging Rod, Bar, and Shapes - Effective Date
- 01-Apr-2020
- Effective Date
- 01-Oct-2019
- Effective Date
- 01-Oct-2019
- Refers
ASTM B124/B124M-19 - Standard Specification for Copper and Copper Alloy Forging Rod, Bar, and Shapes - Effective Date
- 01-Apr-2019
- Effective Date
- 01-Apr-2019
- Effective Date
- 01-Oct-2018
- Effective Date
- 01-Oct-2018
- Effective Date
- 01-Oct-2018
- Effective Date
- 01-Jul-2018
Overview
ASTM B150/B150M-19 is the Standard Specification for Aluminum Bronze Rod, Bar, and Shapes. Developed by ASTM International, this specification defines the requirements for wrought aluminum bronze products, specifically covering rods, bars, and various shapes made from a selection of copper alloys. These alloys include UNS Nos. C61300, C61400, C61900, C62300, C62400, C63000, C63020, C63200, C64200, and C64210. The standard ensures uniformity in chemical composition, mechanical properties, dimensions, and performance, supporting quality in manufacturing and product reliability.
Key Topics
- Alloy Coverage: Applies to multiple aluminum bronze alloys, each identified by precise UNS numbers, supporting a range of corrosion-resistance and mechanical requirements.
- Product Forms: Encompasses rods, bars (round, hexagonal, square, or rectangular), and custom shapes.
- Tempers: Defines several tempers (HR50, M10, M20, M30, O20, O25, O30, O32, TQ30, TQ50, TQ55) to suit various mechanical property needs.
- Mechanical Properties: Products must meet stringent criteria for tensile and yield strength, elongation, and Rockwell hardness, aligning with application needs.
- Dimensional Requirements: Specific tolerances are established for mass, diameter, length, straightness, and edge contours, assuring interchangeability and precision.
- Chemical Composition: Strict composition limits ensure durability, performance, and compliance with industry norms.
- Testing Procedures: Includes mercurous nitrate and ammonia vapor stress corrosion tests, among others, to assess product suitability in demanding environments.
- Dual Units: Specifications are provided in both SI and inch-pound units, supporting international adoption and diverse measurement preferences.
Applications
Aluminum bronze rod, bar, and shapes specified under ASTM B150/B150M-19 are vital in sectors requiring combination of strength and corrosion resistance, including:
- Marine and Shipbuilding: Valves, pumps, and propeller shafts leveraging aluminum bronze's resistance to saltwater corrosion.
- Aerospace: High-strength fasteners and components exposed to harsh environments.
- Oil and Gas: Components such as bushings, bearings, and connectors requiring resistance to wear and chemical attack.
- Heavy Equipment: Wear-resistant machinery parts, bushings, and gears benefitting from the alloys’ mechanical strength and durability.
- General Engineering: Applications where non-sparking or non-magnetic properties are critical, such as safety tools and electrical connectors.
By adhering to ASTM B150/B150M-19, manufacturers, engineers, and end-users can ensure quality, safety, and performance for critical applications. It also assists procurement teams in specifying supplier requirements accurately, supporting consistent results from global suppliers.
Related Standards
- ASTM B124/B124M: Covers copper and copper alloy forging rod, bar, and shapes, particularly for hot forging applications.
- ASTM B249/B249M: Specifies general requirements for wrought copper and copper-alloy rod, bar, shapes, and forgings, including tolerances and lengths.
- ASTM B601: Classifies temper designations for copper and copper alloys, supporting precise selection and specification.
- ASTM B154/B858: Outlines test methods for mercurous nitrate and ammonia vapor tests, determining susceptibility to stress corrosion cracking.
- ASTM E8/E8M, ASTM E18: Provide procedures for tension testing and Rockwell hardness testing of metallic materials.
Summary
Compliance with ASTM B150/B150M-19 ensures that aluminum bronze rods, bars, and shapes meet rigorous international standards for chemical composition, mechanical strength, and dimensional precision. This specification is essential for industries requiring reliable, high-performance copper alloy components, particularly when resistance to corrosion and wear is crucial. By referencing this standard and its related documents, stakeholders foster safer, more durable products and streamline procurement processes within the global metals supply chain.
Buy Documents
ASTM B150/B150M-19 - Standard Specification for Aluminum Bronze Rod, Bar, and Shapes
REDLINE ASTM B150/B150M-19 - Standard Specification for Aluminum Bronze Rod, Bar, and Shapes
Get Certified
Connect with accredited certification bodies for this standard

Element Materials Technology
Materials testing and product certification.

Inštitut za kovinske materiale in tehnologije
Institute of Metals and Technology. Materials testing, metallurgical analysis, NDT.
Sponsored listings
Frequently Asked Questions
ASTM B150/B150M-19 is a technical specification published by ASTM International. Its full title is "Standard Specification for Aluminum Bronze Rod, Bar, and Shapes". This standard covers: ABSTRACT This specification establishes the requirements for rods, bars, and shapes of aluminum bronze with Copper Alloy UNS Nos. C61300, C61400, C61900, C62300, C62400, C63000, C63020, C63200, C64200, and C64210. Products shall be produced in tempers HR50, M10, M20, M30, O20, O25, O30, O32, TQ30, TQ50 and TQ55. Products shall be tested and shall conform to dimensional (mass, diameter, length, thickness, straightness, and edge contour), mechanical (tensile and yield strength, Rockwell hardness, and elongation), and chemical composition requirements. Products should also meet requirements under mercurous nitrate test, ammonia test, and piston finish. SCOPE 1.1 This specification establishes the requirements for aluminum bronze rod, bar, and shapes for Copper Alloys UNS Nos. C61300, C61400, C61900, C62300, C62400, C63000, C63020, C63200, C64200, and C64210. Note 1: Product intended for hot forging is described in Specification B124/B124M. Note 2: Warning—Mercury has been designated by many regulatory agencies as a hazardous substance that can cause serious medical issues. Mercury, or its vapor, has been demonstrated to be hazardous to health and corrosive to materials. Use caution when handling mercury and mercury-containing products. See the applicable product Safety Data Sheet (SDS) for additional information. The potential exists that selling mercury or mercury-containing products, or both, is prohibited by local or national law. Users must determine legality of sales in their location. 1.2 The values stated in either SI units or inch-pound units are to be regarded separately as standard. The values stated in each system are not necessarily exact equivalents; therefore, to ensure conformance with the standard, each system shall be used independently of the other, and values from the two systems shall not be combined. 1.3 This standard does not purport to address all of the safety concerns, if any, associated with its use. It is the responsibility of the user of this standard to establish appropriate safety, health, and environmental practices and determine the applicability of regulatory requirements prior to use. 1.4 This international standard was developed in accordance with internationally recognized principles on standardization established in the Decision on Principles for the Development of International Standards, Guides and Recommendations issued by the World Trade Organization Technical Barriers to Trade (TBT) Committee.
ABSTRACT This specification establishes the requirements for rods, bars, and shapes of aluminum bronze with Copper Alloy UNS Nos. C61300, C61400, C61900, C62300, C62400, C63000, C63020, C63200, C64200, and C64210. Products shall be produced in tempers HR50, M10, M20, M30, O20, O25, O30, O32, TQ30, TQ50 and TQ55. Products shall be tested and shall conform to dimensional (mass, diameter, length, thickness, straightness, and edge contour), mechanical (tensile and yield strength, Rockwell hardness, and elongation), and chemical composition requirements. Products should also meet requirements under mercurous nitrate test, ammonia test, and piston finish. SCOPE 1.1 This specification establishes the requirements for aluminum bronze rod, bar, and shapes for Copper Alloys UNS Nos. C61300, C61400, C61900, C62300, C62400, C63000, C63020, C63200, C64200, and C64210. Note 1: Product intended for hot forging is described in Specification B124/B124M. Note 2: Warning—Mercury has been designated by many regulatory agencies as a hazardous substance that can cause serious medical issues. Mercury, or its vapor, has been demonstrated to be hazardous to health and corrosive to materials. Use caution when handling mercury and mercury-containing products. See the applicable product Safety Data Sheet (SDS) for additional information. The potential exists that selling mercury or mercury-containing products, or both, is prohibited by local or national law. Users must determine legality of sales in their location. 1.2 The values stated in either SI units or inch-pound units are to be regarded separately as standard. The values stated in each system are not necessarily exact equivalents; therefore, to ensure conformance with the standard, each system shall be used independently of the other, and values from the two systems shall not be combined. 1.3 This standard does not purport to address all of the safety concerns, if any, associated with its use. It is the responsibility of the user of this standard to establish appropriate safety, health, and environmental practices and determine the applicability of regulatory requirements prior to use. 1.4 This international standard was developed in accordance with internationally recognized principles on standardization established in the Decision on Principles for the Development of International Standards, Guides and Recommendations issued by the World Trade Organization Technical Barriers to Trade (TBT) Committee.
ASTM B150/B150M-19 is classified under the following ICS (International Classification for Standards) categories: 77.150.10 - Aluminium products. The ICS classification helps identify the subject area and facilitates finding related standards.
ASTM B150/B150M-19 has the following relationships with other standards: It is inter standard links to ASTM B150/B150M-12(2017), ASTM B150/B150M-03, ASTM B150/B150M-02, ASTM B150M-95a, ASTM E8/E8M-24, ASTM B249/B249M-23, ASTM B124/B124M-20, ASTM B124/B124M-19a, ASTM B249/B249M-19a, ASTM B124/B124M-19, ASTM B249/B249M-19, ASTM B601-18a, ASTM B124/B124M-18a, ASTM B249/B249M-18a, ASTM E18-18. Understanding these relationships helps ensure you are using the most current and applicable version of the standard.
ASTM B150/B150M-19 is available in PDF format for immediate download after purchase. The document can be added to your cart and obtained through the secure checkout process. Digital delivery ensures instant access to the complete standard document.
Standards Content (Sample)
This international standard was developed in accordance with internationally recognized principles on standardization established in the Decision on Principles for the
Development of International Standards, Guides and Recommendations issued by the World Trade Organization Technical Barriers to Trade (TBT) Committee.
Designation:B150/B150M −19
Standard Specification for
Aluminum Bronze Rod, Bar, and Shapes
This standard is issued under the fixed designation B150/B150M; the number immediately following the designation indicates the year
of original adoption or, in the case of revision, the year of last revision. A number in parentheses indicates the year of last reapproval.
A superscript epsilon (´) indicates an editorial change since the last revision or reapproval.
1. Scope* B124/B124M Specification for Copper and Copper Alloy
Forging Rod, Bar, and Shapes
1.1 This specification establishes the requirements for alu-
B154 Test Method for Mercurous Nitrate Test for Copper
minum bronze rod, bar, and shapes for Copper Alloys UNS
Alloys
Nos. C61300, C61400, C61900, C62300, C62400, C63000,
B249/B249M Specification for General Requirements for
C63020, C63200, C64200, and C64210.
Wrought Copper and Copper-Alloy Rod, Bar, Shapes and
NOTE 1—Product intended for hot forging is described in Specification
Forgings
B124/B124M.
B601 Classification forTemper Designations for Copper and
NOTE 2—Warning—Mercury has been designated by many regulatory
Copper Alloys—Wrought and Cast
agencies as a hazardous substance that can cause serious medical issues.
B858 Test Method forAmmoniaVaporTest for Determining
Mercury,oritsvapor,hasbeendemonstratedtobehazardoustohealthand
corrosive to materials. Use caution when handling mercury and mercury-
Susceptibility to Stress Corrosion Cracking in Copper
containing products. See the applicable product Safety Data Sheet (SDS)
Alloys
for additional information. The potential exists that selling mercury or
E8/E8M Test Methods for Tension Testing of Metallic Ma-
mercury-containing products, or both, is prohibited by local or national
terials
law. Users must determine legality of sales in their location.
E18 Test Methods for Rockwell Hardness of Metallic Ma-
1.2 The values stated in either SI units or inch-pound units
terials
are to be regarded separately as standard. The values stated in
E53 Test Method for Determination of Copper in Unalloyed
each system are not necessarily exact equivalents; therefore, to
Copper by Gravimetry
ensure conformance with the standard, each system shall be
E62 Test Methods for Chemical Analysis of Copper and
used independently of the other, and values from the two
CopperAlloys (Photometric Methods) (Withdrawn 2010)
systems shall not be combined.
E118 Test Methods for Chemical Analysis of Copper-
1.3 This standard does not purport to address all of the
Chromium Alloys (Withdrawn 2010)
safety concerns, if any, associated with its use. It is the
E478 Test Methods for ChemicalAnalysis of CopperAlloys
responsibility of the user of this standard to establish appro-
priate safety, health, and environmental practices and deter- 3. General Requirements
mine the applicability of regulatory requirements prior to use.
3.1 The following sections of Specification B249/B249M
1.4 This international standard was developed in accor-
constitute a part of this specification:
dance with internationally recognized principles on standard-
3.1.1 Terminology;
ization established in the Decision on Principles for the
3.1.2 Materials and Manufacture;
Development of International Standards, Guides and Recom-
3.1.3 Workmanship, Finish, and Appearance;
mendations issued by the World Trade Organization Technical
3.1.4 Sampling;
Barriers to Trade (TBT) Committee.
3.1.5 Number of Tests and Retests;
3.1.6 Specimen Preparation;
2. Referenced Documents
3.1.7 Test Methods;
2.1 ASTM Standards:
3.1.8 Significance of Numerical Limits;
3.1.9 Inspection;
1 3.1.10 Rejection and Rehearing;
ThisspecificationisunderthejurisdictionofASTMCommitteeB05onCopper
and CopperAlloys and is the direct responsibility of Subcommittee B05.02 on Rod,
3.1.11 Certification;
Bar, Wire, Shapes and Forgings.
3.1.12 Mill Test Report;
Current edition approved April 1, 2019. Published April 2019. Originally
3.1.13 Packaging and Package Marking, Preservation and
approved in 1941. Last previous edition approved in 2017 as B150/B150M–12
Delivery; and
(2017). DOI: 10.1520/B0150_B0150M–19.
For referenced ASTM standards, visit the ASTM website, www.astm.org, or
contact ASTM Customer Service at service@astm.org. For Annual Book of ASTM
Standards volume information, refer to the standard’s Document Summary page on The last approved version of this historical standard is referenced on
the ASTM website. www.astm.org.
*A Summary of Changes section appears at the end of this standard
Copyright © ASTM International, 100 Barr Harbor Drive, PO Box C700, West Conshohocken, PA 19428-2959. United States
B150/B150M−19
3.1.14 Supplementary Requirements. 4.2.4 Residual stress test (Performance Requirements sec-
tion)
3.2 In addition, when a section with a title identical to those
4.2.4.1 Ammonia Vapor Test or Mercurous Nitrate Test,
referenced in 3.1, appears in this specification, it contains
4.2.4.2 For Ammonia Vapor Test, pH value other than 10.
additional requirements that supplement those appearing in
4.2.5 If piston finish or shafting is required, (Workmanship,
Specification B249/B249M.
Finish, and Appearance section), and
4.2.6 When tensile test is required for alloys with hardness
4. Ordering Information
requirements in Table 3 (see 8.2.1).
4.1 Include the following information when placing orders
for product under this specification, as applicable:
5. Materials and Manufacture
4.1.1 Specification designation and year of issue,
5.1 Manufacture:
4.1.2 Copper alloy UNS No. (See Table 1),
5.1.1 Copper Alloy UNS C63020—Rod and Bar shall be
4.1.3 Temper (see Temper section),
heat-treated to 26 Rockwell hardness (C scale) (HRC) mini-
4.1.3.1 When Alloy UNS No. C63000 is specified, specify
mum as follows:
standard strength or high strength temper (See Table 2),
5.1.2 Heat to 1550°/1650°F [850/900°C] for 2 h minimum
4.1.4 Product cross-section (for example round, hexagonal,
and quenched in water.
square, and so forth),
5.1.3 Temper at 900°/1000°F [480/540°C] for 2 h minimum
4.1.5 Dimensions (diameter or distance between parallel
and air cool to room temperature.
surfaces and length) and permissible variations (Section 10),
5.2 Copper Alloy UNS C63200—Rod and Bar shall be
4.1.5.1 When product of CopperAlloy UNS No. C63020 is
heat-treated as follows:
specified, the tolerances for diameter, thickness, width, and
5.2.1 Heat to 1550°F [850°C] minimum for 1 h minimum at
length shall be part of the contract or purchase order and shall
temperature and quench in water or other suitable medium,
be agreed upon between the supplier and the purchaser.
5.2.2 Temper anneal at 1300 6 25°F [700 6 15°C] for 3 to
4.1.5.2 Shapes—When product is shapes, the dimensional
9 h at temperature as required to obtain desired mechanical
tolerances shall be as agreed upon between the manufacturer
properties, and
and the purchaser and shall be specified.
5.2.3 Heat treatment is not mandatory for sections that
4.1.6 Quantity, total weight, footage, or number of pieces
exceed 12 in. [300 mm] in diameter or thickness.
for each size.
4.1.7 If product is being purchased for agencies of the U.S.
6. Chemical Composition
government.
6.1 The material shall conform by alloy to the chemical
4.2 The following options are available and should be
composition requirements in Table 1 for the copper alloy UNS
specified at the time of placing the order when required:
designation specified in the ordering information.
4.2.1 If Copper Alloy C61300 material is intended for
subsequent welding applications (See Note B, Table 2), 6.2 For alloys in which copper is listed as “remainder,”
4.2.2 Certification, copper is the difference between the sum of all elements
4.2.3 Mill test reports, determined and 100 %.
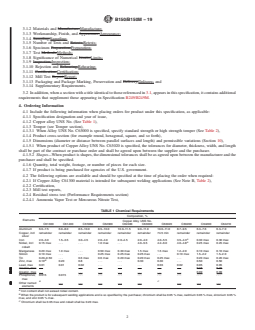
TABLE 1 Chemical Requirements
Composition, %
Elements
Copper Alloy UNS No.
C61300 C61400 C61900 C62300 C62400 C63000 C63020 C63200 C64200 C64210
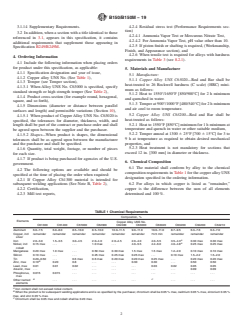
Aluminum 6.0–7.5 6.0–8.0 8.5–10.0 8.5–10.0 10.0–11.5 9.0–11.0 10.0–11.0 8.7–9.5 6.3–7.6 6.3–7.0
Copper, incl remainder remainder remainder remainder remainder remainder 74.5 min remainder remainder remainder
silver
A
Iron 2.0–3.0 1.5–3.5 3.0–4.5 2.0–4.0 2.0–4.5 2.0–4.0 4.0–5.5 3.5–4.3 0.30 max 0.30 max
A
Nickel, incl 0.15 max . . . . . . 1.0 max . . . 4.0–5.5 4.2–6.0 4.0–4.8 0.25 max 0.25 max
cobalt
Manganese 0.20 max 1.0 max . . . 0.50 max 0.30 max 1.5 max 1.5 max 1.2–2.0 0.10 max 0.10 max
Silicon 0.10 max . . . . . . 0.25 max 0.25 max 0.25 max . . . 0.10 max 1.5–2.2 1.5–2.0
Tin 0.20–0.50 . . . 0.6 max 0.6 max 0.20 max 0.20 max 0.25 max . . . 0.20 max 0.20 max
B
Zinc, max 0.10 0.20 0.8 . . . . . . 0.30 0.30 . . . 0.50 0.50
Lead, max 0.01 0.01 0.02 . . . . . . . . . 0.03 0.02 0.05 0.05
Arsenic, max . . . . . . . . . . . . . . . . . . . . . 0.09 0.09
Phosphorus, 0.015 0.015 . . . . . . . .
max
B C
Other named . . . . . . . .
elements
A
Iron content shall not exceed nickel content.
B
When the product is for subsequent welding applications and is so specified by the purchaser, chromium shall be 0.05 % max, cadmium 0.05 % max, zirconium 0.05 %
max, and zinc 0.05 % max.
C
Chromium shall be 0.05 max and cobalt shall be 0.20 max.
B150/B150M−19
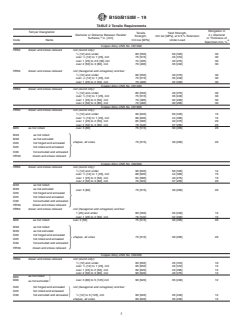
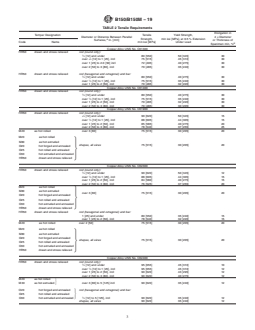
TABLE 2 Tensile Requirements
Elongation in
Temper Designation
Tensile Yield Strength,
Diameter or Distance Between Parallel 4 × Diameter
Strength, min ksi [MPa], at 0.5 % Extension
A
Surfaces, in. [mm] or Thickness of
min ksi [MPa] Under Load
Code Name B
Specimen min, %
Copper Alloy UNS No. C61300
HR50 drawn and stress relieved rod (round only):
⁄2 [12] and under 80 [550] 50 [345] 30
over ⁄2 [12] to 1 [25], incl 75 [515] 45 [310] 30
over 1 [25] to 2.0 [50] incl 72 [495] 40 [275] 30
over 2 [50] to 3 [80], incl 70 [485] 35 [240] 30
HR50 drawn and stress relieved rod (hexagonal and octagonal) and bar:
⁄2 [12] and under 80 [550] 40 [275] 30
over ⁄2 [12] to 1 [25], incl 75 [515] 35 [240] 30
over 1 [25] to 2 [50], incl 70 [485] 32 [220] 30
Copper Alloy UNS No. C61400
HR50 drawn and stress relieved rod (round only):
⁄2 [12] and under 80 [550] 40 [275] 30
over ⁄2 [12] to 1 [25], incl 75 [515] 35 [240] 30
over 1 [25] to 2 [50], incl 70 [485] 32 [220] 30
over 2 [50] to 3 [80], incl 70 [485] 30 [205] 30
Copper Alloy UNS No. C61900
HR50 drawn and stress relieved rod (round only):
⁄2 [12] and under 90 [620] 50 [345] 15
over ⁄2 [12] to 1 [25], incl 88 [605] 44 [305] 15
over 1 [25] to 2 [50], incl 85 [585] 40 [275] 20
over 2 [50] to 3 [80], incl 78 [540] 37 [255] 25
M20 as hot rolled over 3 [80] 75 [515] 30 [205] 20
M20 as hot rolled
M30 as hot extruded
shapes, all sizes 75 [515] 30 [205] 20
O20 hot forged and annealed
O25 hot rolled and annealed
O30 hot extruded and annealed
HR50 drawn and stress relieved
Copper Alloy UNS No. C62300
HR50 drawn and stress relieved rod (round only):
⁄2 [12] and under 90 [620] 50 [345] 12
over ⁄2 [12] to 1 [25], incl 88 [605] 44 [305] 15
over 1 [25] to 2 [50], incl 84 [580] 40 [275] 15
over 2 [50] to 3 [80], incl 76 [525] 37 [255] 20
M20 as hot rolled
M30 as hot extruded
over 3 [80] 75 [515] 30 [205] 20
O20 hot forged and annealed
O25 hot rolled and annealed
O30 hot extruded and annealed
HR50 drawn and stress relieved
HR50 drawn and stress relieved rod (hexagonal and octagonal) and bar:
1 [25] and under 80 [550] 35 [240] 15
over 1 [25] to 2 [50], incl 78 [540] 32 [220] 15
M20 as hot rolled over 2 [50] 75 [515] 30 [205] 20
M20 as hot rolled
M30 as hot extruded
O20 hot forged and annealed
shapes, all sizes 75 [515] 30 [205] 20
O25 hot rolled and annealed
O30 hot extruded and annealed
HR50 drawn and stress relieved
Copper Alloy UNS No. C62400
HR50 drawn and stress relieved rod (round only):
⁄2 [12] and under 95 [655] 45 [310] 10
over ⁄2 [12] to 1 [25], incl 95 [655] 45 [310] 12
over 1 [25] to 2 [50], incl 90 [620] 43 [295] 12
over 2 [50] to 3 [80], incl 90 [620] 40 [275] 12
M20 as hot rolled
J
M30 as hot extruded over 3 [80] to 5 [125] incl 9
...
This document is not an ASTM standard and is intended only to provide the user of an ASTM standard an indication of what changes have been made to the previous version. Because
it may not be technically possible to adequately depict all changes accurately, ASTM recommends that users consult prior editions as appropriate. In all cases only the current version
of the standard as published by ASTM is to be considered the official document.
Designation: B150/B150M − 12 (Reapproved 2017) B150/B150M − 19
Standard Specification for
Aluminum Bronze Rod, Bar, and Shapes
This standard is issued under the fixed designation B150/B150M; the number immediately following the designation indicates the year
of original adoption or, in the case of revision, the year of last revision. A number in parentheses indicates the year of last reapproval.
A superscript epsilon (´) indicates an editorial change since the last revision or reapproval.
1. Scope*
1.1 This specification establishes the requirements for aluminum bronze rod, bar, and shapes for Copper Alloys UNS Nos.
C61300, C61400, C61900, C62300, C62400, C63000, C63020, C63200, C64200, and C64210.
NOTE 1—Product intended for hot forging is described in Specification B124/B124M.
NOTE 2—Warning—Mercury has been designated by many regulatory agencies as a hazardous materialsubstance that can cause serious medical issues.
Mercury, or its vapor, has been demonstrated to be hazardous to health and corrosive to materials. Caution should be taken Use caution when handling
mercury and mercury containing mercury-containing products. See the applicable product Safety Data Sheet (SDS) for additional information. Users
should be aware The potential exists that selling mercury and/or mercury containing products into your state or country may be prohibited by law.or
mercury-containing products, or both, is prohibited by local or national law. Users must determine legality of sales in their location.
1.2 The values stated in either SI units or inch-pound units are to be regarded separately as standard. The values stated in each
system mayare not benecessarily exact equivalents; therefore, to ensure conformance with the standard, each system shall be used
independently of the other. Combiningother, and values from the two systems may result in non-conformance with the
standard.shall not be combined.
1.3 This standard does not purport to address all of the safety concerns, if any, associated with its use. It is the responsibility
of the user of this standard to establish appropriate safety safety, health, and healthenvironmental practices and determine the
applicability of regulatory requirements prior to use.
1.4 This international standard was developed in accordance with internationally recognized principles on standardization
established in the Decision on Principles for the Development of International Standards, Guides and Recommendations issued
by the World Trade Organization Technical Barriers to Trade (TBT) Committee.
2. Referenced Documents
2.1 ASTM Standards:
B124/B124M Specification for Copper and Copper Alloy Forging Rod, Bar, and Shapes
B154 Test Method for Mercurous Nitrate Test for Copper Alloys
B249/B249M Specification for General Requirements for Wrought Copper and Copper-Alloy Rod, Bar, Shapes and Forgings
B601 Classification for Temper Designations for Copper and Copper Alloys—Wrought and Cast
B858 Test Method for Ammonia Vapor Test for Determining Susceptibility to Stress Corrosion Cracking in Copper Alloys
E8/E8M Test Methods for Tension Testing of Metallic Materials
E18 Test Methods for Rockwell Hardness of Metallic Materials
E53 Test Method for Determination of Copper in Unalloyed Copper by Gravimetry
E62 Test Methods for Chemical Analysis of Copper and Copper Alloys (Photometric Methods) (Withdrawn 2010)
E118 Test Methods for Chemical Analysis of Copper-Chromium Alloys (Withdrawn 2010)
E478 Test Methods for Chemical Analysis of Copper Alloys
3. General Requirements
3.1 The following sections of Specification B249/B249M constitute a part of this specification:
3.1.1 Terminology,Terminology;
This specification is under the jurisdiction of ASTM Committee B05 on Copper and Copper Alloys and is the direct responsibility of Subcommittee B05.02 on Rod, Bar,
Wire, Shapes and Forgings.
Current edition approved April 1, 2017April 1, 2019. Published April 2017April 2019. Originally approved in 1941. Last previous edition approved in 20122017 as
B150/B150M-12. –12 (2017). DOI: 10.1520/B0150_B0150M-12R17.10.1520/B0150_B0150M–19.
For referenced ASTM standards, visit the ASTM website, www.astm.org, or contact ASTM Customer Service at service@astm.org. For Annual Book of ASTM Standards
volume information, refer to the standard’s Document Summary page on the ASTM website.
The last approved version of this historical standard is referenced on www.astm.org.
*A Summary of Changes section appears at the end of this standard
Copyright © ASTM International, 100 Barr Harbor Drive, PO Box C700, West Conshohocken, PA 19428-2959. United States
B150/B150M − 19
3.1.2 Materials and Manufacture,Manufacture;
3.1.3 Workmanship, Finish, and Appearance,Appearance;
3.1.4 Sampling,Sampling;
3.1.5 Number of Tests and Retests,Retests;
3.1.6 Specimen Preparation,Preparation;
3.1.7 Test Methods,Methods;
3.1.8 Significance of Numerical Limits,Limits;
3.1.9 Inspection,Inspection;
3.1.10 Rejection and Rehearing,Rehearing;
3.1.11 Certification,Certification;
3.1.12 Mill Test Report,Report;
3.1.13 Packaging and Package Marking, Preservation and Delivery,Delivery; and
3.1.14 Supplementary Requirements.
3.2 In addition, when a section with a title identical to those referenced in 3.1, appears in this specification, it contains additional
requirements that supplement those appearing in Specification B249/B249M.
4. Ordering Information
4.1 Include the following information when placing orders for product under this specification, as applicable:
4.1.1 Specification designation and year of issue,
4.1.2 Copper alloy UNS No. (See Table 1),
4.1.3 Temper (see Temper section),
4.1.3.1 When Alloy UNS No. C63000 is specified, specify standard strength or high strength temper (See Table 2),
4.1.4 Product cross-section (for example round, hexagonal, square, and so forth),
4.1.5 Dimensions (diameter or distance between parallel surfaces and length) and permissible variations (Section 10),
4.1.5.1 When product of Copper Alloy UNS No. C63020 is specified, the tolerances for diameter, thickness, width, and length
shall be part of the contract or purchase order and shall be agreed upon between the supplier and the purchaser.
4.1.5.2 Shapes—When product is shapes, the dimensional tolerances shall be as agreed upon between the manufacturer and the
purchaser and shall be specified.
4.1.6 Quantity, total weight, footage, or number of pieces for each size.
4.1.7 If product is being purchased for agencies of the U.S. government.
4.2 The following options are available and should be specified at the time of placing the order when required:
4.2.1 If Copper Alloy C61300 material is intended for subsequent welding applications (See Note B, Table 2),
4.2.2 Certification,
4.2.3 Mill test reports,
4.2.4 Residual stress test (Performance Requirements section)
4.2.4.1 Ammonia Vapor Test or Mercurous Nitrate Test,
TABLE 1 Chemical Requirements
Composition, %
Elements
Copper Alloy UNS No.
C61300 C61400 C61900 C62300 C62400 C63000 C63020 C63200 C64200 C64210
Aluminum 6.0–7.5 6.0–8.0 8.5–10.0 8.5–10.0 10.0–11.5 9.0–11.0 10.0–11.0 8.7–9.5 6.3–7.6 6.3–7.0
Copper, incl remainder remainder remainder remainder remainder remainder 74.5 min remainder remainder remainder
silver
A
Iron 2.0–3.0 1.5–3.5 3.0–4.5 2.0–4.0 2.0–4.5 2.0–4.0 4.0–5.5 3.5–4.3 0.30 max 0.30 max
A
Nickel, incl 0.15 max . . . . . . 1.0 max . . . 4.0–5.5 4.2–6.0 4.0–4.8 0.25 max 0.25 max
cobalt
Manganese 0.20 max 1.0 max . . . 0.50 max 0.30 max 1.5 max 1.5 max 1.2–2.0 0.10 max 0.10 max
Silicon 0.10 max . . . . . . 0.25 max 0.25 max 0.25 max . . . 0.10 max 1.5–2.2 1.5–2.0
Tin 0.20–0.50 . . . 0.6 max 0.6 max 0.20 max 0.20 max 0.25 max . . . 0.20 max 0.20 max
B
Zinc, max 0.10 0.20 0.8 . . . . . . 0.30 0.30 . . . 0.50 0.50
Lead, max 0.01 0.01 0.02 . . . . . . . . . 0.03 0.02 0.05 0.05
Arsenic, max . . . . . . . . . . . . . . . . . . . . . 0.15 0.15
Arsenic, max . . . . . . . . . . . . . . . . . . . . . 0.09 0.09
Phosphorus, 0.015 0.015 . . . . . . . . . . . . . . . . . . . . . . . .
max
B C
Other named . . . . . . . . . . . . . . . . . . . . . . . .
elements
A
Iron content shall not exceed nickel content.
B
When the product is for subsequent welding applications and is so specified by the purchaser, chromium shall be 0.05 % max, cadmium 0.05 % max, zirconium 0.05 %
max, and zinc 0.05 % max.
C
Chromium shall be 0.05 max and cobalt shall be 0.20 max.
B150/B150M − 19
TABLE 2 Tensile Requirements
Elongation in
Temper Designation
Tensile Yield Strength,
Diameter or Distance Between Parallel 4 × Diameter
Strength, min ksi [MPa], at 0.5 % Extension
A
Surfaces, in. [mm] or Thickness of
min ksi [MPa] Under Load
Code Name B
Specimen min, %
Copper Alloy UNS No. C61300
HR50 drawn and stress relieved rod (round only):
⁄2 [12] and under 80 [550] 50 [345] 30
over ⁄2 [12] to 1 [25], incl 75 [515] 45 [310] 30
over 1 [25] to 2.0 [50] incl 72 [495] 40 [275] 30
over 2 [50] to 3 [80], incl 70 [485] 35 [240] 30
HR50 drawn and stress relieved rod (hexagonal and octagonal) and bar:
⁄2 [12] and under 80 [550] 40 [275] 30
over ⁄2 [12] to 1 [25], incl 75 [515] 35 [240] 30
over 1 [25] to 2 [50], incl 70 [485] 32 [220] 30
Copper Alloy UNS No. C61400
HR50 drawn and stress relieved rod (round only):
⁄2 [12] and under 80 [550] 40 [275] 30
over ⁄2 [12] to 1 [25], incl 75 [515] 35 [240] 30
over 1 [25] to 2 [50], incl 70 [485] 32 [220] 30
over 2 [50] to 3 [80], incl 70 [485] 30 [205] 30
Copper Alloy UNS No. C61900
HR50 drawn and stress relieved rod (round only):
⁄2 [12] and under 90 [620] 50 [345] 15
over ⁄2 [12] to 1 [25], incl 88 [605] 44 [305] 15
over 1 [25] to 2 [50], incl 85 [585] 40 [275] 20
over 2 [50] to 3 [80], incl 78 [540] 37 [255] 25
M20 as hot rolled over 3 [80] 75 [515] 30 [205] 20
M20 as hot rolled
M30 as hot extruded
shapes, all sizes 75 [515] 30 [205] 20
O20 hot forged and annealed
O25 hot rolled and annealed
O30 hot extruded and annealed
HR50 drawn and stress relieved
Copper Alloy UNS No. C62300
HR50 drawn and stress relieved rod (round only):
⁄2 [12] and under 90 [620] 50 [345] 12
over ⁄2 [12] to 1 [25], incl 88 [605] 44 [305] 15
over 1 [25] to 2 [50], incl 84 [580] 40 [275] 15
over 2 [50] to 3 [80], incl 76 [525] 37 [255] 20
M20 as hot rolled
M30 as hot extruded
over 3 [80] 75 [515] 30 [205] 20
O20 hot forged and annealed
O25 hot rolled and annealed
O30 hot extruded and annealed
HR50 drawn and stress relieved
HR50 drawn and stress relieved rod (hexagonal and octagonal) and bar:
1 [25] and under 80 [550] 35 [240] 15
over 1 [25] to 2 [50], incl 78 [540] 32 [220] 15
M20 as hot rolled over 2 [50] 75 [515] 30 [205] 20
M20 as hot rolled
M30 as hot extruded
O20 hot forged and annealed
shapes, all sizes 75 [515] 30 [205] 20
O25 hot rolled and annealed
O30 hot extruded and annealed
HR50 drawn and stress relieved
Copper Alloy UNS No. C62400
HR50 drawn and stress relieved rod (round only):
⁄2 [12] and under 95 [655] 45 [310] 10
over ⁄2 [12] to 1 [25], incl 95 [655] 45 [310] 12
over 1 [25] to 2 [50], incl 90 [620] 43 [295] 12
over 2 [50] to 3 [80], incl 90 [620] 40 [275] 12
as hot rolled
M20
J
M30 over 3 [80] to 5 [125] incl 90 [620] 35 [240] 12
as hot extruded
O20 hot forged and annealed
rod (hexagonal and octagonal) and bar:
O25 hot rolled and annealed
J
O30 hot extruded and annealed ⁄2 [12] to 5 [125], incl 90 [620] 35 [240] 12
shapes, all sizes 90 [620] 35 [240] 12
B150/B150M − 19
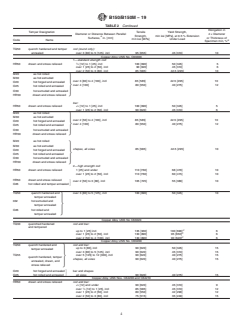
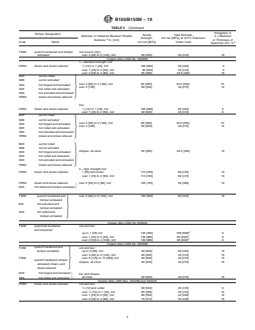
TABLE 2 Continued
Elongation in
Temper Designation
Tensile Yield Strength,
Diameter or Distance Between Parallel 4 × Diameter
Strength, min ksi [MPa], at 0.5 % Extension
A
Surfaces, in. [mm] or Thickness of
Code Name min ksi [MPa] Under Load
B
Specimen min, %
TQ50 quench hardened and temper rod (round only):
annealed over 3 [80] to 5 [125], incl 95 [655] 45 [310] 10
Copper Alloy UNS No. C63000
1—standard strength rod:
HR50 drawn and stress relieved ⁄2 [12] to 1 [25], incl 100 [690] 50 [345] 5
over 1 [25] to 2 [50], incl 90 [620] 45 [310] 6
over 2 [50] to 3 [80], incl 85 [585] 42.5 [295] 10
M20 as hot rolled
M30 as hot extruded
over 3 [80] to 4 [100], incl 85 [585] 42.5 [295] 10
O20 hot forged and annealed
over 4 [100] 80 [550] 40 [275] 12
O25 hot rolled and annealed
O30 hot extruded and annealed
HR50 drawn and stress relieved
bar:
HR50 drawn and stress reliev
...
Questions, Comments and Discussion
Ask us and Technical Secretary will try to provide an answer. You can facilitate discussion about the standard in here.
Loading comments...