ASTM D6441-05(2024)
(Test Method)Standard Test Methods for Measuring the Hiding Power of Powder Coatings
Standard Test Methods for Measuring the Hiding Power of Powder Coatings
SIGNIFICANCE AND USE
5.1 Contrast ratio at a specified film thickness is a useful hiding power parameter for production control and purchasing specifications.
5.2 The greater the hiding power, the less coating is required per unit area to obtain adequate hiding. Knowledge of hiding power is therefore important in regard to coating costs and for comparing coating value.
SCOPE
1.1 These test methods determine and report the hiding power of a powder coating with respect to two parameters:
1.1.1 Test Method A—Contrast Ratio at a given film thickness
1.1.2 Test Method B—Film thickness at 0.98 (98 %) contrast ratio.
Note 1: The measured parameters follow powder coating industry practice by measuring hiding power in relation to film thickness, rather than the “Spreading Rate” function employed in Test Methods D344 and D2805 and other hiding power test methods.
Note 2: Hiding power is photometrically defined as the spreading rate at 0.98 contrast ratio. See definitions of spreading rate and hiding power in Terminology D16, D2805, and the Paint and Coatings Testing Manual.
Note 3: The contrast ratio 0.98 is conventionally accepted in the coatings industry as representing “complete” hiding for reflectometric hiding power measurements. But visually, as well as photometrically, it is slightly less than complete.
1.2 These test methods cover the determination of the hiding power of powder coatings applied by electrostatic spraying.
1.3 These test methods determine hiding power by means of reflectometric and thickness gauge measurements. They are limited to coatings having a minimum CIE-Y reflectance of 15 %.
1.4 The values stated in SI units are to be regarded as the standard. The values given in parentheses are for information only.
1.5 This standard does not purport to address all of the safety concerns, if any, associated with its use. It is the responsibility of the user of this standard to establish appropriate safety, health, and environmental practices and determine the applicability of regulatory limitations prior to use.
1.6 This international standard was developed in accordance with internationally recognized principles on standardization established in the Decision on Principles for the Development of International Standards, Guides and Recommendations issued by the World Trade Organization Technical Barriers to Trade (TBT) Committee.
General Information
- Status
- Published
- Publication Date
- 31-Jan-2024
- Technical Committee
- D01 - Paint and Related Coatings, Materials, and Applications
- Drafting Committee
- D01.51 - Powder Coatings
Relations
- Replaces
ASTM D6441-05(2016) - Standard Test Methods for Measuring the Hiding Power of Powder Coatings - Effective Date
- 01-Feb-2024
- Effective Date
- 01-Feb-2024
Overview
ASTM D6441-05(2024) - Standard Test Methods for Measuring the Hiding Power of Powder Coatings provides industry-accepted procedures for objectively evaluating the hiding power, or opacity, of powder coatings. Developed by ASTM International, this standard outlines test methods essential for production quality control, procurement specifications, and cost optimization in the coatings industry. The standard describes two primary test methods for assessing hiding power with respect to contrast ratio and film thickness, focusing on powder coatings applied via electrostatic spraying.
Key Topics
- Hiding Power & Opacity: This standard defines hiding power as the capability of a powder coating to obscure the surface underneath. Hiding power is quantitatively represented by the contrast ratio and the minimum film thickness required to achieve specific opacity.
- Contrast Ratio Measurement: Test Method A measures the contrast ratio at a given film thickness, assessing how much the coating hides a black substrate compared to a white substrate.
- Film Thickness at Given Opacity: Test Method B determines the precise film thickness at which the coating achieves a 98% contrast ratio, conventionally considered ‘complete’ hiding in the coatings industry.
- Measurement Tools: Use of reflectometers and thickness gauges are integral for both methods, ensuring accurate, reproducible results. Reflectance is measured photometrically, following established ASTM methods.
- Substrates and Reflectance: Panels with sharply defined black and white areas are used, adhering to specified minimum and maximum reflectance values to standardize results.
- Industry Practice: The methods follow powder coating industry practices, as opposed to spreading rate functions used in other hiding power standards.
Applications
ASTM D6441-05(2024) is applied throughout the powder coatings industry for:
- Production Quality Control: Monitoring and controlling production batches to ensure consistent coating performance regarding hiding power.
- Procurement and Specifications: Providing concrete hiding power data for powder coatings, enabling informed purchasing and material selection decisions.
- Cost Optimization: Allowing manufacturers and end users to minimize material usage per unit area by choosing coatings with higher hiding power, directly impacting project and operational costs.
- Product Development & R&D: Supporting research and development activities within coatings and materials laboratories by standardizing opacity evaluation methods.
- Performance Comparison: Facilitating direct, objective comparisons between powder coatings from different manufacturers or different production lots.
Powder coatings tested according to this standard are commonly used in architectural, automotive, appliance, and general industrial applications where uniform appearance and material efficiency are critical.
Related Standards
For comprehensive coatings evaluation and terminology, the following standards are directly relevant to ASTM D6441-05(2024):
- ASTM D16: Terminology for Paint, Related Coatings, Materials, and Applications
- ASTM D2805: Test Method for Hiding Power of Paints by Reflectometry
- ASTM D3451: Guide for Testing Coating Powders and Powder Coatings
- ASTM E1331 / E1347 / E1349: Methods for measuring reflectance factor and color by spectrophotometry and colorimetry
- CGSB 1-GP-71: Canadian General Standards Board Method for Hiding Power, Contrast Ratio
Adhering to ASTM D6441-05(2024) ensures compatibility with internationally recognized test principles, supporting regulatory compliance and global trade of powder coating materials.
Keywords: powder coatings, hiding power, ASTM D6441, opacity, contrast ratio, film thickness, reflectometry, coatings industry standards
Buy Documents
ASTM D6441-05(2024) - Standard Test Methods for Measuring the Hiding Power of Powder Coatings
Frequently Asked Questions
ASTM D6441-05(2024) is a standard published by ASTM International. Its full title is "Standard Test Methods for Measuring the Hiding Power of Powder Coatings". This standard covers: SIGNIFICANCE AND USE 5.1 Contrast ratio at a specified film thickness is a useful hiding power parameter for production control and purchasing specifications. 5.2 The greater the hiding power, the less coating is required per unit area to obtain adequate hiding. Knowledge of hiding power is therefore important in regard to coating costs and for comparing coating value. SCOPE 1.1 These test methods determine and report the hiding power of a powder coating with respect to two parameters: 1.1.1 Test Method A—Contrast Ratio at a given film thickness 1.1.2 Test Method B—Film thickness at 0.98 (98 %) contrast ratio. Note 1: The measured parameters follow powder coating industry practice by measuring hiding power in relation to film thickness, rather than the “Spreading Rate” function employed in Test Methods D344 and D2805 and other hiding power test methods. Note 2: Hiding power is photometrically defined as the spreading rate at 0.98 contrast ratio. See definitions of spreading rate and hiding power in Terminology D16, D2805, and the Paint and Coatings Testing Manual. Note 3: The contrast ratio 0.98 is conventionally accepted in the coatings industry as representing “complete” hiding for reflectometric hiding power measurements. But visually, as well as photometrically, it is slightly less than complete. 1.2 These test methods cover the determination of the hiding power of powder coatings applied by electrostatic spraying. 1.3 These test methods determine hiding power by means of reflectometric and thickness gauge measurements. They are limited to coatings having a minimum CIE-Y reflectance of 15 %. 1.4 The values stated in SI units are to be regarded as the standard. The values given in parentheses are for information only. 1.5 This standard does not purport to address all of the safety concerns, if any, associated with its use. It is the responsibility of the user of this standard to establish appropriate safety, health, and environmental practices and determine the applicability of regulatory limitations prior to use. 1.6 This international standard was developed in accordance with internationally recognized principles on standardization established in the Decision on Principles for the Development of International Standards, Guides and Recommendations issued by the World Trade Organization Technical Barriers to Trade (TBT) Committee.
SIGNIFICANCE AND USE 5.1 Contrast ratio at a specified film thickness is a useful hiding power parameter for production control and purchasing specifications. 5.2 The greater the hiding power, the less coating is required per unit area to obtain adequate hiding. Knowledge of hiding power is therefore important in regard to coating costs and for comparing coating value. SCOPE 1.1 These test methods determine and report the hiding power of a powder coating with respect to two parameters: 1.1.1 Test Method A—Contrast Ratio at a given film thickness 1.1.2 Test Method B—Film thickness at 0.98 (98 %) contrast ratio. Note 1: The measured parameters follow powder coating industry practice by measuring hiding power in relation to film thickness, rather than the “Spreading Rate” function employed in Test Methods D344 and D2805 and other hiding power test methods. Note 2: Hiding power is photometrically defined as the spreading rate at 0.98 contrast ratio. See definitions of spreading rate and hiding power in Terminology D16, D2805, and the Paint and Coatings Testing Manual. Note 3: The contrast ratio 0.98 is conventionally accepted in the coatings industry as representing “complete” hiding for reflectometric hiding power measurements. But visually, as well as photometrically, it is slightly less than complete. 1.2 These test methods cover the determination of the hiding power of powder coatings applied by electrostatic spraying. 1.3 These test methods determine hiding power by means of reflectometric and thickness gauge measurements. They are limited to coatings having a minimum CIE-Y reflectance of 15 %. 1.4 The values stated in SI units are to be regarded as the standard. The values given in parentheses are for information only. 1.5 This standard does not purport to address all of the safety concerns, if any, associated with its use. It is the responsibility of the user of this standard to establish appropriate safety, health, and environmental practices and determine the applicability of regulatory limitations prior to use. 1.6 This international standard was developed in accordance with internationally recognized principles on standardization established in the Decision on Principles for the Development of International Standards, Guides and Recommendations issued by the World Trade Organization Technical Barriers to Trade (TBT) Committee.
ASTM D6441-05(2024) is classified under the following ICS (International Classification for Standards) categories: 87.040 - Paints and varnishes. The ICS classification helps identify the subject area and facilitates finding related standards.
ASTM D6441-05(2024) has the following relationships with other standards: It is inter standard links to ASTM D6441-05(2016), ASTM D3451-06(2017). Understanding these relationships helps ensure you are using the most current and applicable version of the standard.
ASTM D6441-05(2024) is available in PDF format for immediate download after purchase. The document can be added to your cart and obtained through the secure checkout process. Digital delivery ensures instant access to the complete standard document.
Standards Content (Sample)
This international standard was developed in accordance with internationally recognized principles on standardization established in the Decision on Principles for the
Development of International Standards, Guides and Recommendations issued by the World Trade Organization Technical Barriers to Trade (TBT) Committee.
Designation: D6441 − 05 (Reapproved 2024)
Standard Test Methods for
Measuring the Hiding Power of Powder Coatings
This standard is issued under the fixed designation D6441; the number immediately following the designation indicates the year of
original adoption or, in the case of revision, the year of last revision. A number in parentheses indicates the year of last reapproval. A
superscript epsilon (´) indicates an editorial change since the last revision or reapproval.
1. Scope mendations issued by the World Trade Organization Technical
Barriers to Trade (TBT) Committee.
1.1 These test methods determine and report the hiding
power of a powder coating with respect to two parameters:
2. Referenced Documents
1.1.1 Test Method A—Contrast Ratio at a given film thick-
2.1 ASTM Standards:
ness
D16 Terminology for Paint, Related Coatings, Materials, and
1.1.2 Test Method B—Film thickness at 0.98 (98 %) con-
Applications
trast ratio.
D344 Test Method for Relative Hiding Power of Paints by
NOTE 1—The measured parameters follow powder coating industry
the Visual Evaluation of Brushouts (Withdrawn 2018)
practice by measuring hiding power in relation to film thickness, rather
D2805 Test Method for Hiding Power of Paints by Reflec-
than the “Spreading Rate” function employed in Test Methods D344 and
tometry
D2805 and other hiding power test methods.
NOTE 2—Hiding power is photometrically defined as the spreading rate
D3451 Guide for Testing Coating Powders and Powder
at 0.98 contrast ratio. See definitions of spreading rate and hiding power
Coatings
in Terminology D16, D2805, and the Paint and Coatings Testing Manual.
E284 Terminology of Appearance
NOTE 3—The contrast ratio 0.98 is conventionally accepted in the
E1331 Test Method for Reflectance Factor and Color by
coatings industry as representing “complete” hiding for reflectometric
hiding power measurements. But visually, as well as photometrically, it is Spectrophotometry Using Hemispherical Geometry
slightly less than complete.
E1347 Test Method for Color and Color-Difference Mea-
surement by Tristimulus Colorimetry
1.2 These test methods cover the determination of the
E1349 Test Method for Reflectance Factor and Color by
hiding power of powder coatings applied by electrostatic
Spectrophotometry Using Bidirectional (45°:0° or 0°:45°)
spraying.
Geometry
1.3 These test methods determine hiding power by means of
2.2 Other Standard:
reflectometric and thickness gauge measurements. They are
1-GP-71 Method 14.7, Hiding Power, Contrast Ratio
limited to coatings having a minimum CIE-Y reflectance of
Method, October 1982
15 %.
1.4 The values stated in SI units are to be regarded as the
3. Terminology
standard. The values given in parentheses are for information
3.1 Definitions of Terms Specific to This Standard:
only.
3.1.1 reflectance, n—term of wide applicability, referring
1.5 This standard does not purport to address all of the
herein to the luminous reflectance factor as defined in Termi-
safety concerns, if any, associated with its use. It is the
nology E284, and equivalent to the CIE Tristimulus value Y
responsibility of the user of this standard to establish appro-
measured in accordance with Test Methods E1331, E1347 or
priate safety, health, and environmental practices and deter-
Test Method E1349 with specular reflection excluded. It is
mine the applicability of regulatory limitations prior to use.
expressed as a percentage in this standard.
1.6 This international standard was developed in accor-
3.1.2 white substrate, n—For purposes of this test, a sub-
dance with internationally recognized principles on standard-
strate of neutral shade with a minimum reflectance of 78 %.
ization established in the Decision on Principles for the
Development of International Standards, Guides and Recom-
For referenced ASTM standards, visit the ASTM website, www.astm.org, or
contact ASTM Customer Service at service@astm.org. For Annual Book of ASTM
These test methods are under the jurisdiction of ASTM Committee D01 on Standards volume information, refer to the standard’s Document Summary page on
Paint and Related Coatings, Materials, and Applications and are the direct the ASTM website.
responsibility of Subcommittee D01.51 on Powder Coatings. The last approved version of this historical standard is referenced on
Current edition approved Feb. 1, 2024. Published February 2024. Originally www.astm.org.
approved in 1999. Last previous edition approved in 2016 as D6441 – 05 (2016). Canadian General Standards Board, (CGSB), 222 Queen St., Ottawa, Ont.,
DOI: 10.1520/D6441-05R24. Canada K1A 1G6.
Copyright © ASTM International, 100 Barr Harbor Drive, PO Box C700, West Conshohocken, PA 19428-2959. United States
D6441 − 05 (2024)
3.1.3 black substrate, n—A substrate with a maximum 3.1.8 opacity, n—The degree to which a coating film hides a
reflectance of 1 %, which is effectively zero for the purpose of black and white substrate, as perceived visually or as measured
measuring hiding power.
instrumentally, (see contrast ratio defined in 3.1.7).
3.1.4 white reflectance (R ), n—Reflectance of the applied
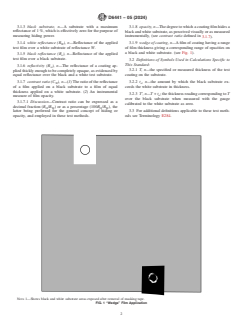
3.1.9 wedge of coating, n—A film of coating having a range
W
test film over a white substrate of reflectance W.
of film thickness giving a corresponding range of opacities on
a black and white substrate. (see Fig. 1).
3.1.5 black reflectance (R ), n—Reflectance of the applied
o
test film over a black substrate.
3.2 Definitions of Symbols Used in Calculations Specific to
This Standard:
3.1.6 reflectivity (R ), n—The reflectance of a coating ap-
∞
3.2.1 T, n—the specified or measured thickness of the test
plied thickly enough to be completely opaque, as evidenced by
equal reflectance over the black and a white test substrate. coating on the substrate.
3.1.7 contrast ratio (C ), n—(1) The ratio of the reflectance
3.2.2 t , n—the amount by which the black substrate ex-
W o
of a film applied on a black substrate to a film of equal
ceeds the white substrate in thickness.
thickness applied on a white substrate. (2) An instrumental
3.2.3 T', n—T + t ; the thickness reading corresponding to T
o
measure of film opacity.
over the black substrate when measured with the gauge
3.1.7.1 Discussion—Contrast ratio can be expressed as a
calibrated to the white substrate as zero.
decimal fraction (R /R ) or as a percentage (100R /R ), the
O W O W
latter being preferred for the general concept of hiding or 3.3 For additional definitions applicable to these test meth-
opacity, and employed in these test methods. ods see Terminology E284.
NOTE 1—Shows black and white substrate areas exposed after removal of masking tape.
FIG. 1 “Wedge” Film Application
D6441 − 05 (2024)
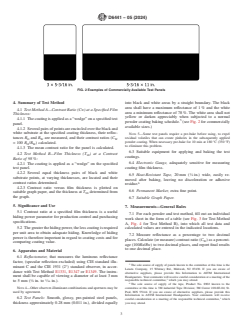
FIG. 2 Examples of Commercially Available Test Panels
4. Summary of Test Method into black and white areas by a straight boundary. The black
area shall have a maximum reflectance of 1 % and the white
4.1 Test Method A—Contrast Ratio (C ) at a Specified Film
W
area a minimum reflectance of 78 %. The white area shall not
Thickness:
yellow or darken appreciably when subjected to a normal
4.1.1 The coating is applied as a “wedge” on a specified test
powder coating baking schedule. (see Fig. 2 for commercially
panel.
available sizes.)
4.1.2 Several pairs of points are encircled over the black and
white substrate at the specified coating thickness, their reflec-
NOTE 5—Some test panels require a pre-bake before using, to expel
tances R and R are measured, and their contrast ratios (C residual volatiles that can create pinholes in the subsequently applied
O W W
powder coating. When necessary pre-bake for 10 min at 180 °C (350 °F)
= 100 R /R ) calculated.
O W
to eliminate this problem.
4.1.3 The mean contrast ratio for the panel is calculated.
6.3 Suitable equipment for applying and baking the test
4.2 Test Method B—Film Thickness (T ) at a Contrast
coatings.
Ratio of 98 %:
6.4 Electronic Gauge, adequately sensitive for measuring
4.2.1 The coating is applied as a “wedge” on the specified
coating film thickness.
test panel.
4.2.2 Several equal thickness pairs of black and white
6.5 Heat-Resistant Tape, 20 mm ( ⁄4 in.) wide, easily re-
substrate points, at varying thicknesses, are located and their
moved after baking, leaving no discoloration or adhesive
contrast ratios determined.
residue.
4.2.3 Contrast ratio versus film thickness is plotted on
6.6 Permanent Marker, extra fine point.
suitable graph paper, and the thickness at T determined from
the graph.
6.7 Suitable Graph Paper.
5. Significance and Use
7. Measurements—General Rules
5.1 Contrast ratio at a specified film thickness is a useful
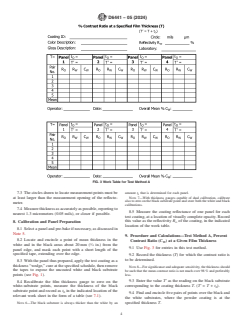
7.1 For each powder and test method, fill out an individual
hiding power parameter for production control and purchasing
work sheet in the form of a table (see Fig. 3 for Test Method
specifications.
A, Fig. 4 for Test Method B), into which all test data and
5.2 The greater the hiding power, the less coating is required
calculated values are entered in the indicated locations.
per unit area to obtain adequate hiding. Knowledge of hiding
7.2 Measure reflectance as a percentage to two decimal
power is therefore important in regard to coating costs and for
places. Calculate (or measure) contrast ratio (C ) as a percent-
W
comparing coating value.
age (100R /R ) to two decimal places, and report final results
B W
to one decimal place.
6. Apparatus and Material
6.1 Reflectometer, that measures the luminous reflectance
factor, (specular reflection excluded) using CIE standard illu-
The sole source of supply of panels known to the committee at this time is the
minant C and the CIE 1931 (2°) standard observer, in accor-
Leneta Company, 15 Whitney Rd., Mahwah, NJ 07430. If you are aware of
dance with Test Method E1331, E1347 or E1349. The instru-
alternative suppliers, please provide this Information to ASTM International
ment shall be capable of viewing a diameter of at least 3 mm Headquarters. Your comments will receive careful consideration at a meeting of the
1 3 responsible technical committee, which you may attend.
to 5 mm ( ⁄8 in. to ⁄16 in.).
The sole source of supply of the tape, Product No. 8902 known to the
committee at this time is 3M industrial Tape Division; 3M Center 220-8E-04; St.
NOTE 4—Other observer-illuminant combinations and apertures may be
Paul, MN 55144. If you are aware of alternative suppliers, please provide this
used by agreement.
Information to ASTM International Headquarters. Your comments will receive
6.2 Test Panels: Smooth, glossy, pre-painted steel panels,
careful consideration at a meeting of the responsible technical committee, which
thickness approximately 0.28 mm (0.011 in.), divided equally you may attend.
D6441 − 05 (2024)
FIG. 3 Work Table for Test Method A
amount t that is determined for each panel.
7.3 The circles drawn to locate measurement points must be
NOTE 7—With thickness gauges capable of dual calibration, calibrate
at least larger than the measurement opening of the reflecto-
also to zero on the bla
...


Questions, Comments and Discussion
Ask us and Technical Secretary will try to provide an answer. You can facilitate discussion about the standard in here.
Loading comments...