ASTM E2918-18
(Test Method)Standard Test Method for Performance Validation of Thermomechanical Analyzers
Standard Test Method for Performance Validation of Thermomechanical Analyzers
SIGNIFICANCE AND USE
5.1 This test method may be used to determine and validate the performance of a particular thermomechanical analyzer apparatus.
5.2 This test method may be used to determine and validate the performance of a particular method based upon thermomechanical analyzer temperature or length change measurements.
5.3 This test method may be used to determine the repeatability of a particular apparatus, operator, or laboratory.
5.4 This test method may be used for specification and regulatory compliance purposes.
SCOPE
1.1 This test method provides procedures for validating temperature and length change measurements of thermomechanical analyzers (TMA) and analytical methods based upon the measurement of temperature and length change. Performance parameters include temperature repeatability, linearity and bias; and dimension change repeatability, detection limit, quantitation limit, linearity and bias.
1.2 Validation of apparatus performance and analytical methods is a necessary requirement for quality initiatives. Results may also be used for legal purposes.
1.3 The values stated in SI units are to be regarded as standard. No other units of measurement are included in this standard.
1.4 This standard does not purport to address all of the safety concerns, if any, associated with its use. It is the responsibility of the user of this standard to establish appropriate safety, health, and environmental practices and determine the applicability of regulatory limitations prior to use.
1.5 This international standard was developed in accordance with internationally recognized principles on standardization established in the Decision on Principles for the Development of International Standards, Guides and Recommendations issued by the World Trade Organization Technical Barriers to Trade (TBT) Committee.
General Information
Relations
Buy Standard
Standards Content (Sample)
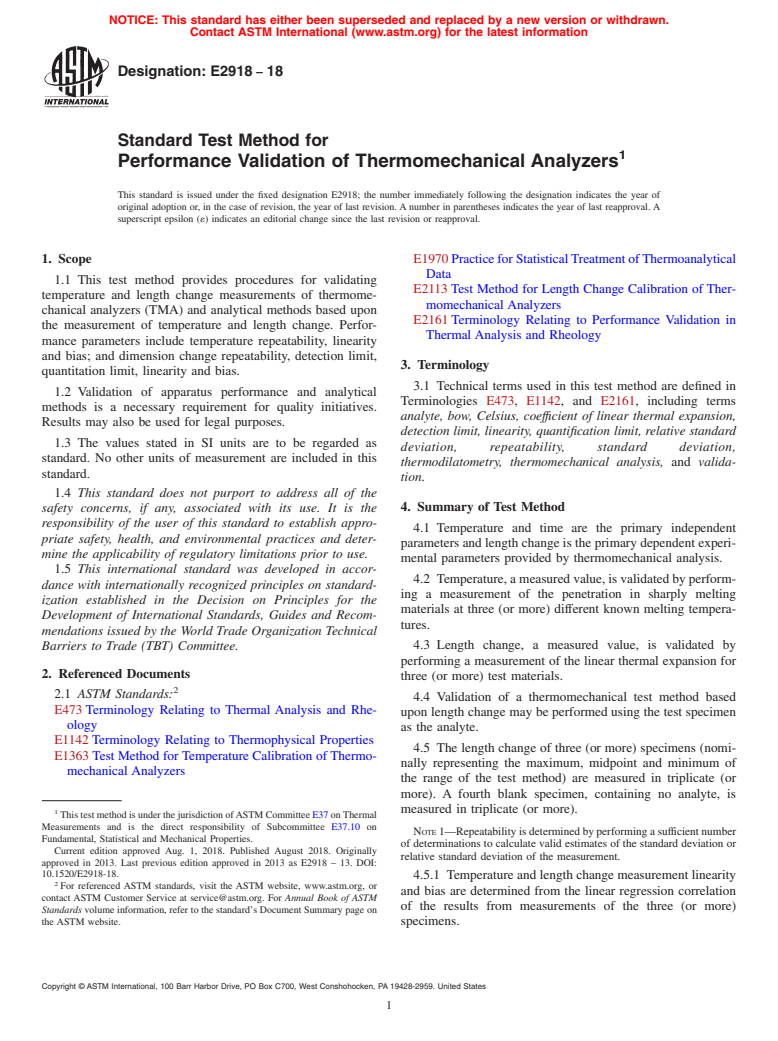
NOTICE: This standard has either been superseded and replaced by a new version or withdrawn.
Contact ASTM International (www.astm.org) for the latest information
Designation: E2918 − 18
Standard Test Method for
1
Performance Validation of Thermomechanical Analyzers
This standard is issued under the fixed designation E2918; the number immediately following the designation indicates the year of
original adoption or, in the case of revision, the year of last revision. A number in parentheses indicates the year of last reapproval. A
superscript epsilon (´) indicates an editorial change since the last revision or reapproval.
1. Scope E1970 PracticeforStatisticalTreatmentofThermoanalytical
Data
1.1 This test method provides procedures for validating
E2113 Test Method for Length Change Calibration of Ther-
temperature and length change measurements of thermome-
momechanical Analyzers
chanical analyzers (TMA) and analytical methods based upon
E2161 Terminology Relating to Performance Validation in
the measurement of temperature and length change. Perfor-
Thermal Analysis and Rheology
mance parameters include temperature repeatability, linearity
and bias; and dimension change repeatability, detection limit,
3. Terminology
quantitation limit, linearity and bias.
3.1 Technical terms used in this test method are defined in
1.2 Validation of apparatus performance and analytical
Terminologies E473, E1142, and E2161, including terms
methods is a necessary requirement for quality initiatives.
analyte, bow, Celsius, coeffıcient of linear thermal expansion,
Results may also be used for legal purposes.
detection limit, linearity, quantification limit, relative standard
1.3 The values stated in SI units are to be regarded as
deviation, repeatability, standard deviation,
standard. No other units of measurement are included in this
thermodilatometry, thermomechanical analysis, and valida-
standard.
tion.
1.4 This standard does not purport to address all of the
4. Summary of Test Method
safety concerns, if any, associated with its use. It is the
responsibility of the user of this standard to establish appro-
4.1 Temperature and time are the primary independent
priate safety, health, and environmental practices and deter-
parameters and length change is the primary dependent experi-
mine the applicability of regulatory limitations prior to use.
mental parameters provided by thermomechanical analysis.
1.5 This international standard was developed in accor-
4.2 Temperature,ameasuredvalue,isvalidatedbyperform-
dance with internationally recognized principles on standard-
ing a measurement of the penetration in sharply melting
ization established in the Decision on Principles for the
materials at three (or more) different known melting tempera-
Development of International Standards, Guides and Recom-
tures.
mendations issued by the World Trade Organization Technical
Barriers to Trade (TBT) Committee. 4.3 Length change, a measured value, is validated by
performing a measurement of the linear thermal expansion for
2. Referenced Documents
three (or more) test materials.
2
2.1 ASTM Standards:
4.4 Validation of a thermomechanical test method based
E473 Terminology Relating to Thermal Analysis and Rhe-
upon length change may be performed using the test specimen
ology
as the analyte.
E1142 Terminology Relating to Thermophysical Properties
4.5 The length change of three (or more) specimens (nomi-
E1363 Test Method for Temperature Calibration of Thermo-
nally representing the maximum, midpoint and minimum of
mechanical Analyzers
the range of the test method) are measured in triplicate (or
more). A fourth blank specimen, containing no analyte, is
measured in triplicate (or more).
1
ThistestmethodisunderthejurisdictionofASTMCommitteeE37onThermal
Measurements and is the direct responsibility of Subcommittee E37.10 on
NOTE1—Repeatabilityisdeterminedbyperformingasufficientnumber
Fundamental, Statistical and Mechanical Properties.
of determinations to calculate valid estimates of the standard deviation or
Current edition approved Aug. 1, 2018. Published August 2018. Originally
relative standard deviation of the measurement.
approved in 2013. Last previous edition approved in 2013 as E2918 – 13. DOI:
10.1520/E2918-18.
4.5.1 Temperature and length change measurement linearity
2
For referenced ASTM standards, visit the ASTM website, www.astm.org, or
and bias are determined from the linear regression correlation
contact ASTM Customer Service at service@astm.org. For Annual Book of ASTM
of the results from measurements of the three (or more)
Standards volume information, refer to the standard’s Document Summary page on
the ASTM website. specimens.
Copyright © ASTM International, 100 Barr Harbor Drive, PO Box C700, West Conshohocken, PA 19428-2959. United States
1
---------------------- Page: 1 ----------------------
E2918 − 18
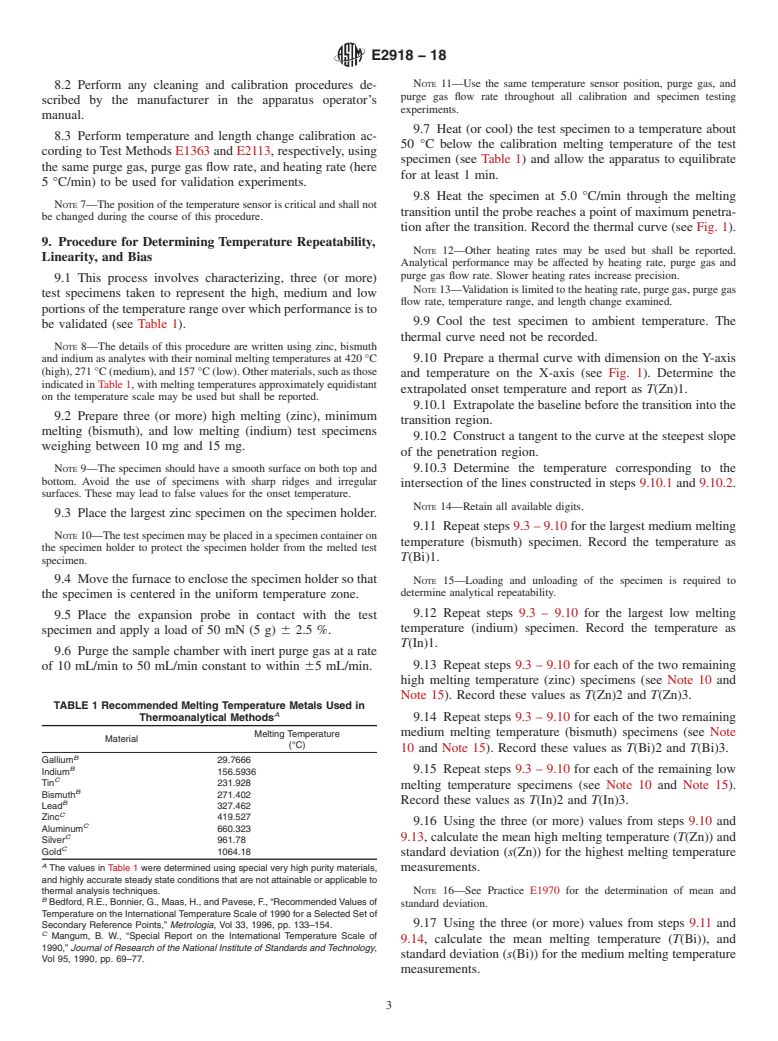
4.5.2 Length change detection limit and quantitation limit change between 2 °C/min and 10 °C/min (or greater) to within
are de
...
This document is not an ASTM standard and is intended only to provide the user of an ASTM standard an indication of what changes have been made to the previous version. Because
it may not be technically possible to adequately depict all changes accurately, ASTM recommends that users consult prior editions as appropriate. In all cases only the current version
of the standard as published by ASTM is to be considered the official document.
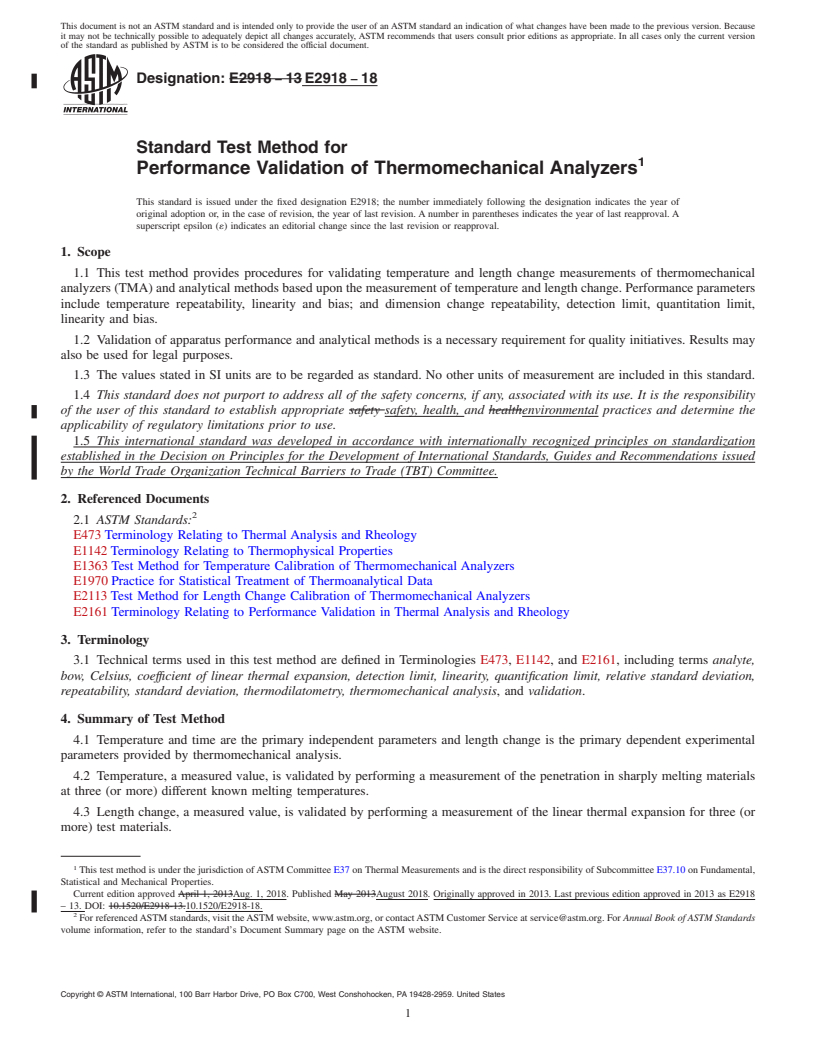
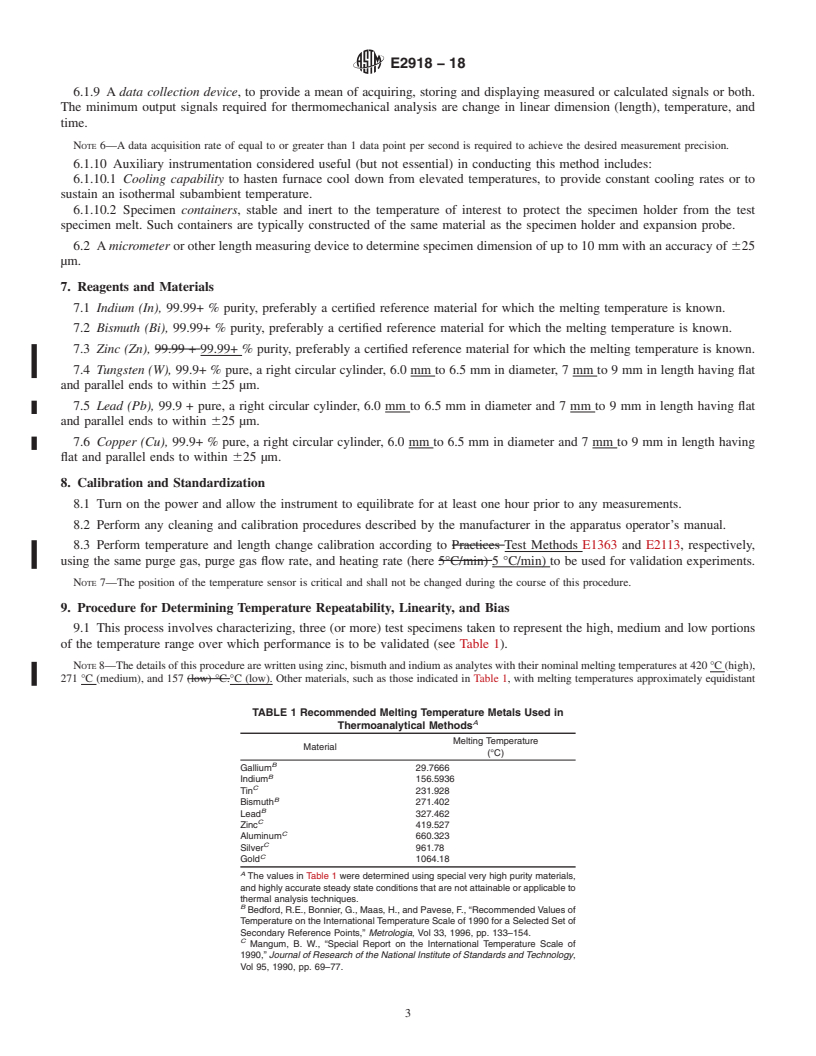
Designation: E2918 − 13 E2918 − 18
Standard Test Method for
1
Performance Validation of Thermomechanical Analyzers
This standard is issued under the fixed designation E2918; the number immediately following the designation indicates the year of
original adoption or, in the case of revision, the year of last revision. A number in parentheses indicates the year of last reapproval. A
superscript epsilon (´) indicates an editorial change since the last revision or reapproval.
1. Scope
1.1 This test method provides procedures for validating temperature and length change measurements of thermomechanical
analyzers (TMA) and analytical methods based upon the measurement of temperature and length change. Performance parameters
include temperature repeatability, linearity and bias; and dimension change repeatability, detection limit, quantitation limit,
linearity and bias.
1.2 Validation of apparatus performance and analytical methods is a necessary requirement for quality initiatives. Results may
also be used for legal purposes.
1.3 The values stated in SI units are to be regarded as standard. No other units of measurement are included in this standard.
1.4 This standard does not purport to address all of the safety concerns, if any, associated with its use. It is the responsibility
of the user of this standard to establish appropriate safety safety, health, and healthenvironmental practices and determine the
applicability of regulatory limitations prior to use.
1.5 This international standard was developed in accordance with internationally recognized principles on standardization
established in the Decision on Principles for the Development of International Standards, Guides and Recommendations issued
by the World Trade Organization Technical Barriers to Trade (TBT) Committee.
2. Referenced Documents
2
2.1 ASTM Standards:
E473 Terminology Relating to Thermal Analysis and Rheology
E1142 Terminology Relating to Thermophysical Properties
E1363 Test Method for Temperature Calibration of Thermomechanical Analyzers
E1970 Practice for Statistical Treatment of Thermoanalytical Data
E2113 Test Method for Length Change Calibration of Thermomechanical Analyzers
E2161 Terminology Relating to Performance Validation in Thermal Analysis and Rheology
3. Terminology
3.1 Technical terms used in this test method are defined in Terminologies E473, E1142, and E2161, including terms analyte,
bow, Celsius, coeffıcient of linear thermal expansion, detection limit, linearity, quantification limit, relative standard deviation,
repeatability, standard deviation, thermodilatometry, thermomechanical analysis, and validation.
4. Summary of Test Method
4.1 Temperature and time are the primary independent parameters and length change is the primary dependent experimental
parameters provided by thermomechanical analysis.
4.2 Temperature, a measured value, is validated by performing a measurement of the penetration in sharply melting materials
at three (or more) different known melting temperatures.
4.3 Length change, a measured value, is validated by performing a measurement of the linear thermal expansion for three (or
more) test materials.
1
This test method is under the jurisdiction of ASTM Committee E37 on Thermal Measurements and is the direct responsibility of Subcommittee E37.10 on Fundamental,
Statistical and Mechanical Properties.
Current edition approved April 1, 2013Aug. 1, 2018. Published May 2013August 2018. Originally approved in 2013. Last previous edition approved in 2013 as E2918
– 13. DOI: 10.1520/E2918-13.10.1520/E2918-18.
2
For referenced ASTM standards, visit the ASTM website, www.astm.org, or contact ASTM Customer Service at service@astm.org. For Annual Book of ASTM Standards
volume information, refer to the standard’s Document Summary page on the ASTM website.
Copyright © ASTM International, 100 Barr Harbor Drive, PO Box C700, West Conshohocken, PA 19428-2959. United States
1
---------------------- Page: 1 ----------------------
E2918 − 18
4.4 Validation of a thermomechanical test method based upon length change may be performed using the test specimen as the
analyte.
4.5 The length change of three (or more) specimens (nominally representing the maximum, midpoint and minimum of the range
of the test method) are measured in triplicate (or more). A fourth blank specimen, containing no analyte, is measured in triplicate
(or more).
NOTE 1—Repeatability is determined by performing a sufficient number of determinations to calculate valid estimates of the standard deviation or
relative standard d
...


Questions, Comments and Discussion
Ask us and Technical Secretary will try to provide an answer. You can facilitate discussion about the standard in here.