ASTM E2301-12(2022)
(Test Method)Standard Test Method for Daytime Colorimetric Properties of Fluorescent Retroreflective Sheeting and Marking Materials for High Visibility Traffic Control and Personal Safety Applications Using 45°:Normal Geometry
Standard Test Method for Daytime Colorimetric Properties of Fluorescent Retroreflective Sheeting and Marking Materials for High Visibility Traffic Control and Personal Safety Applications Using 45°:Normal Geometry
SIGNIFICANCE AND USE
5.1 This test method provides procedures for obtaining tristimulus values, luminance factors and chromaticity coordinates of fluorescent-retroreflective materials by bispectral colorimetry using a 45:0 or 0:45 optical measuring system.
5.2 The CIE 1931 (2°) standard observer is used to calculate the colorimetric properties of fluorescent-retroreflective sheeting and markings used in daytime high visibility traffic control and personal safety applications because in practice these materials are primarily viewed from a distance where they subtend less than 4° of the visual field.
5.3 This test method is applicable to object-color specimens of any gloss level.
5.4 Due to the retroreflective properties of these materials the colorimetric data may not be suitable for use in computer colorant formulation.
5.5 This test method is suitable for quality control testing of fluorescent-retroreflective sheeting and marking materials.
Note 1: Separation of the fluorescence and reflectance components from the total colorimetric properties provides useful and meaningful information to evaluate independently the luminescent and diffuse reflective efficiency and consistency of these materials.
5.6 This test method is the referee method for determining the conformance of fluorescent-retroreflective sheeting and marking materials to standard daytime colorimetric specifications.
SCOPE
1.1 This test method describes the instrumental measurement of the colorimetric properties (CIE tristimulus values, luminance factors, and chromaticity coordinates) of fluorescent-retroreflective sheeting and marking materials when illuminated by daylight.
1.2 This test method is generally applicable to any sheeting or marking material having combined fluorescent and retroreflective properties used for daytime high visibility traffic control and personal safety applications.
1.3 The values stated in SI units are to be regarded as standard. No other units of measurement are included in this standard.
1.4 This standard does not purport to address all of the safety concerns, if any, associated with its use. It is the responsibility of the user of this standard to establish appropriate safety, health, and environmental practices and determine the applicability of regulatory limitations prior to use.
1.5 This international standard was developed in accordance with internationally recognized principles on standardization established in the Decision on Principles for the Development of International Standards, Guides and Recommendations issued by the World Trade Organization Technical Barriers to Trade (TBT) Committee.
General Information
- Status
- Published
- Publication Date
- 30-Sep-2022
- Technical Committee
- E12 - Color and Appearance
- Drafting Committee
- E12.05 - Fluorescence
Relations
- Refers
ASTM E1164-23 - Standard Practice for Obtaining Spectrometric Data for Object-Color Evaluation - Effective Date
- 01-Nov-2023
- Effective Date
- 01-May-2017
- Effective Date
- 01-Aug-2015
- Effective Date
- 01-Apr-2015
- Effective Date
- 01-Jan-2015
- Effective Date
- 01-Jan-2015
- Effective Date
- 01-May-2014
- Effective Date
- 01-Nov-2013
- Effective Date
- 01-Jun-2013
- Effective Date
- 01-May-2013
- Effective Date
- 01-Jan-2013
- Refers
ASTM E1164-12e1 - Standard Practice for Obtaining Spectrometric Data for Object-Color Evaluation - Effective Date
- 01-Jul-2012
- Effective Date
- 01-Jul-2012
- Refers
ASTM E1164-12 - Standard Practice for Obtaining Spectrometric Data for Object-Color Evaluation - Effective Date
- 01-Jul-2012
- Effective Date
- 01-Jul-2012
Overview
ASTM E2301-12(2022) specifies the standard test method for determining the daytime colorimetric properties of fluorescent retroreflective sheeting and marking materials. Developed by ASTM International, this method is essential for evaluating materials used to enhance visibility in traffic control and personal safety applications. The test employs a 45°:normal (45:0 or 0:45) optical measuring geometry and bispectral colorimetry techniques to measure tristimulus values, luminance factors, and chromaticity coordinates according to CIE standards.
This method is recognized for providing reliable, standardized data on the visual properties of high-visibility materials under daylight conditions, ensuring their effectiveness and compliance with relevant safety and visibility requirements.
Key Topics
- Measurement Techniques: Utilizes bispectral colorimetry with either 45:0 or 0:45 geometry to assess the colorimetric properties of fluorescent retroreflective materials.
- Colorimetric Quantities: Reports tristimulus values (XYZ), luminance factors (Y), and chromaticity coordinates (x, y) for both total, reflectance, and fluorescence components.
- CIE 1931 Standard Observer: Applies the CIE 1931 (2°) standard to replicate viewing conditions common for traffic control and personal safety products, where materials are observed from a distance.
- Applicability: Suitable for samples with any gloss level, and is particularly focused on materials combining both fluorescent and retroreflective properties.
- Quality Control: Provides a referee test method for determining conformance to standard daytime colorimetric specifications, making it ideal for quality assurance and product certification.
- Data Integrity: Recommends regular instrument calibration and verification using traceable standards to ensure measurement accuracy and repeatability.
Applications
ASTM E2301-12(2022) is widely applied in the following fields:
- Traffic Control Devices: Evaluation of road signs, cones, and barriers that require high daytime visibility to ensure road safety.
- Personal Safety Equipment: Assessment of clothing, vests, and gear used by workers and emergency responders for increased visibility in daylight conditions.
- Material Quality Assurance: Used by manufacturers and testing laboratories to verify product consistency and conformity before release to market.
- Research and Development: Supports the development of new high-visibility materials by providing a standardized approach to colorimetric evaluation.
- Regulatory Compliance: Helps organizations meet national and international standards related to traffic safety and personal protective equipment.
By using this standard, stakeholders can accurately and consistently assess the optical performance of safety-critical materials, supporting efforts to reduce accidents and enhance public safety through improved visibility.
Related Standards
The following standards support or are referenced by ASTM E2301-12(2022):
- ASTM E179 – Guide for Selection of Geometric Conditions for Measurement of Reflection and Transmission Properties of Materials
- ASTM E284 – Terminology of Appearance
- ASTM E308 – Practice for Computing the Colors of Objects by Using the CIE System
- ASTM E2152 – Practice for Computing the Colors of Fluorescent Objects from Bispectral Photometric Data
- ASTM E2153 – Practice for Obtaining Bispectral Photometric Data for Evaluation of Fluorescent Color
- ASTM D2244 – Practice for Calculation of Color Tolerances and Color Differences from Instrumentally Measured Color Coordinates
- CIE 15:2004 – Colorimetry
For achieving consistent and precise results in the color measurement of fluorescent retroreflective materials, adherence to ASTM E2301-12(2022) alongside these related standards is strongly recommended.
Keywords: ASTM E2301, fluorescent retroreflective materials, colorimetric properties, high visibility, traffic control, personal safety, bispectral colorimetry, CIE 1931 observer, chromaticity coordinates, luminance factor, quality control, standardized test method.
Buy Documents
ASTM E2301-12(2022) - Standard Test Method for Daytime Colorimetric Properties of Fluorescent Retroreflective Sheeting and Marking Materials for High Visibility Traffic Control and Personal Safety Applications Using 45°:Normal Geometry
Get Certified
Connect with accredited certification bodies for this standard

NSF International
Global independent organization facilitating standards development and certification.

BSMI (Bureau of Standards, Metrology and Inspection)
Taiwan's standards and inspection authority.

CIS Institut d.o.o.
Personal Protective Equipment (PPE) certification body. Notified Body NB-2890 for EU Regulation 2016/425 PPE.
Sponsored listings
Frequently Asked Questions
ASTM E2301-12(2022) is a standard published by ASTM International. Its full title is "Standard Test Method for Daytime Colorimetric Properties of Fluorescent Retroreflective Sheeting and Marking Materials for High Visibility Traffic Control and Personal Safety Applications Using 45°:Normal Geometry". This standard covers: SIGNIFICANCE AND USE 5.1 This test method provides procedures for obtaining tristimulus values, luminance factors and chromaticity coordinates of fluorescent-retroreflective materials by bispectral colorimetry using a 45:0 or 0:45 optical measuring system. 5.2 The CIE 1931 (2°) standard observer is used to calculate the colorimetric properties of fluorescent-retroreflective sheeting and markings used in daytime high visibility traffic control and personal safety applications because in practice these materials are primarily viewed from a distance where they subtend less than 4° of the visual field. 5.3 This test method is applicable to object-color specimens of any gloss level. 5.4 Due to the retroreflective properties of these materials the colorimetric data may not be suitable for use in computer colorant formulation. 5.5 This test method is suitable for quality control testing of fluorescent-retroreflective sheeting and marking materials. Note 1: Separation of the fluorescence and reflectance components from the total colorimetric properties provides useful and meaningful information to evaluate independently the luminescent and diffuse reflective efficiency and consistency of these materials. 5.6 This test method is the referee method for determining the conformance of fluorescent-retroreflective sheeting and marking materials to standard daytime colorimetric specifications. SCOPE 1.1 This test method describes the instrumental measurement of the colorimetric properties (CIE tristimulus values, luminance factors, and chromaticity coordinates) of fluorescent-retroreflective sheeting and marking materials when illuminated by daylight. 1.2 This test method is generally applicable to any sheeting or marking material having combined fluorescent and retroreflective properties used for daytime high visibility traffic control and personal safety applications. 1.3 The values stated in SI units are to be regarded as standard. No other units of measurement are included in this standard. 1.4 This standard does not purport to address all of the safety concerns, if any, associated with its use. It is the responsibility of the user of this standard to establish appropriate safety, health, and environmental practices and determine the applicability of regulatory limitations prior to use. 1.5 This international standard was developed in accordance with internationally recognized principles on standardization established in the Decision on Principles for the Development of International Standards, Guides and Recommendations issued by the World Trade Organization Technical Barriers to Trade (TBT) Committee.
SIGNIFICANCE AND USE 5.1 This test method provides procedures for obtaining tristimulus values, luminance factors and chromaticity coordinates of fluorescent-retroreflective materials by bispectral colorimetry using a 45:0 or 0:45 optical measuring system. 5.2 The CIE 1931 (2°) standard observer is used to calculate the colorimetric properties of fluorescent-retroreflective sheeting and markings used in daytime high visibility traffic control and personal safety applications because in practice these materials are primarily viewed from a distance where they subtend less than 4° of the visual field. 5.3 This test method is applicable to object-color specimens of any gloss level. 5.4 Due to the retroreflective properties of these materials the colorimetric data may not be suitable for use in computer colorant formulation. 5.5 This test method is suitable for quality control testing of fluorescent-retroreflective sheeting and marking materials. Note 1: Separation of the fluorescence and reflectance components from the total colorimetric properties provides useful and meaningful information to evaluate independently the luminescent and diffuse reflective efficiency and consistency of these materials. 5.6 This test method is the referee method for determining the conformance of fluorescent-retroreflective sheeting and marking materials to standard daytime colorimetric specifications. SCOPE 1.1 This test method describes the instrumental measurement of the colorimetric properties (CIE tristimulus values, luminance factors, and chromaticity coordinates) of fluorescent-retroreflective sheeting and marking materials when illuminated by daylight. 1.2 This test method is generally applicable to any sheeting or marking material having combined fluorescent and retroreflective properties used for daytime high visibility traffic control and personal safety applications. 1.3 The values stated in SI units are to be regarded as standard. No other units of measurement are included in this standard. 1.4 This standard does not purport to address all of the safety concerns, if any, associated with its use. It is the responsibility of the user of this standard to establish appropriate safety, health, and environmental practices and determine the applicability of regulatory limitations prior to use. 1.5 This international standard was developed in accordance with internationally recognized principles on standardization established in the Decision on Principles for the Development of International Standards, Guides and Recommendations issued by the World Trade Organization Technical Barriers to Trade (TBT) Committee.
ASTM E2301-12(2022) is classified under the following ICS (International Classification for Standards) categories: 13.340.01 - Protective equipment in general; 17.180.20 - Colours and measurement of light. The ICS classification helps identify the subject area and facilitates finding related standards.
ASTM E2301-12(2022) has the following relationships with other standards: It is inter standard links to ASTM E1164-23, ASTM E308-17, ASTM D2244-15a, ASTM E308-15, ASTM D2244-15, ASTM D2244-15e1, ASTM D2244-14, ASTM E284-13b, ASTM E284-13a, ASTM E691-13, ASTM E284-13, ASTM E1164-12e1, ASTM E308-12, ASTM E1164-12, ASTM E179-12. Understanding these relationships helps ensure you are using the most current and applicable version of the standard.
ASTM E2301-12(2022) is available in PDF format for immediate download after purchase. The document can be added to your cart and obtained through the secure checkout process. Digital delivery ensures instant access to the complete standard document.
Standards Content (Sample)
This international standard was developed in accordance with internationally recognized principles on standardization established in the Decision on Principles for the
Development of International Standards, Guides and Recommendations issued by the World Trade Organization Technical Barriers to Trade (TBT) Committee.
Designation:E2301 −12 (Reapproved 2022)
Standard Test Method for
Daytime Colorimetric Properties of Fluorescent
Retroreflective Sheeting and Marking Materials for High
Visibility Traffic Control and Personal Safety Applications
Using 45°:Normal Geometry
This standard is issued under the fixed designation E2301; the number immediately following the designation indicates the year of
original adoption or, in the case of revision, the year of last revision.Anumber in parentheses indicates the year of last reapproval.A
superscript epsilon (´) indicates an editorial change since the last revision or reapproval.
1. Scope Color Differences from Instrumentally Measured Color
Coordinates
1.1 This test method describes the instrumental measure-
E179Guide for Selection of Geometric Conditions for
ment of the colorimetric properties (CIE tristimulus values,
Measurement of Reflection and Transmission Properties
luminance factors, and chromaticity coordinates) of
of Materials
fluorescent-retroreflective sheeting and marking materials
E284Terminology of Appearance
when illuminated by daylight.
E308PracticeforComputingtheColorsofObjectsbyUsing
1.2 This test method is generally applicable to any sheeting
the CIE System
or marking material having combined fluorescent and retrore-
E691Practice for Conducting an Interlaboratory Study to
flective properties used for daytime high visibility traffic
Determine the Precision of a Test Method
control and personal safety applications.
E1164PracticeforObtainingSpectrometricDataforObject-
Color Evaluation
1.3 The values stated in SI units are to be regarded as
standard. No other units of measurement are included in this E1767Practice for Specifying the Geometries of Observa-
tion and Measurement to Characterize the Appearance of
standard.
Materials
1.4 This standard does not purport to address all of the
E2152Practice for Computing the Colors of Fluorescent
safety concerns, if any, associated with its use. It is the
Objects from Bispectral Photometric Data
responsibility of the user of this standard to establish appro-
E2153Practice for Obtaining Bispectral Photometric Data
priate safety, health, and environmental practices and deter-
for Evaluation of Fluorescent Color
mine the applicability of regulatory limitations prior to use.
2.2 CIE Document:
1.5 This international standard was developed in accor-
CIE 15:2004Colorimetry
dance with internationally recognized principles on standard-
ization established in the Decision on Principles for the
3. Terminology
Development of International Standards, Guides and Recom-
mendations issued by the World Trade Organization Technical 3.1 Definitions—The definitions contained in Guide E179,
Barriers to Trade (TBT) Committee. Terminology E284, and Practice E1164 are applicable to this
test method.
2. Referenced Documents
4. Summary of Test Method
2.1 ASTM Standards:
4.1 Thistestmethodprovidesaprocedureformeasuringthe
D2244Practice for Calculation of Color Tolerances and
colorimetric properties of fluorescent-retroreflective sheeting
and markings under simulated daylight illumination. Colori-
metric properties are determined for CIE D65, which approxi-
This test method is under the jurisdiction of ASTM Committee E12 on Color
mates outdoor illumination at midday, and Daylight 15000 K,
and Appearance and is the direct responsibility of Subcommittee E12.05 on
which is an alternate D illuminant chosen to represent low
Fluorescence.
Current edition approved Oct. 1, 2022. Published November 2022. Originally
ambient light/dawn/dusk daylight illumination conditions (see
approved in 2003. Last previous edition approved in 2017 as E2301 – 12 (2017).
CIE 15:2004).
DOI: 10.1520/E2301-12R22.
For referenced ASTM standards, visit the ASTM website, www.astm.org, or
contact ASTM Customer Service at service@astm.org. For Annual Book of ASTM
Standards volume information, refer to the standard’s Document Summary page on Available from CIE (International Commission on Illumination) at www-
the ASTM website. .cie.co.at or www.techstreet.com.
Copyright © ASTM International, 100 Barr Harbor Drive, PO Box C700, West Conshohocken, PA 19428-2959. United States
E2301−12 (2022)
4.2 This test method requires the use of a calibrated bispec- 6.1.4.1 Circumferentialinstrumentsareacceptableprovided
trometer (two-monochromator spectrometer) with either 45:0 the procedure described in 9.3.1 is followed.
or 0:45 geometry that can measure the specimen’s Donaldson
6.1.4.2 Uniplanar instruments are acceptable provided the
matrix (see Practice E2153).
procedure described in 9.3.2 is followed.
6.1.5 The referee aperture sizes shall be 10 degrees for
4.3 This test method provides for calculation and reporting
illumination and 10 degrees for viewing. Use of aperture sizes
of separated fluorescence, reflectance and total tristimulus
deviating from these may affect the measurement results. See
values (XYZ) and luminance factors (Y, %), and total chroma-
Practice E1767 for fundamentals of specification of apertures.
ticity coordinates (x,y) from the Donaldson matrix for the CIE
1931 Standard Colorimetric Observer.
NOTE 4—Fluorescent colorimetric properties (for example, Fluores-
cence tristimulus values (XYZ) ) are not significantly influenced by the
F
aperture sizes. Reflectance colorimetric properties (for example, Reflec-
5. Significance and Use
tancetristimulusvalues(XYZ) )maybegreatlyaffectedbyaperturesizes.
R
5.1 This test method provides procedures for obtaining
Consequently total colorimetric properties (for example, Total tristimulus
tristimulus values, luminance factors and chromaticity coordi- values (XYZ) ) may be greatly affected.
T
natesoffluorescent-retroreflectivematerialsbybispectralcolo-
6.1.6 The illumination monochromator shall illuminate the
rimetry using a 45:0 or 0:45 optical measuring system.
specimenoverthewavelengthrangefrom300nmto780nmat
intervals of 10 nm or less.
5.2 TheCIE1931(2°)standardobserverisusedtocalculate
the colorimetric properties of fluorescent-retroreflective sheet- 6.1.7 The viewing monochromator shall detect the speci-
ing and markings used in daytime high visibility traffic control men radiance over the wavelength range from 380nm to
and personal safety applications because in practice these 780nm at intervals of 10 nm or less.
materials are primarily viewed from a distance where they
6.1.8 The minimum illuminated sample area shall be
subtend less than 4° of the visual field.
100mm with no dimension less than 5 mm.
5.3 Thistestmethodisapplicabletoobject-colorspecimens
6.2 Calibration Standards, as outlined in Practice E2153,
of any gloss level.
supplied by the instrument manufacturer or obtained
separately, with calibration values no older than 24 months.
5.4 Due to the retroreflective properties of these materials
the colorimetric data may not be suitable for use in computer
6.3 Verification Standards—Verificationoftheprecisionand
colorant formulation.
bias of the entire system, including calculation of tristimulus
values, shall be conducted on an annual basis using non-
5.5 Thistestmethodissuitableforqualitycontroltestingof
retroreflective/non-fluorescent, fluorescent/non-retroreflective
fluorescent-retroreflective sheeting and marking materials.
and fluorescent retroreflective color standards with calibration
NOTE 1—Separation of the fluorescence and reflectance components
values traceable to an accredited National Standards Labora-
from the total colorimetric properties provides useful and meaningful
information to evaluate independently the luminescent and diffuse reflec-
tory. The calibration values for the verification panels shall be
tive efficiency and consistency of these materials.
no older than 36 months.
5.6 This test method is the referee method for determining NOTE 5—Stable fluorescent/non-retroreflective and fluorescent retrore-
flective color artifact standards are not widely available as Standard
the conformance of fluorescent-retroreflective sheeting and
Reference Materials (SRMs). However, measurement services are avail-
marking materials to standard daytime colorimetric specifica-
able from Independent Testing Laboratories and National Standards
tions.
Laboratories to calibrate artifacts for use as Verification Standards.
6. Apparatus
7. Test Specimen
6.1 Bispectrometer, with either 45:0 or 0:45 (illumination-
7.1 Specimen Preparations:
:viewing) geometry.
7.1.1 Samples shall be tested mounted on the substrate that
6.1.1 The tolerance on the inclination of the 45-degree axis
will be utilized for the intended application.Apply the sample
shall be 2 degrees (45 6 2 degrees).
tothesubstrateinaccordancewiththerecommendationsofthe
6.1.2 The tolerance on the 0-degree axis shall be 2 degrees
material’s manufacturer.
from the normal (0 6 2 degrees).
7.1.2 If the sample is not supplied with its intended
substrate, or if the intended substrate is not defined, then the
NOTE 2—For maximum reproducibility smaller tolerances on the axis
sample shall be mounted or backed by a black panel, such as a
angles are recommended.
blacktile.Theblackpanelshallhavealuminancefactor(Y)of
6.1.3 Forthe45:0condition,theilluminationgeometrymay
less than 4%.
be annular, circumferential or uniplanar and the viewing shall
be normal to the specimen. For the 0:45 condition, the
NOTE 6—The measurement results will depend upon the spectral
reflectance properties of the material behind the specimen as well as the
illumination shall be normal to the specimen and the viewing
specimen thickness.
geometry may be annular, circumferential or uniplanar.
6.1.4 The referee geometry shall be annular 45:0. 7.1.3 Specimens should be uniform in physical properties
over the area measured.
NOTE 3—Reciprocity between 45:0 and 0:45 geometry for commercial
7.1.4 Number of Test Specimens—Measurements shall be
instruments may not be observed in practice for retroreflective materials
because of the variation in axis angles and aperture sizes of instruments. made on a minimum of 3 test specimens.
E2301−12 (2022)
7.1.5 Specimens that have been subjected to additional After washing, rinse thoroughly with clean water, and blot dry
testing, such as outdoor or machine exposure testing, shall be withasoftcleancloth.Afterwashinganddrying,conditionthe
tested on the substrate used for these additional tests. panels at room temperature for at least 2h prior to conducting
any property measurements.
7.2 Test Conditions—Unless otherwise specified, condition
all test specimens at a temperature of 23°C 6 2°C and 50% 9.3 Position the test specimen at the measurement port of
6 5% relative humidity for 24h prior to testing. the instrument.
9.3.1 If the measurement geometry is circumferential, then
7.3 Sampling—Unlessotherwisespecifiedtestsamplesshall
the testing laboratory must verify that the apertures in the ring
be selected according to the following sampling plan.
are sufficiently close for the measurement to approximate
7.3.1 Sheeting for Traffıc Control Applications—Test
measurement with annular geometry. This may depend on the
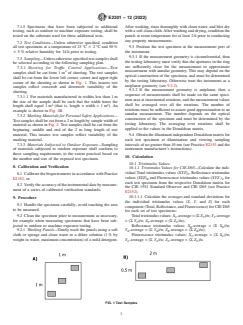
samples shall be cut from 1 m of sheeting. The test samples
optical construction of the specimen, and must be determined
shall be cut from the lower left corner, center and upper right
by the testing laboratory. Otherwise treat the instrument as a
corner of the sheeting as shown in Fig. 1. This insures test
uniplanar geometry (see 9.3.2).
samples reflect crossweb and downweb variability of the
9.3.2 If the measurement geometry is uniplanar, then a
sheeting.
sequence of measurements shall be made on the same speci-
7.3.1.1 For materials manufactured in widths less than 1m
menareaatincrementalrotations,andthemeasurementvalues
the size of the sample shall be such that the width times the
2 2 sh
...


Questions, Comments and Discussion
Ask us and Technical Secretary will try to provide an answer. You can facilitate discussion about the standard in here.
Loading comments...