ASTM E238-17a
(Test Method)Standard Test Method for Pin-Type Bearing Test of Metallic Materials
Standard Test Method for Pin-Type Bearing Test of Metallic Materials
SIGNIFICANCE AND USE
4.1 The data obtained from the bearing test are the bearing ultimate and yield strength. The data provide a measure of the load-carrying capacity of a material edge loaded with a close-fitting cylindrical pin through a hole located a specific distance from the specimen edge.
4.2 Bearing properties are useful in the comparison of materials and design of structures under conditions where the pin is not restricted.
SCOPE
1.1 This test method covers a pin-type bearing test of metallic materials to determine bearing yield strength and bearing strength.
Note 1: The presence of incidental lubricants on the bearing surfaces may significantly lower the value of bearing yield strength obtained by this method.
1.2 Units—The values stated in inch-pound units are to be regarded as standard. The values given in parentheses are mathematical conversions to SI units that are provided for information only and are not considered standard.
1.3 This standard does not purport to address all of the safety concerns, if any, associated with its use. It is the responsibility of the user of this standard to establish appropriate safety and health practices and determine the applicability of regulatory limitations prior to use.
1.4 This international standard was developed in accordance with internationally recognized principles on standardization established in the Decision on Principles for the Development of International Standards, Guides and Recommendations issued by the World Trade Organization Technical Barriers to Trade (TBT) Committee.
General Information
- Status
- Published
- Publication Date
- 31-Mar-2017
- Technical Committee
- E28 - Mechanical Testing
- Drafting Committee
- E28.04 - Uniaxial Testing
Relations
- Effective Date
- 01-Apr-2017
- Effective Date
- 01-Jun-2014
- Effective Date
- 01-May-2014
- Effective Date
- 01-Nov-2011
- Effective Date
- 01-Nov-2011
- Effective Date
- 01-Jun-2010
- Effective Date
- 01-Jun-2010
- Effective Date
- 01-Jan-2010
- Effective Date
- 01-Nov-2009
- Effective Date
- 15-May-2009
- Effective Date
- 15-May-2009
- Effective Date
- 01-Apr-2009
- Effective Date
- 01-Apr-2009
- Effective Date
- 01-Jan-2009
- Effective Date
- 01-Dec-2008
Overview
ASTM E238-17a: Standard Test Method for Pin-Type Bearing Test of Metallic Materials provides a recognized procedure for determining the bearing yield strength and ultimate bearing strength of metallic materials using a pin-type bearing test setup. Developed by ASTM International, this standard evaluates the load-carrying capacity of metallic specimens subjected to a concentrated edge load through a closely-fitted cylindrical pin. The results from this test method are essential for comparing materials and guiding the design of structural connections and joint assemblies, particularly where the loaded pin is not otherwise restricted.
Key Topics
- Bearing Strength Testing: The main focus is on systematically measuring the bearing yield and ultimate strength, which are critical for assessing the durability and reliability of metals in structural applications.
- Specimen Selection and Preparation:
- Flat sheet specimens are used, with attention to material thickness, pin diameter, and edge distance.
- Proper cleaning protocols ensure accurate and repeatable results by eliminating contaminants and lubricants that could affect measurements.
- Test Procedure:
- The specimen is loaded via a hard, close-fitting pin supported to avoid unwanted deformation.
- Load application and deformation are measured precisely using extensometers, ensuring only bearing deformation is recorded.
- Consistent specimen orientation and grain direction codes (e.g., L-T, T-L) are specified for reliable material comparison.
- Data Reporting and Analysis:
- Results include recorded values for bearing yield strength, bearing strength, specimen orientation, test conditions, and observations of fracture modes.
- Detailed documentation supports material quality control and aids material engineers in structural analysis.
Applications
ASTM E238-17a is widely used in engineering and materials science to:
- Compare the Bearing Properties of Metals: Provides valuable data for selecting the best material based on load-carrying capacity in joints and connections.
- Design and Qualify Structural Joints: Critical for parts subjected to pin-type loading such as riveted or bolted joints in aerospace, civil, and mechanical engineering.
- Support Material Specifications: Helps manufacturers and engineers verify conformance to design requirements and industry standards for metallic products.
- Failure Mode Assessment: Enables detailed analysis of fracture modes (crushing, shearout, end splitting, net-tension, diagonal tearing) to predict service-life and optimize component design.
Related Standards
- ASTM E4 - Practices for Force Verification of Testing Machines
- ASTM E6 - Terminology Relating to Methods of Mechanical Testing
- ASTM E83 - Practice for Verification and Classification of Extensometer Systems
- ASTM B769 - Test Method for Shear Testing of Aluminum Alloys
- ASTM B831 - Test Method for Shear Testing of Thin Aluminum Alloy Products
Practical Value
By following ASTM E238-17a, test laboratories, manufacturers, and engineers can achieve:
- Consistent and Reproducible Results: Rigorous preparation and testing protocols ensure high reliability.
- Enhanced Material Selection: Data supports informed choices that boost safety and performance in critical structures.
- Compliance with International Standards: Aligns with established best practices recognized globally for mechanical testing.
- Optimized Structural Connections: Valuable for product development, quality control, failure investigation, and certification in industries demanding robust metal joints.
Keywords
ASTM E238-17a, pin-type bearing test, bearing strength, metallic materials, bearing yield strength, structural joints, mechanical testing, material comparison, failure mode, engineering standards, ASTM mechanical test methods.
Buy Documents
ASTM E238-17a - Standard Test Method for Pin-Type Bearing Test of Metallic Materials
REDLINE ASTM E238-17a - Standard Test Method for Pin-Type Bearing Test of Metallic Materials
Get Certified
Connect with accredited certification bodies for this standard

Element Materials Technology
Materials testing and product certification.

Inštitut za kovinske materiale in tehnologije
Institute of Metals and Technology. Materials testing, metallurgical analysis, NDT.
Sponsored listings
Frequently Asked Questions
ASTM E238-17a is a standard published by ASTM International. Its full title is "Standard Test Method for Pin-Type Bearing Test of Metallic Materials". This standard covers: SIGNIFICANCE AND USE 4.1 The data obtained from the bearing test are the bearing ultimate and yield strength. The data provide a measure of the load-carrying capacity of a material edge loaded with a close-fitting cylindrical pin through a hole located a specific distance from the specimen edge. 4.2 Bearing properties are useful in the comparison of materials and design of structures under conditions where the pin is not restricted. SCOPE 1.1 This test method covers a pin-type bearing test of metallic materials to determine bearing yield strength and bearing strength. Note 1: The presence of incidental lubricants on the bearing surfaces may significantly lower the value of bearing yield strength obtained by this method. 1.2 Units—The values stated in inch-pound units are to be regarded as standard. The values given in parentheses are mathematical conversions to SI units that are provided for information only and are not considered standard. 1.3 This standard does not purport to address all of the safety concerns, if any, associated with its use. It is the responsibility of the user of this standard to establish appropriate safety and health practices and determine the applicability of regulatory limitations prior to use. 1.4 This international standard was developed in accordance with internationally recognized principles on standardization established in the Decision on Principles for the Development of International Standards, Guides and Recommendations issued by the World Trade Organization Technical Barriers to Trade (TBT) Committee.
SIGNIFICANCE AND USE 4.1 The data obtained from the bearing test are the bearing ultimate and yield strength. The data provide a measure of the load-carrying capacity of a material edge loaded with a close-fitting cylindrical pin through a hole located a specific distance from the specimen edge. 4.2 Bearing properties are useful in the comparison of materials and design of structures under conditions where the pin is not restricted. SCOPE 1.1 This test method covers a pin-type bearing test of metallic materials to determine bearing yield strength and bearing strength. Note 1: The presence of incidental lubricants on the bearing surfaces may significantly lower the value of bearing yield strength obtained by this method. 1.2 Units—The values stated in inch-pound units are to be regarded as standard. The values given in parentheses are mathematical conversions to SI units that are provided for information only and are not considered standard. 1.3 This standard does not purport to address all of the safety concerns, if any, associated with its use. It is the responsibility of the user of this standard to establish appropriate safety and health practices and determine the applicability of regulatory limitations prior to use. 1.4 This international standard was developed in accordance with internationally recognized principles on standardization established in the Decision on Principles for the Development of International Standards, Guides and Recommendations issued by the World Trade Organization Technical Barriers to Trade (TBT) Committee.
ASTM E238-17a is classified under the following ICS (International Classification for Standards) categories: 77.040.10 - Mechanical testing of metals. The ICS classification helps identify the subject area and facilitates finding related standards.
ASTM E238-17a has the following relationships with other standards: It is inter standard links to ASTM E238-17, ASTM E4-14, ASTM B831-14, ASTM B769-11, ASTM B831-11, ASTM E83-10a, ASTM E4-10, ASTM E83-10, ASTM E4-09a, ASTM E6-09be1, ASTM E6-09b, ASTM E6-09a, ASTM E4-09, ASTM E6-09, ASTM E4-08. Understanding these relationships helps ensure you are using the most current and applicable version of the standard.
ASTM E238-17a is available in PDF format for immediate download after purchase. The document can be added to your cart and obtained through the secure checkout process. Digital delivery ensures instant access to the complete standard document.
Standards Content (Sample)
This international standard was developed in accordance with internationally recognized principles on standardization established in the Decision on Principles for the
Development of International Standards, Guides and Recommendations issued by the World Trade Organization Technical Barriers to Trade (TBT) Committee.
Designation: E238 − 17a
Standard Test Method for
Pin-Type Bearing Test of Metallic Materials
This standard is issued under the fixed designation E238; the number immediately following the designation indicates the year of
original adoption or, in the case of revision, the year of last revision. A number in parentheses indicates the year of last reapproval. A
superscript epsilon (´) indicates an editorial change since the last revision or reapproval.
1. Scope* 3. Terminology
3.1 Definitions:
1.1 This test method covers a pin-type bearing test of
3.1.1 bearing area—the product of the pin diameter and
metallic materials to determine bearing yield strength and
specimen thickness.
bearing strength.
3.1.2 bearing stress—the force per unit of bearing area.
NOTE 1—The presence of incidental lubricants on the bearing surfaces
may significantly lower the value of bearing yield strength obtained by
3.1.3 bearing strain—theratioofthebearingdeformationof
this method.
the bearing hole, in the direction of the applied force, to the pin
diameter.
1.2 Units—The values stated in inch-pound units are to be
regarded as standard. The values given in parentheses are
3.1.4 bearing yield strength—the bearing stress at which a
mathematical conversions to SI units that are provided for
material exhibits a specified limiting deviation from the pro-
information only and are not considered standard.
portionality of bearing stress to bearing strain.
1.3 This standard does not purport to address all of the
3.1.5 bearing strength—the maximum bearing stress which
safety concerns, if any, associated with its use. It is the
a material is capable of sustaining.
responsibility of the user of this standard to establish appro-
3.1.6 edge distance—thedistancefromtheedgeofabearing
priate safety and health practices and determine the applica-
specimen to the center of the hole in the direction of applied
bility of regulatory limitations prior to use.
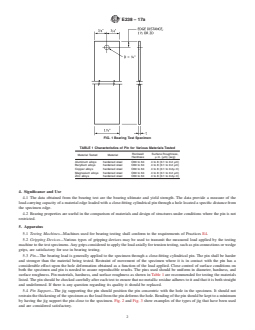
force (Fig. 1).
1.4 This international standard was developed in accor-
3.1.7 edge distance ratio—the ratio of the edge distance to
dance with internationally recognized principles on standard-
the pin diameter.
ization established in the Decision on Principles for the
3.1.8 For definitions of other terms see Terminology E6.
Development of International Standards, Guides and Recom-
mendations issued by the World Trade Organization Technical
4. Significance and Use
Barriers to Trade (TBT) Committee.
4.1 The data obtained from the bearing test are the bearing
ultimate and yield strength. The data provide a measure of the
2. Referenced Documents
load-carrying capacity of a material edge loaded with a
2.1 ASTM Standards:
close-fitting cylindrical pin through a hole located a specific
E4 Practices for Force Verification of Testing Machines
distance from the specimen edge.
E6 Terminology Relating to Methods of Mechanical Testing
4.2 Bearing properties are useful in the comparison of
E83 Practice for Verification and Classification of Exten-
materials and design of structures under conditions where the
someter Systems
pin is not restricted.
B769 Test Method for Shear Testing of Aluminum Alloys
B831 Test Method for Shear Testing of Thin Aluminum
5. Apparatus
Alloy Products
5.1 Testing Machines—Machines used for bearing testing
shall conform to the requirements of Practices E4.
5.2 Gripping Devices—Various types of gripping devices
This test method is under the jurisdiction of ASTM Committee E28 on
may be used to transmit the measured load applied by the
Mechanical Testing and is the direct responsibility of Subcommittee E28.04 on
Uniaxial Testing.
testing machine to the test specimens.Any grips considered to
Current edition approved April 1, 2017. Published April 2017. Originally
apply the load axially for tension testing, such as pin connec-
approved in 1964. Last previous edition approved in 2017 as E238 – 17. DOI:
tions or wedge grips, are satisfactory for use in bearing testing.
10.1520/E0238-17A.
For referenced ASTM standards, visit the ASTM website, www.astm.org, or
5.3 Pin—The bearing load is generally applied to the
contact ASTM Customer Service at service@astm.org. For Annual Book of ASTM
specimen through a close-fitting cylindrical pin. The pin shall
Standards volume information, refer to the standard’s Document Summary page on
the ASTM website. be harder and stronger than the material being tested. Restraint
*A Summary of Changes section appears at the end of this standard
Copyright © ASTM International, 100 Barr Harbor Drive, PO Box C700, West Conshohocken, PA 19428-2959. United States
E238 − 17a
ofmovementofthespecimenwhereitisincontactwiththepin
hasaconsiderableeffectupontheholedeformationobtainedas
a function of the load applied. Close control of surface
conditions on both the specimen and pin is needed to assure
reproducible results. The pins used should be uniform in
diameter, hardness, and surface roughness. Pin materials,
hardness, and surface roughness as shown in Table 1 are
recommended for testing the materials listed. The pin should
be checked carefully after each test to ensure that no metallic
residueadherestoitandthatitisbothstraightandundeformed.
If there is any question regarding its quality it should be
replaced.
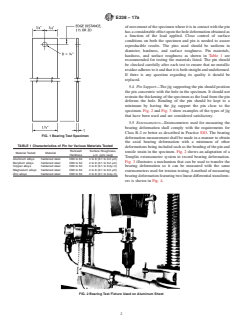
5.4 Pin Support—The jig supporting the pin should position
the pin concentric with the hole in the specimen. It should not
restrain the thickening of the specimen as the load from the pin
deforms the hole. Bending of the pin should be kept to a
minimum by having the jig support the pin close to the
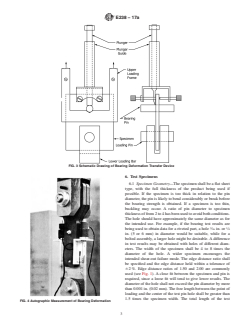
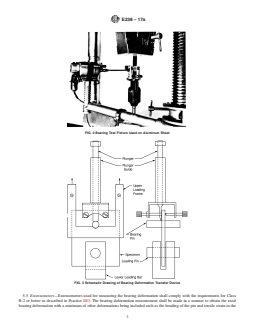
specimen. Fig. 2 and Fig. 3 show examples of the types of jig
that have been used and are considered satisfactory.
5.5 Extensometers—Extensometers used for measuring the
bearing deformation shall comply with the requirements for
Class B-2 or better as described in Practice E83. The bearing
FIG. 1 Bearing Test Specimen
deformation measurement shall be made in a manner to obtain
the axial bearing deformation with a minimum of other
TABLE 1 Characteristics of Pin for Various Materials Tested
deformations being included such as the bending of the pin and
Rockwell Surface Roughness,
tensile strain in the specimen. Fig. 2 shows an adaptation of a
Material Tested Material
Hardness µ in. (µm) (avg)
Templin extensometer system to record bearing deformation.
Aluminum alloys hardened steel C60 to 64 4 to 8 (0.1 to 0.2 µm)
Fig. 3 illustrates a mechanism that can be used to transfer the
Beryllium alloys hardened steel C60 to 64 4 to 8 (0.1 to 0.2 µm)
Copper alloys hardened steel C60 to 64 4 to 8 (0.1 to 0.2µ m) bearing deformation so it can be measured with the same
Magnesium alloys hardened steel C60 to 64 4 to 8 (0.1 to 0.2 µm)
extensometers used for tension testing.Amethod of measuring
Zinc alloys hardened steel C60 to 64 4 to 8 (0.1 to 0.2µ m)
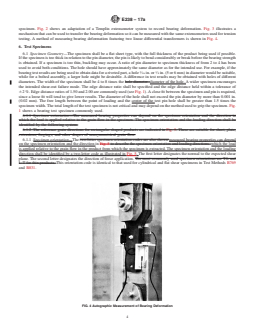
bearingdeformationfeaturingtwolineardifferentialtransform-
ers is shown in Fig. 4.
FIG. 2 Bearing Test Fixture Used on Aluminum Sheet
E238 − 17a
FIG. 3 Schematic Drawing of Bearing Deformation Transfer Device
6. Test Specimens
6.1 Specimen Geometry—The specimen shall be a flat sheet
type, with the full thickness of the product being used if
possible. If the specimen is too thick in relation to the pin
diameter, the pin is likely to bend considerably or break before
the bearing strength is obtained. If a specimen is too thin,
buckling may occur. A ratio of pin diameter to specimen
thicknessoffrom2to4hasbeenusedtoavoidbothconditions.
The hole should have approximately the same diameter as for
the intended use. For example, if the bearing test results are
3 1
being used to obtain data for a riveted part, a hole ⁄16 in. or ⁄4
in. (5 or 6 mm) in diameter would be suitable, while for a
bolted assembly, a larger hole might be desirable.Adifference
in test results may be obtained with holes of different diam-
eters. The width of the specimen shall be 4 to 8 times the
diameter of the hole. A wider specimen encourages the
intended shear-out failure mode. The edge distance ratio shall
be specified and the edge distance held within a tolerance of
62 %. Edge distance ratios of 1.50 and 2.00 are commonly
used (see Fig. 1). A close fit between the specimen and pin is
required, since a loose fit will tend to give lower results. The
diameter of the hole shall not exceed the pin diameter by more
than 0.001 in. (0.02 mm). The free length between the point of
loading and the center of the test pin hole shall be greater than
1.5 times the specimen width. The total length of the test
FIG. 4 Autographic Measurement of Bearing Deformation
...
This document is not an ASTM standard and is intended only to provide the user of an ASTM standard an indication of what changes have been made to the previous version. Because
it may not be technically possible to adequately depict all changes accurately, ASTM recommends that users consult prior editions as appropriate. In all cases only the current version
of the standard as published by ASTM is to be considered the official document.
Designation: E238 − 12 E238 − 17a
Standard Test Method for
Pin-Type Bearing Test of Metallic Materials
This standard is issued under the fixed designation E238; the number immediately following the designation indicates the year of
original adoption or, in the case of revision, the year of last revision. A number in parentheses indicates the year of last reapproval. A
superscript epsilon (´) indicates an editorial change since the last revision or reapproval.
1. Scope*
1.1 This test method covers a pin-type bearing test of metallic materials to determine bearing yield strength and bearing
strength.
NOTE 1—The presence of incidental lubricants on the bearing surfaces may significantly lower the value of bearing yield strength obtained by this
method.
1.2 Units—The values stated in inch-pound units are to be regarded as standard. The values given in parentheses are
mathematical conversions to SI units that are provided for information only and are not considered standard.
1.3 This standard does not purport to address all of the safety concerns, if any, associated with its use. It is the responsibility
of the user of this standard to establish appropriate safety and health practices and determine the applicability of regulatory
limitations prior to use.
1.4 This international standard was developed in accordance with internationally recognized principles on standardization
established in the Decision on Principles for the Development of International Standards, Guides and Recommendations issued
by the World Trade Organization Technical Barriers to Trade (TBT) Committee.
2. Referenced Documents
2.1 ASTM Standards:
E4 Practices for Force Verification of Testing Machines
E6 Terminology Relating to Methods of Mechanical Testing
E83 Practice for Verification and Classification of Extensometer Systems
B769 Test Method for Shear Testing of Aluminum Alloys
B831 Test Method for Shear Testing of Thin Aluminum Alloy Products
3. Terminology
3.1 Definitions:
3.1.1 bearing area—the product of the pin diameter and specimen thickness.
3.1.2 bearing stress—the force per unit of bearing area.
3.1.3 bearing strain—the ratio of the bearing deformation of the bearing hole, in the direction of the applied force, to the pin
diameter.
3.1.4 bearing yield strength—the bearing stress at which a material exhibits a specified limiting deviation from the
proportionality of bearing stress to bearing strain.
3.1.5 bearing strength—the maximum bearing stress which a material is capable of sustaining.
3.1.6 edge distance—the distance from the edge of a bearing specimen to the center of the hole in the direction of applied force
(Fig. 1).
3.1.7 edge distance ratio—the ratio of the edge distance to the pin diameter.
3.1.8 For definitions of other terms see Terminology E6.
This test method is under the jurisdiction of ASTM Committee E28 on Mechanical Testing and is the direct responsibility of Subcommittee E28.04 on Uniaxial Testing.
Current edition approved June 1, 2012April 1, 2017. Published August 2012April 2017. Originally approved in 1964. Last previous edition approved in 20082017 as
E238 – 84 (2008).E238 – 17. DOI: 10.1520/E0238-12.10.1520/E0238-17A.
For referenced ASTM standards, visit the ASTM website, www.astm.org, or contact ASTM Customer Service at service@astm.org. For Annual Book of ASTM Standards
volume information, refer to the standard’s Document Summary page on the ASTM website.
*A Summary of Changes section appears at the end of this standard
Copyright © ASTM International, 100 Barr Harbor Drive, PO Box C700, West Conshohocken, PA 19428-2959. United States
E238 − 17a
FIG. 1 Bearing Test Specimen
TABLE 1 Characteristics of Pin for Various Materials Tested
Rockwell Surface Roughness,
Material Tested Material
Hardness μ in. (μm) (avg)
Aluminum alloys hardened steel C60 to 64 4 to 8 (0.1 to 0.2 μm)
Beryllium alloys hardened steel C60 to 64 4 to 8 (0.1 to 0.2 μm)
Copper alloys hardened steel C60 to 64 4 to 8 (0.1 to 0.2μ m)
Magnesium alloys hardened steel C60 to 64 4 to 8 (0.1 to 0.2 μm)
Zinc alloys hardened steel C60 to 64 4 to 8 (0.1 to 0.2μ m)
4. Significance and Use
4.1 The data obtained from the bearing test are the bearing ultimate and yield strength. The data provide a measure of the
load-carrying capacity of a material edge loaded with a close-fitting cylindrical pin through a hole located a specific distance from
the specimen edge.
4.2 Bearing properties are useful in the comparison of materials and design of structures under conditions where the pin is not
restricted.
5. Apparatus
5.1 Testing Machines—Machines used for bearing testing shall conform to the requirements of Practices E4.
5.2 Gripping Devices—Various types of gripping devices may be used to transmit the measured load applied by the testing
machine to the test specimens. Any grips considered to apply the load axially for tension testing, such as pin connections or wedge
grips, are satisfactory for use in bearing testing.
5.3 Pin—The bearing load is generally applied to the specimen through a close-fitting cylindrical pin. The pin shall be harder
and stronger than the material being tested. Restraint of movement of the specimen where it is in contact with the pin has a
considerable effect upon the hole deformation obtained as a function of the load applied. Close control of surface conditions on
both the specimen and pin is needed to assure reproducible results. The pins used should be uniform in diameter, hardness, and
surface roughness. Pin materials, hardness, and surface roughness as shown in Table 1 are recommended for testing the materials
listed. The pin should be checked carefully after each test to ensure that no metallic residue adheres to it and that it is both straight
and undeformed. If there is any question regarding its quality it should be replaced.
5.4 Pin Support—The jig supporting the pin should position the pin concentric with the hole in the specimen. It should not
restrain the thickening of the specimen as the load from the pin deforms the hole. Bending of the pin should be kept to a minimum
by having the jig support the pin close to the specimen. Fig. 2 and Fig. 3 show examples of the types of jig that have been used
and are considered satisfactory.
E238 − 17a
FIG. 2 Bearing Test Fixture Used on Aluminum Sheet
FIG. 3 Schematic Drawing of Bearing Deformation Transfer Device
5.5 Extensometers—Extensometers used for measuring the bearing deformation shall comply with the requirements for Class
B-2 or better as described in Practice E83. The bearing deformation measurement shall be made in a manner to obtain the axial
bearing deformation with a minimum of other deformations being included such as the bending of the pin and tensile strain in the
E238 − 17a
specimen. Fig. 2 shows an adaptation of a Templin extensometer system to record bearing deformation. Fig. 3 illustrates a
mechanism that can be used to transfer the bearing deformation so it can be measured with the same extensometers used for tension
testing. A method of measuring bearing deformation featuring two linear differential transformers is shown in Fig. 4.
6. Test Specimens
6.1 Specimen Geometry—The specimen shall be a flat sheet type, with the full thickness of the product being used if possible.
If the specimen is too thick in relation to the pin diameter, the pin is likely to bend considerably or break before the bearing strength
is obtained. If a specimen is too thin, buckling may occur. A ratio of pin diameter to specimen thickness of from 2 to 4 has been
used to avoid both conditions. The hole should have approximately the same diameter as for the intended use. For example, if the
3 1
bearing test results are being used to obtain data for a riveted part, a hole ⁄16 in. or ⁄4 in. (5 or 6 mm) in diameter would be suitable,
while for a bolted assembly, a larger hole might be desirable. A difference in test results may be obtained with holes of different
diameters. The width of the specimen shall be 4 to 8 times the hole diameter. diameter of the hole. A wider specimen encourages
the intended shear-out failure mode. The edge distance ratio shall be specified and the edge distance held within a tolerance of
62 %. Edge distance ratios of 1.50 and 2.00 are commonly used (see Fig. 1). A close fit between the specimen and pin is required,
since a loose fit will tend to give lower results. The diameter of the hole shall not exceed the pin diameter by more than 0.001 in.
(0.02 mm). The free length between the point of loading and the center of the test pin hole shall be greater than 1.5 times the
specimen width. The total length of the test specimen is not critical and may depend on the method used to grip the specimen. Fig.
1 shows a bearing test specimen commonly used.
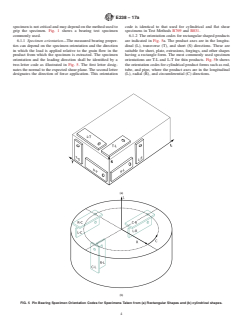
6.1.1 Specimen orientation—The measured bearing properties can depend on the specimen orientation and the direction in
which the load is applied relative to the grain flow in the specimen. The speci
...
Questions, Comments and Discussion
Ask us and Technical Secretary will try to provide an answer. You can facilitate discussion about the standard in here.
Loading comments...