ASTM C157/C157M-17
(Test Method)Standard Test Method for Length Change of Hardened Hydraulic-Cement Mortar and Concrete
Standard Test Method for Length Change of Hardened Hydraulic-Cement Mortar and Concrete
SIGNIFICANCE AND USE
4.1 Measurement of length change permits assessment of the potential for volumetric expansion or contraction of mortar or concrete due to various causes other than applied force or temperature change. This test method is particularly useful for comparative evaluation of this potential in different hydraulic-cement mortar or concrete mixtures.
4.2 This test method provides useful information for experimental purposes or for products that require testing under nonstandard mixing, placing, handling, or curing conditions, such as high product workability or different demolding times. Standard conditions are described in 5.4.1.
4.3 If conditions for mixing, curing, sampling, and storage other than specified in this test method are required, they shall be reported but are not to be considered as standard conditions of this test method. Nonstandard conditions and the reasons for departure from standard conditions shall be reported clearly and prominently with comparator values.
SCOPE
1.1 This test method covers the determination of the length changes that are produced by causes other than externally applied forces and temperature changes in hardened hydraulic-cement mortar and concrete specimens made in the laboratory and exposed to controlled conditions of temperature and moisture.
1.2 The values stated in either SI units or inch-pound units are to be regarded separately as standard. An exception is with regard to sieve sizes and nominal size of aggregate, in which the SI values are the standard as stated in Specification E11. Within the text, the SI units are shown in brackets. The values stated in each system may not be exact equivalents; therefore, each system shall be used independently of the other. Combining values from the two systems may result in non-conformance with the standard.
1.3 This standard does not purport to address all of the safety concerns, if any, associated with its use. It is the responsibility of the user of this standard to establish appropriate safety, health, and environmental practices and determine the applicability of regulatory limitations prior to use.
1.4 This international standard was developed in accordance with internationally recognized principles on standardization established in the Decision on Principles for the Development of International Standards, Guides and Recommendations issued by the World Trade Organization Technical Barriers to Trade (TBT) Committee.
General Information
- Status
- Published
- Publication Date
- 14-Aug-2017
- Technical Committee
- C09 - Concrete and Concrete Aggregates
- Drafting Committee
- C09.68 - Volume Change
Relations
- Effective Date
- 15-Aug-2017
- Refers
ASTM C596-23 - Standard Test Method for Drying Shrinkage of Mortar Containing Hydraulic Cement - Effective Date
- 01-Dec-2023
- Effective Date
- 15-Jul-2020
- Effective Date
- 15-Dec-2019
- Effective Date
- 01-Jan-2019
- Effective Date
- 01-Oct-2018
- Effective Date
- 01-Jul-2018
- Effective Date
- 01-Jan-2018
- Refers
ASTM C596-09(2017) - Standard Test Method for Drying Shrinkage of Mortar Containing Hydraulic Cement - Effective Date
- 01-May-2017
- Effective Date
- 15-Dec-2016
- Effective Date
- 01-Feb-2016
- Effective Date
- 15-Dec-2015
- Effective Date
- 01-Jul-2015
- Effective Date
- 01-Feb-2015
- Effective Date
- 01-Aug-2014
Overview
ASTM C157/C157M-17 is the Standard Test Method for Length Change of Hardened Hydraulic-Cement Mortar and Concrete, published by ASTM International. This standard details the procedures for determining the dimensional changes-expansion or contraction-of hardened hydraulic-cement mortar and concrete specimens when exposed to controlled moisture and temperature conditions, excluding changes caused by applied forces or temperature fluctuations.
Measurement of length change is critical for assessing the potential for volumetric instability in concrete and mortar mixtures, assisting in the evaluation of mixture performance and suitability for specific applications. The method allows for both standard and nonstandard test conditions, providing essential data for research, product development, and quality control in the concrete and construction industry.
Key Topics
- Purpose and Significance:
- Assesses potential expansion or contraction in mortar and concrete due to hydration, moisture, or other factors.
- Enables comparative evaluation of different hydraulic-cement mixtures.
- Supports experimental testing under varied mixing, handling, and curing conditions.
- Test Samples and Preparation:
- Laboratory-made specimens of hardened hydraulic-cement mortar or concrete.
- Specific sample sizes and handling procedures to ensure accuracy and repeatability.
- Apparatus and Environmental Controls:
- Utilizes calibrated molds, comparators, and controlled storage with defined temperature and humidity.
- Procedures:
- Precise methods for mixing, molding, curing, and measuring specimens.
- Regular comparator readings at specified intervals under water or air storage.
- Documentation of any deviation from standard conditions.
- Reporting and Precision:
- Detailed data reporting to ensure consistency and traceability.
- Clear guidelines to report non-standard methods or departures.
Applications
ASTM C157/C157M-17 is widely used across the concrete and construction materials sectors for the following applications:
- Quality Control: Concrete producers and construction teams apply this standard to evaluate shrinkage or expansion potential, helping to select mixtures less prone to cracking or durability issues.
- Research and Development: Engineers and material scientists use the method to study effects of mix design, admixtures, and alternative cementitious materials on length stability.
- Product Certification: Manufacturers of pre-cast or specialty concrete products utilize the test to certify compliance and predict long-term performance.
- Comparative Analysis: The method is valuable in comparative studies where different materials, mixing procedures, or curing practices are assessed for dimensional stability.
- Assessment of Non-Standard Conditions: The standard provides valuable data for products or applications involving non-standard mixing, handling, demolding, or curing-including products requiring high workability or unique demolding intervals.
Related Standards
- ASTM C125 - Terminology Relating to Concrete and Concrete Aggregates
- ASTM C143/C143M - Test Method for Slump of Hydraulic-Cement Concrete
- ASTM C172 - Practice for Sampling Freshly Mixed Concrete
- ASTM C192/C192M - Practice for Making and Curing Concrete Test Specimens in the Laboratory
- ASTM C305 - Practice for Mechanical Mixing of Hydraulic Cement Pastes and Mortars
- ASTM C490 - Practice for Use of Apparatus for Determination of Length Change
- ASTM C511 - Specification for Mixing Rooms, Moist Cabinets, and Related Storage
- ASTM C596 - Test Method for Drying Shrinkage of Mortar Containing Hydraulic Cement
- ASTM C1437 - Test Method for Flow of Hydraulic Cement Mortar
- ASTM E11 - Specification for Woven Wire Test Sieve Cloth and Test Sieves
By adhering to ASTM C157/C157M-17, professionals in concrete and construction can ensure robust, reliable evaluation of length change properties-crucial for durable, high-performance structures and materials.
Buy Documents
ASTM C157/C157M-17 - Standard Test Method for Length Change of Hardened Hydraulic-Cement Mortar and Concrete
REDLINE ASTM C157/C157M-17 - Standard Test Method for Length Change of Hardened Hydraulic-Cement Mortar and Concrete
Get Certified
Connect with accredited certification bodies for this standard

ICC Evaluation Service
Building products evaluation and certification.

QAI Laboratories
Building and construction product testing and certification.

Aboma Certification B.V.
Specialized in construction, metal, and transport sectors.
Sponsored listings
Frequently Asked Questions
ASTM C157/C157M-17 is a standard published by ASTM International. Its full title is "Standard Test Method for Length Change of Hardened Hydraulic-Cement Mortar and Concrete". This standard covers: SIGNIFICANCE AND USE 4.1 Measurement of length change permits assessment of the potential for volumetric expansion or contraction of mortar or concrete due to various causes other than applied force or temperature change. This test method is particularly useful for comparative evaluation of this potential in different hydraulic-cement mortar or concrete mixtures. 4.2 This test method provides useful information for experimental purposes or for products that require testing under nonstandard mixing, placing, handling, or curing conditions, such as high product workability or different demolding times. Standard conditions are described in 5.4.1. 4.3 If conditions for mixing, curing, sampling, and storage other than specified in this test method are required, they shall be reported but are not to be considered as standard conditions of this test method. Nonstandard conditions and the reasons for departure from standard conditions shall be reported clearly and prominently with comparator values. SCOPE 1.1 This test method covers the determination of the length changes that are produced by causes other than externally applied forces and temperature changes in hardened hydraulic-cement mortar and concrete specimens made in the laboratory and exposed to controlled conditions of temperature and moisture. 1.2 The values stated in either SI units or inch-pound units are to be regarded separately as standard. An exception is with regard to sieve sizes and nominal size of aggregate, in which the SI values are the standard as stated in Specification E11. Within the text, the SI units are shown in brackets. The values stated in each system may not be exact equivalents; therefore, each system shall be used independently of the other. Combining values from the two systems may result in non-conformance with the standard. 1.3 This standard does not purport to address all of the safety concerns, if any, associated with its use. It is the responsibility of the user of this standard to establish appropriate safety, health, and environmental practices and determine the applicability of regulatory limitations prior to use. 1.4 This international standard was developed in accordance with internationally recognized principles on standardization established in the Decision on Principles for the Development of International Standards, Guides and Recommendations issued by the World Trade Organization Technical Barriers to Trade (TBT) Committee.
SIGNIFICANCE AND USE 4.1 Measurement of length change permits assessment of the potential for volumetric expansion or contraction of mortar or concrete due to various causes other than applied force or temperature change. This test method is particularly useful for comparative evaluation of this potential in different hydraulic-cement mortar or concrete mixtures. 4.2 This test method provides useful information for experimental purposes or for products that require testing under nonstandard mixing, placing, handling, or curing conditions, such as high product workability or different demolding times. Standard conditions are described in 5.4.1. 4.3 If conditions for mixing, curing, sampling, and storage other than specified in this test method are required, they shall be reported but are not to be considered as standard conditions of this test method. Nonstandard conditions and the reasons for departure from standard conditions shall be reported clearly and prominently with comparator values. SCOPE 1.1 This test method covers the determination of the length changes that are produced by causes other than externally applied forces and temperature changes in hardened hydraulic-cement mortar and concrete specimens made in the laboratory and exposed to controlled conditions of temperature and moisture. 1.2 The values stated in either SI units or inch-pound units are to be regarded separately as standard. An exception is with regard to sieve sizes and nominal size of aggregate, in which the SI values are the standard as stated in Specification E11. Within the text, the SI units are shown in brackets. The values stated in each system may not be exact equivalents; therefore, each system shall be used independently of the other. Combining values from the two systems may result in non-conformance with the standard. 1.3 This standard does not purport to address all of the safety concerns, if any, associated with its use. It is the responsibility of the user of this standard to establish appropriate safety, health, and environmental practices and determine the applicability of regulatory limitations prior to use. 1.4 This international standard was developed in accordance with internationally recognized principles on standardization established in the Decision on Principles for the Development of International Standards, Guides and Recommendations issued by the World Trade Organization Technical Barriers to Trade (TBT) Committee.
ASTM C157/C157M-17 is classified under the following ICS (International Classification for Standards) categories: 91.100.10 - Cement. Gypsum. Lime. Mortar. The ICS classification helps identify the subject area and facilitates finding related standards.
ASTM C157/C157M-17 has the following relationships with other standards: It is inter standard links to ASTM C157/C157M-08(2014)e1, ASTM C596-23, ASTM C305-20, ASTM C125-19a, ASTM C125-19, ASTM C125-18b, ASTM C125-18a, ASTM C125-18, ASTM C596-09(2017), ASTM C125-16, ASTM C192/C192M-16, ASTM C125-15b, ASTM C125-15a, ASTM C125-15, ASTM C125-14. Understanding these relationships helps ensure you are using the most current and applicable version of the standard.
ASTM C157/C157M-17 is available in PDF format for immediate download after purchase. The document can be added to your cart and obtained through the secure checkout process. Digital delivery ensures instant access to the complete standard document.
Standards Content (Sample)
This international standard was developed in accordance with internationally recognized principles on standardization established in the Decision on Principles for the
Development of International Standards, Guides and Recommendations issued by the World Trade Organization Technical Barriers to Trade (TBT) Committee.
Designation: C157/C157M − 17
Standard Test Method for
Length Change of Hardened Hydraulic-Cement Mortar and
Concrete
This standard is issued under the fixed designation C157/C157M; the number immediately following the designation indicates the year
of original adoption or, in the case of revision, the year of last revision. A number in parentheses indicates the year of last reapproval.
A superscript epsilon (´) indicates an editorial change since the last revision or reapproval.
This standard has been approved for use by agencies of the U.S. Department of Defense.
1. Scope* C125 Terminology Relating to Concrete and Concrete Ag-
gregates
1.1 This test method covers the determination of the length
C143/C143M Test Method for Slump of Hydraulic-Cement
changes that are produced by causes other than externally
Concrete
applied forces and temperature changes in hardened hydraulic-
C172 Practice for Sampling Freshly Mixed Concrete
cement mortar and concrete specimens made in the laboratory
C192/C192M Practice for Making and Curing Concrete Test
and exposed to controlled conditions of temperature and
Specimens in the Laboratory
moisture.
C305 Practice for Mechanical Mixing of Hydraulic Cement
1.2 The values stated in either SI units or inch-pound units
Pastes and Mortars of Plastic Consistency
are to be regarded separately as standard.An exception is with
C490 Practice for Use ofApparatus for the Determination of
regard to sieve sizes and nominal size of aggregate, in which
Length Change of Hardened Cement Paste, Mortar, and
the SI values are the standard as stated in Specification E11.
Concrete
Within the text, the SI units are shown in brackets. The values
C511 Specification for Mixing Rooms, Moist Cabinets,
stated in each system may not be exact equivalents; therefore,
Moist Rooms, and Water Storage Tanks Used in the
each system shall be used independently of the other. Combin-
Testing of Hydraulic Cements and Concretes
ing values from the two systems may result in non-
C596 Test Method for Drying Shrinkage of Mortar Contain-
conformance with the standard.
ing Hydraulic Cement
1.3 This standard does not purport to address all of the
C1437 Test Method for Flow of Hydraulic Cement Mortar
safety concerns, if any, associated with its use. It is the
E11 Specification for Woven Wire Test Sieve Cloth and Test
responsibility of the user of this standard to establish appro-
Sieves
priate safety, health, and environmental practices and deter-
E337 Test Method for Measuring Humidity with a Psy-
mine the applicability of regulatory limitations prior to use.
chrometer (the Measurement of Wet- and Dry-Bulb Tem-
1.4 This international standard was developed in accor-
peratures)
dance with internationally recognized principles on standard-
ization established in the Decision on Principles for the
3. Terminology
Development of International Standards, Guides and Recom-
3.1 Definitions—The terms used in this test method are
mendations issued by the World Trade Organization Technical
defined in Terminology C125.
Barriers to Trade (TBT) Committee.
3.2 Definitions of Terms Specific to This Standard:
2. Referenced Documents 3.2.1 length change, n—an increase or decrease in the
lengthofatestspecimenthathasbeencausedtochangebyany
2.1 ASTM Standards:
factor other than externally applied forces and temperature
changes.
This test method is under the jurisdiction of ASTM Committee C09 on
4. Significance and Use
Concrete and ConcreteAggregates and is the direct responsibility of Subcommittee
C09.68 on Volume Change.
4.1 Measurement of length change permits assessment of
Current edition approved Aug. 15, 2017. Published October 2017. Originally
the potential for volumetric expansion or contraction of mortar
approved in 1940. Last previous edition approved in 2014 as C157/
ε1
C157M – 08 (2014) . DOI: 10.1520/C0157_C0157M-17.
or concrete due to various causes other than applied force or
For referenced ASTM standards, visit the ASTM website, www.astm.org, or
temperature change. This test method is particularly useful for
contact ASTM Customer Service at service@astm.org. For Annual Book of ASTM
comparative evaluation of this potential in different hydraulic-
Standards volume information, refer to the standard’s Document Summary page on
the ASTM website. cement mortar or concrete mixtures.
*A Summary of Changes section appears at the end of this standard
Copyright © ASTM International, 100 Barr Harbor Drive, PO Box C700, West Conshohocken, PA 19428-2959. United States
C157/C157M − 17
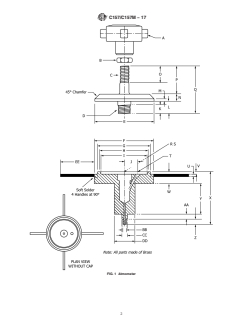
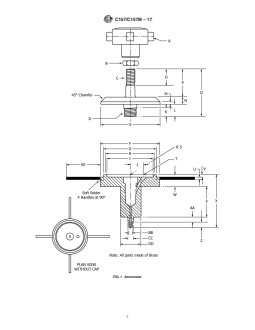
FIG. 1 Atmometer
C157/C157M − 17
4.2 This test method provides useful information for experi- 5.5 Atmometer—The atmometer shall be constructed as
mental purposes or for products that require testing under shown in Fig. 1.
nonstandard mixing, placing, handling, or curing conditions, 5.5.1 Mounting—Fig. 2 shows a suggested arrangement for
such as high product workability or different demolding times. operating the atmometer. Punch a central hole ⁄2 in. [13 mm]
Standard conditions are described in 5.4.1. in diameter in a filter paper, place it on the atmometer, and
secure it in place while dry, by turning the torque handle only,
4.3 If conditions for mixing, curing, sampling, and storage
until it just starts to slip. Mount the atmometer on a stand with
other than specified in this test method are required, they shall
the filter paper in a horizontal position. Mount a 100-mL glass
be reported but are not to be considered as standard conditions
graduate so that the 100-mL mark is from 1 to 3 in. [25 to 75
of this test method. Nonstandard conditions and the reasons for
mm] below the level of the filter paper. Stopper the graduate so
departure from standard conditions shall be reported clearly
that entrance is provided for two short glass tubes not extend-
and prominently with comparator values.
ing to the water level and one long tube extending to the
5. Apparatus
bottom of the graduate. Connect the glass tubing leading from
5.1 Molds and Length Comparator—The molds for casting the bottom of the graduate to the inlet of the atmometer by
means of clear plastic tubing.
test specimens and the length comparator for measuring length
5.5.2 Operation—Use clear plastic tubing to connect a
change shall conform to the requirements of Practice C490.
squeeze bottle containing distilled or deionized water to one of
5.2 Tamper—The tamper shall be made of a nonabsorptive,
the short glass tubes into the graduate. Force water into the
nonabrasive material such as medium-hard rubber or seasoned
graduate until it is about half full and then close the remaining
oak wood rendered nonabsorptive by immersion for 15 min in
glass tube into the graduate. Continue to force water through
paraffin at approximately 392 °F [200 °C], and shall have a
the graduate into the atmometer until the filter paper is
cross section of ⁄2 by 1.0 in. [13 by 25 mm] and a convenient
saturated and there are no air bubbles in the system. Open the
length of about 6 in. [150 mm].The tamping face of the tamper
glasstubeintothegraduateandreleasepressureonthesqueeze
shall be flat and at right angles to the length of the tamper.
bottle gradually to avoid trapping air in the tube leading to the
5.3 Tamping Rod—The tamping rod shall be a straight steel
atmometer. Adjust the level of water in the graduate to
rod ⁄8 in. [10 mm] in diameter and not less than 10 in. [250
approximatelythe100-mLmark.Iftheatmometeristobeused
mm] in length, having at least the tamping end rounded to a
under variable temperature conditions, disconnect the squeeze
hemispherical tip of the same diameter.
bottle after filling the graduate to avoid the possibility of
5.4 Drying Room and Controls—A drying room with suit-
additional water being forced into the graduate. Permit evapo-
able racks shall be provided when storing specimens in air.The
rationofwaterfromthefilterpaperfor1hbeforerecordingthe
racks shall be designed for free circulation of air around
time and initial reading of the graduate. It is not permitted to
specimens, except for necessary supports, and shall be so
omit the waiting period during subsequent use of the atmom-
situated with respect to the nearest wall or other obstruction
eter provided the filter paper does not become dry. Change the
that air circulation is not restricted in the intervening space.
filter paper whenever it shows signs of contamination but not
The supports shall be horizontal and shall consist of two
less frequently than once every two weeks.
nonabsorptive members not deeper than 1 in. [25 mm] and
5.6 Filter Paper—The filter paper to be used with the
having a bearing area of not more than ⁄4 in. [6 mm] in width.
atmometershallbewhitewithasmoothsurfacetexture.Itshall
Conditioned air shall be circulated into and out of the room in
be 6 in. [152 mm] in diameter and 0.050 6 0.003 in. [1.27 6
a uniform manner so that the specified rate of evaporation is
0.08 mm] thick and shall have a cotton fiber content of not less
attained adjacent to all specimens.
than 75 weight %. The density shall be between 0.400 and
5.4.1 The air in the room shall be maintained at a tempera-
0.425 g/cm . The Mullen bursting strength shall not be less
ture of 73 63°F[23 6 2 °C] and a relative humidity of 50 6
than 50 psi [345 kPa].
4 %. The air movement past all specimens shall be such that
the rate of evaporation is 77 6 30-mL/24 h from an atmometer
or 13 6 5-mL/24 h from a 400-mL Griffin low-form beaker
filled to ⁄4 in. [20 mm] from the top. The temperature and
relative humidity of the air in the room shall be measured with
either a sling or Assmann psychrometer at least twice each
workingday.ThepsychrometershallcomplywithTestMethod
E337, except that thermometers having an overall length of 10
in. [250 mm] and marked in subdivisions of 0.5 °F [0.25 °C]
are permitted. The room shall be equipped with a means of
measuring and recording wet- and dry-bulb temperatures
continuously. Correction factors as indicated by the sling or
Assmann psychrometer shall be applied to the recorded data.
The rate of evaporation within the room shall be determined
daily by the use of the atmometer or by the loss of mass of
water from a 400-mLGriffin low-form beaker filled initially to
⁄4 in. [20 mm] from the top. FIG. 2 Atmometer Assembly
C157/C157M − 17
center side plate of the double mold must be appropriately
drilled and tapped to receive the 8-32 by ⁄8 in. [4.5-0.74 IMC
by 16 mm] machine screw of the demolding thumbscrew. Fig.
4 shows the details of a suitable apparatus for demolding
specimens molded in single molds.
Instructions for Use—Remove the end and the outer side plates leaving the
base, center side plate, and gage stud holders in place. Engage the machine
screw in the drilled and tapped end of the center side plate. Turn the thumbscrew
to loosen the bars.
FIG. 3 Device for Detaching 1-in. [25-mm] Square by 11 ⁄4-in.
[285-mm] Bars from Center Side Plate of Double Molds
NOTE 1—Dimensions shown are appropriate for one design of mold for
3-in. [75-mm] square specimens. Change dimensions as required for other
molds.
FIG. 4 Device for Demolding Specimens from Single Molds
NOTE 1—E and D filter paper No. 625 has been found suitable.
5.7 Apparatus for Demolding Specimens—It is useful to
construct an apparatus for demolding specimens molded in
double molds as detailed in Fig. 3 or to a different design that
serves the same purpose. When this device is to be used, the
The sole source of supply of the apparatus known to the committee at this time
is Ahlstrom Filtration Co., Mt. Holly Springs, PA 17065. If you are aware of
alternative suppliers, please provide this information to ASTM International
Headquarters.Your comments will receive careful consideration at a meeting of the
responsible technical committee, which you may attend.
C157/C157M − 17
7. Test Specimens
ASTM C157 FIGURES
Figure Di- SI Units Inch-Pound Units
7.1 Mortar—The test specimen for mortar shall be a prism
mensions
A Adjustable torque handle Adjustable torque handle of 1-in. [25-mm] square cross-section and approximately 11 ⁄4
1.4–1.7 Nm 12–15 in.lb
in. [285 mm] in length. Three specimens shall be prepared for
B Jam nut Jam nut
each test condition.
10–15 IMC ⁄8-in.–16 NC
C 10-mm diameter 1.5 IMC Thd. ⁄8-in. dia–16 NC Thd.
7.2 Concrete—The test specimen for concrete, in which all
D 12-mm diameter 1.5 IMC Thd. ⁄2-in. dia–20 NC Thd.
of the aggregate passes a 2-in. [50-mm] sieve, shall be a prism
E 64-mm diameter 2.50-in. diameter
F 64-mm diameter 2.50-in. diameter
of4-in.[100-mm]squarecross-sectionandapproximately11 ⁄4
G 57-mm diameter 2.25-in. diameter
in. [285 mm] long. However, a prism of 3-in. [75-mm] square
H 52-mm diameter 2.06-in. diameter
cross-section shall be used if all of the aggregate passes a 1-in.
I 51-mm diameter 2.00-in. diameter
J 14mm 0.56in.
sieve [25.0-mm]. Three specimens shall be prepared for each
K 8 mm 0.31 in.
test condition. Since length change is capable of being influ-
L 13mm 0.50in.
enced by the size of the specimen, specimens to be compared
M 3 mm 0.125 in.
N 8 mm 0.31 in.
shall have the same dimensions, and any specification limit
O 19mm 0.75in.
based upon this method shall be applied to a specified size of
P 32mm 1.25in.
specimen.
Q 53mm 2.06in.
1 29
R 1.5-mm drill through 11.5-mm C’ ⁄16-in. drill through ⁄64-in. C’ drill
drill
8. Procedure for Mixing Mortars and Concrete
1 1
32-mm deep tap 12-mm 1.5-mm 1 ⁄4-in. deep tap ⁄2-in.–20 Thd
IMF Thd 8.1 If the mortar or concrete to be tested is made in
3 5 1
S 19 mm deep 16 mm C’ bore 6 ⁄4-in. deep ⁄8-in. C’ bore ⁄4 in.
accordance with requirements other than those given in one of
mm deep deep
the following paragraphs, samples shall be taken and speci-
3 1
T 5-mm drill 3-mm deep C’ drill ⁄16-in. drill ⁄8-in. deep C’ drill
at 60° as shown at 60° as shown
mens molded as described in the sections on sampling and on
through to center tapped hole through to center tapped hole
molding specimens.
U 3 mm 0.12 in. diameter
V 2 mm 0.09 in.
8.2 Bring all materials to a temperature between 65 and 75
W 10mm 0.40in.
°F [18 and 24 °C] before using to make mortar or concrete.
X 60mm 2.36in.
Propor
...
This document is not an ASTM standard and is intended only to provide the user of an ASTM standard an indication of what changes have been made to the previous version. Because
it may not be technically possible to adequately depict all changes accurately, ASTM recommends that users consult prior editions as appropriate. In all cases only the current version
of the standard as published by ASTM is to be considered the official document.
´1
Designation: C157/C157M − 08 (Reapproved 2014) C157/C157M − 17
Standard Test Method for
Length Change of Hardened Hydraulic-Cement Mortar and
Concrete
This standard is issued under the fixed designation C157/C157M; the number immediately following the designation indicates the year
of original adoption or, in the case of revision, the year of last revision. A number in parentheses indicates the year of last reapproval.
A superscript epsilon (´) indicates an editorial change since the last revision or reapproval.
This standard has been approved for use by agencies of the U.S. Department of Defense.
ε NOTE—Editorial corrections were made in November 2014.
1. Scope*
1.1 This test method covers the determination of the length changes that are produced by causes other than externally applied
forces and temperature changes in hardened hydraulic-cement mortar and concrete specimens made in the laboratory and exposed
to controlled conditions of temperature and moisture.
1.2 The values stated in either SI units or inch-pound units are to be regarded separately as standard. An exception is with regard
to sieve sizes and nominal size of aggregate, in which the SI values are the standard as stated in Specification E11. Within the text,
the SI units are shown in brackets. The values stated in each system may not be exact equivalents; therefore, each system shall
be used independently of the other. Combining values from the two systems may result in non-conformance with the standard.
1.3 This standard does not purport to address all of the safety concerns, if any, associated with its use. It is the responsibility
of the user of this standard to establish appropriate safety safety, health, and healthenvironmental practices and determine the
applicability of regulatory limitations prior to use.
1.4 This international standard was developed in accordance with internationally recognized principles on standardization
established in the Decision on Principles for the Development of International Standards, Guides and Recommendations issued
by the World Trade Organization Technical Barriers to Trade (TBT) Committee.
2. Referenced Documents
2.1 ASTM Standards:
C125 Terminology Relating to Concrete and Concrete Aggregates
C143/C143M Test Method for Slump of Hydraulic-Cement Concrete
C172 Practice for Sampling Freshly Mixed Concrete
C192/C192M Practice for Making and Curing Concrete Test Specimens in the Laboratory
C305 Practice for Mechanical Mixing of Hydraulic Cement Pastes and Mortars of Plastic Consistency
C490 Practice for Use of Apparatus for the Determination of Length Change of Hardened Cement Paste, Mortar, and Concrete
C511 Specification for Mixing Rooms, Moist Cabinets, Moist Rooms, and Water Storage Tanks Used in the Testing of Hydraulic
Cements and Concretes
C596 Test Method for Drying Shrinkage of Mortar Containing Hydraulic Cement
C1437 Test Method for Flow of Hydraulic Cement Mortar
E11 Specification for Woven Wire Test Sieve Cloth and Test Sieves
E337 Test Method for Measuring Humidity with a Psychrometer (the Measurement of Wet- and Dry-Bulb Temperatures)
3. Terminology
3.1 Definitions—The terms used in this test method are defined in Terminology C125.
3.2 Definitions of Terms Specific to This Standard:
This test method is under the jurisdiction of ASTM Committee C09 on Concrete and Concrete Aggregates and is the direct responsibility of Subcommittee C09.68 on
Volume Change.
Current edition approved Oct. 1, 2014Aug. 15, 2017. Published November 2014October 2017. Originally approved in 1940. Last previous edition approved in 20082014
ε1
as C157/C157M – 08 (2014) . DOI: 10.1520/C0157_C0157M-08R14E01.10.1520/C0157_C0157M-17.
For referenced ASTM standards, visit the ASTM website, www.astm.org, or contact ASTM Customer Service at service@astm.org. For Annual Book of ASTM Standards
volume information, refer to the standard’s Document Summary page on the ASTM website.
*A Summary of Changes section appears at the end of this standard
Copyright © ASTM International, 100 Barr Harbor Drive, PO Box C700, West Conshohocken, PA 19428-2959. United States
C157/C157M − 17
3.2.1 length change, n—an increase or decrease in the length of a test specimen that has been caused to change by any factor
other than externally applied forces and temperature changes.
4. Significance and Use
4.1 Measurement of length change permits assessment of the potential for volumetric expansion or contraction of mortar or
concrete due to various causes other than applied force or temperature change. This test method is particularly useful for
comparative evaluation of this potential in different hydraulic-cement mortar or concrete mixtures.
4.2 This test method provides useful information for experimental purposes or for products that require testing under
nonstandard mixing, placing, handling, or curing conditions, such as high product workability or different demolding times.
Standard conditions are described in 5.4.1.
4.3 If conditions for mixing, curing, sampling, and storage other than specified in this test method are required, they shall be
reported but are not to be considered as standard conditions of this test method. Nonstandard conditions and the reasons for
departure from standard conditions shall be reported clearly and prominently with comparator values.
5. Apparatus
5.1 Molds and Length Comparator—The molds for casting test specimens and the length comparator for measuring length
change shall conform to the requirements of Practice C490.
5.2 Tamper—The tamper shall be made of a nonabsorptive, nonabrasive material such as medium-hard rubber or seasoned oak
wood rendered nonabsorptive by immersion for 15 min in paraffin at approximately 392 °F [200 °C], and shall have a cross section
of ⁄2 by 1.0 in. [13 by 25 mm] and a convenient length of about 6 in. [150 mm]. The tamping face of the tamper shall be flat and
at right angles to the length of the tamper.
5.3 Tamping Rod—The tamping rod shall be a straight steel rod ⁄8 in. [10 mm] in diameter and not less than 10 in. [250 mm]
in length, having at least the tamping end rounded to a hemispherical tip of the same diameter.
5.4 Drying Room and Controls—A drying room with suitable racks shall be provided when storing specimens in air. The racks
shall be designed for free circulation of air around specimens, except for necessary supports, and shall be so situated with respect
to the nearest wall or other obstruction that air circulation is not restricted in the intervening space. The supports shall be horizontal
and shall consist of two nonabsorptive members not deeper than 1 in. [25 mm] and having a bearing area of not more than ⁄4 in.
[6 mm] in width. Conditioned air shall be circulated into and out of the room in a uniform manner so that the specified rate of
evaporation is attained adjacent to all specimens.
5.4.1 The air in the room shall be maintained at a temperature of 73 6 3 °F [23 6 2 °C] and a relative humidity of 50 6 4 %.
The air movement past all specimens shall be such that the rate of evaporation is 77 6 30-mL/24 h from an atmometer or 13 6
5-mL/24 h from a 400-mL Griffin low-form beaker filled to ⁄4 in. [20 mm] from the top. The temperature and relative humidity
of the air in the room shall be measured with either a sling or Assmann psychrometer at least twice each working day. The
psychrometer shall comply with Test Method E337, except that thermometers having an overall length of 10 in. [250 mm] and
marked in subdivisions of 0.5 °F [0.25 °C] are permitted. The room shall be equipped with a means of measuring and recording
wet- and dry-bulb temperatures continuously. Correction factors as indicated by the sling or Assmann psychrometer shall be
applied to the recorded data. The rate of evaporation within the room shall be determined daily by the use of the atmometer or
by the loss of mass of water from a 400-mL Griffin low-form beaker filled initially to ⁄4 in. [20 mm] from the top.
5.5 Atmometer—The atmometer shall be constructed as shown in Fig. 1.
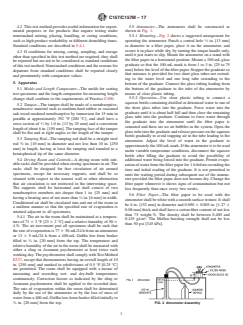
5.5.1 Mounting—Fig. 2 shows a suggested arrangement for operating the atmometer. Punch a central hole ⁄2 in. [13 mm] in
diameter in a filter paper, place it on the atmometer, and secure it in place while dry, by turning the torque handle only, until it
just starts to slip. Mount the atmometer on a stand with the filter paper in a horizontal position. Mount a 100-mL glass graduate
so that the 100-mL mark is from 1 to 3 in. [25 to 75 mm] below the level of the filter paper. Stopper the graduate so that entrance
is provided for two short glass tubes not extending to the water level and one long tube extending to the bottom of the graduate.
Connect the glass tubing leading from the bottom of the graduate to the inlet of the atmometer by means of clear plastic tubing.
5.5.2 Operation—Use clear plastic tubing to connect a squeeze bottle containing distilled or deionized water to one of the short
glass tubes into the graduate. Force water into the graduate until it is about half full and then close the remaining glass tube into
the graduate. Continue to force water through the graduate into the atmometer until the filter paper is saturated and there are no
air bubbles in the system. Open the glass tube into the graduate and release pressure on the squeeze bottle gradually to avoid
trapping air in the tube leading to the atmometer. Adjust the level of water in the graduate to approximately the 100-mL mark. If
the atmometer is to be used under variable temperature conditions, disconnect the squeeze bottle after filling the graduate to avoid
the possibility of additional water being forced into the graduate. Permit evaporation of water from the filter paper for 1 h before
recording the time and initial reading of the graduate. It is not permitted to omit the waiting period during subsequent use of the
atmometer provided the filter paper does not become dry. Change the filter paper whenever it shows signs of contamination but
not less frequently than once every two weeks.
C157/C157M − 17
FIG. 1 Atmometer
C157/C157M − 17
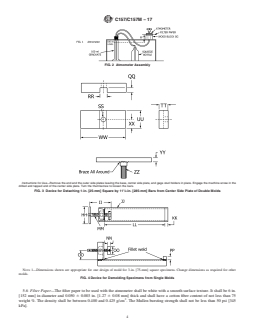
FIG. 2 Atmometer Assembly
Instructions for Use—Remove the end and the outer side plates leaving the base, center side plate, and gage stud holders in place. Engage the machine screw in the
drilled and tapped end of the center side plate. Turn the thumbscrew to loosen the bars.
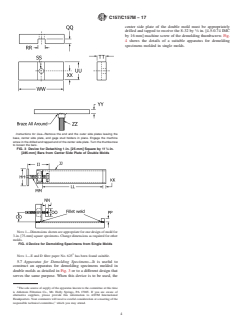
FIG. 3 Device for Detaching 1-in. [25-mm] Square by 11 ⁄4-in. [285-mm] Bars from Center Side Plate of Double Molds
NOTE 1—Dimensions shown are appropriate for one design of mold for 3-in. [75-mm] square specimens. Change dimensions as required for other
molds.
FIG. 4 Device for Demolding Specimens from Single Molds
5.6 Filter Paper—The filter paper to be used with the atmometer shall be white with a smooth surface texture. It shall be 6 in.
[152 mm] in diameter and 0.050 6 0.003 in. [1.27 6 0.08 mm] thick and shall have a cotton fiber content of not less than 75
weight %. The density shall be between 0.400 and 0.425 g/cm . The Mullen bursting strength shall not be less than 50 psi [345
kPa].
C157/C157M − 17
NOTE 1—E and D filter paper No. 625 has been found suitable.
5.7 Apparatus for Demolding Specimens—It is useful to construct an apparatus for demolding specimens molded in double
molds as detailed in Fig. 3 or to a different design that serves the same purpose. When this device is to be used, the center side
plate of the double mold must be appropriately drilled and tapped to receive the 8-32 by ⁄8 in. [4.5-0.74 IMC by 16 mm] machine
screw of the demolding thumbscrew. Fig. 4 shows the details of a suitable apparatus for demolding specimens molded in single
molds.
The sole source of supply of the apparatus known to the committee at this time is Ahlstrom Filtration Co., Mt. Holly Springs, PA 17065. If you are aware of alternative
suppliers, please provide this information to ASTM International Headquarters. Your comments will receive careful consideration at a meeting of the responsible technical
committee, which you may attend.
C157/C157M − 17
ASTM C157 FIGURES
Figure Di- SI Units Inch-Pound Units
mensions
A Adjustable torque handle Adjustable torque handle
1.4–1.7 Nm 12–15 in.lb
B Jam nut Jam nut
10–15 IMC ⁄8-in.–16 NC
C 10-mm diameter 1.5 IMC Thd. ⁄8-in. dia–16 NC Thd.
D 12-mm diameter 1.5 IMC Thd. ⁄2-in. dia–20 NC Thd.
E 64-mm diameter 2.50-in. diameter
F 64-mm diameter 2.50-in. diameter
G 57-mm diameter 2.25-in. diameter
H 52-mm diameter 2.06-in. diameter
I 51-mm diameter 2.00-in. diameter
J 14 mm 0.56 in.
K 8 mm 0.31 in.
L 13 mm 0.50 in.
M 3 mm 0.125 in.
N 8 mm 0.31 in.
O 19 mm 0.75 in.
P 32 mm 1.25 in.
Q 53 mm 2.06 in.
1 29
R 1.5-mm drill through 11.5-mm C’ ⁄16-in. drill through ⁄64-in. C’ drill
drill
1 1
32-mm deep tap 12-mm 1.5-mm 1 ⁄4-in. deep tap ⁄2-in.–20 Thd
IMF Thd
3 5 1
S 19 mm deep 16 mm C’ bore 6 ⁄4-in. deep ⁄8-in. C’ bore ⁄4 in.
mm deep deep
3 1
T 5-mm drill 3-mm deep C’ drill ⁄16-in. drill ⁄8-in. deep C’ drill
at 60° as shown at 60° as shown
through to center tapped hole through to center tapped hole
U 3 mm 0.12 in. diameter
V 2 mm 0.09 in.
W 10 mm 0.40 in.
X 60 mm 2.36 in.
Y 35 mm 1.37 in.
Z 6 mm 0.25 in.
AA 6 mm 0.25 in.
BB 4 mm 0.15 in.
CC 6 mm 0.25 in.
DD 23 mm 0.87 in.
EE 38 mm 1.50 in.
FF 25 to 75 mm 1 to 3 in.
GG 35 mm high 1.37 in. high
HH 100 mm 4 in.
II 130 mm 5 in.
JJ 8 cm–6.1 kg/m channel 3 in.–4.1 lb/ft channel
KK 20 mm ⁄4 in.
LL 330 mm 13 in.
MM 14–2.0 IMC Thd. ⁄2 in.–12 Thd.
NN 20 mm ⁄4 in.
OO 50 mm 2 in.
PP 20 mm ⁄4 in.
QQ 60 mm ⁄4 in.
RR 10 mm ⁄8 in.
SS Drill Cl. hole for Drill Cl. hole for
4.5–0.75 IMC machine screw 8–32 in. machine screw
TT 13 mm ⁄2 in.
UU 25 mm 1 in.
VV 30 mm 1- ⁄16 in.
WW 60 mm 2- ⁄8 in.
XX 12.5 mm ⁄2 in.
YY 6-mm diameter steel rod ⁄4-in. diameter steel rod
ZZ 4.5–0.75 IMC × 16-mm machine 8–32 × ⁄8-in. machine screw
screw
6. Sampling
6.1 Take samples according to the applicable provisions of Practice C192/C192M from batches of hydraulic-cement mortar or
concrete made in the laboratory (Note 2).
NOTE 2—When collecting samples in nonstandard conditions, such as field concrete, it is suggested that Practice C172 be followed. Field cast
specimens can show up to twice as much drying shrinkage as laboratory cast specimens from the same materials and proportions.
7. Test Specimens
7.1 Mortar—The test specimen for
...
Questions, Comments and Discussion
Ask us and Technical Secretary will try to provide an answer. You can facilitate discussion about the standard in here.
Loading comments...