ASTM C29/C29M-17
(Test Method)Standard Test Method for Bulk Density (“Unit Weight”) and Voids in Aggregate
Standard Test Method for Bulk Density (“Unit Weight”) and Voids in Aggregate
SIGNIFICANCE AND USE
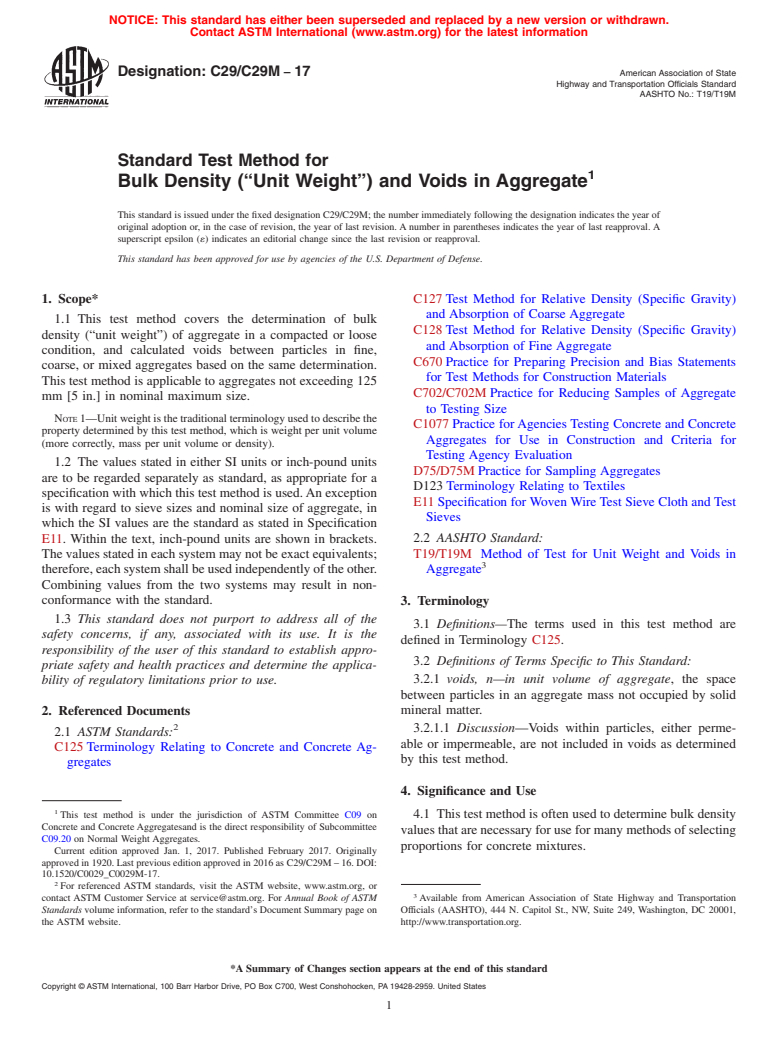
4.1 This test method is often used to determine bulk density values that are necessary for use for many methods of selecting proportions for concrete mixtures.
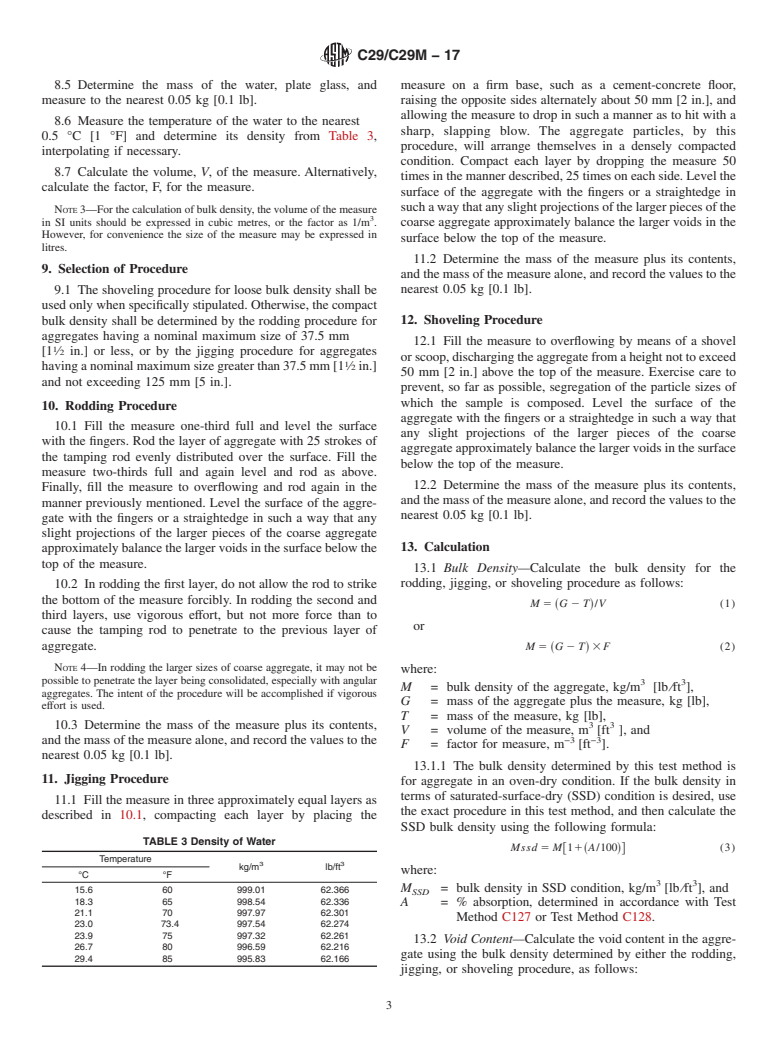
4.2 The bulk density also may be used for determining mass/volume relationships for conversions in purchase agreements. However, the relationship between degree of compaction of aggregates in a hauling unit or stockpile and that achieved in this test method is unknown. Further, aggregates in hauling units and stockpiles usually contain absorbed and surface moisture (the latter affecting bulking), while this test method determines the bulk density on a dry basis.
4.3 A procedure is included for computing the percentage of voids between the aggregate particles based on the bulk density determined by this test method.
SCOPE
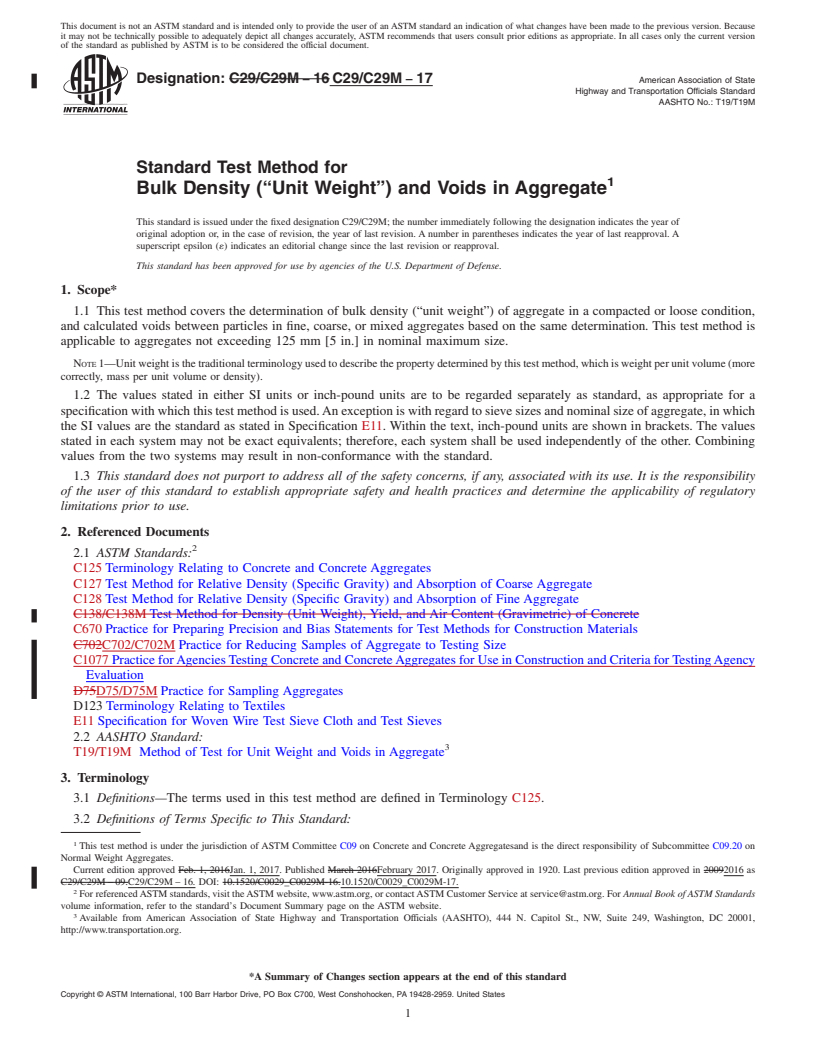
1.1 This test method covers the determination of bulk density (“unit weight”) of aggregate in a compacted or loose condition, and calculated voids between particles in fine, coarse, or mixed aggregates based on the same determination. This test method is applicable to aggregates not exceeding 125 mm [5 in.] in nominal maximum size.
Note 1: Unit weight is the traditional terminology used to describe the property determined by this test method, which is weight per unit volume (more correctly, mass per unit volume or density).
1.2 The values stated in either SI units or inch-pound units are to be regarded separately as standard, as appropriate for a specification with which this test method is used. An exception is with regard to sieve sizes and nominal size of aggregate, in which the SI values are the standard as stated in Specification E11. Within the text, inch-pound units are shown in brackets. The values stated in each system may not be exact equivalents; therefore, each system shall be used independently of the other. Combining values from the two systems may result in non-conformance with the standard.
1.3 This standard does not purport to address all of the safety concerns, if any, associated with its use. It is the responsibility of the user of this standard to establish appropriate safety and health practices and determine the applicability of regulatory limitations prior to use.
General Information
Relations
Buy Standard
Standards Content (Sample)
NOTICE: This standard has either been superseded and replaced by a new version or withdrawn.
Contact ASTM International (www.astm.org) for the latest information
Designation: C29/C29M − 17 American Association of State
Highway and Transportation Officials Standard
AASHTO No.: T19/T19M
Standard Test Method for
1
Bulk Density (“Unit Weight”) and Voids in Aggregate
This standard is issued under the fixed designation C29/C29M; the number immediately following the designation indicates the year of
original adoption or, in the case of revision, the year of last revision.Anumber in parentheses indicates the year of last reapproval.A
superscript epsilon (´) indicates an editorial change since the last revision or reapproval.
This standard has been approved for use by agencies of the U.S. Department of Defense.
1. Scope* C127Test Method for Relative Density (Specific Gravity)
and Absorption of Coarse Aggregate
1.1 This test method covers the determination of bulk
C128Test Method for Relative Density (Specific Gravity)
density (“unit weight”) of aggregate in a compacted or loose
and Absorption of Fine Aggregate
condition, and calculated voids between particles in fine,
C670Practice for Preparing Precision and Bias Statements
coarse, or mixed aggregates based on the same determination.
for Test Methods for Construction Materials
This test method is applicable to aggregates not exceeding 125
C702/C702MPractice for Reducing Samples of Aggregate
mm [5 in.] in nominal maximum size.
to Testing Size
NOTE1—Unitweightisthetraditionalterminologyusedtodescribethe
C1077Practice forAgencies Testing Concrete and Concrete
property determined by this test method, which is weight per unit volume
Aggregates for Use in Construction and Criteria for
(more correctly, mass per unit volume or density).
Testing Agency Evaluation
1.2 The values stated in either SI units or inch-pound units
D75/D75MPractice for Sampling Aggregates
are to be regarded separately as standard, as appropriate for a
D123Terminology Relating to Textiles
specificationwithwhichthistestmethodisused.Anexception
E11Specification forWovenWireTest Sieve Cloth andTest
is with regard to sieve sizes and nominal size of aggregate, in
Sieves
which the SI values are the standard as stated in Specification
E11. Within the text, inch-pound units are shown in brackets. 2.2 AASHTO Standard:
T19/T19M Method of Test for Unit Weight and Voids in
Thevaluesstatedineachsystemmaynotbeexactequivalents;
3
therefore,eachsystemshallbeusedindependentlyoftheother. Aggregate
Combining values from the two systems may result in non-
conformance with the standard.
3. Terminology
1.3 This standard does not purport to address all of the
3.1 Definitions—The terms used in this test method are
safety concerns, if any, associated with its use. It is the
defined in Terminology C125.
responsibility of the user of this standard to establish appro-
3.2 Definitions of Terms Specific to This Standard:
priate safety and health practices and determine the applica-
3.2.1 voids, n—in unit volume of aggregate, the space
bility of regulatory limitations prior to use.
between particles in an aggregate mass not occupied by solid
mineral matter.
2. Referenced Documents
2
3.2.1.1 Discussion—Voids within particles, either perme-
2.1 ASTM Standards:
able or impermeable, are not included in voids as determined
C125Terminology Relating to Concrete and Concrete Ag-
by this test method.
gregates
4. Significance and Use
1
This test method is under the jurisdiction of ASTM Committee C09 on
4.1 This test method is often used to determine bulk density
Concrete and ConcreteAggregatesand is the direct responsibility of Subcommittee
valuesthatarenecessaryforuseformanymethodsofselecting
C09.20 on Normal Weight Aggregates.
proportions for concrete mixtures.
Current edition approved Jan. 1, 2017. Published February 2017. Originally
approvedin1920.Lastpreviouseditionapprovedin2016asC29/C29M–16.DOI:
10.1520/C0029_C0029M-17.
2
For referenced ASTM standards, visit the ASTM website, www.astm.org, or
3
contact ASTM Customer Service at service@astm.org. For Annual Book of ASTM Available from American Association of State Highway and Transportation
Standards volume information, refer to the standard’s Document Summary page on Officials (AASHTO), 444 N. Capitol St., NW, Suite 249, Washington, DC 20001,
the ASTM website. http://www.transportation.org.
*A Summary of Changes section appears at the end of this standard
Copyright © ASTM International, 100 Barr Harbor Drive, PO Box C700, West Conshohocken, PA 19428-2959. United States
1
---------------------- Page: 1 ----------------------
C29/C29M − 17
TABLE 2 Requirements for Measures
4.2 The bulk density also may be used for determining
mass/volume relationships for conversions in purchase agree- Thickness of
Metal, min
ments. However, the relationship between degree of compac-
Capacity of
Units
Upper 38 mm
tion of aggregates in a hauling unit or stockpile and that Measure
Remainder
1
Bottom or 1 ⁄2 in.
o
...
This document is not an ASTM standard and is intended only to provide the user of an ASTM standard an indication of what changes have been made to the previous version. Because
it may not be technically possible to adequately depict all changes accurately, ASTM recommends that users consult prior editions as appropriate. In all cases only the current version
of the standard as published by ASTM is to be considered the official document.
Designation: C29/C29M − 16 C29/C29M − 17 American Association of State
Highway and Transportation Officials Standard
AASHTO No.: T19/T19M
Standard Test Method for
1
Bulk Density (“Unit Weight”) and Voids in Aggregate
This standard is issued under the fixed designation C29/C29M; the number immediately following the designation indicates the year of
original adoption or, in the case of revision, the year of last revision. A number in parentheses indicates the year of last reapproval. A
superscript epsilon (´) indicates an editorial change since the last revision or reapproval.
This standard has been approved for use by agencies of the U.S. Department of Defense.
1. Scope*
1.1 This test method covers the determination of bulk density (“unit weight”) of aggregate in a compacted or loose condition,
and calculated voids between particles in fine, coarse, or mixed aggregates based on the same determination. This test method is
applicable to aggregates not exceeding 125 mm [5 in.] in nominal maximum size.
NOTE 1—Unit weight is the traditional terminology used to describe the property determined by this test method, which is weight per unit volume (more
correctly, mass per unit volume or density).
1.2 The values stated in either SI units or inch-pound units are to be regarded separately as standard, as appropriate for a
specification with which this test method is used. An exception is with regard to sieve sizes and nominal size of aggregate, in which
the SI values are the standard as stated in Specification E11. Within the text, inch-pound units are shown in brackets. The values
stated in each system may not be exact equivalents; therefore, each system shall be used independently of the other. Combining
values from the two systems may result in non-conformance with the standard.
1.3 This standard does not purport to address all of the safety concerns, if any, associated with its use. It is the responsibility
of the user of this standard to establish appropriate safety and health practices and determine the applicability of regulatory
limitations prior to use.
2. Referenced Documents
2
2.1 ASTM Standards:
C125 Terminology Relating to Concrete and Concrete Aggregates
C127 Test Method for Relative Density (Specific Gravity) and Absorption of Coarse Aggregate
C128 Test Method for Relative Density (Specific Gravity) and Absorption of Fine Aggregate
C138/C138M Test Method for Density (Unit Weight), Yield, and Air Content (Gravimetric) of Concrete
C670 Practice for Preparing Precision and Bias Statements for Test Methods for Construction Materials
C702C702/C702M Practice for Reducing Samples of Aggregate to Testing Size
C1077 Practice for Agencies Testing Concrete and Concrete Aggregates for Use in Construction and Criteria for Testing Agency
Evaluation
D75D75/D75M Practice for Sampling Aggregates
D123 Terminology Relating to Textiles
E11 Specification for Woven Wire Test Sieve Cloth and Test Sieves
2.2 AASHTO Standard:
3
T19/T19M Method of Test for Unit Weight and Voids in Aggregate
3. Terminology
3.1 Definitions—The terms used in this test method are defined in Terminology C125.
3.2 Definitions of Terms Specific to This Standard:
1
This test method is under the jurisdiction of ASTM Committee C09 on Concrete and Concrete Aggregatesand is the direct responsibility of Subcommittee C09.20 on
Normal Weight Aggregates.
Current edition approved Feb. 1, 2016Jan. 1, 2017. Published March 2016February 2017. Originally approved in 1920. Last previous edition approved in 20092016 as
C29/C29M – 09.C29/C29M – 16. DOI: 10.1520/C0029_C0029M-16.10.1520/C0029_C0029M-17.
2
For referenced ASTM standards, visit the ASTM website, www.astm.org, or contact ASTM Customer Service at service@astm.org. For Annual Book of ASTM Standards
volume information, refer to the standard’s Document Summary page on the ASTM website.
3
Available from American Association of State Highway and Transportation Officials (AASHTO), 444 N. Capitol St., NW, Suite 249, Washington, DC 20001,
http://www.transportation.org.
*A Summary of Changes section appears at the end of this standard
Copyright © ASTM International, 100 Barr Harbor Drive, PO Box C700, West Conshohocken, PA 19428-2959. United States
1
---------------------- Page: 1 ----------------------
C29/C29M − 17
3.2.1 voids, n—in unit volume of aggregate, the space between particles in an aggregate mass not occupied by solid mineral
matter.
3.2.1.1 Discussion—Voids within particles, either permeable or impermeable, are not included in voids as determined by this
test method.
4. Significa
...


Questions, Comments and Discussion
Ask us and Technical Secretary will try to provide an answer. You can facilitate discussion about the standard in here.