ASTM B872-19
(Specification)Standard Specification for Precipitation-Hardening Nickel Alloys Plate, Sheet, and Strip
Standard Specification for Precipitation-Hardening Nickel Alloys Plate, Sheet, and Strip
ABSTRACT
This specification covers rolled precipitation hardenable UNS N09908, N09925, and N07725 nickel-iron-chromium-columbium-titanium-aluminum alloy plates, sheets, and strips in annealed condition. These materials are used as sheathing for superconductor cables, tooling for the fabrication of such cables and for other applications that require materials with low coefficients of expansion. Precipitation heat treatments for the materials entail heating to a specified temperature, holding at that temperature and then air or furnace cooling.
SCOPE
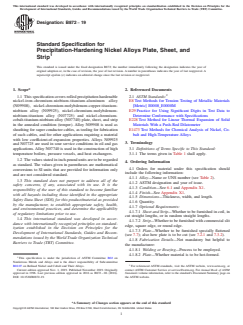
1.1 This specification covers rolled precipitation hardenable nickel-iron-chromium-niobium-titanium-aluminum alloy (N09908), nickel-chromium-molybdenum-copper-titanium-niobium alloy (N09925), nickel-chromium-molybdenum-niobium-titanium alloy (N07725) and nickel-chromium-cobalt-titanium-niobium alloy (N07740) plate, sheet, and strip in the annealed condition (temper). Alloy N09908 is used as sheathing for super conductor cables, as tooling for fabrication of such cables, and for other applications requiring a material with low coefficient-of-expansion properties. Alloys N09925 and N07725 are used in sour service conditions in oil and gas applications. Alloy N07740 is used in the construction of high temperature boilers, pressure vessels, and heat exchangers.
1.2 The values stated in inch-pound units are to be regarded as standard. The values given in parentheses are mathematical conversions to SI units that are provided for information only and are not considered standard.
1.3 This standard does not purport to address all of the safety concerns, if any, associated with its use. It is the responsibility of the user of this standard to become familiar with all hazards including those identified in the appropriate Safety Data Sheet (SDS) for this product/material as provided by the manufacturer, to establish appropriate safety, health, and environmental practices, and determine the applicability of regulatory limitations prior to use.
1.4 This international standard was developed in accordance with internationally recognized principles on standardization established in the Decision on Principles for the Development of International Standards, Guides and Recommendations issued by the World Trade Organization Technical Barriers to Trade (TBT) Committee.
General Information
- Status
- Published
- Publication Date
- 31-Oct-2019
- Technical Committee
- B02 - Nonferrous Metals and Alloys
- Drafting Committee
- B02.07 - Refined Nickel and Cobalt and Their Alloys
Relations
- Effective Date
- 01-Nov-2019
- Effective Date
- 01-Sep-2016
- Effective Date
- 01-Oct-2008
- Effective Date
- 15-Nov-2006
- Effective Date
- 15-Sep-2006
- Effective Date
- 01-Sep-2006
- Effective Date
- 01-May-2006
- Effective Date
- 01-Dec-2004
- Effective Date
- 01-Apr-2004
- Effective Date
- 01-Dec-2003
- Effective Date
- 01-Oct-2003
- Effective Date
- 10-Jul-2003
- Effective Date
- 10-May-2002
- Effective Date
- 10-Oct-2001
- Effective Date
- 10-Oct-2001
Overview
ASTM B872-19 – Standard Specification for Precipitation-Hardening Nickel Alloys Plate, Sheet, and Strip defines the requirements for rolled precipitation hardenable nickel alloy products, including plates, sheets, and strips in the annealed condition. This specification covers several nickel-based alloys such as UNS N09908, N09925, N07725, and N07740, each offering unique properties for demanding industrial environments.
The standard ensures that these materials possess the required mechanical strength, corrosion resistance, and low coefficients of thermal expansion, making them suitable for specialized applications in the electrical, oil and gas, and high-temperature equipment industries.
Key Topics
Alloy Types: The standard addresses four main nickel alloys:
- UNS N09908: Nickel-iron-chromium-niobium-titanium-aluminum alloy, ideal for superconductor cable sheathing and tooling.
- UNS N09925 & N07725: Nickel-chromium-molybdenum alloys designed for sour service in oil and gas environments.
- UNS N07740: Nickel-chromium-cobalt-titanium-niobium alloy used in high-temperature boilers, pressure vessels, and heat exchangers.
Product Forms:
- Hot-rolled plates
- Cold-rolled sheets
- Cold-rolled strips
Condition and Finishes:
- Supplied in the annealed condition
- Surface finishes include descaled or bright annealed
Mechanical and Physical Requirements:
- Specified tensile strength and elongation after heat treatment
- Low and controlled coefficient of thermal expansion
- Precise dimensional and flatness tolerances for each product type
Testing and Compliance:
- Chemical composition verified by product analysis
- Mechanical properties assessed through tension tests
- Thermal expansion measured according to standardized methods
- Sampling, inspection, and product marking requirements outlined
Applications
The precipitation-hardening nickel alloys specified in ASTM B872-19 are engineered to meet the needs of advanced industrial sectors:
- Superconductor Cable Sheathing: Alloy UNS N09908 is valuable where a low coefficient of expansion is essential for stability and performance.
- Oil and Gas Industry: Alloys UNS N09925 and N07725 are suitable for use in harsh, sour service environments, offering resistance to corrosion and sulfide stress cracking.
- High-Temperature Equipment: Alloy UNS N07740 is optimal for manufacturing boilers, pressure vessels, and heat exchangers, thanks to its thermal stability and strength at elevated temperatures.
- Fabrication Tooling: The alloys are also used to produce tooling components that must maintain tight tolerances under fluctuating temperatures.
Related Standards
Users involved in fabrication, quality assurance, or material procurement should also consult the following related ASTM standards for comprehensive compliance and optimal material performance:
- ASTM E8 / E8M: Test Methods for Tension Testing of Metallic Materials
- ASTM E228: Test Method for Linear Thermal Expansion of Solid Materials
- ASTM E1473: Test Methods for Chemical Analysis of Nickel, Cobalt, and High-Temperature Alloys
- ASTM E29: Practice for Using Significant Digits in Test Data to Determine Conformance with Specifications
Practical Value
ASTM B872-19 helps organizations ensure the reliability, quality, and consistency of precipitation-hardening nickel alloy plates, sheets, and strips used in critical engineering applications. Compliance with this standard supports high-performance results in environments requiring superior mechanical properties and resistance to thermal and chemical stresses. Using materials specified in ASTM B872-19, engineers and manufacturers can confidently meet demanding operational, safety, and regulatory requirements across a range of high-technology industries.
Buy Documents
ASTM B872-19 - Standard Specification for Precipitation-Hardening Nickel Alloys Plate, Sheet, and Strip
REDLINE ASTM B872-19 - Standard Specification for Precipitation-Hardening Nickel Alloys Plate, Sheet, and Strip
Get Certified
Connect with accredited certification bodies for this standard

Element Materials Technology
Materials testing and product certification.

Inštitut za kovinske materiale in tehnologije
Institute of Metals and Technology. Materials testing, metallurgical analysis, NDT.
Sponsored listings
Frequently Asked Questions
ASTM B872-19 is a technical specification published by ASTM International. Its full title is "Standard Specification for Precipitation-Hardening Nickel Alloys Plate, Sheet, and Strip". This standard covers: ABSTRACT This specification covers rolled precipitation hardenable UNS N09908, N09925, and N07725 nickel-iron-chromium-columbium-titanium-aluminum alloy plates, sheets, and strips in annealed condition. These materials are used as sheathing for superconductor cables, tooling for the fabrication of such cables and for other applications that require materials with low coefficients of expansion. Precipitation heat treatments for the materials entail heating to a specified temperature, holding at that temperature and then air or furnace cooling. SCOPE 1.1 This specification covers rolled precipitation hardenable nickel-iron-chromium-niobium-titanium-aluminum alloy (N09908), nickel-chromium-molybdenum-copper-titanium-niobium alloy (N09925), nickel-chromium-molybdenum-niobium-titanium alloy (N07725) and nickel-chromium-cobalt-titanium-niobium alloy (N07740) plate, sheet, and strip in the annealed condition (temper). Alloy N09908 is used as sheathing for super conductor cables, as tooling for fabrication of such cables, and for other applications requiring a material with low coefficient-of-expansion properties. Alloys N09925 and N07725 are used in sour service conditions in oil and gas applications. Alloy N07740 is used in the construction of high temperature boilers, pressure vessels, and heat exchangers. 1.2 The values stated in inch-pound units are to be regarded as standard. The values given in parentheses are mathematical conversions to SI units that are provided for information only and are not considered standard. 1.3 This standard does not purport to address all of the safety concerns, if any, associated with its use. It is the responsibility of the user of this standard to become familiar with all hazards including those identified in the appropriate Safety Data Sheet (SDS) for this product/material as provided by the manufacturer, to establish appropriate safety, health, and environmental practices, and determine the applicability of regulatory limitations prior to use. 1.4 This international standard was developed in accordance with internationally recognized principles on standardization established in the Decision on Principles for the Development of International Standards, Guides and Recommendations issued by the World Trade Organization Technical Barriers to Trade (TBT) Committee.
ABSTRACT This specification covers rolled precipitation hardenable UNS N09908, N09925, and N07725 nickel-iron-chromium-columbium-titanium-aluminum alloy plates, sheets, and strips in annealed condition. These materials are used as sheathing for superconductor cables, tooling for the fabrication of such cables and for other applications that require materials with low coefficients of expansion. Precipitation heat treatments for the materials entail heating to a specified temperature, holding at that temperature and then air or furnace cooling. SCOPE 1.1 This specification covers rolled precipitation hardenable nickel-iron-chromium-niobium-titanium-aluminum alloy (N09908), nickel-chromium-molybdenum-copper-titanium-niobium alloy (N09925), nickel-chromium-molybdenum-niobium-titanium alloy (N07725) and nickel-chromium-cobalt-titanium-niobium alloy (N07740) plate, sheet, and strip in the annealed condition (temper). Alloy N09908 is used as sheathing for super conductor cables, as tooling for fabrication of such cables, and for other applications requiring a material with low coefficient-of-expansion properties. Alloys N09925 and N07725 are used in sour service conditions in oil and gas applications. Alloy N07740 is used in the construction of high temperature boilers, pressure vessels, and heat exchangers. 1.2 The values stated in inch-pound units are to be regarded as standard. The values given in parentheses are mathematical conversions to SI units that are provided for information only and are not considered standard. 1.3 This standard does not purport to address all of the safety concerns, if any, associated with its use. It is the responsibility of the user of this standard to become familiar with all hazards including those identified in the appropriate Safety Data Sheet (SDS) for this product/material as provided by the manufacturer, to establish appropriate safety, health, and environmental practices, and determine the applicability of regulatory limitations prior to use. 1.4 This international standard was developed in accordance with internationally recognized principles on standardization established in the Decision on Principles for the Development of International Standards, Guides and Recommendations issued by the World Trade Organization Technical Barriers to Trade (TBT) Committee.
ASTM B872-19 is classified under the following ICS (International Classification for Standards) categories: 77.140.20 - Stainless steels. The ICS classification helps identify the subject area and facilitates finding related standards.
ASTM B872-19 has the following relationships with other standards: It is inter standard links to ASTM B872-06(2016), ASTM E228-11(2016), ASTM E29-08, ASTM E29-06b, ASTM E29-06a, ASTM E228-06, ASTM E29-06, ASTM E29-04, ASTM E8-04, ASTM E1473-03, ASTM E1473-94a(2003), ASTM E8-03, ASTM E29-02e1, ASTM E8-01e2, ASTM E8-01e1. Understanding these relationships helps ensure you are using the most current and applicable version of the standard.
ASTM B872-19 is available in PDF format for immediate download after purchase. The document can be added to your cart and obtained through the secure checkout process. Digital delivery ensures instant access to the complete standard document.
Standards Content (Sample)
This international standard was developed in accordance with internationally recognized principles on standardization established in the Decision on Principles for the
Development of International Standards, Guides and Recommendations issued by the World Trade Organization Technical Barriers to Trade (TBT) Committee.
Designation:B872 −19
Standard Specification for
Precipitation-Hardening Nickel Alloys Plate, Sheet, and
Strip
This standard is issued under the fixed designation B872; the number immediately following the designation indicates the year of
original adoption or, in the case of revision, the year of last revision.Anumber in parentheses indicates the year of last reapproval.A
superscript epsilon (´) indicates an editorial change since the last revision or reapproval.
1. Scope* 2. Referenced Documents
1.1 This specification covers rolled precipitation hardenable 2.1 ASTM Standards:
nickel-iron-chromium-niobium-titanium-aluminum alloy E8Test Methods for Tension Testing of Metallic Materials
(N09908), nickel-chromium-molybdenum-copper-titanium- [Metric] E0008_E0008M
niobium alloy (N09925), nickel-chromium-molybdenum- E29Practice for Using Significant Digits in Test Data to
niobium-titanium alloy (N07725) and nickel-chromium- Determine Conformance with Specifications
cobalt-titanium-niobium alloy (N07740) plate, sheet, and strip E228Test Method for Linear Thermal Expansion of Solid
in the annealed condition (temper). Alloy N09908 is used as Materials With a Push-Rod Dilatometer
sheathing for super conductor cables, as tooling for fabrication E1473Test Methods for Chemical Analysis of Nickel, Co-
of such cables, and for other applications requiring a material balt and High-Temperature Alloys
with low coefficient-of-expansion properties. Alloys N09925
3. Terminology
and N07725 are used in sour service conditions in oil and gas
applications.Alloy N07740 is used in the construction of high 3.1 Definitions of Terms Specific to This Standard:
temperature boilers, pressure vessels, and heat exchangers.
3.1.1 The terms given in Table 1 shall apply.
1.2 The values stated in inch-pound units are to be regarded
4. Ordering Information
as standard. The values given in parentheses are mathematical
4.1 Orders for material under this specification should
conversions to SI units that are provided for information only
include the following information:
and are not considered standard.
4.1.1 Alloy—Name or UNS number (see Table 2).
1.3 This standard does not purport to address all of the
4.1.2 ASTM designation and year of issue.
safety concerns, if any, associated with its use. It is the
4.1.3 Condition—See 6.1 and Appendix X1.
responsibility of the user of this standard to become familiar
4.1.4 Finish—See Appendix X1.
with all hazards including those identified in the appropriate
4.1.5 Dimensions—Thickness, width, and length.
Safety Data Sheet (SDS) for this product/material as provided
4.1.6 Quantity.
by the manufacturer, to establish appropriate safety, health,
4.1.7 Optional Requirements:
and environmental practices, and determine the applicability
4.1.7.1 Sheet and Strip—Whether to be furnished in coil, in
of regulatory limitations prior to use.
cut straight lengths, or in random straight lengths.
1.4 This international standard was developed in accor-
4.1.7.2 Strip—Whethertobefurnishedwithcommercialslit
dance with internationally recognized principles on standard-
edge, square edge, or round edge.
ization established in the Decision on Principles for the
4.1.7.3 Plate—Whether to be furnished specially flattened
Development of International Standards, Guides and Recom-
(see 7.7); also how plate is to be cut (see 7.2.1 and 7.3.2).
mendations issued by the World Trade Organization Technical
4.1.8 Fabrication Details—Not mandatory but helpful to
Barriers to Trade (TBT) Committee.
the manufacturer:
4.1.8.1 Welding or Brazing—Process to be employed.
4.1.8.2 Plate—Whether material is to be hot-formed.
This specification is under the jurisdiction of ASTM Committee B02 on
Nonferrous Metals and Alloys and is the direct responsibility of Subcommittee
B02.07 on Refined Nickel and Cobalt and Their Alloys. For referenced ASTM standards, visit the ASTM website, www.astm.org, or
Current edition approved Nov. 1, 2019. Published November 2019. Originally contact ASTM Customer Service at service@astm.org. For Annual Book of ASTM
approved in 1996. Last previous edition approved in 2016 as B872–06 (2016). Standards volume information, refer to the standard’s Document Summary page on
DOI: 10.1520/B0872-19. the ASTM website.
*A Summary of Changes section appears at the end of this standard
Copyright © ASTM International, 100 Barr Harbor Drive, PO Box C700, West Conshohocken, PA 19428-2959. United States
B872−19
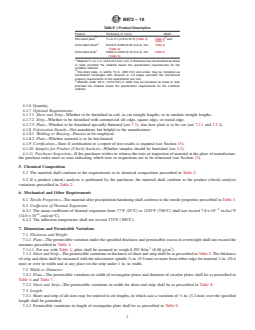
TABLE 1 Product Description
7.2.1 Plate—The permissible variations in width of rectan-
Product Thickness, in. (mm) Width gular plates and diameter of circular plates shall be as
A B
3 1
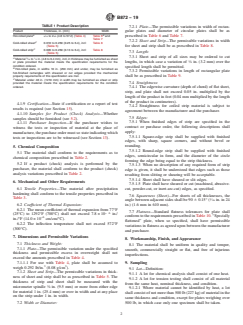
Hot-rolled plate ⁄16 to 2 ⁄4 (4.8 to 57.2) (Table 4) Table 6 and prescribed in Table 6 and Table 7.
Table 7
7.2.2 Sheet and Strip—The permissible variations in width
C
Cold-rolled sheet 0.010 to 0.250 (0.25 to 6.4), incl Table 8
for sheet and strip shall be as prescribed in Table 8.
(Table 5)
C
Cold-rolled strip 0.005 to 0.250 (0.13 to 6.4), incl Table 8
7.3 Length:
(Table 5)
7.3.1 Sheet and strip of all sizes may be ordered to cut
A
3 1
Material ⁄16 to ⁄4in.(4.8to6.4mm),incl,inthicknessmaybefurnishedassheet
lengths, in which case a variation of ⁄8 in. (3.2 mm) over the
or plate provided the material meets the specification requirements for the
condition ordered.
specified length shall be permitted.
B
Hot-rolled plate, in widths 10 in. (250 mm) and under, may be furnished as
7.3.2 Permissible variations in length of rectangular plate
hot-finished rectangles with sheared or cut edges provided the mechanical
shall be as prescribed in Table 9.
property requirements of this specification are met.
C
Material under 48 in. (1219 mm) in width may be furnished as sheet or strip
7.4 Straightness:
provided the material meets the specification requirements for the condition
ordered.
7.4.1 The edgewise curvature (depth of chord) of flat sheet,
strip, and plate shall not exceed 0.05 in. multiplied by the
length of the product in feet (0.04 mm multiplied by the length
of the product in centimetres).
4.1.9 Certification—State if certification or a report of test
7.4.2 Straightness for coiled strip material is subject to
results is required (see Section 15).
agreement between the manufacturer and the purchaser.
4.1.10 Samples for Product (Check) Analysis—Whether
7.5 Edges:
samples should be furnished (see 5.2).
7.5.1 When finished edges of strip are specified in the
4.1.11 Purchaser Inspection—If the purchaser wishes to
contract or purchase order, the following descriptions shall
witness the tests or inspection of material at the place of
apply:
manufacture,thepurchaseordermustsostateindicatingwhich
7.5.1.1 Square-edge strip shall be supplied with finished
tests or inspections are to be witnessed (see Section 13).
edges, with sharp, square corners, and without bevel or
5. Chemical Composition rounding.
7.5.1.2 Round-edge strip shall be supplied with finished
5.1 The material shall conform to the requirements as to
edges, semicircular in form, and the diameter of the circle
chemical composition prescribed in Table 2.
forming the edge being equal to the strip thickness.
5.2 If a product (check) analysis is performed by the
7.5.1.3 When no description of any required form of strip
purchaser, the material shall conform to the product (check)
edge is given, it shall be understood that edges such as those
analysis variations prescribed in Table 2.
resulting from slitting or shearing will be acceptable.
7.5.1.4 Sheet shall have sheared or slit edges.
6. Mechanical and Other Requirements
7.5.1.5 Plate shall have sheared or cut (machined, abrasive-
6.1 Tensile Properties—The material after precipitation
cut, powder-cut, or inert-arc-cut) edges, as specified.
hardening shall conform to the tensile properties prescribed in
7.6 Squareness (Sheet)—For sheets of all thicknesses, the
Table 3.
angle between adjacent sides shall be 90 6 0.15° ( ⁄16 in. in 24
6.2 Coeffıcient of Thermal Expansion: in.) (1.6 mm in 610 mm).
6.2.1 The mean coefficient of thermal expansion from 77°F
7.7 Flatness—Standard flatness tolerances for plate shall
−6
(25°C) to 1292°F (700°C) shall not exceed 7.8×10 in./
conformtotherequirementsprescribedinTable10.“Specially
−6
in./°F (14.0×10 cm/cm/°C).
flattened” plate, when so specified, shall have permissible
6.2.2 The inflection temperature shall not exceed 572°F
variations in flatness as agreed upon between the manufacturer
(300°C).
and purchaser.
7. Dimensions and Permissible Variations
8. Workmanship, Finish, and Appearance
7.1 Thickness and Weight:
8.1 The material shall be uniform in quality and temper,
7.1.1 Plate—The permissible variation under the specified
smooth, commercially straight or flat, and free of injurious
thickness and permissible excess in overweight shall not
imperfections.
exceed the amounts prescribed in Table 4.
7.1.1.1 For use with Table 4, plate shall be assumed to 9. Sampling
3 3
weigh 0.292 lb/in. (8.08 g/cm ).
9.1 Lot—Definition:
7.1.2 Sheet and Strip—The permissible variations in thick-
9.1.1 A lot for chemical analysis shall consist of one heat.
ness of sheet and strip shall be as prescribed in Table 5. The
9.1.2 A lot for tension testing shall consist of all material
thickness of strip and sheet shall be measured with the
from the same heat, nominal thickness, and condition.
micrometer spindle ⁄8in. (9.5 mm) or more from either edge
9.1.2.1 Where material cannot be identified by heat, a lot
for material 1 in. (25.4 mm) or over in width and at any place
shallconsistofnotmorethan500lb(227kg)ofmaterialinthe
on the strip under 1 in. in width.
same thickness and condition, except for plates weighing over
7.2 Width or Diameter: 500 lb, in which case only one specimen shall be taken.
B872−19
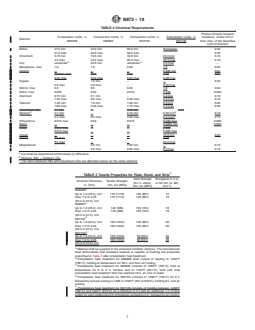
TABLE 2 Chemical Requirements
Product (Check) Analysis
Composition Limits, % Composition Limits, % Composition Limits, % Composition Limits, % Variations, Under min or
Element
N09908 N09925 N07725 N07740 Over max, of the Specified
Limit of Element
Nickel 47.0 min 42.0 min 55.0 min Remainder 0.35
51.0 max 46.0 max 59.0 max 0.35
Chromium 3.75 min 19.5 min 19.0 min 23.5 min 0.10
4.5 max 22.5 max 22.5 max 25.5 max 0.10
A A
Iron remainder 22.0 min remainder 3.0 max .
Manganese, max 1.0 1.0 0.35 1.0 0.03
Carbon . . . 0.005 min 0.01
0.03 max 0.03 max 0.03 max 0.08 max
Copper . 1.5 min . . 0.03
0.5 max 3.0 max . 0.50 max
Silicon, max 0.5 0.5 0.20 1.0 0.03
Sulfur, max 0.005 0.03 0.010 0.030 0.003
Aluminum 0.75 min 0.1 min . 0.2 min 0.10
1.25 max 0.5 max 0.35 max 2.0 max 0.10
Titanium 1.20 min 1.9 min 1.00 min 0.5 min 0.05
1.80 max 2.40 max 1.70 max 2.5 max 0.05
C B
Niobium 2.7 min . 2.75 min 0.50 min 0.10
B
3.3 max 0.5 max 4.00 max 2.5 max 0.15
Phosphorus 0.015 max 0.03 0.015 0.030 max 0.005
Boron . . . 0.0006 min 0.005
0.012 max . . 0.006 max
Cobalt . . . 15.0 min 0.03
0.5 max . . 22.0 max
Molybdenum . 2.5 min 7.00 min . 0.15
... 3.5 max 9.50 max 2.0 max 0.15
A
Iron shall be determined arithmetically by difference.
B
Niobium (Nb) + Tantalum (Ta).
C
The terms Niobium (Nb) and Columbium (Cb) are alternate names for the same element.
A
TABLE 3 Tensile Properties for Plate, Sheet, and Strip
9.2.1.1 Product (Check) Analysis shall be wholly the re-
Yield Strength Elongation in 2 in.
sponsibility of the purchaser.
Nominal Thickness, Tensile Strength,
(0.2 % offset), or 50 mm (or 4D),
in. (mm) min, ksi (MPa)
9.2.2 Tension and Coeffıcient of Thermal Expansion
min, ksi (MPa) min %
B
N09908 Testing—Samples of the material to provide test specimens for
Up to 1.0 (25.4), incl 170 (1172) 120 (827) 12
tension and coefficient of thermal expansion testing shall be
Over 1.0 to 2.25 170 (1172) 120 (827) 10
taken from such locations in each lot as to be representative of
(25.4 to 57.2), incl
C
N09925 that lot.
Up to 1.0 (25.4), incl 140 (965) 105 (724) 18
Over 1.0 to 2.25 140 (965) 105 (724) 18
10. Number of Tests
(25.4 to 57.2), incl
D
N07725
10.1 Chemical Analysis—One test per lot.
Up to 1.0 (25.4), incl 150 (1034) 120 (827) 20
Over 1.0 to 2.25 150 (1034) 120 (827) 20
10.2 Tension—One test per lot.
(25.4 to 57.2), incl
E
N07740
10.3 Coeffıcient of Thermal Expansion—One test per lot.
Up to 1.0 (25.4), incl 150 (1034) 90 (621) 20
Over 1.0 to 2.25 150 (1034) 90 (621) 20
(25.4 to 57.2), incl
11. Specimen Preparation
A
Material shall be supplied in the annealed condition (temper). The manufacturer
11.1 Tension test specimens shall be taken from material in
shall demonstrate that annealed material is capable of meeting the properties
prescribed in Table 3 after precipitation heat treatment.
the annealed condition (temper). The specimen shall be trans-
B
Precipitation heat treatment for N09908 shall consist of heating to 1292°F
verse to the direction of rolling when width will permit. The
(700°C), holding at temperature for 50 h, and then air cooling.
C
Precipitation heat treatment for N09925 consists of 1365°F (740°C), hold at test specimen shall be precipitation heat treated (see Table 3)
temperature for 6 to 9 h, furnace cool to 1150°F (621°C), hold until total
prior to testing.
precipitation heat treatment time has reached 18 h, air cool or faster.
D
Precipitation heat treatment for N07725 consists of 1350°F (732°C) for 8 h
11.2 Tension test specimens shall be any of the standard or
followed by furnace cooling to 1500 to 1200°F (621 to 649°C), holding 8 h, and air
subsize specimens shown in Test Methods E8.
cooling.
E
Precipitation heat treatment for N07740 consists of holding between 1400°F
11.3 In the event of disagreement, referee specimens shall
(760°C) and 1500°F (816°C) for a minimum of 4 h with an additional ⁄2 h of time
added for each additional inch of thickness exceeding 2 in. followed by air cooling. be as follows:
11.3.1 Full thickness of the material machined to the form
and dimensions shown for the sheet-type specimen in Test
Methods E8 for material under ⁄2 in. (12.7 mm) in thickness.
9.2 Test Material Selection:
9.2.1 Chemical Analysis—Representative samples shall be 11.3.2 The largest possible round specimen shown in Test
taken during pouring or subsequent processing. Methods E8 for material ⁄2 in. (12.7 mm) and over.
B872−19
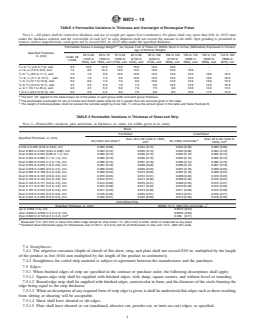
TABLE 4 Permissible Variations in Thickness and Overweight of Rectangular Plates
NOTE 1—All plates shall be ordered to thickness and not to weight per square foot (centimetre). No plates shall vary more than 0.01 in. (0.25 mm)
A
under the thickness ordered, and the overweight of each lot in each shipment shall not exceed the amount in the table. Spot grinding is permitted to
remove surface imperfections, such spots not to exceed 0.01 in. (0.25 mm) under the specified thickness.
B,C
Permissible Excess in Average Weight per Square Foot of Plates for Widths Given in Inches (Millimetres) Expressed in Percent-
age of Nominal Weights
Specified Thickness,
48 to 60 60 to 72 72 to 84 84 to 96 96 to 108 108 to 120 120 to 132 132 to 144 144 to 160
in. (mm)
Under 48
(1220 to (1520 to (1830 to (2130 to (2440 to (2740 to (3050 to (3350 to (3660 to
(1220)
1520), excl 1830), excl 2130), excl 2440), excl 2740), excl 3050), excl 3350), excl 3660), excl 4070), incl
3 5
⁄16 to ⁄16 (4.8 to 7.9), excl 9.0 10.5 12.0 13.5 15.0 16.5 18.0 . . .
5 3
⁄16 to ⁄8 (7.9 to 9.5), excl 7.5 9.0 10.5 12.0 13.5 15.0 16.5 18.0 . .
3 7
⁄8 to ⁄16 (9.5 to 11.1), excl 7.0 7.5 9.0 10.5 12.0 13.5 15.0 16.5 18.0 19.5
7 1
⁄16 to ⁄2 (11.1 to 12.7), excl 6.0 7.0 7.5 9.0 10.5 12.0 13.5 15.0 16.5 18.0
1 5
⁄2 to ⁄8 (12.7 to 15.9), excl 5.0 6.0 7.0 7.5 9.0 10.5 12.0 13.5 15.0 16.5
5 3
⁄8 to ⁄4 (15.9 to 19.1), excl 4.5 5.5 6.0 7.0 7.5 9.0 10.5 12.0 13.5 15.0
⁄4 to 1 (19.1 to 25.4), excl 4.0 4.5 5.5 6.0 7.0 7.5 9.0 10.5 12.0 13.5
1to2 ⁄4 (25.4 to 57.2), incl 5.0 5.0 5.5 6.5 7.0 8.0 8.5 10.0 11.5 13.0
A
The term “lot” applied to this table means all of the plates of each group width and each group thickness.
B
The permissible overweight for lots of circular and sketch plates shall be 25 % greater than the amounts given in this table.
C
The weight of individual plates shall not exceed the nominal weight by more than 1 ⁄4 times the amount given in this table and Table Footnote B.
TABLE 5 Permissible Variations in Thickness of Sheet and Strip
NOTE 1—Permissible variations, plus and minus, in thickness, in. (mm), for widths given in in. (mm).
Sheet
Hot-Rolled Cold-Rolled
Specified Thickness, in. (mm)
Over 48 to 60 (1220 to 1520), Over 48 to 60 (1220 to
A A
48 (1220) and Under 48 (1220) and Under
A A
incl 1520), incl
0.018 to 0.025 (0.46 to 0.64), incl 0.003 (0.08) 0.004 (0.10) 0.002 (0.05) 0.003 (0.08)
Over 0.025 to 0.034 (0.64 to 0.86), incl 0.004 (0.10) 0.005 (0.13) 0.003 (0.08) 0.004 (0.10)
Over 0.034 to 0.043 (0.86 to 1.1), incl 0.005 (0.13) 0.006 (0.15) 0.004 (0.10) 0.005 (0.13)
Over 0.043 to 0.056 (1.1 to 1.4), incl 0.005 (0.13) 0.006 (0.15) 0.004 (0.10) 0.005 (0.13)
Over 0.056 to 0.070 (1.4 to 1.8), incl 0.006 (0.15) 0.007 (0.18) 0.005 (0.13) 0.006 (0.15)
Over 0.070 to 0.078 (1.8 to 2.0), incl 0.007 (0.18) 0.008 (0.20) 0.006 (0.15) 0.007 (0.18)
Over 0.078 to 0.093 (2.0 to 2.4), incl 0.008 (0.20) 0.009 (0.23) 0.007 (0.18) 0.008 (0.20)
Over 0.093 to 0.109 (2.4 to 2.8), incl 0.009 (0.23) 0.010 (0.25)
...
This document is not an ASTM standard and is intended only to provide the user of an ASTM standard an indication of what changes have been made to the previous version. Because
it may not be technically possible to adequately depict all changes accurately, ASTM recommends that users consult prior editions as appropriate. In all cases only the current version
of the standard as published by ASTM is to be considered the official document.
Designation: B872 − 06 (Reapproved 2016) B872 − 19
Standard Specification for
Precipitation-Hardening Nickel Alloys Plate, Sheet, and
Strip
This standard is issued under the fixed designation B872; the number immediately following the designation indicates the year of
original adoption or, in the case of revision, the year of last revision. A number in parentheses indicates the year of last reapproval. A
superscript epsilon (´) indicates an editorial change since the last revision or reapproval.
1. Scope Scope*
1.1 This specification covers rolled precipitation hardenable nickel-iron-chromium-columbium (Nb)-titanium-aluminum alloy
(N09908) nickel-iron-chromium-niobium-titanium-aluminum alloy (N09908), nickel-chromium-molybdenum-copper-titanium-
niobium alloy (N09925), nickel-chromium-molybdenum-niobium-titanium alloy (N07725) and nickel-chromium-cobalt-titanium-
niobium alloy (N07740) plate, sheet, and strip in the annealed condition (temper). This alloyAlloy N09908 is used as sheathing
for super conductor cables, as tooling for fabrication of such cables, and for other applications requiring a material with low
coefficient-of-expansion properties. Alloys N09925 and N07725 are used in sour service conditions in oil and gas applications.
Alloy N07740 is used in the construction of high temperature boilers, pressure vessels, and heat exchangers.
1.2 The values stated in inch-pound units are to be regarded as standard. The values given in parentheses are mathematical
conversions to SI units that are provided for information only and are not considered standard.
1.3 This standard does not purport to address all of the safety concerns, if any, associated with its use. It is the responsibility
of the user of this standard to become familiar with all hazards including those identified in the appropriate Safety Data Sheet
(SDS) for this product/material as provided by the manufacturer, to establish appropriate safety safety, health, and healthenvi-
ronmental practices, and determine the applicability of regulatory limitations prior to use.
1.4 This international standard was developed in accordance with internationally recognized principles on standardization
established in the Decision on Principles for the Development of International Standards, Guides and Recommendations issued
by the World Trade Organization Technical Barriers to Trade (TBT) Committee.
2. Referenced Documents
2.1 ASTM Standards:
E8 Test Methods for Tension Testing of Metallic Materials [Metric] E0008_E0008M
E29 Practice for Using Significant Digits in Test Data to Determine Conformance with Specifications
E228 Test Method for Linear Thermal Expansion of Solid Materials With a Push-Rod Dilatometer
E1473 Test Methods for Chemical Analysis of Nickel, Cobalt and High-Temperature Alloys
3. Terminology
3.1 Definitions of Terms Specific to This Standard:
3.1.1 The terms given in Table 1 shall apply.
4. Ordering Information
4.1 Orders for material under this specification should include the following information:
4.1.1 Alloy—Name or UNS number (see Table 2).
4.1.2 ASTM designation and year of issue.
4.1.3 Condition—See 6.1 and Appendix X1.
4.1.4 Finish—See Appendix X1.
4.1.5 Dimensions—Thickness, width, and length.
This specification is under the jurisdiction of ASTM Committee B02 on Nonferrous Metals and Alloys and is the direct responsibility of Subcommittee B02.07 on Refined
Nickel and Cobalt and Their Alloys.
Current edition approved June 1, 2016Nov. 1, 2019. Published June 2016November 2019. Originally approved in 1996. Last previous edition approved in 20112016 as
B872 – 11.B872 – 06 (2016). DOI: 10.1520/B0872-06R16.10.1520/B0872-19.
For referenced ASTM standards, visit the ASTM website, www.astm.org, or contact ASTM Customer Service at service@astm.org. For Annual Book of ASTM Standards
volume information, refer to the standard’s Document Summary page on the ASTM website.
*A Summary of Changes section appears at the end of this standard
Copyright © ASTM International, 100 Barr Harbor Drive, PO Box C700, West Conshohocken, PA 19428-2959. United States
B872 − 19
TABLE 1 Product Description
Product Thickness, in. (mm) Width
A B
3 1
Hot-rolled plate ⁄16 to 2 ⁄4 (4.8 to 57.2) (Table 4) Table 6 and
Table 7
C
Cold-rolled sheet 0.010 to 0.250 (0.25 to 6.4), incl Table 8
(Table 5)
C
Cold-rolled strip 0.005 to 0.250 (0.13 to 6.4), incl Table 8
(Table 5)
A 3 1
Material ⁄16 to ⁄4 in. (4.8 to 6.4 mm), incl, in thickness may be furnished as sheet
or plate provided the material meets the specification requirements for the
condition ordered.
B
Hot-rolled plate, in widths 10 in. (250 mm) and under, may be furnished as
hot-finished rectangles with sheared or cut edges provided the mechanical
property requirements of this specification are met.
C
Material under 48 in. (1219 mm) in width may be furnished as sheet or strip
provided the material meets the specification requirements for the condition
ordered.
4.1.6 Quantity.
4.1.7 Optional Requirements:
4.1.7.1 Sheet and Strip—Whether to be furnished in coil, in cut straight lengths, or in random straight lengths.
4.1.7.2 Strip—Whether to be furnished with commercial slit edge, square edge, or round edge.
4.1.7.3 Plate—Whether to be furnished specially flattened (see 7.7); also how plate is to be cut (see 7.2.1 and 7.3.2).
4.1.8 Fabrication Details—Not mandatory but helpful to the manufacturer:
4.1.8.1 Welding or Brazing—Process to be employed.
4.1.8.2 Plate—Whether material is to be hot-formed.
4.1.9 Certification—State if certification or a report of test results is required (see Section 15).
4.1.10 Samples for Product (Check) Analysis—Whether samples should be furnished (see 5.2).
4.1.11 Purchaser Inspection—If the purchaser wishes to witness the tests or inspection of material at the place of manufacture,
the purchase order must so state indicating which tests or inspections are to be witnessed (see Section 13).
5. Chemical Composition
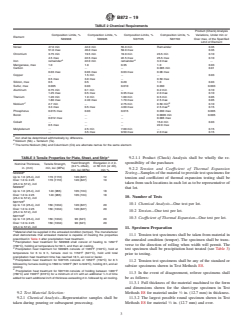
5.1 The material shall conform to the requirements as to chemical composition prescribed in Table 2.
5.2 If a product (check) analysis is performed by the purchaser, the material shall conform to the product (check) analysis
variations prescribed in Table 2.
6. Mechanical and Other Requirements
6.1 Tensile Properties—The material after precipitation hardening shall conform to the tensile properties prescribed in Table 3.
6.2 Coeffıcient of Thermal Expansion:
− 6
6.2.1 The mean coefficient of thermal expansion from 77°F (25°C) to 1292°F (700°C) shall not exceed 7.8 × 10 in./in./°F
−6
(14.0 × 10 cm/cm/°C).
6.2.2 The inflection temperature shall not exceed 572°F (300°C).
7. Dimensions and Permissible Variations
7.1 Thickness and Weight:
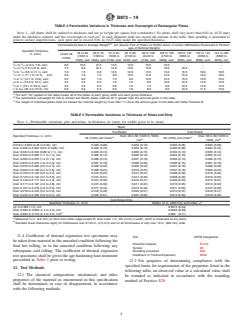
7.1.1 Plate—The permissible variation under the specified thickness and permissible excess in overweight shall not exceed the
amounts prescribed in Table 4.
3 3
7.1.1.1 For use with Table 4, plate shall be assumed to weigh 0.292 lb/in. (8.08 g/cm ).
7.1.2 Sheet and Strip—The permissible variations in thickness of sheet and strip shall be as prescribed in Table 5. The thickness
of strip and sheet shall be measured with the micrometer spindle ⁄8 in. (9.5 mm) or more from either edge for material 1 in. (25.4
mm) or over in width and at any place on the strip under 1 in. in width.
7.2 Width or Diameter:
7.2.1 Plate—The permissible variations in width of rectangular plates and diameter of circular plates shall be as prescribed in
Table 6 and Table 7.
7.2.2 Sheet and Strip—The permissible variations in width for sheet and strip shall be as prescribed in Table 8.
7.3 Length:
7.3.1 Sheet and strip of all sizes may be ordered to cut lengths, in which case a variation of ⁄8 in. (3.2 mm) over the specified
length shall be permitted.
7.3.2 Permissible variations in length of rectangular plate shall be as prescribed in Table 9.
B872 − 19
TABLE 2 Chemical Requirements
Product (Check) Analysis
Composition Limits, % Composition Limits, % Composition Limits, % Composition Limits, % Variations, Under min or
Element
N09908 N09925 N07725 N07740 Over max, of the Specified
Limit of Element
Nickel 47.0 min 42.0 min 55.0 min Remainder 0.35
51.0 max 46.0 max 59.0 max 0.35
Chromium 3.75 min 19.5 min 19.0 min 23.5 min 0.10
4.5 max 22.5 max 22.5 max 25.5 max 0.10
A A
Iron remainder 22.0 min remainder 3.0 max .
Manganese, max 1.0 1.0 0.35 1.0 0.03
Carbon . . . 0.005 min 0.01
Carbon, max 0.03 0.03 0.03 0.01
0.03 max 0.03 max 0.03 max 0.08 max
Copper . 1.5 min . . 0.03
0.5 max 3.0 max . 0.50 max
Silicon, max 0.5 0.5 0.20 1.0 0.03
Sulfur, max 0.005 0.03 0.010 0.030 0.003
Aluminum 0.75 min 0.1 min . 0.2 min 0.10
1.25 max 0.5 max 0.35 max 2.0 max 0.10
Titanium 1.20 min 1.9 min 1.00 min 0.5 min 0.05
1.80 max 2.40 max 1.70 max 2.5 max 0.05
Columbium (Nb) 2.7 min . 2.75 min 0.10
C B
Niobium 2.7 min . 2.75 min 0.50 min 0.10
B
3.3 max 0.5 max 4.00 max 2.5 max 0.15
Phosphorus 0.015 max 0.03 0.015 0.030 max 0.005
Boron . . . 0.0006 min 0.005
Boron 0.012 max . . 0.005
0.012 max . . 0.006 max
Cobalt . . . 15.0 min 0.03
Cobalt 0.5 max . . 0.03
0.5 max . . 22.0 max
Molybdenum . 2.5 min 7.00 min . 0.15
... 3.5 max 9.50 max 2.0 max 0.15
A
Iron shall be determined arithmetically by difference.
B
Niobium (Nb) + Tantalum (Ta).
C
The terms Niobium (Nb) and Columbium (Cb) are alternate names for the same element.
A
TABLE 3 Tensile Properties for Plate, Sheet, and Strip
Yield Strength Elongation in 2 in.
Nominal Thickness, Tensile Strength,
(0.2 % offset), or 50 mm (or 4D),
in. (mm) min, ksi (MPa)
min, ksi (MPa) min %
B
N09908
Up to 1.0 (25.4), incl 170 (1172) 120 (827) 12
Over 1.0 to 2.25 170 (1172) 120 (827) 10
(25.4 to 57.2), incl
C
N09925
Up to 1.0 (25.4), incl 140 (965) 105 (724) 18
Over 1.0 to 2.25 140 (965) 105 (724) 18
(25.4 to 57.2), incl
D
N07725
Up to 1.0 (25.4), incl 150 (1034) 120 (827) 20
Over 1.0 to 2.25 150 (1034) 120 (827) 20
(25.4 to 57.2), incl
E
N07740
Up to 1.0 (25.4), incl 150 (1034) 90 (621) 20
Over 1.0 to 2.25 150 (1034) 90 (621) 20
(25.4 to 57.2), incl
A
Material shall be supplied in the annealed condition (temper). The manufacturer
shall demonstrate that annealed material is capable of meeting the properties
prescribed in Table 3 after precipitation heat treatment.
B
Precipitation heat treatment for N09908 shall consist of heating to 1292°F
(700°C), holding at temperature for 50 h, and then air cooling.
C
Precipitation heat treatment for N09925 consists of 1365°F (740°C), hold at
temperature for 6 to 9 h, furnace cool to 1150°F (621°C), hold until total
precipitation heat treatment time has reached 18 h, air cool or faster.
D
Precipitation heat treatment for N07725 consists of 1350°F (732°C) for 8 h
followed by furnace cooling to 1500 to 1200°F (621 to 649°C), holding 8 h, and air
cooling.
E
Precipitation heat treatment for N07740 consists of holding between 1400°F
(760°C) and 1500°F (816°C) for a minimum of 4 h with an additional ⁄2 h of time
added for each additional inch of thickness exceeding 2 in. followed by air cooling.
B872 − 19
TABLE 4 Permissible Variations in Thickness and Overweight of Rectangular Plates
NOTE 1—All plates shall be ordered to thickness and not to weight per square foot (centimetre). No plates shall vary more than 0.01 in. (0.25 mm)
A
under the thickness ordered, and the overweight of each lot in each shipment shall not exceed the amount in the table. Spot grinding is permitted to
remove surface imperfections, such spots not to exceed 0.01 in. (0.25 mm) under the specified thickness.
B,C
Permissible Excess in Average Weight per Square Foot of Plates for Widths Given in Inches (Millimetres) Expressed in Percent-
age of Nominal Weights
Specified Thickness,
48 to 60 60 to 72 72 to 84 84 to 96 96 to 108 108 to 120 120 to 132 132 to 144 144 to 160
in. (mm)
Under 48
(1220 to (1520 to (1830 to (2130 to (2440 to (2740 to (3050 to (3350 to (3660 to
(1220)
1520), excl 1830), excl 2130), excl 2440), excl 2740), excl 3050), excl 3350), excl 3660), excl 4070), incl
3 5
⁄16 to ⁄16 (4.8 to 7.9), excl 9.0 10.5 12.0 13.5 15.0 16.5 18.0 . . .
5 3
⁄16 to ⁄8 (7.9 to 9.5), excl 7.5 9.0 10.5 12.0 13.5 15.0 16.5 18.0 . .
3 7
⁄8 to ⁄16 (9.5 to 11.1), excl 7.0 7.5 9.0 10.5 12.0 13.5 15.0 16.5 18.0 19.5
7 1
⁄16 to ⁄2 (11.1 to 12.7), excl 6.0 7.0 7.5 9.0 10.5 12.0 13.5 15.0 16.5 18.0
1 5
⁄2 to ⁄8 (12.7 to 15.9), excl 5.0 6.0 7.0 7.5 9.0 10.5 12.0 13.5 15.0 16.5
5 3
⁄8 to ⁄4 (15.9 to 19.1), excl 4.5 5.5 6.0 7.0 7.5 9.0 10.5 12.0 13.5 15.0
⁄4 to 1 (19.1 to 25.4), excl 4.0 4.5 5.5 6.0 7.0 7.5 9.0 10.5 12.0 13.5
1 to 2 ⁄4 (25.4 to 57.2), incl 5.0 5.0 5.5 6.5 7.0 8.0 8.5 10.0 11.5 13.0
A
The term “lot” applied to this table means all of the plates of each group width and each group thickness.
B
The permissible overweight for lots of circular and sketch plates shall be 25 % greater than the amounts given in this table.
C
The weight of individual plates shall not exceed the nominal weight by more than 1 ⁄4 times the amount given in this table and Table Footnote B.
TABLE 5 Permissible Variations in Thickness of Sheet and Strip
NOTE 1—Permissible variations, plus and minus, in thickness, in. (mm), for widths given in in. (mm).
Sheet
Hot-Rolled Cold-Rolled
Specified Thickness, in. (mm)
Over 48 to 60 (1220 to 1520), Over 48 to 60 (1220 to
A A
48 (1220) and Under 48 (1220) and Under
A A
incl 1520), incl
0.018 to 0.025 (0.46 to 0.64), incl 0.003 (0.08) 0.004 (0.10) 0.002 (0.05) 0.003 (0.08)
Over 0.025 to 0.034 (0.64 to 0.86), incl 0.004 (0.10) 0.005 (0.13) 0.003 (0.08) 0.004 (0.10)
Over 0.034 to 0.043 (0.86 to 1.1), incl 0.005 (0.13) 0.006 (0.15) 0.004 (0.10) 0.005 (0.13)
Over 0.043 to 0.056 (1.1 to 1.4), incl 0.005 (0.13) 0.006 (0.15) 0.004 (0.10) 0.005 (0.13)
Over 0.056 to 0.070 (1.4 to 1.8), incl 0.006 (0.15) 0.007 (0.18) 0.005 (0.13) 0.006 (0.15)
Over 0.070 to 0.078 (1.8 to 2.0), incl 0.007 (0.18) 0.008 (0.20) 0.006 (0.15) 0.007 (0.18)
Over 0.078 to 0.093 (2.0 to 2.4), incl 0.008 (0.20) 0.009 (0.23) 0.007 (0.18) 0.008 (0.20)
Over 0.093 to 0.109 (2.4 to 2.8), incl 0.009 (0.23) 0.010 (0.25) 0.007 (0.18) 0.009 (0.23)
Over 0.109 to 0.125 (2.8 to 3.2), incl 0.010 (0.25) 0.012 (0.31) 0.008 (0.20) 0.010 (0.25)
Over 0.125 to 0.140 (3.2 to 3.6), incl 0.012 (0.31) 0.014 (0.36) 0.008 (0.20) 0.010 (0.25)
Over 0.140 to 0.171 (3.6 to 4.3), incl 0.014 (0.36) 0.016 (0.41) 0.009 (0.23) 0.012 (0.31)
Over 0.171 to 0.187 (4.3 to 4.8), incl 0.015 (0.38) 0.017 (0.43) 0.010 (0.25) 0.013 (0.33)
Over 0.187 to 0.218 (4.8 to 5.5), incl 0.017 (0.43) 0.019 (0.48) 0.011 (0.28) 0.015 (0.38)
Over 0.218 to 0.234 (5.5 to 5.9), incl 0.018 (0.46) 0.020 (0.51) 0.012 (0.31) 0.016 (0.41)
Over 0.234 to 0.250 (5.9 to 6.4), incl 0.020 (0.51) 0.022 (0.56) 0.013 (0.33) 0.018 (0.46)
Cold-Rolled Strip
A
Specified Thickness, in. (mm) Widths 12 in. (305 mm) and Under, ±
Up to 0.050 (1.3), incl 0.0015 (0.04)
Over 0.050 to 0.093 (1.3 to 2.4), incl 0.0025 (0.06)
B
Over 0.093 to 0.125 (2.4 to 3.2), incl 0.004 (0.11)
A
Measured ⁄8 in. (9.5 mm) or more from either edge except for strip under 1 in. (25.4 mm) in width, which is measured at any place.
B
Standard sheet tolerances apply for thicknesses over 0.125 in. (3.2 mm) and for all thicknesses of strip over 12 in. (305 mm) wide.
7.4 Straightness:
7.4.1 The edgewise curvature (depth of chord) of flat sheet, strip, and plate shall not exceed 0.05 in. multiplied by the length
of the product in feet (0.04 mm multiplied by the length of the product in centimetres).
7.4.2 Straightness for coiled strip material is subject to agreement between the manufacturer and the purchaser.
7.5 Edges:
7.5.1 When finished edges of strip are specified in the contract or purchase order, the following descriptions shall apply:
7.5.1.1 Square-edge strip shall be supplied with finished edges, with sharp, square corners, and without bevel or rounding.
7.5.1.2 Round-edge strip shall be supplied with finished edges, semicircular in form, and the diameter of the circle forming the
edge being equal to the strip thickness.
7.5.1.3 When no description of any required form of strip edge is given, it shall be understood that edges such as those resulting
from slitting or shearing will be acceptable.
7.5.1.4 Sheet shall have sheared or slit edges.
7.5.1.5 Plate shall have sheared or cut (machined, abrasive-cut, powder-cut, or inert-arc-cut) edges, as specified.
B872 − 19
A B,C
TABLE 6 Permissible Variations in Width of Sheared, Plasma-Torch-Cut, and Abrasive-Cut Rectangular Plate
Permissible Variations in Widths for Widths Given, in. (mm)
Up to 30 (760), incl Over 30 to 72 (760 Over 72 to 108 (1830 Over 108 to 144 (2740 Over 144 to 160 (3660
Specified Thickness
to 1830), incl to 2740), incl to 3660), incl to 4070), incl
Plus Minus Plus Minus Plus Minus Plus Minus Plus Minus
Inches
D
Sheared:
3 5 3 1 1 1 3 1 1 1
⁄16 to ⁄16, excl ⁄16 ⁄8 ⁄4 ⁄8 ⁄8 ⁄8 ⁄2 ⁄8 . .
5 1 1 1 3 1 3 1 1 1 5 1
⁄16 to ⁄2, excl ⁄4 ⁄8 ⁄8 ⁄8 ⁄8 ⁄8 ⁄2 ⁄8 ⁄8 ⁄8
1 3 3 1 3 1 1 1 5 1 3 1
⁄2 to ⁄4, excl ⁄8 ⁄8 ⁄8 ⁄8 ⁄2 ⁄8 ⁄8 ⁄8 ⁄4 ⁄8
3 1 1 1 1 5 1 3 1 7 1
⁄4 to 1, excl ⁄2 ⁄8 ⁄2 ⁄8 ⁄8 ⁄8 ⁄4 ⁄8 ⁄8 ⁄8
1 5 1 5 1 3 1 7 1 1
1 to 1 ⁄4, incl ⁄8 ⁄8 ⁄8 ⁄8 ⁄4 ⁄8 ⁄8 ⁄8 1 ⁄8
E, F
Abrasive-cut:
3 1 1 1 1 1 1 1 1 1 1 1
⁄16 to 1 ⁄4, incl ⁄8 ⁄8 ⁄8 ⁄8 ⁄8 ⁄8 ⁄8 ⁄8 ⁄8 ⁄8
1 1 3 1 3 1 3 1 3 1 3 1
over 1 ⁄4 to 2 ⁄4 , incl ⁄16 ⁄8 ⁄16 ⁄8 ⁄16 ⁄8 ⁄16 ⁄8 ⁄16 ⁄8
G
Plasma-torch-cut:
3 1 3 3 3 3 3
⁄16 to 1 ⁄2, excl ⁄4 0 ⁄4 0 ⁄4 0 ⁄4 0 ⁄4
...
Questions, Comments and Discussion
Ask us and Technical Secretary will try to provide an answer. You can facilitate discussion about the standard in here.
Loading comments...