ASTM G17-07(2020)
(Test Method)Standard Test Method for Penetration Resistance of Pipeline Coatings (Blunt Rod)
Standard Test Method for Penetration Resistance of Pipeline Coatings (Blunt Rod)
SIGNIFICANCE AND USE
3.1 Since pipeline coatings are subjected to concentrated pressures exerted by the weight of the pipe and the backfill, this test is intended primarily for determining the resistance of the coating to penetration or deformation under controlled conditions.
3.1.1 Deformation of a compressible coating does not signify a potential weakness in underground burial service, if the coating is not penetrated. Deformation cannot be compared to penetration into and through a coating.
SCOPE
1.1 This accelerated test method is used to determine the relative resistance of steel pipeline coatings to penetration or deformation by a blunt rod under a specified load. The test method is intended to apply to the testing of all types of nonmetallic pipeline coatings subjected to various temperatures.
1.2 The values stated in SI units to three significant decimals are to be regarded as the standard. The values given in parentheses are for information only.
1.3 This standard does not purport to address all of the safety concerns, if any, associated with its use. It is the responsibility of the user of this standard to establish appropriate safety, health, and environmental practices and determine the applicability of regulatory limitations prior to use.
1.4 This international standard was developed in accordance with internationally recognized principles on standardization established in the Decision on Principles for the Development of International Standards, Guides and Recommendations issued by the World Trade Organization Technical Barriers to Trade (TBT) Committee.
General Information
- Status
- Published
- Publication Date
- 31-Jul-2020
- Technical Committee
- D01 - Paint and Related Coatings, Materials, and Applications
- Drafting Committee
- D01.48 - Durability of Pipeline Coating and Linings
Relations
- Replaces
ASTM G17-07(2013) - Standard Test Method for Penetration Resistance of Pipeline Coatings (Blunt Rod) - Effective Date
- 01-Aug-2020
- Effective Date
- 01-Aug-2020
Overview
ASTM G17-07(2020), Standard Test Method for Penetration Resistance of Pipeline Coatings (Blunt Rod), is a widely-recognized standard developed by ASTM International for testing the resistance of nonmetallic pipeline coatings to penetration or deformation by a blunt rod. This standard is particularly relevant for steel pipelines that are frequently exposed to concentrated pressures from the weight of the pipe itself and the surrounding backfill material during underground installation. By providing a controlled methodology for evaluating coating durability, ASTM G17-07(2020) supports the selection and quality assurance of protective coatings necessary for pipeline longevity and safety.
Key Topics
- Penetration Resistance Testing: The standard specifies a method using a blunt rod under a defined load to measure the resistance of a coating applied to steel pipe samples. The method assesses whether the coating deforms or is penetrated, especially under varying temperature conditions.
- Applicability Across Coating Types: Applicable to all kinds of nonmetallic pipeline coatings, making it a flexible choice for manufacturers and asset owners evaluating coating options.
- Temperature Control: Test specimens can be assessed at a variety of temperatures, reflecting the diverse environmental and service conditions faced by buried pipelines.
- Data Collection & Reporting: Provides guidance on documenting important test parameters, including specimen identification, coating thickness, test temperature, and penetration or deformation results.
- Precision and Reproducibility: Addresses consistency in measurements within and between laboratories, reinforcing reliability in results.
Applications
The practical value of ASTM G17-07(2020) extends throughout the pipeline coatings industry, including:
- Quality Assurance: Coating manufacturers and pipeline operators rely on this standard to evaluate the resistance of materials to concentrated loads before field installation.
- Product Comparison: Enables direct comparison of various coating formulations or application methods under identical test conditions.
- Pipeline Integrity Management: Information gathered from these resistance tests helps ensure that selected coatings will maintain their protective function throughout the pipeline’s life, especially in underground conditions.
- Regulatory Compliance: By aligning with international standardization principles and referenced in specifications or tender documents, this standard assists organizations in meeting technical requirements for pipeline construction and maintenance projects.
- Research & Development: R&D teams utilize results from this method to optimize and innovate coating materials for improved performance against physical damage.
Related Standards
ASTM G17-07(2020) is part of a broader suite of pipeline coating standards and may be used in conjunction with:
- ASTM D2247 - Standard Practice for Testing Water Resistance of Coatings in 100% Relative Humidity
- ASTM G8 - Standard Test Methods for Cathodic Disbonding of Pipeline Coatings
- ASTM D4541 - Standard Test Method for Pull-Off Strength of Coatings Using Portable Adhesion Testers
Additional reference may be made to international guides by the World Trade Organization Technical Barriers to Trade (TBT) Committee, ensuring global alignment for pipeline coating practices.
Keywords: pipeline coatings, penetration resistance, blunt rod test, ASTM G17, underground pipeline protection, coating durability, standardized test methods, pipeline integrity, nonmetallic coatings, quality assurance.
Buy Documents
ASTM G17-07(2020) - Standard Test Method for Penetration Resistance of Pipeline Coatings (Blunt Rod)
Frequently Asked Questions
ASTM G17-07(2020) is a standard published by ASTM International. Its full title is "Standard Test Method for Penetration Resistance of Pipeline Coatings (Blunt Rod)". This standard covers: SIGNIFICANCE AND USE 3.1 Since pipeline coatings are subjected to concentrated pressures exerted by the weight of the pipe and the backfill, this test is intended primarily for determining the resistance of the coating to penetration or deformation under controlled conditions. 3.1.1 Deformation of a compressible coating does not signify a potential weakness in underground burial service, if the coating is not penetrated. Deformation cannot be compared to penetration into and through a coating. SCOPE 1.1 This accelerated test method is used to determine the relative resistance of steel pipeline coatings to penetration or deformation by a blunt rod under a specified load. The test method is intended to apply to the testing of all types of nonmetallic pipeline coatings subjected to various temperatures. 1.2 The values stated in SI units to three significant decimals are to be regarded as the standard. The values given in parentheses are for information only. 1.3 This standard does not purport to address all of the safety concerns, if any, associated with its use. It is the responsibility of the user of this standard to establish appropriate safety, health, and environmental practices and determine the applicability of regulatory limitations prior to use. 1.4 This international standard was developed in accordance with internationally recognized principles on standardization established in the Decision on Principles for the Development of International Standards, Guides and Recommendations issued by the World Trade Organization Technical Barriers to Trade (TBT) Committee.
SIGNIFICANCE AND USE 3.1 Since pipeline coatings are subjected to concentrated pressures exerted by the weight of the pipe and the backfill, this test is intended primarily for determining the resistance of the coating to penetration or deformation under controlled conditions. 3.1.1 Deformation of a compressible coating does not signify a potential weakness in underground burial service, if the coating is not penetrated. Deformation cannot be compared to penetration into and through a coating. SCOPE 1.1 This accelerated test method is used to determine the relative resistance of steel pipeline coatings to penetration or deformation by a blunt rod under a specified load. The test method is intended to apply to the testing of all types of nonmetallic pipeline coatings subjected to various temperatures. 1.2 The values stated in SI units to three significant decimals are to be regarded as the standard. The values given in parentheses are for information only. 1.3 This standard does not purport to address all of the safety concerns, if any, associated with its use. It is the responsibility of the user of this standard to establish appropriate safety, health, and environmental practices and determine the applicability of regulatory limitations prior to use. 1.4 This international standard was developed in accordance with internationally recognized principles on standardization established in the Decision on Principles for the Development of International Standards, Guides and Recommendations issued by the World Trade Organization Technical Barriers to Trade (TBT) Committee.
ASTM G17-07(2020) is classified under the following ICS (International Classification for Standards) categories: 87.040 - Paints and varnishes. The ICS classification helps identify the subject area and facilitates finding related standards.
ASTM G17-07(2020) has the following relationships with other standards: It is inter standard links to ASTM G17-07(2013), ASTM G20-10(2019). Understanding these relationships helps ensure you are using the most current and applicable version of the standard.
ASTM G17-07(2020) is available in PDF format for immediate download after purchase. The document can be added to your cart and obtained through the secure checkout process. Digital delivery ensures instant access to the complete standard document.
Standards Content (Sample)
This international standard was developed in accordance with internationally recognized principles on standardization established in the Decision on Principles for the
Development of International Standards, Guides and Recommendations issued by the World Trade Organization Technical Barriers to Trade (TBT) Committee.
Designation: G17 − 07 (Reapproved 2020)
Standard Test Method for
Penetration Resistance of Pipeline Coatings (Blunt Rod)
This standard is issued under the fixed designation G17; the number immediately following the designation indicates the year of original
adoption or, in the case of revision, the year of last revision.Anumber in parentheses indicates the year of last reapproval.Asuperscript
epsilon (´) indicates an editorial change since the last revision or reapproval.
1. Scope coating is not penetrated. Deformation cannot be compared to
penetration into and through a coating.
1.1 This accelerated test method is used to determine the
relative resistance of steel pipeline coatings to penetration or
4. Apparatus
deformation by a blunt rod under a specified load. The test
4.1 Test apparatus shall consist of a dead weight tester that
method is intended to apply to the testing of all types of
can press the flat tip of a rod against the coated pipe. The
nonmetallic pipeline coatings subjected to various tempera-
flat-tipped end of the rod contacting the coating shall have a
tures.
diameter of 6.350 mm 6 0.0254 mm (0.250 in. 6 0.001 in.)
1.2 The values stated in SI units to three significant deci-
and together with supplementary weight and any other weight-
mals are to be regarded as the standard. The values given in
contributing parts shall have a total weight of 4.453 kg (9.817
parentheses are for information only.
lb), resulting in a unit pressure of 14.060 kg/cm (200 psi)
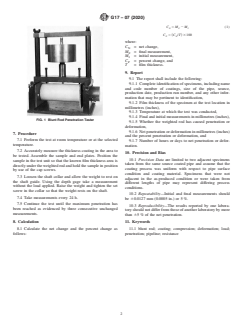
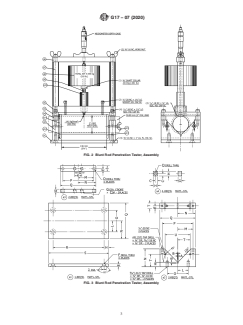
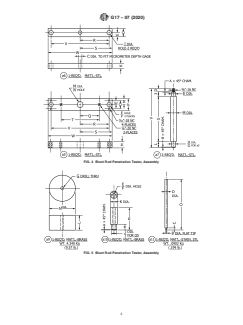
1.3 This standard does not purport to address all of the against the coating. Detailed design of the apparatus is shown
safety concerns, if any, associated with its use. It is the
in Figs. 1-6 and Tables 1-4 show dimensions.
responsibility of the user of this standard to establish appro-
4.2 Depth Gage, a device capable of measuring the penetra-
priate safety, health, and environmental practices and deter-
tion movement of the rod accurately to 0.0254 mm (0.001 in.).
mine the applicability of regulatory limitations prior to use.
4.3 Temperature Chamber, a thermostatically controlled
1.4 This international standard was developed in accor-
enclosure to provide heating and cooling of the specimen and
dance with internationally recognized principles on standard-
test apparatus (excluding depth gage) to within 62°C (3.6°F)
ization established in the Decision on Principles for the
of the desired test temperature. This equipment is optional
Development of International Standards, Guides and Recom-
when the test can be run within 62°C (3.6°F) of the desired
mendations issued by the World Trade Organization Technical
test temperature without its use.
Barriers to Trade (TBT) Committee.
4.4 Temperature Controlled Box, to fully enclose the test
2. Summary of Test Method
apparatus except the indicating means of the depth gage, as
2.1 The depth or rate of penetration or deformation that is
optional equipment in cases where a test is to be run at a
caused by a weighted blunt rod to a coating system applied to temperature higher than room temperature. The enclosure shall
steel pipe is measured over a period of time with a micrometer
be thermostatically controlled, capable of maintaining the
depth gage. Three consecutive identical readings taken at temperature to within 62°C (3.6°F) of the test temperature,
specified intervals conclude the test.
which normally will be in the range of 23 to 76.6°C (73.4 to
170°F).
3. Significance and Use
4.5 Thermometer, a temperature measurement device accu-
3.1 Since pipeline coatings are subjected to concentrated
rate to 60.5°C (61°F).
pressuresexertedbytheweightofthepipeandthebackfill,this
test is intended primarily for determining the resistance of the 5. Test Specimens
coating to penetration or deformation under controlled condi-
5.1 The test specimens shall be 150 mm (6 in.) long and
tions.
prepared with its surface preparation and coating procedures
3.1.1 Deformation of a compressible coating does not sig-
equivalent to that of production coated pipe. Duplicate tests
nify a potential weakness in underground burial service, if the
shall be run.
6. Conditioning
This test method is under the jurisdiction of ASTM Committee D01 on Paint
and Related Coatings, Materials, andApplications and is the direct responsibility of
6.1 The specimen shall be exposed to the test temperature
Subcommittee D01.48 on Durability of Pipeline Coating and Linings.
for a period of 24 h before beginning the test. If the test
Current edition approved Aug. 1, 2020. Published August 2020. Originally
temperature is the same as room temperature, it shall be 21 to
approved in 1971. Last previous edition approved in 2013 as G17 – 07 (2013). DOI:
10.1520/G0017-07R20. 25°C (70 to 77°F).
Copyright © ASTM International, 100 Barr Harbor Drive, PO Box C700, West Conshohocken, PA 19428-2959. United States
G17 − 07 (2020)
C 5 M 2 M (1)
N F I
C 5 ~C /T! 3100
P N
where:
C = net change,
N
M = final measurement,
F
M = initial measurement,
I
C = percent change, and
P
T = film thickness.
9. Report
9.1 The report shall include the following:
9.1.1 Complete identification
...


Questions, Comments and Discussion
Ask us and Technical Secretary will try to provide an answer. You can facilitate discussion about the standard in here.
Loading comments...