ASTM E2092-23
(Test Method)Standard Test Method for Distortion Temperature in Three-Point Bending by Thermomechanical Analysis
Standard Test Method for Distortion Temperature in Three-Point Bending by Thermomechanical Analysis
SIGNIFICANCE AND USE
5.1 Data obtained by this test method shall not be used to predict the behavior of materials at elevated temperatures except in applications in which the conditions of time, temperature, method of loading, and stress are similar to those specified in the test.
5.2 This standard is particularly suited for quality control and development work. The data are not intended for use in design or predicting endurance at elevated temperatures.
SCOPE
1.1 This test method describes the determination of the temperature at which the specific modulus of a test specimen is realized by deflection in three-point bending. This temperature is identified as the distortion temperature. The distortion temperature is that temperature at which a test specimen of defined geometry deforms to a level of strain under applied stress of 0.455 MPa (66 psi) (Method A) and 1.82 MPa (264 psi) (Method B) equivalent to those used in Test Method D648. The test is applicable over the range of temperature from ambient to 300 °C.
Note 1: This test method is intended to provide results similar to those of Test Method D648 but is performed on a thermomechanical analyzer using a smaller test specimen. Equivalence of results to those obtained by Test Method D648 has been demonstrated on a limited number of materials. The results of this test method shall be considered to be independent and unrelated to those of Test Method D648 unless the user demonstrates equivalence.
1.2 The values stated in SI units are to be regarded as standard. No other units of measurement are included in this standard.
1.3 This standard does not purport to address all of the safety concerns, if any, associated with its use. It is the responsibility of the user of this standard to establish appropriate safety, health, and environmental practices and determine the applicability of regulatory limitations prior to use.
1.4 This international standard was developed in accordance with internationally recognized principles on standardization established in the Decision on Principles for the Development of International Standards, Guides and Recommendations issued by the World Trade Organization Technical Barriers to Trade (TBT) Committee.
General Information
- Status
- Published
- Publication Date
- 31-Oct-2023
- Technical Committee
- E37 - Thermal Measurements
- Drafting Committee
- E37.10 - Fundamental, Statistical and Mechanical Properties
Relations
- Effective Date
- 01-Nov-2023
- Effective Date
- 01-Oct-2023
- Effective Date
- 01-Oct-2023
- Effective Date
- 01-Aug-2023
- Effective Date
- 01-May-2023
- Effective Date
- 01-Nov-2023
Overview
ASTM E2092-23 establishes a standard test method for determining the distortion temperature in three-point bending by thermomechanical analysis (TMA). This method defines the temperature at which a specimen of known geometry deforms under a specified load. Unlike broader performance tests, ASTM E2092-23 focuses on precise, controlled conditions, making it highly suitable for quality control and material development within a temperature range of ambient to 300 °C.
This standard provides a method that is similar in intent to ASTM D648, but uses smaller specimens and a TMA apparatus, facilitating rapid thermal characterization for polymers and related materials. All values are expressed in SI units.
Key Topics
- Distortion Temperature Measurement: The test method identifies the temperature at which a predetermined strain (typically 0.20%) is observed in a test specimen under stresses of 0.455 MPa (Method A) or 1.82 MPa (Method B).
- Three-Point Bending Configuration: A rectangular specimen is supported at two points while a force is applied at the center, and deformation is monitored as temperature rises at a controlled rate.
- Use of Thermomechanical Analyzer (TMA): The test is performed on a TMA with specific calibration requirements to ensure accuracy in temperature, force, and deflection measurements.
- SI Units: All measurements and reported results use SI units exclusively for consistency and global applicability.
- Quality Control and Material Development: Results are best suited for comparative work in process validation, material qualification, and research-not for predicting in-service material endurance.
- Equivalence to D648: While results often align with those from ASTM D648, users must demonstrate equivalence independently for their specific materials.
Applications
ASTM E2092-23 is valuable for organizations seeking rapid, reproducible data on the thermal deformation characteristics of plastics and polymers. Key applications include:
- Quality Control: Manufacturers can quickly screen production batches for consistent heat distortion behavior using small sample sizes and efficient TMA equipment.
- Research and Development: Material scientists use this method to compare formulations, study the effects of additives or processing variations, and assess thermal performance under controlled flexural load.
- Material Comparison: The test supports comparative analysis across samples for benchmarking and product development purposes.
- Process Optimization: By linking thermal deformation properties to manufacturing or processing variables, companies can refine their processes for improved product performance.
Important Note
The data from this method should not be used for structural design or to predict long-term performance at elevated temperatures unless the use environment closely replicates test conditions (time, load, stress).
Related Standards
Professionals employing ASTM E2092-23 may also reference the following standards:
- ASTM D648 - Test Method for Deflection Temperature of Plastics Under Flexural Load in the Edgewise Position
- ASTM E473 - Terminology Relating to Thermal Analysis and Rheology
- ASTM E1142 - Terminology Relating to Thermophysical Properties
- ASTM E1363 - Test Method for Temperature Calibration of Thermomechanical Analyzers
- ASTM E2113 - Test Method for Length Change Calibration of Thermomechanical Analyzers
- ASTM E2206 - Test Method for Force Calibration of Thermomechanical Analyzers
- ASTM E3142 - Test Method for Thermal Lag of Thermal Analysis Apparatus
Referencing these standards ensures comprehensive understanding and proper calibration, supporting reliable distortion temperature measurements in thermomechanical analysis.
Keywords: ASTM E2092-23, distortion temperature, three-point bending, thermomechanical analysis, TMA, heat distortion temperature, plastics testing, quality control, thermal analysis, flexural load, ASTM standards
Buy Documents
ASTM E2092-23 - Standard Test Method for Distortion Temperature in Three-Point Bending by Thermomechanical Analysis
REDLINE ASTM E2092-23 - Standard Test Method for Distortion Temperature in Three-Point Bending by Thermomechanical Analysis
Get Certified
Connect with accredited certification bodies for this standard

Smithers Quality Assessments
US management systems and product certification.

DIN CERTCO
DIN Group product certification.
Sponsored listings
Frequently Asked Questions
ASTM E2092-23 is a standard published by ASTM International. Its full title is "Standard Test Method for Distortion Temperature in Three-Point Bending by Thermomechanical Analysis". This standard covers: SIGNIFICANCE AND USE 5.1 Data obtained by this test method shall not be used to predict the behavior of materials at elevated temperatures except in applications in which the conditions of time, temperature, method of loading, and stress are similar to those specified in the test. 5.2 This standard is particularly suited for quality control and development work. The data are not intended for use in design or predicting endurance at elevated temperatures. SCOPE 1.1 This test method describes the determination of the temperature at which the specific modulus of a test specimen is realized by deflection in three-point bending. This temperature is identified as the distortion temperature. The distortion temperature is that temperature at which a test specimen of defined geometry deforms to a level of strain under applied stress of 0.455 MPa (66 psi) (Method A) and 1.82 MPa (264 psi) (Method B) equivalent to those used in Test Method D648. The test is applicable over the range of temperature from ambient to 300 °C. Note 1: This test method is intended to provide results similar to those of Test Method D648 but is performed on a thermomechanical analyzer using a smaller test specimen. Equivalence of results to those obtained by Test Method D648 has been demonstrated on a limited number of materials. The results of this test method shall be considered to be independent and unrelated to those of Test Method D648 unless the user demonstrates equivalence. 1.2 The values stated in SI units are to be regarded as standard. No other units of measurement are included in this standard. 1.3 This standard does not purport to address all of the safety concerns, if any, associated with its use. It is the responsibility of the user of this standard to establish appropriate safety, health, and environmental practices and determine the applicability of regulatory limitations prior to use. 1.4 This international standard was developed in accordance with internationally recognized principles on standardization established in the Decision on Principles for the Development of International Standards, Guides and Recommendations issued by the World Trade Organization Technical Barriers to Trade (TBT) Committee.
SIGNIFICANCE AND USE 5.1 Data obtained by this test method shall not be used to predict the behavior of materials at elevated temperatures except in applications in which the conditions of time, temperature, method of loading, and stress are similar to those specified in the test. 5.2 This standard is particularly suited for quality control and development work. The data are not intended for use in design or predicting endurance at elevated temperatures. SCOPE 1.1 This test method describes the determination of the temperature at which the specific modulus of a test specimen is realized by deflection in three-point bending. This temperature is identified as the distortion temperature. The distortion temperature is that temperature at which a test specimen of defined geometry deforms to a level of strain under applied stress of 0.455 MPa (66 psi) (Method A) and 1.82 MPa (264 psi) (Method B) equivalent to those used in Test Method D648. The test is applicable over the range of temperature from ambient to 300 °C. Note 1: This test method is intended to provide results similar to those of Test Method D648 but is performed on a thermomechanical analyzer using a smaller test specimen. Equivalence of results to those obtained by Test Method D648 has been demonstrated on a limited number of materials. The results of this test method shall be considered to be independent and unrelated to those of Test Method D648 unless the user demonstrates equivalence. 1.2 The values stated in SI units are to be regarded as standard. No other units of measurement are included in this standard. 1.3 This standard does not purport to address all of the safety concerns, if any, associated with its use. It is the responsibility of the user of this standard to establish appropriate safety, health, and environmental practices and determine the applicability of regulatory limitations prior to use. 1.4 This international standard was developed in accordance with internationally recognized principles on standardization established in the Decision on Principles for the Development of International Standards, Guides and Recommendations issued by the World Trade Organization Technical Barriers to Trade (TBT) Committee.
ASTM E2092-23 is classified under the following ICS (International Classification for Standards) categories: 83.080.01 - Plastics in general. The ICS classification helps identify the subject area and facilitates finding related standards.
ASTM E2092-23 has the following relationships with other standards: It is inter standard links to ASTM E2092-18a, ASTM E473-23b, ASTM E1142-23b, ASTM E473-23a, ASTM E1142-23a, ASTM E2769-22. Understanding these relationships helps ensure you are using the most current and applicable version of the standard.
ASTM E2092-23 is available in PDF format for immediate download after purchase. The document can be added to your cart and obtained through the secure checkout process. Digital delivery ensures instant access to the complete standard document.
Standards Content (Sample)
This international standard was developed in accordance with internationally recognized principles on standardization established in the Decision on Principles for the
Development of International Standards, Guides and Recommendations issued by the World Trade Organization Technical Barriers to Trade (TBT) Committee.
Designation: E2092 − 23
Standard Test Method for
Distortion Temperature in Three-Point Bending by
Thermomechanical Analysis
This standard is issued under the fixed designation E2092; the number immediately following the designation indicates the year of
original adoption or, in the case of revision, the year of last revision. A number in parentheses indicates the year of last reapproval. A
superscript epsilon (´) indicates an editorial change since the last revision or reapproval.
1. Scope* 2. Referenced Documents
1.1 This test method describes the determination of the 2.1 ASTM Standards:
temperature at which the specific modulus of a test specimen is D648 Test Method for Deflection Temperature of Plastics
realized by deflection in three-point bending. This temperature Under Flexural Load in the Edgewise Position
is identified as the distortion temperature. The distortion E473 Terminology Relating to Thermal Analysis and Rhe-
temperature is that temperature at which a test specimen of ology
defined geometry deforms to a level of strain under applied E1142 Terminology Relating to Thermophysical Properties
stress of 0.455 MPa (66 psi) (Method A) and 1.82 MPa E1363 Test Method for Temperature Calibration of Thermo-
(264 psi) (Method B) equivalent to those used in Test Method mechanical Analyzers
D648. The test is applicable over the range of temperature from E2113 Test Method for Length Change Calibration of Ther-
ambient to 300 °C. momechanical Analyzers
E2206 Test Method for Force Calibration of Thermome-
NOTE 1—This test method is intended to provide results similar to those
chanical Analyzers
of Test Method D648 but is performed on a thermomechanical analyzer
E3142 Test Method for Thermal Lag of Thermal Analysis
using a smaller test specimen. Equivalence of results to those obtained by
Test Method D648 has been demonstrated on a limited number of
Apparatus
materials. The results of this test method shall be considered to be
independent and unrelated to those of Test Method D648 unless the user
3. Terminology
demonstrates equivalence.
3.1 Definitions—Specific technical terms used in this stan-
1.2 The values stated in SI units are to be regarded as
dard are defined in Terminologies E473 and E1142, including
standard. No other units of measurement are included in this
stress, strain, and thermomechanical analyzer.
standard.
3.1.1 distortion temperature [°C], n—the temperature at
1.3 This standard does not purport to address all of the
which an arbitrary strain level is obtained in three-point
safety concerns, if any, associated with its use. It is the
bending under an arbitrary load.
responsibility of the user of this standard to establish appro-
4. Summary of Test Method
priate safety, health, and environmental practices and deter-
mine the applicability of regulatory limitations prior to use.
4.1 A test specimen of known dimensions is tested in
1.4 This international standard was developed in accor-
three-point bending mode. A known stress is applied to the
dance with internationally recognized principles on standard-
center of a test specimen supported near its ends, as it is heated
ization established in the Decision on Principles for the
at a constant rate from ambient temperature to the upper
Development of International Standards, Guides and Recom-
temperature limit for the material. The deflection of the test
mendations issued by the World Trade Organization Technical
specimen is recorded as a function of temperature. The
Barriers to Trade (TBT) Committee.
temperature at which a predetermined level of strain is ob-
served in the test specimen is analyzed as the distortion
temperature.
This test method is under the jurisdiction of Committee E37 on Thermal
Measurements and is the direct responsibility of Subcommittee E37.10 on
Fundamental, Statistical and Mechanical Properties. For referenced ASTM standards, visit the ASTM website, www.astm.org, or
Current edition approved Nov. 1, 2023. Published November 2023. Originally contact ASTM Customer Service at service@astm.org. For Annual Book of ASTM
approved in 2000. Last previous edition approved in 2018 as E2092 – 18a. DOI: Standardsvolume information, refer tot he standard’s Document Summary page on
10.1520/E2092-23. the ASTM website.
*A Summary of Changes section appears at the end of this standard
Copyright © ASTM International, 100 Barr Harbor Drive, PO Box C700, West Conshohocken, PA 19428-2959. United States
E2092 − 23
5. Significance and Use 6.1.6 Temperature Sensor, that can be positioned reproduc-
ibly in close proximity to the specimen to measure its tempera-
5.1 Data obtained by this test method shall not be used to
ture within the range between 25 °C and 300 °C readable to
predict the behavior of materials at elevated temperatures
60.1 °C.
except in applications in which the conditions of time,
6.1.7 Temperature Programmer and Furnace, capable of
temperature, method of loading, and stress are similar to those
temperature programming the test specimen from ambient to
specified in the test.
300 °C at a linear rate of at least 2 °C ⁄min 6 0.1 °C/min.
5.2 This standard is particularly suited for quality control
6.1.8 Means of Providing a Specimen Environment, of inert
and development work. The data are not intended for use in
gas at a purge rate of 50 mL/min 6 5 %.
design or predicting endurance at elevated temperatures.
NOTE 2—Typically, inert purge gases that inhibit specimen oxidation
are 99.9+ % pure nitrogen, helium or argon. Dry gases are recommended
6. Apparatus
for all experiments unless the effect of moisture is part of the study. The
purge gas used for the test specimen shall be the same as that used during
6.1 A thermomechanical analyzer consisting of:
calibration.
6.1.1 Rigid Specimen Holder, of inert, low coefficient of
-1 -1
expansion material <20 μm m · °C to center the specimen in 6.1.9 Data Collection Device, to provide a means of
acquiring, storing, and displaying measured or calculated
the furnace and to fix the specimen to mechanical ground.
6.1.2 Flexure Fixture, of inert, low coefficient of expansion signals, or both. The minimum output signals required for a
-1 -1
thermomechanical analyzer are dimension ion change, tem-
material <20 μm m · °C , to support the test specimen in a
three-point bending mode (see Fig. 1). perature and time.
6.1.10 While not required, it is convenient to have a data
6.1.3 Rigid Knife Edge Compression Probe, of inert, low
-1 -1
coefficient of expansion material <20 μm m · °C that analysis device, that will perform and display the calculations
of this standard.
contacts the specimen with an applied compression force (see
Fig. 1).
6.2 Micrometer, calipers, film gage or other length-
6.1.4 Deflection Sensing Element, having a linear output
measuring device capable of measuring lengths of 0.01 mm to
over a minimum range of 5 mm to measure the displacement of
20 mm readable to within 60.001 mm.
the rigid compression probe (see 6.1.3) to within 60.1 μm.
7. Hazards
6.1.5 Programmable Weight or Force Transducer, to gener-
ate a constant force (62.5 %) between at least 0.01 N to 1.0 N,
7.1 Toxic or corrosive effluents, or both, may be released
that is applied to the specimen through the rigid compression
when heating some materials and could be harmful to person-
probe (see 6.1.3).
nel and to apparatus.
7.2 Because the specimen size is small, care must be taken
to ensure that each specimen is homogeneous and representa-
tive of the sample as a whole.
8. Sampling
8.1 The specimens may be cut from sheets, plates, or
molded shapes, or may be molded to the desired finished
dimensions.
8.2 The specimens used in this test method are ordinarily in
the form of rectangular beams with aspect ratios of 1:3:10 for
thickness or specimen depth (d), width (b) and length (l),
depending upon the modulus of the sample and length of the
support span (L).
NOTE 3—Other specimen and support dimensions may be used but care
must be taken that the support length to specimen thickness ratio (L/d) be
greater than 10.
NOTE 4—The specimen shall be long enough to allow overhanging on
each end of at least 10 % of the support span, that is, l ≥ 1.2 L.
NOTE 5—The overhang shall be sufficient to prevent the specimen from
slipping from the supports.
8.3 This test method assumes that the material is isotropic.
Should the specimen be anisotropic, such as in reinforced
composites, the direction of the reinforcing agent shall be
reported relative to the specimen dimensions.
9. Calibration
9.1 Calibrate the temperature display of the apparatus ac-
cording to Test Method E1363 using a heating rate of 2 °C/min
FIG. 1 Flexure Support Geometry 6 0.1 °C/min.
E2092 − 23
NOTE 6—Temperature calibration shall be performed using the same
10.7 Center the specimen on the supports, with the long axis
heating rate as that used for the test specimen (see Appendix X1).
of the specimen perpendicular to the loading nose and supports
9.2 Calibrate the deflection (length change) display of the (see Fig. 1).
apparatus according to the instrument manufacturer’s instruc-
NOTE 10—The typical rectangular test beam is tested flatwise on the
tions (see Test Method E2113).
support span, with the applied force through its thinnest dimension.
9.3 Calibrate the mechanism for applying force to the test
10.8 Set initial experimental conditions by placing the test
specimen according to the instrument manufacturer’s instruc-
specimen into flexure support, loading the compression probe
tions (see Test Method E2206).
onto the center of the test specimen in the three-point bending
NOTE 7—Calibration or calibration verification of all signals at least
mode with the force calculated in 10.5. Set the deflection-axis
annually is recommended.
signal to be zero at ambient temperature.
10. Procedure
10.9 Program the temperature from ambient temperature at
2 °C ⁄min 6 0.1 °C ⁄min until the deflection, D 6 10 %,
10.1 Measure the test length (L) of the test specimen as the
determined in 10.6, is obtained while recording specimen
distance between the two support points of the flexure support
deflection and temperature. Once the deflec
...
This document is not an ASTM standard and is intended only to provide the user of an ASTM standard an indication of what changes have been made to the previous version. Because
it may not be technically possible to adequately depict all changes accurately, ASTM recommends that users consult prior editions as appropriate. In all cases only the current version
of the standard as published by ASTM is to be considered the official document.
Designation: E2092 − 18a E2092 − 23
Standard Test Method for
Distortion Temperature in Three-Point Bending by
Thermomechanical Analysis
This standard is issued under the fixed designation E2092; the number immediately following the designation indicates the year of
original adoption or, in the case of revision, the year of last revision. A number in parentheses indicates the year of last reapproval. A
superscript epsilon (´) indicates an editorial change since the last revision or reapproval.
1. Scope*
1.1 This test method describes the determination of the temperature at which the specific modulus of a test specimen is realized
by deflection in three-point bending. This temperature is identified as the distortion temperature. The distortion temperature is that
temperature at which a test specimen of defined geometry deforms to a level of strain under applied stress of 0.455 MPa (66 psi)
(Method A) and 1.82 MPa (264 psi) (264 psi) (Method B) equivalent to those used in Test Method D648. The test is applicable
over the range of temperature from ambient to 300 °C.
NOTE 1—This test method is intended to provide results similar to those of Test Method D648 but is performed on a thermomechanical analyzer using
a smaller test specimen. Equivalence of results to those obtained by Test Method D648 has been demonstrated on a limited number of materials. The
results of this test method shall be considered to be independent and unrelated to those of Test Method D648 unless the user demonstrates equivalence.
1.2 The values stated in SI units are to be regarded as standard. No other units of measurement are included in this standard.
1.3 This standard does not purport to address all of the safety concerns, if any, associated with its use. It is the responsibility
of the user of this standard to establish appropriate safety, health, and environmental practices and determine the applicability of
regulatory limitations prior to use.
1.4 This international standard was developed in accordance with internationally recognized principles on standardization
established in the Decision on Principles for the Development of International Standards, Guides and Recommendations issued
by the World Trade Organization Technical Barriers to Trade (TBT) Committee.
2. Referenced Documents
2.1 ASTM Standards:
D648 Test Method for Deflection Temperature of Plastics Under Flexural Load in the Edgewise Position
E473 Terminology Relating to Thermal Analysis and Rheology
E1142 Terminology Relating to Thermophysical Properties
E1363 Test Method for Temperature Calibration of Thermomechanical Analyzers
E2113 Test Method for Length Change Calibration of Thermomechanical Analyzers
E2206 Test Method for Force Calibration of Thermomechanical Analyzers
E3142 Test Method for Thermal Lag of Thermal Analysis Apparatus
This test method is under the jurisdiction of Committee E37 on Thermal Measurements and is the direct responsibility of Subcommittee E37.10 on Fundamental,
Statistical and Mechanical Properties.
Current edition approved Dec. 1, 2018Nov. 1, 2023. Published January 2019November 2023. Originally approved in 2000. Last previous edition approved in 2018 as
E2092 – 18.E2092 – 18a. DOI: 10.1520/E2092-18A.10.1520/E2092-23.
For referenced ASTM standards, visit the ASTM website, www.astm.org, or contact ASTM Customer Service at service@astm.org. For Annual Book of ASTM
Standardsvolume information, refer tot he standard’s Document Summary page on the ASTM website.
*A Summary of Changes section appears at the end of this standard
Copyright © ASTM International, 100 Barr Harbor Drive, PO Box C700, West Conshohocken, PA 19428-2959. United States
E2092 − 23
3. Terminology
3.1 Definitions—Specific technical terms used in this standard are defined in Terminologies E473 and E1142, including stress,
strain, and thermomechanical analyzer.
3.1.1 distortion temperature [°C], n—the temperature at which an arbitrary strain level is obtained in three-point bending under
an arbitrary load.
4. Summary of Test Method
4.1 A test specimen of known dimensions is tested in three-point bending mode. A known stress is applied to the center of a test
specimen supported near its ends, as it is heated at a constant rate from ambient temperature to the upper temperature limit for the
material. The deflection of the test specimen is recorded as a function of temperature. The temperature at which a predetermined
level of strain is observed in the test specimen is analyzed as the distortion temperature.
5. Significance and Use
5.1 Data obtained by this test method shall not be used to predict the behavior of materials at elevated temperatures except in
applications in which the conditions of time, temperature, method of loading, and stress are similar to those specified in the test.
5.2 This standard is particularly suited for quality control and development work. The data are not intended for use in design or
predicting endurance at elevated temperatures.
6. Apparatus
6.1 A thermomechanical analyzer consisting of:
-1 -1
6.1.1 Rigid Specimen Holder, of inert, low coefficient of expansion material <20 μm m · °C to center the specimen in the
furnace and to fix the specimen to mechanical ground.
-1 -1
6.1.2 Flexure Fixture, of inert, low coefficient of expansion material <20 μm m · °C , to support the test specimen in a
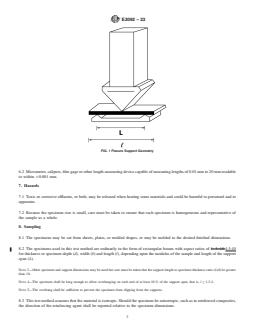
three-point bending mode (see Fig. 1).
-1 -1
6.1.3 Rigid Knife Edge Compression Probe, of inert, low coefficient of expansion material <20 μm m · °C that contacts the
specimen with an applied compression force (see Fig. 1).
6.1.4 Deflection Sensing Element, having a linear output over a minimum range of 5 mm to measure the displacement of the rigid
compression probe (see 6.1.3) to within 60.1 μm.
6.1.5 Programmable Weight or Force Transducer, to generate a constant force (62.5 %) between at least 0.01 N to 1.0 N, that
is applied to the specimen through the rigid compression probe (see 6.1.3).
6.1.6 Temperature Sensor, that can be positioned reproducibly in close proximity to the specimen to measure its temperature within
the range between 25 °C and 300 °C readable to 6 0.1 60.1 °C.
6.1.7 Temperature Programmer and Furnace, capable of temperature programming the test specimen from ambient to 300 °C at
a linear rate of at least 22 °C ⁄min 6 0.1 °C/min.
6.1.8 Means of Providing a Specimen Environment, of inert gas at a purge rate of 50 mL/min 6 5 %.
NOTE 2—Typically, inert purge gases that inhibit specimen oxidation are 99.9+ % pure nitrogen, helium or argon. Dry gases are recommended for all
experiments unless the effect of moisture is part of the study. The purge gas used for the test specimen shall be the same as that used during calibration.
6.1.9 Data Collection Device, to provide a means of acquiring, storing, and displaying measured or calculated signals, or both.
The minimum output signals required for a thermomechanical analyzer are dimension ion change, temperature and time.
6.1.10 While not required, it is convenient to have a data analysis device, that will perform and display the calculations of this
standard.
E2092 − 23
FIG. 1 Flexure Support Geometry
6.2 Micrometer, calipers, film gage or other length-measuring device capable of measuring lengths of 0.01 mm to 20 mm readable
to within 60.001 mm.
7. Hazards
7.1 Toxic or corrosive effluents, or both, may be released when heating some materials and could be harmful to personnel and to
apparatus.
7.2 Because the specimen size is small, care must be taken to ensure that each specimen is homogeneous and representative of
the sample as a whole.
8. Sampling
8.1 The specimens may be cut from sheets, plates, or molded shapes, or may be molded to the desired finished dimensions.
8.2 The specimens used in this test method are ordinarily in the form of rectangular beams with aspect ratios of 1: 3: 10 1:3:10
for thickness or specimen depth (d), width (b) and length (l), depending upon the modulus of the sample and length of the support
span (L).
NOTE 3—Other specimen and support dimensions may be used but care must be taken that the support length to specimen thickness ratio (L/d) be greater
than 10.
NOTE 4—The specimen shall be long enough to allow overhanging on each end of at least 10 % of the support span, that is, l ≥ 1.2 L.
NOTE 5—The overhang shall be sufficient to prevent the specimen from slipping from the supports.
8.3 This test method assumes that the material is isotropic. Should the specimen be anisotropic, such as in reinforced composites,
the direction of the reinforcing agent shall be reported relative to the specimen dimensions.
E2092 − 23
9. Calibration
9.1 Calibrate the temperature display of the apparatus according to Test Method E1363 using a heating rate of 2 °C/min 6 0.1
°C/min.
NOTE 6—Temperature calibration shall be performed using the same heating rate as that used for the test specimen (see Appendix X1).
9.2 Calibrate the deflection (length change) display of the apparatus according to the instrument manufacturer’s instructions (see
Test Method E2113).
9.3 Calibrate the mechanism for applying force to the test specimen according to the instrument manufacturer’s instructions (see
Test Method E2206).
NOTE 7—Calibration or calibration verification of all signals at least annually is recommended.
10. Procedure
10.1 Measure the test length (L) of the test specimen as the distance between the two support points of the flexure support
geometry to three significant figures (see Fig. 1).
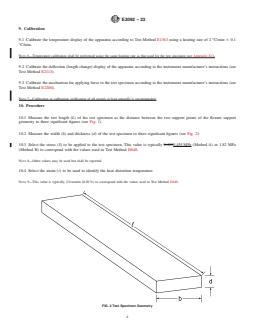
10.2 Measure the width (b) and thickness (d) of the test specimen to three significant figures (see Fig. 2).
10.3 Select the stress (S) to be applied to the test specimen. This value is typically 0.4550.455 MPa (Method A) or 1.82 MPa
(Method B) to correspond with the values used in Test Method D648.
NOTE 8—Other values may be used but shall be reported.
10.4 Select the strain (r) to be used to identify the heat distortion temperature.
NOTE 9—This value is typically 2.0 mm/m (0.20 %) to correspond with the values used in Test Method D648.
FIG. 2 Test Specimen Geometry
E2092 − 23
10.5 Using Eq 1, calculate to three significant figures the for
...
Questions, Comments and Discussion
Ask us and Technical Secretary will try to provide an answer. You can facilitate discussion about the standard in here.
Loading comments...