ASTM B667-97(2019)
(Practice)Standard Practice for Construction and Use of a Probe for Measuring Electrical Contact Resistance
Standard Practice for Construction and Use of a Probe for Measuring Electrical Contact Resistance
SIGNIFICANCE AND USE
4.1 Electrical contact resistance is an important characteristic of the contact in certain components, such as connectors, switches, slip rings, and relays. Ordinarily, contact resistance is required to be low and stable for proper functioning of many devices or apparatus in which the component is used. It is more convenient to determine contact resistance with a probe than to incorporate the contact material into an actual component for the purpose of measurement. However, if the probe contact material is different from that employed in the component, the results obtained may not be applicable to the device.
4.2 Information on contact resistance is useful in materials development, in failure analysis studies, in the manufacturing and quality control of contact devices, and in research.
4.3 Contact resistance is not a unique single-valued property of a material. It is affected by the mechanical conditions of the contact, the geometry and roughness of contacting surfaces, surface cleanliness, and contact history, as well as by the material properties of hardness and conductivity of both contacting members. An objective of this practice is to define and control many of the known variables in such a way that valid comparisons of the contact properties of materials can be made.
4.4 In some techniques for measuring contact resistance it is not possible to eliminate bulk resistance, that is, the resistance of the metal pieces comprising the contact and the resistance of the wires and connections used to introduce the test current into the samples. In these cases, the measurement is actually of an overall resistance, which is often confused with contact resistance.
SCOPE
1.1 This practice describes equipment and techniques for measuring electrical contact resistance with a probe and the presentation of results.
1.2 The values stated in SI units are to be regarded as standard. No other units of measurement are included in this standard.
1.3 This standard does not purport to address all of the safety concerns, if any, associated with its use. It is the responsibility of the user of this standard to become familiar with all hazards including those identified in the appropriate Material Safety Data Sheet (MSDS) for this product/material as provided by the manufacturer, to establish appropriate safety, health, and environmental practices, and determine the applicability of regulatory limitations prior to use.
1.4 This international standard was developed in accordance with internationally recognized principles on standardization established in the Decision on Principles for the Development of International Standards, Guides and Recommendations issued by the World Trade Organization Technical Barriers to Trade (TBT) Committee.
General Information
- Status
- Published
- Publication Date
- 31-Oct-2019
- Technical Committee
- B02 - Nonferrous Metals and Alloys
Relations
- Effective Date
- 01-Nov-2019
- Effective Date
- 01-Feb-2013
- Effective Date
- 01-May-2007
- Effective Date
- 01-May-2004
- Effective Date
- 10-Oct-2000
Overview
ASTM B667-97(2019), Standard Practice for Construction and Use of a Probe for Measuring Electrical Contact Resistance, provides detailed guidance on equipment, techniques, and procedures for measuring electrical contact resistance using a specialized probe. This practice is essential for evaluating the electrical performance and reliability of contacts used in critical components such as connectors, switches, slip rings, and relays. The standard facilitates comparative studies and quality assurance by ensuring measurements are made using uniform and controlled conditions. ASTM B667 plays a significant role in materials development, failure analysis, quality control, and research within electrical and electronic manufacturing industries.
Key Topics
- Electrical Contact Resistance: Defined as the resistance to current flow between two touching bodies, influenced by both the constriction at contact points (asperities) and any surface films present.
- Probe Construction: Specifies probe materials (usually noble metals like pure gold), surface characteristics, and mechanical design considerations to ensure measurement repeatability.
- Measurement Techniques: Covers methods for isolating and quantifying contact resistance, while managing potential confounding factors like bulk resistance from wires and electrical leads.
- Variables Affecting Measurements:
- Surface roughness and cleanliness
- Load applied by the probe
- Contact geometry
- Probe and surface material properties
- Vibration and mechanical stability
- Data Presentation: Recommends statistical approaches to report contact resistance values, such as load characteristic curves and probability distributions.
- Safety and Compliance: Reminds users to consider all relevant safety, environmental, and health practices before application.
Applications
ASTM B667-97(2019) is widely used in scenarios where precise and reliable electrical contact resistance measurements are critical:
- Component Manufacturing: Ensures low and stable contact resistance in electrical contacts for relays, switches, connectors, and slip rings, which is essential for the reliable operation of electronic devices.
- Materials Research and Development: Evaluates the performance of novel or modified surface treatments, platings, or contact alloys.
- Failure Analysis: Identifies causes of increased contact resistance-such as contamination, wear, oxidation, or material degradation-in fielded equipment.
- Quality Control: Routine incoming and outgoing testing of contact materials using a standardized probe technique enables comparison of contact resistance across lots, suppliers, or production runs.
- Statistical Analysis: By enabling multiple measurements across different points on a specimen, the standard supports robust statistical evaluation of contact performance.
Related Standards
ASTM B667-97(2019) references and complements several other key standards relevant to electrical contacts and resistance measurement:
- ASTM B542 - Terminology Relating to Electrical Contacts and Their Use
- ASTM B539 - Test Methods for Measuring Contact Resistance of Electrical Connections (Static Contacts)
- International Standards - Developed in line with WTO Technical Barriers to Trade (TBT) principles, supporting global harmonization in electrical test methods.
Practical Value
Adopting ASTM B667-97(2019) in your processes brings numerous practical benefits:
- Consistency and Reproducibility: The standard’s guidelines for probe design and measurement technique result in more reliable and comparable data.
- Process Improvement: Insights gained from standardized resistance measurements can lead to process optimizations and improved product lifespans.
- Regulatory Compliance: Aligns with international standardization principles, supporting trade and technical communication.
- Enhanced Product Reliability: Early identification of high contact resistance reduces the risk of field failures and supports customer satisfaction.
By using ASTM B667, professionals in engineering, quality assurance, R&D, and manufacturing can ensure that electrical contact resistance is measured accurately and efficiently, driving both innovation and reliability in modern electronic components.
Buy Documents
ASTM B667-97(2019) - Standard Practice for Construction and Use of a Probe for Measuring Electrical Contact Resistance
Get Certified
Connect with accredited certification bodies for this standard

BSMI (Bureau of Standards, Metrology and Inspection)
Taiwan's standards and inspection authority.
Sponsored listings
Frequently Asked Questions
ASTM B667-97(2019) is a standard published by ASTM International. Its full title is "Standard Practice for Construction and Use of a Probe for Measuring Electrical Contact Resistance". This standard covers: SIGNIFICANCE AND USE 4.1 Electrical contact resistance is an important characteristic of the contact in certain components, such as connectors, switches, slip rings, and relays. Ordinarily, contact resistance is required to be low and stable for proper functioning of many devices or apparatus in which the component is used. It is more convenient to determine contact resistance with a probe than to incorporate the contact material into an actual component for the purpose of measurement. However, if the probe contact material is different from that employed in the component, the results obtained may not be applicable to the device. 4.2 Information on contact resistance is useful in materials development, in failure analysis studies, in the manufacturing and quality control of contact devices, and in research. 4.3 Contact resistance is not a unique single-valued property of a material. It is affected by the mechanical conditions of the contact, the geometry and roughness of contacting surfaces, surface cleanliness, and contact history, as well as by the material properties of hardness and conductivity of both contacting members. An objective of this practice is to define and control many of the known variables in such a way that valid comparisons of the contact properties of materials can be made. 4.4 In some techniques for measuring contact resistance it is not possible to eliminate bulk resistance, that is, the resistance of the metal pieces comprising the contact and the resistance of the wires and connections used to introduce the test current into the samples. In these cases, the measurement is actually of an overall resistance, which is often confused with contact resistance. SCOPE 1.1 This practice describes equipment and techniques for measuring electrical contact resistance with a probe and the presentation of results. 1.2 The values stated in SI units are to be regarded as standard. No other units of measurement are included in this standard. 1.3 This standard does not purport to address all of the safety concerns, if any, associated with its use. It is the responsibility of the user of this standard to become familiar with all hazards including those identified in the appropriate Material Safety Data Sheet (MSDS) for this product/material as provided by the manufacturer, to establish appropriate safety, health, and environmental practices, and determine the applicability of regulatory limitations prior to use. 1.4 This international standard was developed in accordance with internationally recognized principles on standardization established in the Decision on Principles for the Development of International Standards, Guides and Recommendations issued by the World Trade Organization Technical Barriers to Trade (TBT) Committee.
SIGNIFICANCE AND USE 4.1 Electrical contact resistance is an important characteristic of the contact in certain components, such as connectors, switches, slip rings, and relays. Ordinarily, contact resistance is required to be low and stable for proper functioning of many devices or apparatus in which the component is used. It is more convenient to determine contact resistance with a probe than to incorporate the contact material into an actual component for the purpose of measurement. However, if the probe contact material is different from that employed in the component, the results obtained may not be applicable to the device. 4.2 Information on contact resistance is useful in materials development, in failure analysis studies, in the manufacturing and quality control of contact devices, and in research. 4.3 Contact resistance is not a unique single-valued property of a material. It is affected by the mechanical conditions of the contact, the geometry and roughness of contacting surfaces, surface cleanliness, and contact history, as well as by the material properties of hardness and conductivity of both contacting members. An objective of this practice is to define and control many of the known variables in such a way that valid comparisons of the contact properties of materials can be made. 4.4 In some techniques for measuring contact resistance it is not possible to eliminate bulk resistance, that is, the resistance of the metal pieces comprising the contact and the resistance of the wires and connections used to introduce the test current into the samples. In these cases, the measurement is actually of an overall resistance, which is often confused with contact resistance. SCOPE 1.1 This practice describes equipment and techniques for measuring electrical contact resistance with a probe and the presentation of results. 1.2 The values stated in SI units are to be regarded as standard. No other units of measurement are included in this standard. 1.3 This standard does not purport to address all of the safety concerns, if any, associated with its use. It is the responsibility of the user of this standard to become familiar with all hazards including those identified in the appropriate Material Safety Data Sheet (MSDS) for this product/material as provided by the manufacturer, to establish appropriate safety, health, and environmental practices, and determine the applicability of regulatory limitations prior to use. 1.4 This international standard was developed in accordance with internationally recognized principles on standardization established in the Decision on Principles for the Development of International Standards, Guides and Recommendations issued by the World Trade Organization Technical Barriers to Trade (TBT) Committee.
ASTM B667-97(2019) is classified under the following ICS (International Classification for Standards) categories: 17.220.20 - Measurement of electrical and magnetic quantities. The ICS classification helps identify the subject area and facilitates finding related standards.
ASTM B667-97(2019) has the following relationships with other standards: It is inter standard links to ASTM B542-13(2019), ASTM B542-13, ASTM B542-07, ASTM B542-04, ASTM B542-00. Understanding these relationships helps ensure you are using the most current and applicable version of the standard.
ASTM B667-97(2019) is available in PDF format for immediate download after purchase. The document can be added to your cart and obtained through the secure checkout process. Digital delivery ensures instant access to the complete standard document.
Standards Content (Sample)
This international standard was developed in accordance with internationally recognized principles on standardization established in the Decision on Principles for the
Development of International Standards, Guides and Recommendations issued by the World Trade Organization Technical Barriers to Trade (TBT) Committee.
Designation: B667 − 97 (Reapproved 2019)
Standard Practice for
Construction and Use of a Probe for Measuring Electrical
Contact Resistance
This standard is issued under the fixed designation B667; the number immediately following the designation indicates the year of
original adoption or, in the case of revision, the year of last revision. A number in parentheses indicates the year of last reapproval. A
superscript epsilon (´) indicates an editorial change since the last revision or reapproval.
1. Scope 3.2.1 contact resistance, n—the resistance to current flow
between two touching bodies, consisting of constriction resis-
1.1 This practice describes equipment and techniques for
tance and film resistance.
measuring electrical contact resistance with a probe and the
3.2.1.1 Discussion—Constriction resistance originates in the
presentation of results.
fact that mating surfaces touch in most cases at only their high
1.2 The values stated in SI units are to be regarded as
spots, which are often called “asperities” or, more commonly,
standard. No other units of measurement are included in this
a-spots. The current flow lines are then forced to constrict as
standard.
they funnel through these tiny areas. If oxide films or other
1.3 This standard does not purport to address all of the
insulating layers interfere with these metal-to-metal contacts,
safety concerns, if any, associated with its use. It is the the contact resistance will be higher than when such layers are
responsibility of the user of this standard to become familiar
absent (see 4.4 for bulk resistance limitation).
with all hazards including those identified in the appropriate
3.2.2 contact resistance probe, n—an apparatus for deter-
Material Safety Data Sheet (MSDS) for this product/material
mining electrical contact resistance characteristics of a metal
as provided by the manufacturer, to establish appropriate
surface. Probe, in this instance, should be distinguished from
safety, health, and environmental practices, and determine the
the classical tool whose function it is to touch or move an
applicability of regulatory limitations prior to use.
object.
1.4 This international standard was developed in accor-
4. Significance and Use
dance with internationally recognized principles on standard-
ization established in the Decision on Principles for the
4.1 Electrical contact resistance is an important characteris-
Development of International Standards, Guides and Recom-
tic of the contact in certain components, such as connectors,
mendations issued by the World Trade Organization Technical
switches, slip rings, and relays. Ordinarily, contact resistance is
Barriers to Trade (TBT) Committee.
required to be low and stable for proper functioning of many
devices or apparatus in which the component is used. It is more
2. Referenced Documents
convenient to determine contact resistance with a probe than to
incorporate the contact material into an actual component for
2.1 ASTM Standards:
the purpose of measurement. However, if the probe contact
B542 Terminology Relating to Electrical Contacts and Their
material is different from that employed in the component, the
Use
results obtained may not be applicable to the device.
3. Terminology
4.2 Information on contact resistance is useful in materials
development, in failure analysis studies, in the manufacturing
3.1 Definitions—Many terms used in this practice are de-
and quality control of contact devices, and in research.
fined in Terminology B542.
4.3 Contact resistance is not a unique single-valued property
3.2 Definitions of Terms Specific to This Standard:
of a material. It is affected by the mechanical conditions of the
contact, the geometry and roughness of contacting surfaces,
1 surface cleanliness, and contact history, as well as by the
This practice is under the jurisdiction of ASTM Committee B02 on Nonferrous
Metals and Alloys and is the direct responsibility of Subcommittee B02.05 on material properties of hardness and conductivity of both
Precious Metals and Electrical Contact Materials and Test Methods.
contacting members. An objective of this practice is to define
Current edition approved Nov. 1, 2019. Published November 2019. Originally
and control many of the known variables in such a way that
approved in 1980. Last previous edition approved in 2014 as B667 – 97 (2014).
valid comparisons of the contact properties of materials can be
DOI: 10.1520/B0667-97R19.
For referenced ASTM standards, visit the ASTM website, www.astm.org, or
made.
contact ASTM Customer Service at service@astm.org. For Annual Book of ASTM
4.4 In some techniques for measuring contact resistance it is
Standards volume information, refer to the standard’s Document Summary page on
the ASTM website. not possible to eliminate bulk resistance, that is, the resistance
Copyright © ASTM International, 100 Barr Harbor Drive, PO Box C700, West Conshohocken, PA 19428-2959. United States
B667 − 97 (2019)
of the metal pieces comprising the contact and the resistance of precisely. In such cases, fine (for example, 50-μm diameter),
the wires and connections used to introduce the test current into straight, or U-shaped gold or platinum wires can be used as the
the samples. In these cases, the measurement is actually of an probe.
overall resistance, which is often confused with contact resis-
6.4 The apparatus must be isolated from vibration to avoid
tance.
damaging the surface film that may exist at the interface to be
evaluated. The slightest movement can translate into extremely
5. General Description of a Probe
large stresses at the tops of small asperities. Likewise, bounce
5.1 A probe generally includes the following:
should be avoided when touching the probe to the specimen.
5.1.1 Fixtures for holding specimens of varied size and
Vibration may reveal itself as a noisy signal when contact
shape and for attaching electrical leads to them.
resistance is continuously monitored electronically.
5.1.2 A mechanism that applies a measurable load to the
6.4.1 For sensitive surfaces, a preliminary run should be
specimen that can be increased, decreased, or held constant.
made on as-received (uncleaned) test specimens of the same
5.1.3 A shock mounted table to prevent any indigenous
surface material as the samples to be measured. If the
vibrations from inadvertently altering the conditions at the
vibration-induced fluctuations are greater than 10 %, additional
contact interface.
antivibrational measures should be taken.
5.1.4 A reference surface (the probe) that is pressed against 6.4.2 Wipe should not be introduced when contact resis-
the specimen and which is normally made of a noble metal.
tance versus load characteristics are being measured, since as
Noble metals such as pure gold are used because they are little as a few micrometers of lateral movement can drastically
substantially free of oxide films and have the best likelihood of
change the contact resistance of samples having films.
obtaining reproducible results.
NOTE 1—Some variation of contact resistance with time under load has
5.1.5 A current source with current and voltage measuring 4
been found to occur for many materials. It is therefore recommended that,
instrumentation for determining contact resistance. Ordinarily,
for continuously monitored runs, the resistance at the final applied load
contact resistance is determined at dry circuit conditions to should also be recorded after a fixed dwell time, usually 10 to 30 s.
avoid changes that may occur due to voltage breakdown or
6.5 The power supply shall be capable of delivering a
heating at the contact interface.
pulse-free source under dry circuit conditions. To avoid errors
that may arise due to contact potentials and thermal EMF’s all
5.2 Additional electrical circuitry may be included to permit
d-c measurements should be taken with forward and reverse
related measurements to be obtained, such as the voltage
voltages and the results averaged. Measurements taken with
breakdown or the current versus voltage characteristics of
low frequency a-c sources automatically compensate for this
film-covered surfaces.
error.
5.3 Probes are also convenient for determining the depen-
dence of contact resistance on sliding or wipe when a slide is
7. Requirements of the Probe Contact
incorporated in the specimen holder. This permits the probe to
7.1 The probe is normally made with a pure gold surface,
be moved small measurable distances after loading.
although other noble metals can be used. The probe should be
smooth and have a large radius of curvature to minimize the
6. Design Aspects
possibility that it may damage the specimen surface. An
6.1 The probe is mounted on one end of a pivoted beam, a
exception to this latter recommendation are the wire probes
cantilever, or a coil spring. Force is applied by dead weight,
that are generally designed for low normal loads (6.3).
compression of the spring, bending of the cantilever, or
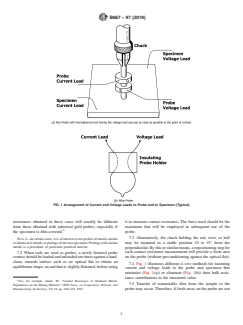
7.1.1 One early probe design that has seen much use is a
electromagnetically.
3.2-mm diameter solid gold rod having a hemispherical end.
6.2 Probe holders have been designed so that force may be
Such probes have been used extensively to loads of 10 N. They
applied to the contact and to an electronic load cell which is
can be made by machining gold rods to finish dimensions,
mounted between the probe contact and a micrometer spindle
followed by burnishing with a glass microscope slide or other
that can be advanced. An alternative design is to mount the
hard smooth surface, using care to maintain the radius of the
specimen on the load cell and to advance the probe directly
end.
with the micrometer spindle. Load and contact resistance are
7.1.2 Other common probe types are solid gold rivets
the usual parameters measured and recorded simultaneously.
coined to a sp
...


Questions, Comments and Discussion
Ask us and Technical Secretary will try to provide an answer. You can facilitate discussion about the standard in here.
Loading comments...