Standard Specification for Seamless Austenitic Steel Pipe for High-Temperature Central-Station Service

ABSTRACT
This specification covers seamless austenitic steel pipe intended for high-temperature central-station service. The grades covered are five H grades and two nitrogen grades. Pipe may be either hot finished or cold finished, with a suitable finishing treatment. All pipes shall be furnished in the heat-treated condition unless the order specifically states that no final heat treatment shall be applied. Tensile tests, hydrostatic test, nondestructive electric tests, ultrasonic tests, eddy-current tests, tension tests, and flattening tests shall be made to conform to the requirements specified.
SCOPE
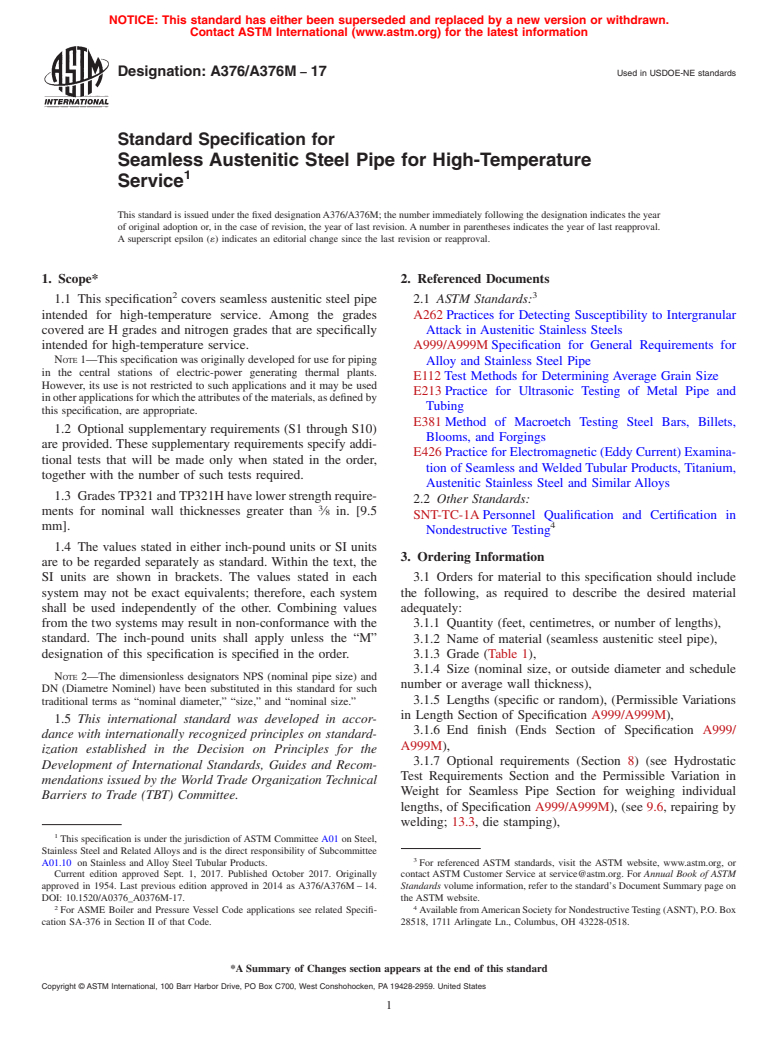
1.1 This specification covers seamless austenitic steel pipe intended for high-temperature central-station service. Among the grades covered are five H grades and two nitrogen grades (304N and 316N) that are specifically intended for high-temperature service.  
1.2 Optional supplementary requirements (S1 through S10) are provided. These supplementary requirements specify additional tests that will be made only when stated in the order, together with the number of such tests required.
1.3 Grades TP321 and TP321H have lower strength requirements for nominal wall thicknesses greater than 3/8 in. [9.5 mm].  
1.4 The values stated in either inch-pound units or SI units are to be regarded separately as standard. Within the text, the SI units are shown in brackets. The values stated in each system may not be exact equivalents; therefore, each system shall be used independently of the other. Combining values from the two systems may result in non-conformance with the standard. The inch-pound units shall apply unless the “M” designation of this specification is specified in the order.
Note 1—The dimensionless designator NPS (nominal pipe size) has been substituted in this standard for such traditional terms as “nominal diameter,” “size,” and “nominal size.”

General Information

Status
Historical
Publication Date
30-Sep-2011
Current Stage
Ref Project

Relations

Buy Standard

Technical specification
ASTM A376/A376M-06(2011) - Standard Specification for Seamless Austenitic Steel Pipe for High-Temperature Central-Station Service
English language
7 pages
sale 15% off
Preview
sale 15% off
Preview
Technical specification
REDLINE ASTM A376/A376M-06(2011) - Standard Specification for Seamless Austenitic Steel Pipe for High-Temperature Central-Station Service
English language
7 pages
sale 15% off
Preview
sale 15% off
Preview

Standards Content (Sample)


NOTICE: This standard has either been superseded and replaced by a new version or withdrawn.
Contact ASTM International (www.astm.org) for the latest information
Used in USDOE-NE standards
Designation: A376/A376M – 06 (Reapproved 2011)
Standard Specification for
Seamless Austenitic Steel Pipe for High-Temperature
Central-Station Service
This standard is issued under the fixed designationA376/A376M; the number immediately following the designation indicates the year
of original adoption or, in the case of revision, the year of last revision. A number in parentheses indicates the year of last reapproval.
A superscript epsilon (´) indicates an editorial change since the last revision or reapproval.
1. Scope Alloy and Stainless Steel Pipe
E112 Test Methods for Determining Average Grain Size
1.1 This specification covers seamless austenitic steel pipe
E213 Practice for Ultrasonic Testing of Metal Pipe and
intended for high-temperature central-station service. Among
Tubing
the grades covered are five H grades and two nitrogen grades
E381 Method of Macroetch Testing Steel Bars, Billets,
(304N and 316N) that are specifically intended for high-
Blooms, and Forgings
temperature service.
E426 Practice for Electromagnetic (Eddy-Current) Exami-
1.2 Optional supplementary requirements (S1 through S10)
nation of Seamless and Welded Tubular Products, Auste-
are provided. These supplementary requirements specify addi-
nitic Stainless Steel and Similar Alloys
tional tests that will be made only when stated in the order,
2.2 Other Standards:
together with the number of such tests required.
SNT-TC-1A Personnel Qualification and Certification in
1.3 GradesTP321 andTP321H have lower strength require-
Nondestructive Testing
ments for nominal wall thicknesses greater than ⁄8 in. [9.5
mm].
3. Terminology
1.4 The values stated in either inch-pound units or SI units
3.1 Definitions—For definitions of terms used in this speci-
are to be regarded separately as standard. Within the text, the
fication, refer to Terminology A941.
SI units are shown in brackets. The values stated in each
system may not be exact equivalents; therefore, each system
4. Ordering Information
shall be used independently of the other. Combining values
4.1 Orders for material to this specification should include
from the two systems may result in non-conformance with the
the following, as required to describe the desired material
standard. The inch-pound units shall apply unless the “M”
adequately:
designation of this specification is specified in the order.
4.1.1 Quantity (feet, centimetres, or number of lengths),
NOTE 1—The dimensionless designator NPS (nominal pipe size) has
4.1.2 Name of material (seamless austenitic steel pipe),
been substituted in this standard for such traditional terms as “nominal
4.1.3 Grade (Table 1),
diameter,” “size,” and “nominal size.”
4.1.4 Size (nominal size, or outside diameter and schedule
number or average wall thickness),
2. Referenced Documents
4.1.5 Lengths (specific or random), (Permissible Variations
2.1 ASTM Standards:
in Length Section of Specification A999/A999M),
A262 Practices for Detecting Susceptibility to Intergranular
4.1.6 End finish (Ends Section of Specification A999/
Attack in Austenitic Stainless Steels
A999M),
A941 Terminology Relating to Steel, Stainless Steel, Re-
4.1.7 Optional requirements (Section 9) (see Hydrostatic
lated Alloys, and Ferroalloys
Test Requirements Section and the Permissible Variation in
A999/A999M Specification for General Requirements for
Weight for Seamless Pipe Section for weighing individual
lengths,ofSpecificationA999/A999M),(see10.6,repairingby
welding; 14.3, die stamping),
This specification is under the jurisdiction of ASTM Committee A01 on Steel,
Stainless Steel and RelatedAlloys and is the direct responsibility of Subcommittee
4.1.8 Test report required (Certification Section of Specifi-
A01.10 on Stainless and Alloy Steel Tubular Products.
cation A999/A999M),
Current edition approved Oct. 1, 2011. Published March 2012. Originally
4.1.9 Specification designation, and
approved in 1954. Last previous edition approved in 2006 as A376/A376M–06.
DOI: 10.1520/A0376_A0376M-06R11. 4.1.10 Special requirements or any supplementary require-
For ASME Boiler and Pressure Vessel Code applications see related Specifi-
ments selected, or both.
cation SA-376 in Section II of that Code.
For referenced ASTM standards, visit the ASTM website, www.astm.org, or
contact ASTM Customer Service at service@astm.org. For Annual Book of ASTM
Standards volume information, refer to the standard’s Document Summary page on AvailablefromAmericanSocietyforNondestructiveTesting(ASNT),P.O.Box
the ASTM website. 28518, 1711 Arlingate Ln., Columbus, OH 43228-0518.
Copyright © ASTM International, 100 Barr Harbor Drive, PO Box C700, West Conshohocken, PA 19428-2959, United States.
A376/A376M – 06 (2011)
TABLE 1 Chemical Requirements
UNS Composition,%
Desig-
Carbon Man- Phos- Sul- Sili- Nickel Chromium Molyb- Tita- Colum- Tan- Nitro- Others
Grade
nation
A
ganese, phorus, fur, con, denum nium bium talum gen
max max max max
TP304 S30400 0.08 max 2.00 0.045 0.030 0.75 8.0–11.0 18.0–20.0 . . . . . . . . . . . . . . . . . .
TP304H S30409 0.04–0.10 2.00 0.045 0.030 0.75 8.0–11.0 18.0–20.0 . . . . . . . . . . . . . . . . . .
TP304N S30451 0.08 max 2.00 0.045 0.030 0.75 8.0–11.0 18.0–20.0 . . . . . . . . . . . . 0.10–0.16 . . .
TP304LN S30453 0.035 max 2.00 0.045 0.030 0.75 8.0–11.0 18.0–20.0 . . . . . . . . . . . . 0.10–0.16 . . .
TP316 S31600 0.08 max 2.00 0.045 0.030 0.75 11.0–14.0 16.0–18.0 2.00–3.00 . . . . . . . . . . . . . . .
TP316H S31609 0.04–0.10 2.00 0.045 0.030 0.75 11.0–14.0 16.0–18.0 2.00–3.00 . . . . . . . . . . . . . . .
TP316N S31651 0.08 max 2.00 0.045 0.030 0.75 11.0–14.0 16.0–18.0 2.00–3.00 . . . . . . . . . 0.10–0.16 . . .
TP316LN S31653 0.035 max 2.00 0.045 0.030 0.75 11.0–14.0 16.0–18.0 2.00–3.00 . . . . . . . . . 0.10–0.16 . . .
B
TP321 S32100 0.08 max 2.00 0.045 0.030 0.75 9.0–13.0 17.0–19.0 . . . . . . .
C
TP321H S32109 0.04–0.10 2.00 0.045 0.030 0.75 9.0–13.0 17.0–19.0 . . . . . . .
D
TP347 S34700 0.08 max 2.00 0.045 0.030 0.75 9.0–13.0 17.0–19.0 . . . . . . . . .
E
TP347H S34709 0.04–0.10 2.00 0.045 0.030 0.75 9.0–13.0 17.0–19.0 . . . . . . . . .
F D
TP348 S34800 0.08 max 2.00 0.045 0.030 0.75 9.0–13.0 17.0–19.0 . . . . . . 0.10 . . . Co 0.20 max
E
TP348H S34809 0.04–0.10 2.00 0.045 0.030 1.00 9.0–13.0 17.0–19.0 0.10
16-8-2H S16800 0.05–0.10 2.00 0.045 0.030 0.75 7.5–9.5 14.5–16.5 1.50–2.00 . . . . . . . . . . . . . . .
. . . S31725 0.030 max 2.00 0.045 0.030 0.75 13.5–17.5 18.0–20.0 4.0–5.0 . . . . . . . . . 0.20 max Cu 0.75 max
. . . S31726 0.030 max 2.00 0.045 0.030 0.75 14.5–17.5 17.0–20.0 4.0–5.0 . . . . . . . . . 0.10–0.20 Cu 0.75 max
. . . S34565 0.030 max 5.0–7.0 0.030 0.010 1.0 16.0–18.0 23.0–25.0 4.0–5.0 . . . . . . . . . 0.040–0.060 Cb 0.10 max
A
The method of analysis for nitrogen shall be a matter of agreement between the purchaser and manufacturer.
B
The titanium content shall be not less than five times the carbon content and not more than 0.70 %.
C
The titanium content shall be not less than four times the carbon content and not more than 0.70 %.
D
The columbium content shall be not less than ten times the carbon content and not more than 1.10 %.
E
The columbium content shall be not less than eight times the carbon content and not more than 1.10 %.
F
This grade is intended for special purpose applications.
5. General Requirements cessing, the minimum solution-treating temperature for Grades
TP321H,TP347H,andTP348Hshallbe2000°F[1100°C],for
5.1 Material furnished to this specification shall conform to
Grades TP304H and TP316H, 1900 °F [1040 °C], and for
the applicable requirements of the current edition of Specifi-
Grade 16-8-2H, 1800 °F [980 °C]. If the material is hot-rolled,
cation A999/A999M unless otherwise provided herein.
the minimum solution-treating temperatures for Grades
6. Materials and Manufacture TP321H, TP347H, and TP348H shall be 1925 °F [1050 °C],
for Grades TP304H and TP316H, 1900 °F [1040 °C], and for
6.1 Manufacture—At the manufacturer’s option, pipe may
Grade 16-8-2H, 1800 °F [980 °C].
be either hot finished or cold finished, with a suitable finishing
6.2.5 Grade S34565—Heat treatment shall consist of heat-
treatment, where necessary.
ing to a temperature in the range of 2050 °F [1120 °C]
6.2 Heat Treatment:
minimum and 2140 °F [1170 °C] maximum, and quenching in
6.2.1 All pipe shall be furnished in the heat-treated condi-
water or rapidly cooling by other means.
tion unless the order specifically states that no final heat
treatment shall be applied.When the order is furnished without 6.3 A solution annealing temperature above 1950 °F [1065
°C] may impair the resistance to intergranular corrosion after
final heat treatment, each pipe shall be stenciled “HT-O.”
6.2.2 As an alternate to final heat treatment in a continuous subsequent exposure to sensitizing conditions in TP321,
TP321H, TP347, TP347H, TP348, and TP348H. When speci-
furnace or batch-type furnace, immediately following hot
forming while the temperature of the pipes is not less than the fied by the purchaser, a lower temperature stabilization or
specified minimum solution treatment temperature, pipes may re-solution anneal shall be used subsequent to the initial high
be individually quenched in water or rapidly cooled by other temperature solution anneal (see Supplementary Requirement
means. S9).
6.2.3 Grades TP304, TP304N, TP304LN, TP316, TP316N,
6.4 The grain size of grades 304H, 316H, 321H, 347H, and
TP316LN, TP321, TP347, TP348, 16-8-2H, S 31725, and
348H as determined in accordance with Test Methods E112,
S 31726 —Unless otherwise stated in the order, heat treatment
shall be No. 7 or coarser.
shall consist of heating to a minimum temperature of 1900 °F
[1040 °C] and quenching in water or rapidly cooling by other
7. Chemical Composition
means.
7.1 The steel shall conform to the requirements as to
6.2.3.1 The purchaser may specify controlled structural or
chemical composition prescribed in Table 1.
special service characteristics which shall be used as a guide
for the most suitable heat treatment. If the final heat treatment
8. Product Analysis
is at a temperature under 1900 °F [1040 °C], each pipe shall be
stenciled with the final heat treatment temperature in degrees 8.1 At the request of the purchaser, an analysis of one billet
Fahrenheit or Celsius after the suffix “HT.” from each heat or two pipes from each lot (Note 2) shall be
6.2.4 Grades TP304H, TP316H, TP321H, TP347H, made by the manufacturer. A lot of pipe shall consist of the
TP348H, and 16-8-2H—If cold working is involved in pro- following:
A376/A376M – 06 (2011)
10.2.4 Rejected.
NPS Designator Lengths of Pipe in Lot
10.3 To provide a workmanlike finish and basis for evalu-
Under NPS 2 400 or fraction thereof
ating conformance with 10.2, the pipe manufacturer shall
NPS 2 to NPS 5, incl 200 or fraction thereof
remove by grinding the following:
Over NPS 5 100 or fraction thereof
10.3.1 Mechanical marks, abrasions (see Note 3), and pits,
NOTE 2—Alot shall consist of the number of lengths specified in 8.1 of
any of which imperfections are deeper than ⁄16 in. [1.6 mm].
the same size and wall thickness from any one heat of steel.
NOTE 3—Marksandabrasionsaredefinedascablemarks,dinges,guide
8.2 The results of these analyses shall be reported to the
marks, roll marks, ball scratches, scores, die marks, and so forth.
purchaser or the purchaser’s representative, and shall conform
to the requirements specified in Table 1.
10.3.2 Visual imperfections commonly referred to as scabs,
8.3 If the analysis of one of the tests specified in Section 9
seams, laps, tears, or slivers found by exploration in accor-
does not conform to the requirements specified in Section 7,an
dance with 10.1 to be deeper than 5 % of the nominal wall
analysis of each billet or pipe from the same heat or lot may be
thickness.
made, and all billets or pipe conforming to the requirements
10.4 At the purchaser’s discretion, pipe shall be subject to
shall be accepted.
rejection if surface imperfections acceptable under 10.2 are not
scattered, but appear over a large area in excess of what is
9. Tensile Requirements
consideredaworkmanlikefinish.Dispositionofsuchpipeshall
9.1 The material shall conform to the requirements as to be a matter of agreement between the manufacturer and the
tensile properties prescribed in Table 2. purchaser.
10.5 When imperfections or defects are removed by grind-
10. Workmanship, Finish, and Appearance
ing, a smooth curved surface shall be maintained, and the wall
10.1 The pipe manufacturer shall explore a sufficient num- thickness shall not be decreased below that permitted by this
specification.Theoutsidediameteratthepointofgrindingmay
ber of visual surface imperfections to provide reasonable
assurance that they have been properly evaluated with respect be reduced by the amount so removed.
10.5.1 Wall thickness measurements shall be made with a
to depth. Exploration of all surface imperfections is not
required but may be necessary to assure compliance with 10.2. mechanical caliper or with a properly calibrated nondestructive
testing device of appropriate accuracy. In case of dispute, the
10.2 Surfaceimperfectionsthatpenetratemorethan12 ⁄2 %
of the nominal wall thickness or encroach on the minimum measurementdeterminedbyuseofthemechanicalcalipershall
govern.
wall thickness shall be considered defects. Pipe with such
defects shall be given one of the following dispositions: 10.6 Weld repair shall be permitted only subject to the
10.2.1 The defect may be removed by grinding provided approval of the purchaser and in accordance with Specification
that the remaining wall thickness is within specified limits. A999/A999M.
10.2.2 Repaired in accordance with the repair welding 10.7 The finished pipe shall be reasonably straight.
provisions of 10.6. 10.8 The pipe shall be free of scale and contaminating iron
10.2.3 The section of pipe containing the defect may be cut particles. Pickling, blasting, or surface finishing is not manda-
tory when pipe is bright annealed. The purchaser may request
off within the limits of requirements on length.
that a passivating treatment be applied.
TABLE 2 Tensile Requirements
11. Hydrostatic or Nondestructive Electric Test
A
Tensile Yield Elongation in 2 in. or 50
strength, strength mm 11.1 Each pipe shall be subjected to the Nondestructive
Grade min, ksi min, (or 4D) min, %
Electric Test or the Hydrostatic Test. Unless specified by the
[MPa] ksi
Longitudinal Transverse
purchaser, either test may be used at the option of the producer.
[MPa]
11.2 Hydrostatic Test— Each length of finished pipe shall
TP304, TP304H,
be subjected to the hydrostatic test in accordance with Speci-
TP304LN, TP316,
TP316H, TP316LN, 75 30
fication
...


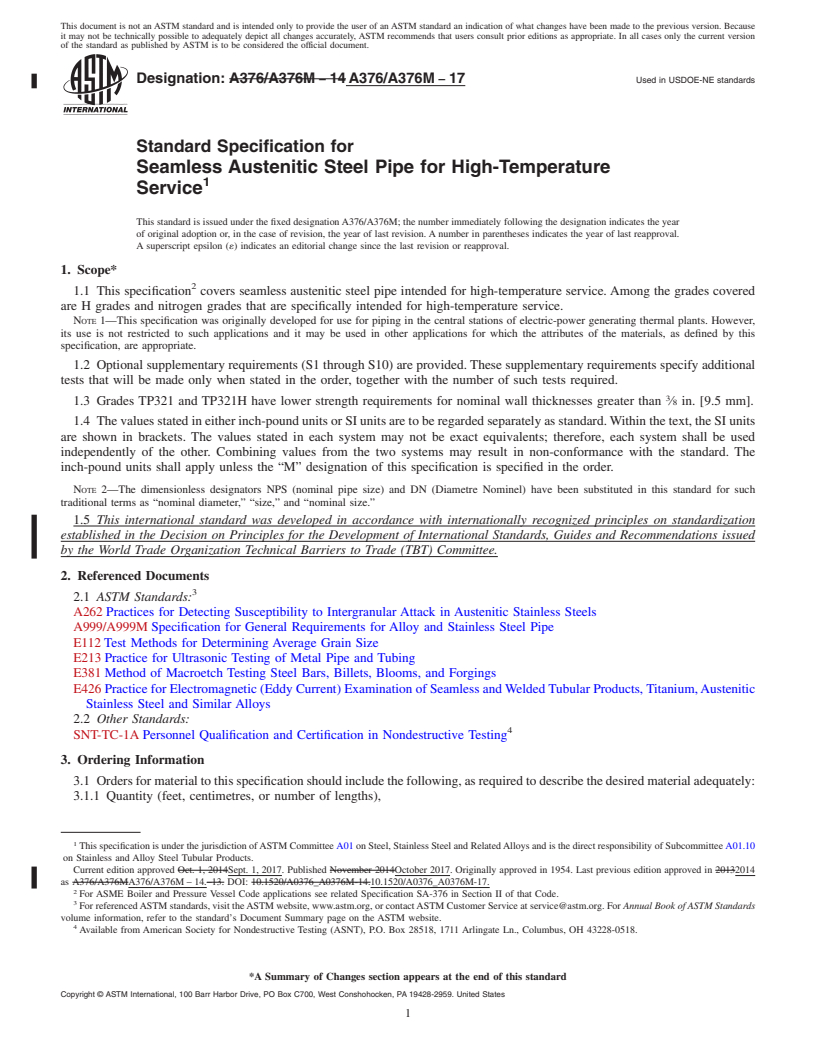
This document is not an ASTM standard and is intended only to provide the user of an ASTM standard an indication of what changes have been made to the previous version. Because
it may not be technically possible to adequately depict all changes accurately, ASTM recommends that users consult prior editions as appropriate. In all cases only the current version
of the standard as published by ASTM is to be considered the official document.
Used in USDOE-NE standards
Designation:A376/A376M–06 Designation: A376/A376M – 06 (Reapproved 2011)
Standard Specification for
Seamless Austenitic Steel Pipe for High-Temperature
Central-Station Service
This standard is issued under the fixed designationA376/A376M; the number immediately following the designation indicates the year
of original adoption or, in the case of revision, the year of last revision. A number in parentheses indicates the year of last reapproval.
A superscript epsilon (´) indicates an editorial change since the last revision or reapproval.
1. Scope *
1.1 This specification covers seamless austenitic steel pipe intended for high-temperature central-station service. Among the
grades covered are five H grades and two nitrogen grades (304N and 316N) that are specifically intended for high-temperature
service.
1.2 Optional supplementary requirements (S1 through S10) are provided. These supplementary requirements specify additional
tests that will be made only when stated in the order, together with the number of such tests required.
1.3 Grades TP321 and TP321H have lower strength requirements for nominal wall thicknesses greater than ⁄8 in. [9.5 mm].
1.4 Thevaluesstatedineitherinch-poundunitsorSIunitsaretoberegardedseparatelyasstandard.Withinthetext,theSIunits
are shown in brackets.The values stated in each system aremay not be exact equivalents; therefore, each system mustshall be used
independentlyoftheother.Combiningvaluesfromthetwosystemsmayresultinnon-conformancewiththespecification.standard.
The inch-pound units shall apply unless the “M” designation of this specification is specified in the order.
NOTE 1—The dimensionless designator NPS (nominal pipe size) has been substituted in this standard for such traditional terms as “nominal diameter,”
“size,” and “nominal size.”
2. Referenced Documents
2.1 ASTM Standards:
A262 Practices for Detecting Susceptibility to Intergranular Attack in Austenitic Stainless Steels
A941 Terminology Relating to Steel, Stainless Steel, Related Alloys, and Ferroalloys
A999/A999M Specification for General Requirements for Alloy and Stainless Steel Pipe
E112 Test Methods for Determining Average Grain Size
E213 Practice for Ultrasonic Testing of Metal Pipe and Tubing
E381 Method of Macroetch Testing Steel Bars, Billets, Blooms, and Forgings
E426 Practice for Electromagnetic (Eddy-Current) Examination of Seamless andWeldedTubular Products,Austenitic Stainless
Steel and Similar Alloys
2.2 Other Standards:
SNT-TC-1A Personnel Qualification and Certification in Nondestructive Testing
3. Terminology
3.1 Definitions—For definitions of terms used in this specification, refer to Terminology A941.
4. Ordering Information
4.1 Ordersformaterialtothisspecificationshouldincludethefollowing,asrequiredtodescribethedesiredmaterialadequately:
4.1.1 Quantity (feet, centimetres, or number of lengths),
4.1.2 Name of material (seamless austenitic steel pipe),
4.1.3 Grade (Table 1),
4.1.4 Size (nominal size, or outside diameter and schedule number or average wall thickness),
4.1.5 Lengths (specific or random), (Permissible Variations in Length Section of Specification A999/A999M),
This specification is under the jurisdiction ofASTM CommitteeA01 on Steel, Stainless Steel and RelatedAlloys and is the direct responsibility of SubcommitteeA01.10
on Stainless and Alloy Steel Tubular Products.
Current edition approved MarchOct. 1, 2006.2011. Published April 2006.March 2012. Originally approved in 1954. Last previous edition approved in 20042006 as
A376/A376M–04.A376/A376M–06. DOI: 10.1520/A0376_A0376M-06R11.
For ASME Boiler and Pressure Vessel Code applications see related Specification SA-376 in Section II of that Code.
For referencedASTM standards, visit theASTM website, www.astm.org, or contactASTM Customer Service at service@astm.org. For Annual Book of ASTM Standards
volume information, refer to the standard’s Document Summary page on the ASTM website.
Available from American Society for Nondestructive Testing (ASNT), P.O. Box 28518, 1711 Arlingate Ln., Columbus, OH 43228-0518.
Copyright © ASTM International, 100 Barr Harbor Drive, PO Box C700, West Conshohocken, PA 19428-2959, United States.
A376/A376M – 06 (2011)
TABLE 1 Chemical Requirements
UNS Composition,%
Desig-
Carbon Man- Phos- Sul- Sili- Nickel Chromium Molyb- Tita- Colum- Tan- Nitro- Others
Grade
nation
A
ganese, phorus, fur, con, denum nium bium talum gen
max max max max
TP304 S30400 0.08 max 2.00 0.045 0.030 0.75 8.0–11.0 18.0–20.0 . . . . . . . . . . . . . . . . . .
TP304H S30409 0.04–0.10 2.00 0.045 0.030 0.75 8.0–11.0 18.0–20.0 . . . . . . . . . . . . . . . . . .
TP304N S30451 0.08 max 2.00 0.045 0.030 0.75 8.0–11.0 18.0–20.0 . . . . . . . . . . . . 0.10–0.16 . . .
TP304LN S30453 0.035 max 2.00 0.045 0.030 0.75 8.0–11.0 18.0–20.0 . . . . . . . . . . . . 0.10–0.16 . . .
TP316 S31600 0.08 max 2.00 0.045 0.030 0.75 11.0–14.0 16.0–18.0 2.00–3.00 . . . . . . . . . . . . . . .
TP316H S31609 0.04–0.10 2.00 0.045 0.030 0.75 11.0–14.0 16.0–18.0 2.00–3.00 . . . . . . . . . . . . . . .
TP316N S31651 0.08 max 2.00 0.045 0.030 0.75 11.0–14.0 16.0–18.0 2.00–3.00 . . . . . . . . . 0.10–0.16 . . .
TP316LN S31653 0.035 max 2.00 0.045 0.030 0.75 11.0–14.0 16.0–18.0 2.00–3.00 . . . . . . . . . 0.10–0.16 . . .
B
TP321 S32100 0.08 max 2.00 0.045 0.030 0.75 9.0–13.0 17.0–19.0 . . . . . . .
C
TP321H S32109 0.04–0.10 2.00 0.045 0.030 0.75 9.0–13.0 17.0–19.0 . . . . . . .
D
TP347 S34700 0.08 max 2.00 0.045 0.030 0.75 9.0–13.0 17.0–19.0 . . . . . . . . .
E
TP347H S34709 0.04–0.10 2.00 0.045 0.030 0.75 9.0–13.0 17.0–19.0 . . . . . . . . .
F D
TP348 S34800 0.08 max 2.00 0.045 0.030 0.75 9.0–13.0 17.0–19.0 . . . . . . 0.10 . . . Co 0.20 max
E
TP348H S34809 0.04–0.10 2.00 0.045 0.030 1.00 9.0–13.0 17.0–19.0 0.10
16-8-2H S16800 0.05–0.10 2.00 0.045 0.030 0.75 7.5–9.5 14.5–16.5 1.50–2.00 . . . . . . . . . . . . . . .
. . . S31725 0.030 max 2.00 0.045 0.030 0.75 13.5–17.5 18.0–20.0 4.0–5.0 . . . . . . . . . 0.20 max Cu 0.75 max
. . . S31726 0.030 max 2.00 0.045 0.030 0.75 14.5–17.5 17.0–20.0 4.0–5.0 . . . . . . . . . 0.10–0.20 Cu 0.75 max
. . . S34565 0.030 max 5.0–7.0 0.030 0.010 1.0 16.0–18.0 23.0–25.0 4.0–5.0 . . . . . . . . . 0.040–0.060 Cb 0.10 max
A
The method of analysis for nitrogen shall be a matter of agreement between the purchaser and manufacturer.
B
The titanium content shall be not less than five times the carbon content and not more than 0.70 %.
C
The titanium content shall be not less than four times the carbon content and not more than 0.70 %.
D
The columbium content shall be not less than ten times the carbon content and not more than 1.10 %.
E
The columbium content shall be not less than eight times the carbon content and not more than 1.10 %.
F
This grade is intended for special purpose applications.
4.1.6 End finish (Ends Section of Specification A999/A999M),
4.1.7 Optional requirements (Section 9) (see HydrostaticTest Requirements Section and the PermissibleVariation inWeight for
Seamless Pipe Section for weighing individual lengths, of SpecificationA999/A999M), (see 10.6, repairing by welding; 14.3, die
stamping),
4.1.8 Test report required (Certification Section of Specification A999/A999M),
4.1.9 Specification designation, and
4.1.10 Special requirements or any supplementary requirements selected, or both.
5. General Requirements
5.1 Material furnished to this specification shall conform to the applicable requirements of the current edition of Specification
A999/A999M unless otherwise provided herein.
6. Materials and Manufacture
6.1 Manufacture—At the manufacturer’s option, pipe may be either hot finished or cold finished, with a suitable finishing
treatment, where necessary.
6.2 Heat Treatment:
6.2.1 Allpipeshallbefurnishedintheheat-treatedconditionunlesstheorderspecificallystatesthatnofinalheattreatmentshall
be applied. When the order is furnished without final heat treatment, each pipe shall be stenciled “HT-O.”
6.2.2 As an alternate to final heat treatment in a continuous furnace or batch-type furnace, immediately following hot forming
whilethetemperatureofthepipesisnotlessthanthespecifiedminimumsolutiontreatmenttemperature,pipesmaybeindividually
quenched in water or rapidly cooled by other means.
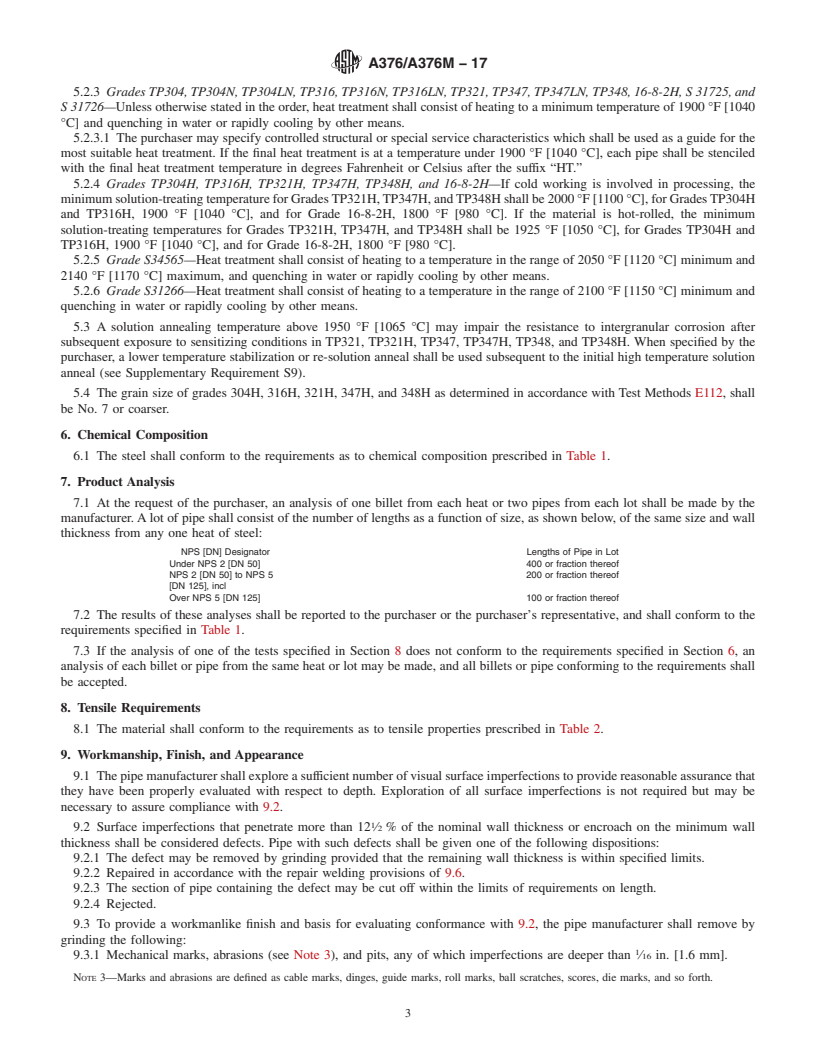
6.2.3 Grades TP304, TP304N, TP304LN, TP316, TP316N, TP316LN, TP321, TP347, TP348, 16-8-2H, S 31725, and S 31726
—Unless otherwise stated in the order, heat treatment shall consist of heating to a minimum temperature of 1900 °F [1040 °C]
and quenching in water or rapidly cooling by other means.
6.2.3.1 The purchaser may specify controlled structural or special service characteristics which shall be used as a guide for the
most suitable heat treatment. If the final heat treatment is at a temperature under 1900 °F [1040 °C], each pipe shall be stenciled
with the final heat treatment temperature in degrees Fahrenheit or Celsius after the suffix “HT.”
6.2.4 Grades TP304H, TP316H, TP321H, TP347H, TP348H, and 16-8-2H—If cold working is involved in processing, the
minimumsolution-treatingtemperatureforGradesTP321H,TP347H,andTP348Hshallbe2000°F[1100°C],forGradesTP304H
and TP316H, 1900 °F [1040 °C], and for Grade 16-8-2H, 1800 °F [980 °C]. If the material is hot-rolled, the minimum
solution-treating temperatures for Grades TP321H, TP347H, and TP348H shall be 1925 °F [1050 °C], for Grades TP304H and
TP316H, 1900 °F [1040 °C], and for Grade 16-8-2H, 1800 °F [980 °C].
6.2.5 Grade S34565—Heat treatment shall consist of heating to a temperature in the range of 2050 °F [1120 °C] minimum and
2140 °F [1170 °C] maximum, and quenching in water or rapidly cooling by other means.
A376/A376M – 06 (2011)
6.3 A solution annealing temperature above 1950 °F [1065 °C] may impair the resistance to intergranular corrosion after
subsequent exposure to sensitizing conditions in TP321, TP321H, TP347, TP347H, TP348, and TP348H. When specified by the
purchaser, a lower temperature stabilization or re-solution anneal shall be used subsequent to the initial high temperature solution
anneal (see Supplementary Requirement S9).
6.4 The grain size of grades 304H, 316H, 321H, 347H, and 348H as determined in accordance with Test Methods E112, shall
be No. 7 or coarser.
7. Chemical Composition
7.1 The steel shall conform to the requirements as to chemical composition prescribed in Table 1.
8. Product Analysis
8.1 At the request of the purchaser, an analysis of one billet from each heat or two pipes from each lot (Note 2) shall be made
by the manufacturer. A lot of pipe shall consist of the following:
NPS Designator Lengths of Pipe in Lot
Under NPS 2 400 or fraction thereof
NPS 2 to NPS 5, incl 200 or fraction thereof
Over NPS 5 100 or fraction thereof
NOTE 2—A lot shall consist of the number of lengths specified in 8.1 of the same size and wall thickness from any one heat of steel.
8.2 The results of these analyses shall be reported to the purchaser or the purchaser’s representative, and shall conform to the
requirements specified in Table 1.
8.3 If the analysis of one of the tests specified in Section 9 does not conform to the requirements specified in Section 7, an
analysis of each billet or pipe from the same heat or lot may be made, and all billets or pipe conforming to the requirements shall
be accepted.
9. Tensile Requirements
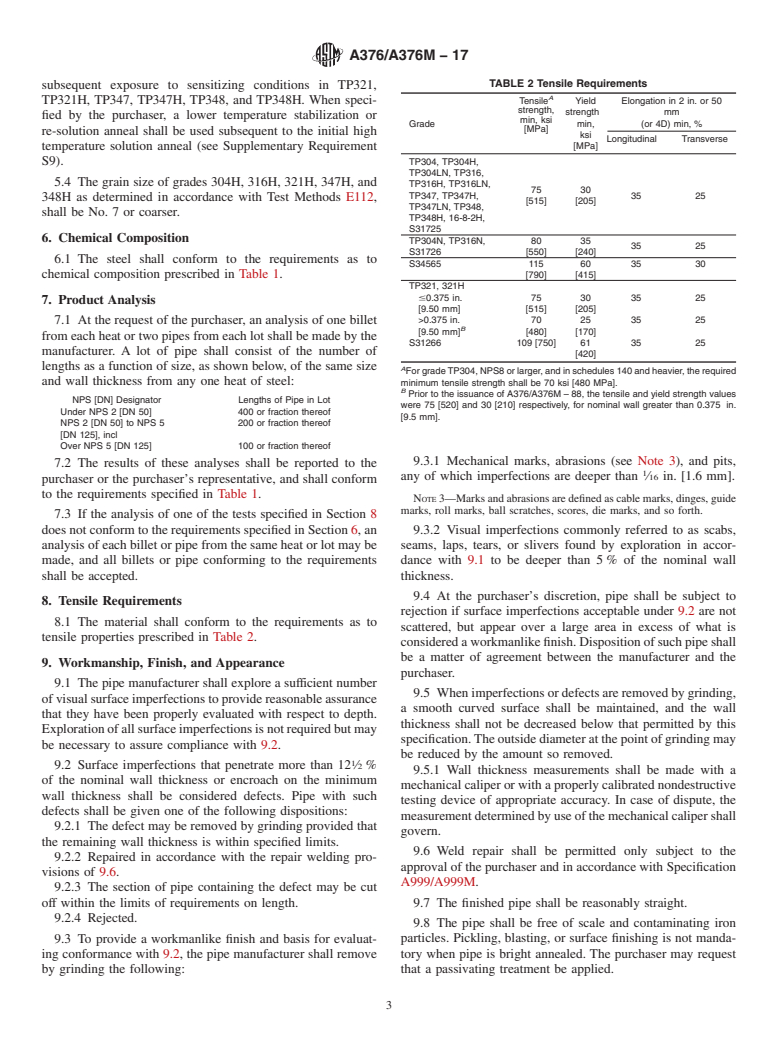
9.1 The material shall conform to the requirements as to tensile properties prescribed in Table 2.
10. Workmanship, Finish, and Appearance
10.1 The pipe manufacturer shall explore a sufficient number of visual surface imperfections to provide reasonable assurance
that they have been properly evaluated with respect to depth. Exploration of all surface imperfections is not required but may be
necessary to assure compliance with 10.2.
10.2 Surface imperfections that penetrate more than 12 ⁄2 % of the nominal wall thickness or encroach on the minimum wall
thickness shall be considered defects. Pipe with such defects shall be given one of the following dispositions:
10.2.1 The defect may be removed by grinding provided that the remaining wall thickness is within specified limits.
10.2.2 Repaired in accordance with the repair welding provisions of 10.6.
TABLE 2 Tensile Requirements
A
Tensile Yield Elongation in 2 in. or 50
strength, strength mm
Grade min, ksi min, (or 4D) min, %
[MPa] ksi
Longitudinal Transverse
[MPa]
TP304, TP304H,
TP304LN, TP316,
TP316H, TP316LN, 75 30
35 25
TP347, TP347H, [515] [205]
TP348, TP348H,
16-8-2H, S31725
TP304N, TP316N, 80 35
35 25
S31726 [550] [240]
S34565 115 60 35 30
[790] [415]
TP321, 321H
# ⁄8 9 75 30 35 25
[515] [205]
B
> ⁄8 9 70 25 35 25
[480] [170]
A
For grade TP304, NPS8 or larger, and in schedules 140 and heavier, the
required minimum tensile strength shall be 70 ksi [480 MPa].
B
Prior to the issuance of A376/A376M – 88, the tensile and yield strength
values were 75 [520] and 30 [210] respectively, for nominal wall greater than ⁄8 in.
[9.5 mm].
A376/A376M – 06 (2011)
10.2.3 The section of pipe containing the defect may be cut off within the limits of requirements on length.
10.2.4 Rejected.
10.3 To provide a workmanlike finish and basis for evaluating conformance with 10.2, the pipe manufacturer shall remove by
grinding the following:
10.3.1 Mechanical marks, abrasions (see Note 3), and pits, any of which imperfections are deeper than ⁄16 in. [1.6 mm].
NOTE 3—Marks and abrasions are defined as cable marks, dinges, guide marks, roll marks, ball scratches, scores, die marks, and so forth.
10.3.2 Visual imperfections commonly referred to as scabs, seams, laps, tears, or slivers found by exploration in accordance
with 10.1 to be deeper than 5 % of the nominal wall thickness.
10.4 At the purchaser’s discretion, pipe shall be subject to rejection if surface imperfections acceptable under 10.2 are not
scattered, but appear over a large area in excess of what is considered a workmanlike finish. Disposition of such pipe shall be a
matter of agreement between the manufacturer and the purchaser.
10.5 When imperfections or defects are removed by grinding, a smooth curved surface shall be maintained, and the wall
thickness shall not be decreased below that permitted by this specification. The outside diameter at the point of grinding may be
reduced by the amount so removed.
10.5.1 Wall thickness measurements shall be made with a mechanical caliper or with a properly calibrated nondestructive
testing device
...

Questions, Comments and Discussion

Ask us and Technical Secretary will try to provide an answer. You can facilitate discussion about the standard in here.