ASTM F994-86(2022)
(Specification)Standard Specification for Design and Installation of Overboard Discharge Hull Penetration Connections
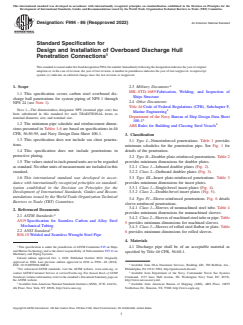
Standard Specification for Design and Installation of Overboard Discharge Hull Penetration Connections
ABSTRACT
This specification covers carbon steel overboard discharge hull penetrations for system piping. Penetrations shall be classified as follows: Type I; Type II (Class 1 and Class 2); Type III (Class 1 and Class 2); and Type IV (Classes 1, 2, and 3). Doubler and insert plates shall be of material with physical properties equal to or better than the reinforced shell plate. Overboard discharges shall be combined to the maximum extent practicable to minimize the number of shell penetrations. Overboard discharges shall be located to minimize recirculation into suction seachests. Shell penetrations shall be located outside of cathodic protection areas. Penetration pipe extension past the shell plate shall be equal to the pipe wall thickness.
SCOPE
1.1 This specification covers carbon steel overboard discharge hull penetrations for system piping of NPS 1 through NPS 24 (see Note 1).
Note 1: The dimensionless designator NPS (nominal pipe size) has been substituted in this standard for such TRADITIONAL terms as nominal diameter, size, and nominal size.
1.2 The minimum pipe schedule and reinforcement dimensions presented in Tables 1-6 are based on specifications in 46 CFR, 56.50-95, and Navy Design Data Sheet 100-1.
1.3 This specification does not include sea chest penetrations.
1.4 This specification does not include penetrations in protective plating.
1.5 The values stated in inch-pound units are to be regarded as standard. No other units of measurement are included in this standard.
1.6 This international standard was developed in accordance with internationally recognized principles on standardization established in the Decision on Principles for the Development of International Standards, Guides and Recommendations issued by the World Trade Organization Technical Barriers to Trade (TBT) Committee.
General Information
- Status
- Published
- Publication Date
- 30-Sep-2022
- Technical Committee
- F25 - Ships and Marine Technology
- Drafting Committee
- F25.11 - Machinery and Piping Systems
Relations
- Refers
ASTM A519-06(2012) - Standard Specification for Seamless Carbon and Alloy Steel Mechanical Tubing - Effective Date
- 01-Mar-2012
- Effective Date
- 01-Oct-2006
- Effective Date
- 10-Sep-2003
- Refers
ASTM A519-96(2001) - Standard Specification for Seamless Carbon and Alloy Steel Mechanical Tubing - Effective Date
- 10-Oct-1996
Overview
ASTM F994-86(2022) establishes the standard specification for the design and installation of overboard discharge hull penetration connections for marine system piping. Developed by ASTM International, this standard applies specifically to carbon steel hull penetrations for nominal pipe sizes (NPS) ranging from 1 to 24. It provides clear classification, material requirements, general installation practices, and design guidance to ensure the safety, structural integrity, and efficiency of overboard discharge systems on vessels. This standard does not cover sea chest penetrations or penetrations within protective plating, focusing solely on direct hull connections.
Key Topics
- Scope and Applicability
- Applies to carbon steel overboard discharge hull penetrations for system piping (NPS 1 through NPS 24).
- Excludes sea chest and protective plating penetrations.
- Inch-pound units are standard for all measurements.
- Classifications
- Type I: Nonreinforced penetrations.
- Type II: Doubler plate-reinforced (Class 1: inboard, Class 2: outboard).
- Type III: Insert plate-reinforced (Class 1: single-bevel, Class 2: double-bevel).
- Type IV: Sleeve-reinforced (Class 1: nonmachined steel tube, Class 2: machined steel tube or pipe, Class 3: rolled steel flatbar or plate).
- Material Requirements
- Discharge pipes and reinforcement plates should meet or exceed the strength of the shell plate.
- Materials specified according to Title 46 CFR, A519 (Seamless Carbon and Alloy Steel Mechanical Tubing), and relevant Navy and ABS guidelines.
- Installation and Design Requirements
- Overboard discharges should be combined to reduce the number of hull penetrations.
- Penetrations must be spaced a minimum of 3 inches from welding seams and positioned to allow for clear, safe welding.
- Penetrations must be located away from cathodic protection zones and areas where recirculation could affect vessel intakes.
- Extensions past the shell plate should equal the wall thickness of the pipe, not exceeding 3/8 inch.
- Welding Standards
- Welding must adhere to the figures and dimensional standards within ASTM F994-86(2022) as well as ABS and MIL-STD-1689 for military vessels.
- Weld quality and proper finishing (removal of burrs and sharp edges) are emphasized.
Applications
ASTM F994-86(2022) is a critical standard for:
- Shipyards and Vessel Construction
- Guides naval architects, shipbuilders, and marine engineers in fabricating safe and consistent overboard discharge connections.
- Regulatory Compliance
- Ensures vessel piping systems comply with marine engineering codes, including U.S. Coast Guard, Navy, and international shipping requirements for hull penetrations.
- Retrofitting and Maintenance
- Provides criteria for repair or upgrade work that involve replacing or modifying overboard discharge penetrations on existing ships.
- Quality Assurance
- Offers a reference framework to inspection officials and certifying bodies assessing marine hull piping installations.
By specifying material properties, design classifications, installation practices, and compliance requirements, this standard helps improve the reliability, safety, and operational efficiency of shipboard piping systems.
Related Standards
Professionals working with ASTM F994-86(2022) may also reference these related marine and piping system standards:
- ASTM A519 – Specification for Seamless Carbon and Alloy Steel Mechanical Tubing
- ANSI B36.10 – Welded and Seamless Wrought Steel Pipe
- MIL-STD-1689 – Fabrication, Welding, and Inspection of Ships Structure
- Title 46 CFR, Subchapter F – Marine Engineering
- ABS Rules for Building and Classing Steel Vessels
- Navy Bureau of Ship Design Data Sheet 100-1
Aligning with these standards ensures comprehensive compliance and coordination across global marine vessel construction and maintenance projects.
Keywords: overboard discharge, hull penetration, marine piping, ship piping systems, ASTM F994, vessel compliance, carbon steel penetrations, marine engineering standards, welding, reinforcement plates, ABS, MIL-STD-1689.
Buy Documents
ASTM F994-86(2022) - Standard Specification for Design and Installation of Overboard Discharge Hull Penetration Connections
Get Certified
Connect with accredited certification bodies for this standard

DNV
DNV is an independent assurance and risk management provider.

Lloyd's Register
Lloyd's Register is a global professional services organisation specialising in engineering and technology.

ABS Quality Evaluations Inc.
American Bureau of Shipping quality certification.
Sponsored listings
Frequently Asked Questions
ASTM F994-86(2022) is a technical specification published by ASTM International. Its full title is "Standard Specification for Design and Installation of Overboard Discharge Hull Penetration Connections". This standard covers: ABSTRACT This specification covers carbon steel overboard discharge hull penetrations for system piping. Penetrations shall be classified as follows: Type I; Type II (Class 1 and Class 2); Type III (Class 1 and Class 2); and Type IV (Classes 1, 2, and 3). Doubler and insert plates shall be of material with physical properties equal to or better than the reinforced shell plate. Overboard discharges shall be combined to the maximum extent practicable to minimize the number of shell penetrations. Overboard discharges shall be located to minimize recirculation into suction seachests. Shell penetrations shall be located outside of cathodic protection areas. Penetration pipe extension past the shell plate shall be equal to the pipe wall thickness. SCOPE 1.1 This specification covers carbon steel overboard discharge hull penetrations for system piping of NPS 1 through NPS 24 (see Note 1). Note 1: The dimensionless designator NPS (nominal pipe size) has been substituted in this standard for such TRADITIONAL terms as nominal diameter, size, and nominal size. 1.2 The minimum pipe schedule and reinforcement dimensions presented in Tables 1-6 are based on specifications in 46 CFR, 56.50-95, and Navy Design Data Sheet 100-1. 1.3 This specification does not include sea chest penetrations. 1.4 This specification does not include penetrations in protective plating. 1.5 The values stated in inch-pound units are to be regarded as standard. No other units of measurement are included in this standard. 1.6 This international standard was developed in accordance with internationally recognized principles on standardization established in the Decision on Principles for the Development of International Standards, Guides and Recommendations issued by the World Trade Organization Technical Barriers to Trade (TBT) Committee.
ABSTRACT This specification covers carbon steel overboard discharge hull penetrations for system piping. Penetrations shall be classified as follows: Type I; Type II (Class 1 and Class 2); Type III (Class 1 and Class 2); and Type IV (Classes 1, 2, and 3). Doubler and insert plates shall be of material with physical properties equal to or better than the reinforced shell plate. Overboard discharges shall be combined to the maximum extent practicable to minimize the number of shell penetrations. Overboard discharges shall be located to minimize recirculation into suction seachests. Shell penetrations shall be located outside of cathodic protection areas. Penetration pipe extension past the shell plate shall be equal to the pipe wall thickness. SCOPE 1.1 This specification covers carbon steel overboard discharge hull penetrations for system piping of NPS 1 through NPS 24 (see Note 1). Note 1: The dimensionless designator NPS (nominal pipe size) has been substituted in this standard for such TRADITIONAL terms as nominal diameter, size, and nominal size. 1.2 The minimum pipe schedule and reinforcement dimensions presented in Tables 1-6 are based on specifications in 46 CFR, 56.50-95, and Navy Design Data Sheet 100-1. 1.3 This specification does not include sea chest penetrations. 1.4 This specification does not include penetrations in protective plating. 1.5 The values stated in inch-pound units are to be regarded as standard. No other units of measurement are included in this standard. 1.6 This international standard was developed in accordance with internationally recognized principles on standardization established in the Decision on Principles for the Development of International Standards, Guides and Recommendations issued by the World Trade Organization Technical Barriers to Trade (TBT) Committee.
ASTM F994-86(2022) is classified under the following ICS (International Classification for Standards) categories: 47.020.30 - Piping systems. The ICS classification helps identify the subject area and facilitates finding related standards.
ASTM F994-86(2022) has the following relationships with other standards: It is inter standard links to ASTM A519-06(2012), ASTM A519-06, ASTM A519-03, ASTM A519-96(2001). Understanding these relationships helps ensure you are using the most current and applicable version of the standard.
ASTM F994-86(2022) is available in PDF format for immediate download after purchase. The document can be added to your cart and obtained through the secure checkout process. Digital delivery ensures instant access to the complete standard document.
Standards Content (Sample)
This international standard was developed in accordance with internationally recognized principles on standardization established in the Decision on Principles for the
Development of International Standards, Guides and Recommendations issued by the World Trade Organization Technical Barriers to Trade (TBT) Committee.
Designation:F994 −86 (Reapproved 2022) An American National Standard
Standard Specification for
Design and Installation of Overboard Discharge Hull
Penetration Connections
ThisstandardisissuedunderthefixeddesignationF994;thenumberimmediatelyfollowingthedesignationindicatestheyearoforiginal
adoption or, in the case of revision, the year of last revision.Anumber in parentheses indicates the year of last reapproval.Asuperscript
epsilon (´) indicates an editorial change since the last revision or reapproval.
1. Scope 2.3 Military Document:
MIL-STD-1689 Fabrication, Welding, and Inspection of
1.1 This specification covers carbon steel overboard dis-
Ships Structure
charge hull penetrations for system piping of NPS 1 through
2.4 Other Documents:
NPS 24 (see Note 1).
Title 46 Code of Federal Regulations (CFR), Subchapter F,
NOTE 1—The dimensionless designator NPS (nominal pipe size) has 4
Marine Engineering
been substituted in this standard for such TRADITIONAL terms as
Department of the Navy Bureau of Ship Design Data Sheet
nominal diameter, size, and nominal size.
100-1
1.2 The minimum pipe schedule and reinforcement dimen-
ABS Rules for Building and Classing Steel Vessels
sions presented in Tables 1-6 are based on specifications in 46
CFR, 56.50-95, and Navy Design Data Sheet 100-1.
3. Classification
1.3 This specification does not include sea chest penetra-
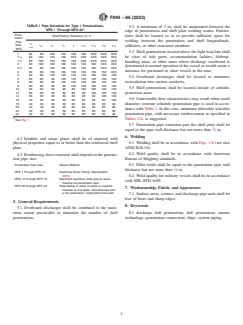
3.1 Type I—Nonreinforced penetrations. Table 1 provides
tions.
minimum schedules for the penetration pipe. See Fig. 1 for
details of the penetration.
1.4 This specification does not include penetrations in
protective plating.
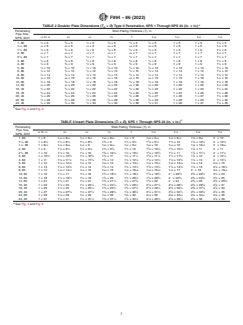
3.2 Type II—Doubler plate-reinforced penetrations. Table 2
provides minimum dimensions for doubler plates.
1.5 The values stated in inch-pound units are to be regarded
3.2.1 Class 1—Inboard doubler plates (Fig. 2).
as standard. No other units of measurement are included in this
3.2.2 Class 2—Outboard doubler plates (Fig. 3).
standard.
1.6 This international standard was developed in accor- 3.3 Type III—Insert plate-reinforced penetrations. Table 3
dance with internationally recognized principles on standard- provides minimum dimensions for insert plates.
ization established in the Decision on Principles for the 3.3.1 Class 1—Single-bevel insert plates (Fig. 4).
Development of International Standards, Guides and Recom-
3.3.2 Class 2—Double-bevel insert plates (Fig. 5).
mendations issued by the World Trade Organization Technical
3.4 Type IV—Sleeve-reinforced penetrations. Fig. 6 details
Barriers to Trade (TBT) Committee.
sleeve-reinforced penetrations.
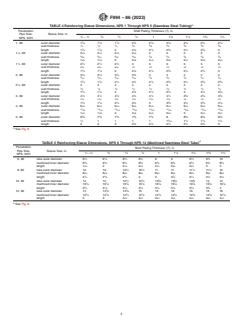
3.4.1 Class 1—Sleeves of nonmachined steel tube. Table 4
2. Referenced Documents
provides minimum dimensions for nonmachined sleeves.
2.1 ASTM Standards:
3.4.2 Class2—Sleevesofmachinedsteeltubeorpipe.Table
A519 Specification for Seamless Carbon and Alloy Steel
5 provides minimum dimensions for machined sleeves.
Mechanical Tubing
3.4.3 Class 3—Sleeves of rolled steel flatbar or plate. Table
2.2 ANSI Standard:
6 provides minimum dimensions for rolled sleeves.
B36.10 Welded and Seamless Wrought Steel Pipe
4. Materials
This specification is under the jurisdiction of ASTM Committee F25 on Ships
4.1 Discharge pipe shall be of an acceptable material as
and Marine Technology and is the direct responsibility of Subcommittee F25.11 on
specified by Title 46 CFR, 56.60-1.
Machinery and Piping Systems.
Current edition approved Oct. 1, 2022. Published October 2022. Originally
approved in 1986. Last previous edition approved in 2018 as F994 – 86 (2018).
DOI: 10.1520/F0994-86R22. Available from DLA Document Services, Building 4/D, 700 Robbins Ave.,
For referenced ASTM standards, visit the ASTM website, www.astm.org, or Philadelphia, PA 19111-5094, http://quicksearch.dla.mil.
contact ASTM Customer Service at service@astm.org. For Annual Book of ASTM Available from Department of the Navy, Commander Naval Sea Systems
Standards volume information, refer to the standard’s Document Summary page on Command, 1333 Isaac Hull Avenue, SE, Washington Navy Yard, DC 20376,
the ASTM website. http://www.navsea.navy.mil.
3 6
Available from American National Standards Institute (ANSI), 25 W. 43rd St., Available from American Bureau of Shipping (ABS), ABS Plaza, 16855
4th Floor, New York, NY 10036, http://www.ansi.org. Northchase Dr., Houston, TX 77060, http://www.eagle.org.
Copyright © ASTM International, 100 Barr Harbor Drive, PO Box C700, West Conshohocken, PA 19428-2959. United States
F994−86 (2022)
TABLE 1 Pipe Schedule for Type 1 Penetrations,
5.2 A minimum of 3 in. shall be maintained between the
A
NPS 1 Through NPS 24
edge of penetrations and shell plate welding seams. Penetra-
Pene-
Shell Plating Thickness (T), in. tions shall be located so as to provide sufficient space for
tration
welding between the penetration and shell longitudinals,
Pipe
⁄4
5 3 7 1 1 3 1
Size,
⁄8 ⁄4 ⁄8 11 ⁄8 1 ⁄4 1 ⁄8 1 ⁄2 stiffeners, or other structural members.
– ⁄2
NPS
5.3 Shell penetrations located above the light load line shall
1 80 80 160 160 160 160 XXS XXS XXS
be clear of side ports, accommodation ladders, lifeboat-
1 ⁄4 80 160 160 160 XXS XXS XXS XXS XXS
1 ⁄2 80 160 160 160 160 XXS XXS XXS XXS
handling areas, or other areas where discharge overboard is
2 80 160 160 160 160 160 160 XXS XXS
detrimental to normal operation of the vessel or would create a
2 ⁄2 80 80 160 160 160 160 160 XXS XXS
nuisance for personnel or other vessels in the area.
3 80 80 160 160 160 160 160 160 XXS
4 80 80 120 120 120 120 160 160 160
5.4 Overboard discharges shall be located to minimize
5 80 80 80 120 120 120 120 160 160
6 80 80 80 120 120 120 120 120 160 recirculation into suction seachests.
8 80 80 80 80 100 100 100 120 120
5.5 Shell penetrations shall be located outside of cathodic
10 60 60 60 80 80 100 100 100 120
12 60 60 60 80 80 80 100 100 100
protection areas.
14 60 60 60 80 80 80 80 100 100
5.6 Unfavorable flow characteristics may result when small
16 40 60 60 60 80 80 80 80 100
18 40 40 60 60 60 80 80 80 80
diameter, extreme schedule penetration pipe is used in accor-
20 40 40 60 60 60 60 80 80 80
dance with Table 1. In this case, minimum allowable schedule
22 40 40 60 60 60 60 80 80 80
penetration pipe, with necessary reinforcement as specified in
24 40 40 60 60 60 60 60 60 80
A Tables 2-6, is suggested.
See Fig. 1.
5.7 Penetration pipe extension past the shell plate shall be
equal to the pipe wall thickness but not more than ⁄8 in.
6. Welding
4.2 Doubler and insert plates shall be of material with
6.1 Welding shall be in accordance with Figs. 1-6 (see also
physical properties equal to or better than the reinforced shell
ANSI B36.10).
plate.
6.2 Weld quality shall be in accordance with American
4.3 Reinforcing sleeve material shall depend on the penetra-
Bureau of Shipping standards.
tion pipe size:
Penetration Pipe Size Sleeve Material 6.3 Fillet welds shall be equal to the penetration pipe wall
thickness but not more than ⁄8 in.
NPS 1 through NPS 10 Seamless Steel Tubing, Specification
A519.
6.4 Weld quality for military vessels shall be in accordance
NPS 12 through NPS 18 Machined seamless steel pipe of same
with MIL-STD-1689.
material as penetration pipe.
NPS 20 through NPS 24 Steel flatbar or plate of same or superior
7. Workmanship, Finish, and Appearance
material as hull plate, manufactured with
a full penetration, longitudinal butt weld.
7.1 Surface areas, corners, and discharge pipe ends shall be
free of burrs and sharp edges.
5. General Requirements
8. Keywords
5.1 Overboard discharges shall be combined to the maxi-
mum extent practicable to minimize the number of shell 8.1 discharge hull penetration; hull penetration; marine
penetrations. technology; penetration connection; ships; system piping
F994−86 (2022)
A
TABLE 2 Doubler Plate Dimensions (T × D) Type II Penetration, NPS 1 Through NPS 24 (in. × in.)
D
Penetrating
Shell Plating Thickness (T), in.
Pipe Size,
1 1 5 3 7 1 1 3 1
⁄4 to ⁄2 ⁄8 ⁄4 ⁄8 11 ⁄8 1 ⁄4 1 ⁄8 1 ⁄2
NPS, SCH
1 3 1 5 3 3 1
1, 80 ⁄4×5 ⁄8×5 ⁄2×5 ⁄8×5 ⁄4×5 ⁄4×5 1×5 1×5 1 ⁄4×5
1 1 3 1 5 3 3 1
1 ⁄4,80 ⁄4×6 ⁄8×6 ⁄2×6 ⁄8×6 ⁄4×6 ⁄4×6 1×6 1×6 1 ⁄4×6
1 1 3 1 5 3 3 1
1 ⁄2,80 ⁄4×6 ⁄8×6 ⁄2×6 ⁄8×6 ⁄4×6 ⁄4×6 1×6 1×6 1 ⁄4×6
1 3 1 5 3 3 1
2, 80 ⁄4×7 ⁄8×7 ⁄2×7 ⁄8×7 ⁄4×7 ⁄4×7 1×7 1×7 1 ⁄4×7
1 1 3 1 5 3 3 1
2 ⁄2,80 ⁄4×7 ⁄8×7 ⁄2×7 ⁄8×7 ⁄4×7 ⁄4×7 1×7 1×7 1 ⁄4×7
1 3 1 5 3 3 1
3, 80 ⁄4×8 ⁄8×8 ⁄2×8 ⁄8×8 ⁄4×8 ⁄4×8 1×8 1×8 1 ⁄4×8
1 3 1 5 3 3 1
4, 80 ⁄4×9 ⁄8×9 ⁄2×9 ⁄8×9 ⁄4×9 ⁄4×9 1×9 1×9 1 ⁄4×9
1 3 1 5 3 3 1
5, 80 ⁄4×10 ⁄8×10 ⁄2×10 ⁄8×10 ⁄4×10 ⁄4×10 1×10 1×10 1 ⁄4×10
1 3 1 5 3 3 1
6, 80 ⁄4×12 ⁄8×12 ⁄2×12 ⁄8×12 ⁄4×12 ⁄4×12 1×12 1×12 1 ⁄4×12
1 3 1 5 3 3 1
8, 80 ⁄4×14 ⁄8×14 ⁄2×14 ⁄8×14 ⁄4×14 ⁄4×14 1×14 1×14 1 ⁄4×14
1 3 1 5 3 3 1
10, 60 ⁄4×16 ⁄8×16 ⁄2×16 ⁄8×16 ⁄4×16 ⁄4×16 1×16 1×16 1 ⁄4×16
1 3 1 5 3 3 1
12, 60 ⁄4×18 ⁄8×18 ⁄2×18 ⁄8×18 ⁄4×18 ⁄4×18 1×18 1×18 1 ⁄4×18
1 3 1 5 3 3 1
14, 60 ⁄4×20 ⁄8×20 ⁄2×20 ⁄8×20 ⁄4×20 ⁄4×20 1×20 1×20 1 ⁄4×20
1 3 1 5 3 3 1
16, 40 ⁄4×22 ⁄8×22 ⁄2×22 ⁄8×22 ⁄
...


Questions, Comments and Discussion
Ask us and Technical Secretary will try to provide an answer. You can facilitate discussion about the standard in here.
Loading comments...