ASTM D3076-18
(Practice)Standard Practice for Effective Crimping on Outside Crimped Valves of Aerosol Containers (Withdrawn 2023)
Standard Practice for Effective Crimping on Outside Crimped Valves of Aerosol Containers (Withdrawn 2023)
SIGNIFICANCE AND USE
5.1 This practice provides information for the establishment of quality control procedures on filling lines.
SCOPE
1.1 This practice covers the effective crimping on outside crimped valves within the wide parameters of containers and valves available.
1.2 Practices appear in the following order:
Sections
Optical Comparator Practice
4 to 7
Caliper Practice
8 to 12
1.3 The values stated in SI units are to be regarded as standard. No other units of measurement are included in this standard.
1.4 This standard does not purport to address all of the safety concerns, if any, associated with its use. It is the responsibility of the user of this standard to establish appropriate safety, health, and environmental practices and determine the applicability of regulatory limitations prior to use.
1.5 This international standard was developed in accordance with internationally recognized principles on standardization established in the Decision on Principles for the Development of International Standards, Guides and Recommendations issued by the World Trade Organization Technical Barriers to Trade (TBT) Committee.
WITHDRAWN RATIONALE
This practice covered the effective crimping on outside crimped valves within the wide parameters of containers and valves available.
Formerly under the jurisdiction of Committee D10 on Packaging, this practice was withdrawn in December 2023. This standard is being withdrawn without replacement because the Household and Consumer Products Association (HCPA) offers standards for Aerosol Products.
General Information
Relations
Buy Standard
Standards Content (Sample)
This international standard was developed in accordance with internationally recognized principles on standardization established in the Decision on Principles for the
Development of International Standards, Guides and Recommendations issued by the World Trade Organization Technical Barriers to Trade (TBT) Committee.
Designation:D3076 −18
Standard Practice for
Effective Crimping on Outside Crimped Valves of Aerosol
1
Containers
This standard is issued under the fixed designation D3076; the number immediately following the designation indicates the year of
original adoption or, in the case of revision, the year of last revision. A number in parentheses indicates the year of last reapproval. A
superscript epsilon (´) indicates an editorial change since the last revision or reapproval.
1. Scope 3.2 General definitions of terms relating to aerosol products
are found in D3064.
1.1 This practice covers the effective crimping on outside
crimped valves within the wide parameters of containers and
OPTICAL COMPARATOR PRACTICE
valves available.
1.2 Practices appear in the following order: 4. Summary of Practice
Sections
4.1 This practice involves drawing a projected, enlarged
Optical Comparator Practice 4 to 7
profile of the container and valve, then removing the valve and
Caliper Practice 8 to 12
drawingtheprojectedprofileofthecontainerfinish.Measuring
1.3 The values stated in SI units are to be regarded as
the resultant void and subtracting the dimensions of the
standard. No other units of measurement are included in this
essentially noncompressed components from this value results
standard.
in the value representing the compressed thickness of the valve
1.4 This standard does not purport to address all of the
sealing gasket.
safety concerns, if any, associated with its use. It is the
responsibility of the user of this standard to establish appro-
5. Significance and Use
priate safety, health, and environmental practices and deter-
5.1 This practice provides information for the establishment
mine the applicability of regulatory limitations prior to use.
of quality control procedures on filling lines.
1.5 This international standard was developed in accor-
dance with internationally recognized principles on standard-
6. Apparatus
ization established in the Decision on Principles for the
Development of International Standards, Guides and Recom-
6.1 Optical Comparator.
mendations issued by the World Trade Organization Technical
6.2 Clamping Jig, fastened to the comparator bench.
Barriers to Trade (TBT) Committee.
6.3 Grinder, electric, small enough to be hand held.
2. Referenced Documents
2
7. Procedure
2.1 ASTM Standards:
D996 Terminology of Packaging and Distribution Environ-
7.1 Crimp a valve on an empty bottle with the line crimper
ments
set at normal operation, and clamp the bottle in the jig on the
D3064 Terminology Relating to Aerosol Products
comparator bench.
7.2 Draw the projected, enlarged image on tracing paper.
3. Terminology
NOTE 1—Grid ruled tracing paper makes the tracing much easier.
3.1 General definitions for packaging and distribution envi-
ronments are found in Terminology D996. 7.3 Without disturbing the paper or bottle, cut a wedge out
of the valve with the electric grinder, and remove the valve.
7.4 Trace the projected image of the container alone on the
1
This practice is under the jurisdiction ofASTM Committee D10 on Packaging
same paper.
and are the direct responsibility of Subcommittee D10.33 on Aerosol Products.This
practice was originally developed by the Chemical Specialties ManufacturersAssn.
7.5 Measure the void between the two silhouettes (Fig. 1
Current edition approved May 1, 2018. Published June 2018. Originally
and Fig. 2). Subtract the dimensions (multiplied by the
approved in 1972. Last previous edition approved in 2010 as D3076 – 00 (2010).
DOI: 10.1520/D3076-18.
enlargement factor of the essentially uncompressed compo-
2
For referenced ASTM standards, visit the ASTM website, www.astm.org, or
nentsofthevalve)fromthisvaluetoobtainthethicknessofthe
contact ASTM Customer Service at service@astm.org. For Annual Book of ASTM
compressed gasket multipled by the enlargement factor, and
Standards volume information, refer to the standard’s Document Summary page on
the ASTM website. convert this reading into percent compression.
Copyright © ASTM International, 100 Barr Harbor Drive, PO Box C700, West Conshohocken, PA 19428-2959. United States
1
---------------------- Page: 1 ----------------------
D3076−18
A—points between which effective crimp height measurement should be made (these points are self-determining when the calipers are held parallel to thesideofthe
valve).
B—points between which a relative measurement may be established for nondestructure quality control use from optical comparator data.
C—effective compression.
D—flat compression.
FIG. 1Effective Crimp Height
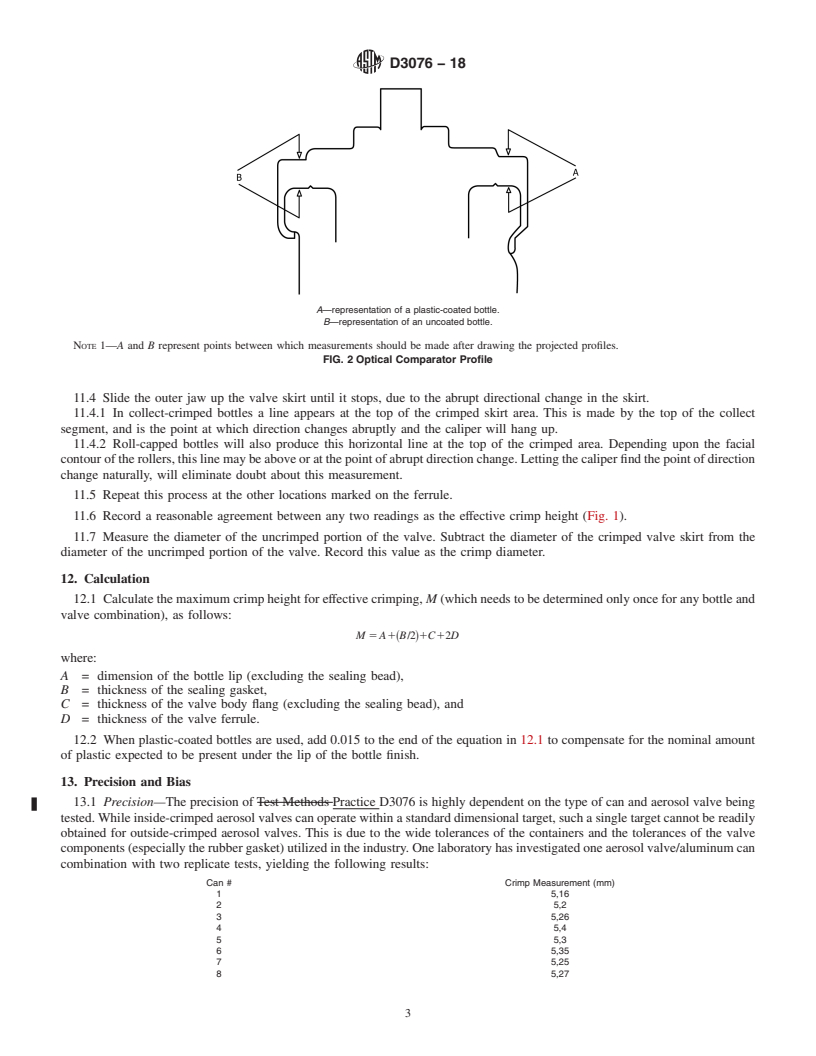
A—representation of a plastic-coated bottle.
B—representation of an uncoated bottle.
NOTE 1—A and B represent points be
...
This document is not an ASTM standard and is intended only to provide the user of an ASTM standard an indication of what changes have been made to the previous version. Because
it may not be technically possible to adequately depict all changes accurately, ASTM recommends that users consult prior editions as appropriate. In all cases only the current version
of the standard as published by ASTM is to be considered the official document.
Designation: D3076 − 00 (Reapproved 2010) D3076 − 18
Standard Test Methods Practice for
Effective Crimping on Outside Crimped Valves of Aerosol
1
Containers
This standard is issued under the fixed designation D3076; the number immediately following the designation indicates the year of
original adoption or, in the case of revision, the year of last revision. A number in parentheses indicates the year of last reapproval. A
superscript epsilon (´) indicates an editorial change since the last revision or reapproval.
1. Scope
1.1 These test methods cover This practice covers the effective crimping on outside crimped valves within the wide parameters
of containers and valves available.
1.2 The test methods Practices appear in the following order:
Sections
Optical Comparator Test Method 4 to 7
Optical Comparator Practice 4 to 7
Caliper Test Method 8 to 12
Caliper Practice 8 to 12
1.3 The values stated in SI units are to be regarded as standard. No other units of measurement are included in this standard.
1.4 This standard does not purport to address all of the safety concerns, if any, associated with its use. It is the responsibility
of the user of this standard to establish appropriate safety safety, health, and healthenvironmental practices and determine the
applicability of regulatory limitations prior to use.
1.5 This international standard was developed in accordance with internationally recognized principles on standardization
established in the Decision on Principles for the Development of International Standards, Guides and Recommendations issued
by the World Trade Organization Technical Barriers to Trade (TBT) Committee.
2. Referenced Documents
2
2.1 ASTM Standards:
D996 Terminology of Packaging and Distribution Environments
D3064 Terminology Relating to Aerosol Products
3. Terminology
3.1 General definitions for packaging and distribution environments are found in Terminology D996.
3.2 General definitions of terms relating to aerosol products are found in D3064.
OPTICAL COMPARATOR TEST METHODOPTICAL COMPARATOR PRACTICE
4. Summary of Test MethodPractice
4.1 This test method practice involves drawing a projected, enlarged profile of the container and valve, then removing the valve
and drawing the projected profile of the container finish. Measuring the resultant void and subtracting the dimensions of the
essentially noncompressed components from this value results in the value representing the compressed thickness of the valve
sealing gasket.
5. Significance and Use
5.1 This test method practice provides information for the establishment of quality control procedures on filling lines.
1
These test methods are This practice is under the jurisdiction of ASTM Committee D10 on Packaging and are the direct responsibility of Subcommittee D10.33 on
Mechanical DispensersAerosol Products. These test methods were This practice was originally developed by the Chemical Specialties Manufacturers Assn.
Current edition approved Oct. 1, 2010May 1, 2018. Published November 2010June 2018. Originally approved in 1972. Last previous edition approved in 20052010 as
D3076 – 00 (2005).(2010). DOI: 10.1520/D3076-00R10.10.1520/D3076-18.
2
For referenced ASTM standards, visit the ASTM website, www.astm.org, or contact ASTM Customer Service at service@astm.org. For Annual Book of ASTM Standards
volume information, refer to the standard’s Document Summary page on the ASTM website.
Copyright © ASTM International, 100 Barr Harbor Drive, PO Box C700, West Conshohocken, PA 19428-2959. United States
1
---------------------- Page: 1 ----------------------
D3076 − 18
6. Apparatus
6.1 Optical Comparator.
6.2 Clamping Jig, fastened to the comparator bench.
6.3 Grinder, electric, small enough to be hand held.
7. Procedure
7.1 Crimp a valve on an empty bottle with the line crimper set at normal operation, and clamp the bottle in the jig on the
comparator bench.
7.2 Draw the projected, enlarged image on tracing paper.
NOTE 1—Grid ruled tracing paper makes the tracing much easier.
7.3 Without disturbing the paper or bottle, cut a wedge out of the valve with the electric grinder, and remove the valve.
7.4 Trace the projected image of the container alone on the same paper.
7.5 Measure the void between the two silhouettes (Fig. 1 and Fig. 2). Subtract the dimensions (multiplied by the enlargement
factor of the essentially uncompressed components of the valve) from this value to obtain the thickness of the compressed gasket
multipled by the enlargement factor, and convert this reading into percent compression.
CALIPER T
...


Questions, Comments and Discussion
Ask us and Technical Secretary will try to provide an answer. You can facilitate discussion about the standard in here.