ASTM E643-15
(Test Method)Standard Test Method for Ball Punch Deformation of Metallic Sheet Material
Standard Test Method for Ball Punch Deformation of Metallic Sheet Material
SIGNIFICANCE AND USE
4.1 The ball punch deformation test is widely used to evaluate and compare the formability of metallic sheet materials. Biaxial stretching is the predominant mode of deformation occurring during the test and, therefore, the results are most often used to rate or compare materials that are to be formed mainly by stretching. However, precise correlations between the cup height as determined by this test and the formability of a sheet material under production conditions have not been established.
4.2 It is recognized that the cup heights for specimens from the same sample may vary with differences in magnitude of hold-down force, lubrication, and method of end point determination. The procedures described in Sections 5, 7.1, and 7.3 will minimize these variations.
SCOPE
1.1 This test method covers the procedure for conducting the ball punch deformation test for metallic sheet materials intended for forming applications. The test applies to specimens with thicknesses between 0.008 and 0.080 in. (0.2 and 2.0 mm).
Note 1: The ball punch deformation test is intended to replace the Olsen cup test by standardizing many of the test parameters that previously have been left to the discretion of the testing laboratory.
Note 2: The modified Erichsen test has been standardized in Europe. The main differences between the ball punch deformation test and the Erichsen test are the diameters of the penetrator and the dies. Erichsen cup heights are given in SI units.
1.2 The values stated in inch-pound units are to be regarded as standard. The values given in parentheses are mathematical conversions to SI units that are provided for information only and are not considered standard.
1.3 This standard does not purport to address all of the safety concerns, if any, associated with its use. It is the responsibility of the user of this standard to establish appropriate safety and health practices and determine the applicability of regulatory limitations prior to use.
General Information
- Status
- Published
- Publication Date
- 30-Apr-2015
- Technical Committee
- E28 - Mechanical Testing
- Drafting Committee
- E28.02 - Ductility and Formability
Relations
- Effective Date
- 01-May-2015
- Effective Date
- 01-May-2014
- Effective Date
- 01-May-2013
- Effective Date
- 01-May-2013
- Effective Date
- 01-Nov-2011
- Effective Date
- 01-Oct-2010
- Effective Date
- 01-Oct-2008
- Effective Date
- 01-Oct-2008
- Refers
ASTM E177-06b - Standard Practice for Use of the Terms Precision and Bias in ASTM Test Methods - Effective Date
- 15-Nov-2006
- Refers
ASTM E177-06a - Standard Practice for Use of the Terms Precision and Bias in ASTM Test Methods - Effective Date
- 01-Nov-2006
- Effective Date
- 01-Nov-2005
- Refers
ASTM E177-04e1 - Standard Practice for Use of the Terms Precision and Bias in ASTM Test Methods - Effective Date
- 01-Nov-2004
- Effective Date
- 01-Nov-2004
- Effective Date
- 01-Nov-2004
- Refers
ASTM E177-90a(2002) - Standard Practice for Use of the Terms Precision and Bias in ASTM Test Methods - Effective Date
- 10-Jan-2002
Overview
ASTM E643-15: Standard Test Method for Ball Punch Deformation of Metallic Sheet Material is a leading standard developed by ASTM International, aimed at evaluating the formability of metallic sheet materials. The ball punch deformation test subjects metallic sheets to biaxial stretching, replicating the primary modes of deformation encountered during sheet forming processes. This standard is particularly valuable for industries where metallic sheets are shaped mainly by stretching operations, providing a reliable means for comparing material ductility and performance under controlled laboratory conditions.
Key Topics
- Formability Assessment: The method is used to measure and compare the formability, particularly the stretchability, of metallic sheet materials intended for forming applications.
- Test Material Range: Applicable to sheet materials with thicknesses from 0.008 to 0.080 inches (0.2 to 2.0 mm).
- Test Procedure: The test uses a spherical-ended penetrator to form a cup in the metallic specimen while monitoring the displacement (cup height) at necking or fracture.
- Biaxial Stretching: The process primarily involves stretching the sheet material simultaneously in two directions, which offers a close simulation of real-world forming conditions.
- Repeatability and Reproducibility: ASTM E643-15 establishes specific parameters and apparatus requirements to ensure test consistency and to minimize variation due to lubrication, hold-down force, or endpoint determination methods.
- Reporting Requirements: Clear guidelines for reporting results, including material identification, test conditions, cup height measurements, and calculation of average values and ranges.
Applications
- Material Qualification: Commonly used to evaluate and compare various metallic sheet materials, such as steel and aluminum alloys, for use in automotive, appliance, and construction industries.
- Quality Control: The test method supports ongoing quality assurance programs by providing a standardized approach to monitor material consistency and performance over time.
- Research and Development: Material scientists utilize this method to investigate the effects of production variables (e.g., alloy composition, rolling conditions) on formability.
- Supplier-Material Comparison: Allows purchasers and specifiers to compare sheet metal grades from different suppliers, ensuring materials meet desired forming characteristics.
- Process Optimization: The results can help optimize forming processes by selecting materials with suitable deformation characteristics, potentially reducing production defects.
Related Standards
- Olsen Cup Test: The ball punch deformation test replaces the Olsen cup test by standardizing test parameters formerly left to laboratory discretion.
- Modified Erichsen Test: While similar in objective, the Erichsen test, standardized in Europe, differs in penetrator and die dimensions and reports results in SI units.
- ASTM E177: Practice for Use of the Terms Precision and Bias in ASTM Test Methods, referenced for statistical validity.
- ASTM E691: Practice for Conducting an Interlaboratory Study to Determine the Precision of a Test Method.
- NIST Handbook 91: Serves as a statistical reference for test result analysis.
Practical Value
ASTM E643-15 is a key tool for anyone involved in the specification, quality control, or R&D of metallic sheet materials. By providing a repeatable laboratory method for assessing stretchability, the standard supports improved material selection, manufacturing efficiency, and product performance. Consistent application of ASTM E643-15 ensures that materials chosen for stretching operations-such as automotive body panels, appliance housings, and industrial enclosures-meet rigorous performance benchmarks and contribute to overall process reliability.
Keywords: ASTM E643-15, ball punch deformation, metallic sheet material, formability test, stretchability, ductility, quality control, biaxial stretching, material qualification, standardized test method.
Buy Documents
ASTM E643-15 - Standard Test Method for Ball Punch Deformation of Metallic Sheet Material
REDLINE ASTM E643-15 - Standard Test Method for Ball Punch Deformation of Metallic Sheet Material
Get Certified
Connect with accredited certification bodies for this standard

Element Materials Technology
Materials testing and product certification.

Inštitut za kovinske materiale in tehnologije
Institute of Metals and Technology. Materials testing, metallurgical analysis, NDT.
Sponsored listings
Frequently Asked Questions
ASTM E643-15 is a standard published by ASTM International. Its full title is "Standard Test Method for Ball Punch Deformation of Metallic Sheet Material". This standard covers: SIGNIFICANCE AND USE 4.1 The ball punch deformation test is widely used to evaluate and compare the formability of metallic sheet materials. Biaxial stretching is the predominant mode of deformation occurring during the test and, therefore, the results are most often used to rate or compare materials that are to be formed mainly by stretching. However, precise correlations between the cup height as determined by this test and the formability of a sheet material under production conditions have not been established. 4.2 It is recognized that the cup heights for specimens from the same sample may vary with differences in magnitude of hold-down force, lubrication, and method of end point determination. The procedures described in Sections 5, 7.1, and 7.3 will minimize these variations. SCOPE 1.1 This test method covers the procedure for conducting the ball punch deformation test for metallic sheet materials intended for forming applications. The test applies to specimens with thicknesses between 0.008 and 0.080 in. (0.2 and 2.0 mm). Note 1: The ball punch deformation test is intended to replace the Olsen cup test by standardizing many of the test parameters that previously have been left to the discretion of the testing laboratory. Note 2: The modified Erichsen test has been standardized in Europe. The main differences between the ball punch deformation test and the Erichsen test are the diameters of the penetrator and the dies. Erichsen cup heights are given in SI units. 1.2 The values stated in inch-pound units are to be regarded as standard. The values given in parentheses are mathematical conversions to SI units that are provided for information only and are not considered standard. 1.3 This standard does not purport to address all of the safety concerns, if any, associated with its use. It is the responsibility of the user of this standard to establish appropriate safety and health practices and determine the applicability of regulatory limitations prior to use.
SIGNIFICANCE AND USE 4.1 The ball punch deformation test is widely used to evaluate and compare the formability of metallic sheet materials. Biaxial stretching is the predominant mode of deformation occurring during the test and, therefore, the results are most often used to rate or compare materials that are to be formed mainly by stretching. However, precise correlations between the cup height as determined by this test and the formability of a sheet material under production conditions have not been established. 4.2 It is recognized that the cup heights for specimens from the same sample may vary with differences in magnitude of hold-down force, lubrication, and method of end point determination. The procedures described in Sections 5, 7.1, and 7.3 will minimize these variations. SCOPE 1.1 This test method covers the procedure for conducting the ball punch deformation test for metallic sheet materials intended for forming applications. The test applies to specimens with thicknesses between 0.008 and 0.080 in. (0.2 and 2.0 mm). Note 1: The ball punch deformation test is intended to replace the Olsen cup test by standardizing many of the test parameters that previously have been left to the discretion of the testing laboratory. Note 2: The modified Erichsen test has been standardized in Europe. The main differences between the ball punch deformation test and the Erichsen test are the diameters of the penetrator and the dies. Erichsen cup heights are given in SI units. 1.2 The values stated in inch-pound units are to be regarded as standard. The values given in parentheses are mathematical conversions to SI units that are provided for information only and are not considered standard. 1.3 This standard does not purport to address all of the safety concerns, if any, associated with its use. It is the responsibility of the user of this standard to establish appropriate safety and health practices and determine the applicability of regulatory limitations prior to use.
ASTM E643-15 is classified under the following ICS (International Classification for Standards) categories: 77.040.10 - Mechanical testing of metals. The ICS classification helps identify the subject area and facilitates finding related standards.
ASTM E643-15 has the following relationships with other standards: It is inter standard links to ASTM E643-09, ASTM E177-14, ASTM E691-13, ASTM E177-13, ASTM E691-11, ASTM E177-10, ASTM E691-08, ASTM E177-08, ASTM E177-06b, ASTM E177-06a, ASTM E691-05, ASTM E177-04e1, ASTM E177-06, ASTM E177-04, ASTM E177-90a(2002). Understanding these relationships helps ensure you are using the most current and applicable version of the standard.
ASTM E643-15 is available in PDF format for immediate download after purchase. The document can be added to your cart and obtained through the secure checkout process. Digital delivery ensures instant access to the complete standard document.
Standards Content (Sample)
This international standard was developed in accordance with internationally recognized principles on standardization established in the Decision on Principles for the
Development of International Standards, Guides and Recommendations issued by the World Trade Organization Technical Barriers to Trade (TBT) Committee.
Designation: E643 − 15
Standard Test Method for
Ball Punch Deformation of Metallic Sheet Material
This standard is issued under the fixed designation E643; the number immediately following the designation indicates the year of
original adoption or, in the case of revision, the year of last revision. A number in parentheses indicates the year of last reapproval. A
superscript epsilon (´) indicates an editorial change since the last revision or reapproval.
INTRODUCTION
The ball punch deformation test is used for evaluating the ductility of metallic sheet materials. The
testinvolvesbiaxialstretchingofaconstrainedtestspecimen.Ideally,nodraw-inofflangemetalfrom
under the hold-down occurs. The sheet metal test specimen is bulged at a specified rate until the force
drops or until either necking or fracture occurs; the test is then terminated. Ball punch (penetrator)
movement to drop-in-force or necking or fracture is the test result. It is known that test results may
vary with hold-down force, lubrication, and criterion for determining the end point of the test.
1. Scope E177 Practice for Use of the Terms Precision and Bias in
ASTM Test Methods
1.1 This test method covers the procedure for conducting
E691 Practice for Conducting an Interlaboratory Study to
the ball punch deformation test for metallic sheet materials
Determine the Precision of a Test Method
intended for forming applications. The test applies to speci-
2.2 National Institute of Standards and Technology Docu-
mens with thicknesses between 0.008 and 0.080 in. (0.2 and
ment:
2.0 mm).
NIST Handbook 91 Experimental Statistics
NOTE 1—The ball punch deformation test is intended to replace the
Olsen cup test by standardizing many of the test parameters that 3. Terminology
previously have been left to the discretion of the testing laboratory.
3.1 Definitions of Terms Specific to This Standard:
NOTE 2—The modified Erichsen test has been standardized in Europe.
3.1.1 cup height, the height of the formed cup at the end
The main differences between the ball punch deformation test and the
Erichsen test are the diameters of the penetrator and the dies. Erichsen cup
point of the test.
heights are given in SI units.
4. Significance and Use
1.2 The values stated in inch-pound units are to be regarded
as standard. The values given in parentheses are mathematical 4.1 The ball punch deformation test is widely used to
conversions to SI units that are provided for information only evaluate and compare the formability of metallic sheet mate-
and are not considered standard. rials. Biaxial stretching is the predominant mode of deforma-
tion occurring during the test and, therefore, the results are
1.3 This standard does not purport to address all of the
most often used to rate or compare materials that are to be
safety concerns, if any, associated with its use. It is the
formed mainly by stretching. However, precise correlations
responsibility of the user of this standard to establish appro-
between the cup height as determined by this test and the
priate safety and health practices and determine the applica-
formability of a sheet material under production conditions
bility of regulatory limitations prior to use.
have not been established.
2. Referenced Documents
4.2 It is recognized that the cup heights for specimens from
the same sample may vary with differences in magnitude of
2.1 ASTM Standards:
hold-down force, lubrication, and method of end point deter-
mination. The procedures described in Sections 5, 7.1, and 7.3
This test method is under the jurisdiction of ASTM Committee E28 on will minimize these variations.
Mechanical Testing and is the direct responsibility of Subcommittee E28.02 on
Ductility and Formability.
5. Apparatus
Current edition approved May 1, 2015. Published June 2015. Originally
5.1 Cupping Machines (Fig. 1) —Any machine used for ball
published in 1978. Last previous edition approved in 2009 as E643–09. DOI:
10.1520/E0643-15.
punchdeformationtestsshallbeequippedtoholdthespecimen
For referenced ASTM standards, visit the ASTM website, www.astm.org, or
contact ASTM Customer Service at service@astm.org. For Annual Book of ASTM
Standards volume information, refer to the standard’s Document Summary page on Available from National Institute of Standards and Technology (NIST), 100
the ASTM website. Bureau Dr., Stop 1070, Gaithersburg, MD 20899-1070, http://www.nist.gov.
Copyright © ASTM International, 100 Barr Harbor Drive, PO Box C700, West Conshohocken, PA 19428-2959. United States
E643 − 15
60°
Dimensions
Key
in. mm
(1) Thickness of test piece full thickness full thickness
(2) Width of test piece (minimum) 3.5 89
(3) Bore Diameter of top die See 6.3. See 6.3.
(4) Bore Diameter of bottom die 1 ± 0.004 25.4 ± 0.1
(5) External diameter of top die (approximate) 3.5 89
(6) External diameter of bottom die (approximate) 3.5 89
(7) Corner radius of interior top die 0.032 ± 0.002 0.81 ± 0.05
(8) Corner radius of exterior top die 0.032 0.81
(9) Depth of bore of top die 0.032 0.81
(10) Depth of bore of top die 0.197 ± 0.010 5.00 ± 0.025
(11) Thickness of top die (minimum) 0.78 20
(12) Thickness of bottom die (minimum) 0.78 20
A
(13) Diameter of spherical end of penetrator 0.875 ± 0.002 22.2 ± 0.05
(14) Cup Height Cup Height Cup Height
A
“Olsen Ball, 22.22 mm ( ⁄8 in.); “Erichsen” Ball, 20mm.
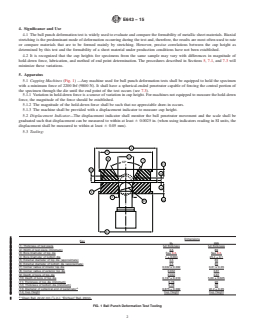
FIG. 1 Ball Punch Deformation Test Tooling
with a minimum force of 2200 lbf (9800 N). It shall have a penetrator shall contact the specimen. The penetrator shall
spherical-ended penetrator capable of forcing the central por- move along the axial centerline of the top and bottom dies. It
tion of the specimen through the die until the end point of the shall be clean and free from oxide build-up, corrosion, dirt, etc.
test occurs (see 7.3).
5.3.2 The surface of the top die in contact with the test
5.1.1 Variationinhold-downforceisasourceofvariationin
specimen shall be plane and parallel to the surface of the
cup height. For machines not equipped to measure the hold-
bottom die. Both surfaces shall be clean and free from oxide
down force, the magnitude of the force should be established.
build-up, corrosion, dirt, etc.
5.1.2 The magnitude of the hold-down force shall be such
5.3.3 The surface finish of the penetrator and top die in
that no appreciable draw-in occurs.
contact with the specimen shall not exceed 160 µin. (0.004
5.1.3 The machine shall be provided with a displacement
mm) when based on maximum distance peak-to-peak.
indicator to measure cup height.
5.3.4 The spherical portion of the penetrator shall have a
5.2 Displacement Indicator—The displacement indicator
hardnessnotlessthan62HRC.Theworkingsurfacesofthetop
shall monitor the ball penetrator movement and the scale shall
and bottom dies shall have a hardness of 56 HRC or higher.
be graduated such that displacement can be measured to within
atleast 60.0025in.(whenusingindicatorsreadinginSIunits,
6. Test Specimens
the displacement shall be measured to within at least 6 0.05
6.1 Number of Tests—A minimum of three tests shall be
mm).
performed. When greater precision is required, see Section 9
5.3 Tooling:
for determining the number of tests to be performed.
5.3.1 Thepenetratorshallbesufficientlyrigidsoasnottobe
deformed or to turn or move laterally during the test. Its head 6.2 Specimen Size—Specimen blanks may be either circular
shall be spherical and have a diameter of 0.875 6 0.002 in. or rectangular. The minimum width (or diameter) shall be 3.5
(22.2 6 0.05 mm), and only this spherical portion of the in. (89 mm). When evaluating rectangular strip, the cups shall
E643 − 15
notbecloserthan3.0in.(76mm)fromcentertocenter,andthe 7.3.1 The preferred method for determining the end point
center of any cup shall not be within 1.5 in. (38 mm) of the end shall be by the drop-in force on the specimen. In general, this
of the strip. indicates the onset of necking in the dome.
6.2.1 Theminimumspecimenwidthmaybe2.5in.(64mm) 7.3.1.1 Some test machines may not be equipped with a
for machines unable to accommodate larger width specimen
...
This document is not an ASTM standard and is intended only to provide the user of an ASTM standard an indication of what changes have been made to the previous version. Because
it may not be technically possible to adequately depict all changes accurately, ASTM recommends that users consult prior editions as appropriate. In all cases only the current version
of the standard as published by ASTM is to be considered the official document.
Designation: E643 − 09 E643 − 15
Standard Test Method for
Ball Punch Deformation of Metallic Sheet Material
This standard is issued under the fixed designation E643; the number immediately following the designation indicates the year of
original adoption or, in the case of revision, the year of last revision. A number in parentheses indicates the year of last reapproval. A
superscript epsilon (´) indicates an editorial change since the last revision or reapproval.
INTRODUCTION
The ball punch deformation test is used for evaluating the ductility of metallic sheet materials. The
test involves biaxial stretching of a constrained test specimen. Ideally, no draw-in of flange metal from
under the hold-down occurs. The sheet metal test specimen is bulged at a specified rate until the
loadforce drops or until either necking or fracture occurs; the test is then terminated. Ball punch
(penetrator) movement to drop in-load drop-in-force or necking or fracture is the test result. It is
known that test results may vary with hold-down force, lubrication, and criterion for determining the
end point of the test.
1. Scope
1.1 This test method covers the procedure for conducting the ball punch deformation test for metallic sheet materials intended
for forming applications. The test applies to specimens with thicknesses between 0.008 and 0.080 in. (0.20 and 2.00 mm).
1.1 The values stated in inch–pound units are to be regarded as the standard. This test method covers the procedure for
conducting the ball punch deformation test for metallic sheet materials intended for forming applications. The test applies to
specimens with thicknesses between 0.008 and 0.080 in. (0.2 and 2.0 mm).
NOTE 1—The ball punch deformation test is intended to replace the Olsen cup test by standardizing many of the test parameters that previously have
been left to the discretion of the testing laboratory.
NOTE 2—The modified Erichsen test has been standardized in Europe. The main differences between the ball punch deformation test and the Erichsen
test are the diameters of the penetrator and the dies. Erichsen cup heights are given in SI units.
1.2 The values stated in inch-pound units are to be regarded as standard. The values given in parentheses are mathematical
conversions to SI units that are provided for information only and are not considered standard.
1.3 This standard does not purport to address all of the safety concerns, if any, associated with its use. It is the responsibility
of the user of this standard to establish appropriate safety and health practices and determine the applicability of regulatory
limitations prior to use.
2. Referenced Documents
2.1 ASTM Standards:
E177 Practice for Use of the Terms Precision and Bias in ASTM Test Methods
E691 Practice for Conducting an Interlaboratory Study to Determine the Precision of a Test Method
2.2 National Institute of Standards and Technology Document:
NIST Handbook 91 Experimental Statistics
3. Terminology
3.1 Definitions of Terms Specific to This Standard:
3.1.1 cup height, the height of the formed cup at the end point of the test.
This test method is under the jurisdiction of ASTM Committee E28 on Mechanical Testing and is the direct responsibility of Subcommittee E28.02 on Ductility and
Formability.
Current edition approved June 1, 2009May 1, 2015. Published June 2009June 2015. Originally published in 1978. Last previous edition approved in 20002009 as E643
-84(2000) which was withdrawn March 2009 and reinstated in June 2009. DOI: 10.1520/E0643-09.–09. DOI: 10.1520/E0643-15.
For referenced ASTM standards, visit the ASTM website, www.astm.org, or contact ASTM Customer Service at service@astm.org. For Annual Book of ASTM Standards
volume information, refer to the standard’s Document Summary page on the ASTM website.
Available from National Institute of Standards and Technology (NIST), 100 Bureau Dr., Stop 1070, Gaithersburg, MD 20899-1070, http://www.nist.gov.
Copyright © ASTM International, 100 Barr Harbor Drive, PO Box C700, West Conshohocken, PA 19428-2959. United States
E643 − 15
4. Significance and Use
4.1 The ball punch deformation test is widely used to evaluate and compare the formability of metallic sheet materials. Biaxial
stretching is the predominant mode of deformation occurring during the test and, therefore, the results are most often used to rate
or compare materials that are to be formed mainly by stretching. However, precise correlations between the cup height as
determined by this test and the formability of a sheet material under production conditions have not been established.
4.2 It is recognized that the cup heights for specimens from the same sample may vary with differences in magnitude of
hold-down force, lubrication, and method of end point determination. The procedures described in Sections 5, 7.1, and 7.3 will
minimize these variations.
5. Apparatus
5.1 Cupping Machines (Fig. 1) —Any machine used for ball punch deformation tests shall be equipped to hold the specimen
with a minimum force of 2200 lbf (9800 N). It shall have a spherical-ended penetrator capable of forcing the central portion of
the specimen through the die until the end point of the test occurs (see 7.3).
5.1.1 Variation in hold-down force is a source of variation in cup height. For machines not equipped to measure the hold-down
force, the magnitude of the force should be established.
5.1.2 The magnitude of the hold-down force shall be such that no appreciable draw-in occurs.
5.1.3 The machine shall be provided with a displacement indicator to measure cup height.
5.2 Displacement Indicator—The displacement indicator shall monitor the ball penetrator movement and the scale shall be
graduated such that displacement can be measured to within at least 6 0.0025 in. (when using indicators reading in SI units, the
displacement shall be measured to within at least 6 0.05 mm).
5.3 Tooling:
60°
Dimensions
Key
in. mm
(1) Thickness of test piece full thickness full thickness
(2) Width of test piece (minimum) 3.5 89
(3) Bore Diameter of top die See 6.3. See 6.3.
(4) Bore Diameter of bottom die 1 ± 0.004 25.4 ± 0.1
(5) External diameter of top die (approximate) 3.5 89
(6) External diameter of bottom die (approximate) 3.5 89
(7) Corner radius of interior top die 0.032 ± 0.002 0.81 ± 0.05
(8) Corner radius of exterior top die 0.032 0.81
(9) Depth of bore of top die 0.032 0.81
(10) Depth of bore of top die 0.197 ± 0.010 5.00 ± 0.025
(11) Thickness of top die (minimum) 0.78 20
(12) Thickness of bottom die (minimum) 0.78 20
A
(13) Diameter of spherical end of penetrator 0.875 ± 0.002 22.2 ± 0.05
(14) Cup Height Cup Height Cup Height
A
“Olsen Ball, 22.22 mm ( ⁄8 in.); “Erichsen” Ball, 20mm.
FIG. 1 Ball Punch Deformation Test Tooling
E643 − 15
5.3.1 The penetrator shall be sufficiently rigid so as not to be deformed or to turn or move laterally during the test. Its head shall
be spherical and have a diameter of 0.875 6 0.002 in. (22.226 (22.2 6 0.05 mm), and only this spherical portion of the penetrator
shall contact the specimen. The penetrator shall move along the axial centerline of the top and bottom dies. It shall be clean and
free from oxide build-up, corrosion, dirt, etc.
5.3.2 The surface of the top die in contact with the test specimen shall be plane and parallel to the surface of the bottom die.
Both surfaces shall be clean and free from oxide build-up, corrosion, dirt, etc.
5.3.3 The surface finish of the penetrator and top die in contact with the specimen shall not exceed 160 μin. (0.004 mm) when
based on maximum distance peak-to-peak.
5.3.4 The spherical portion of the penetrator shall have a hardness not less than 62 HRC. The working surfaces of the top and
bottom dies shall have a hardness of 56 HRC or higher.
6. Test Specimens
6.1 Number of Tests—A minimum of three tests shall be performed. When greater precision is required, see Section 9 for
determining the number of tests to be performed.
6.2 Specimen Size—Specimen blanks may be either circular or rectangular. The minimum width (or diameter) shall be 3.5 in.
(90(89 mm). When evaluating rectangular strip, the cups shall not be closer than 3.0 in. (75(76 mm) from center to center, and
the center of any cup shall not be within 1.5 in. (38 mm) of the end of the strip.
NOTE 3—The minimum specimen width may be 2.5 in. (65 mm) for machines unable to accommodate larger width specimens.
6.2.1 The minimum specimen wi
...

Questions, Comments and Discussion
Ask us and Technical Secretary will try to provide an answer. You can facilitate discussion about the standard in here.
Loading comments...