ASTM D522/D522M-13
(Test Method)Standard Test Methods for Mandrel Bend Test of Attached Organic Coatings
Standard Test Methods for Mandrel Bend Test of Attached Organic Coatings
SIGNIFICANCE AND USE
4.1 Coatings attached to substrates are elongated when the substrates are bent during the manufacture of articles or when the articles are abused in service. These test methods have been useful in rating attached coatings for their ability to resist cracking when elongated. They have been useful in evaluating the flexibility of coatings on flexible substrates.
SCOPE
1.1 These test methods cover the determination of the resistance to cracking (flexibility) of attached organic coatings on substrates of sheet metal or rubber-type materials.
1.2 The values stated in either SI units or inch-pound units are to be regarded separately as standard. The values stated in each system may not be exact equivalents; therefore, each system shall be used independently of the other. Combining values from the two systems may result in non-conformance with the standard.
1.3 This standard does not purport to address all of the safety concerns, if any, associated with its use. It is the responsibility of the user of this standard to establish appropriate safety and health practices and determine the applicability of regulatory limitations prior to use.
General Information
Relations
Buy Standard
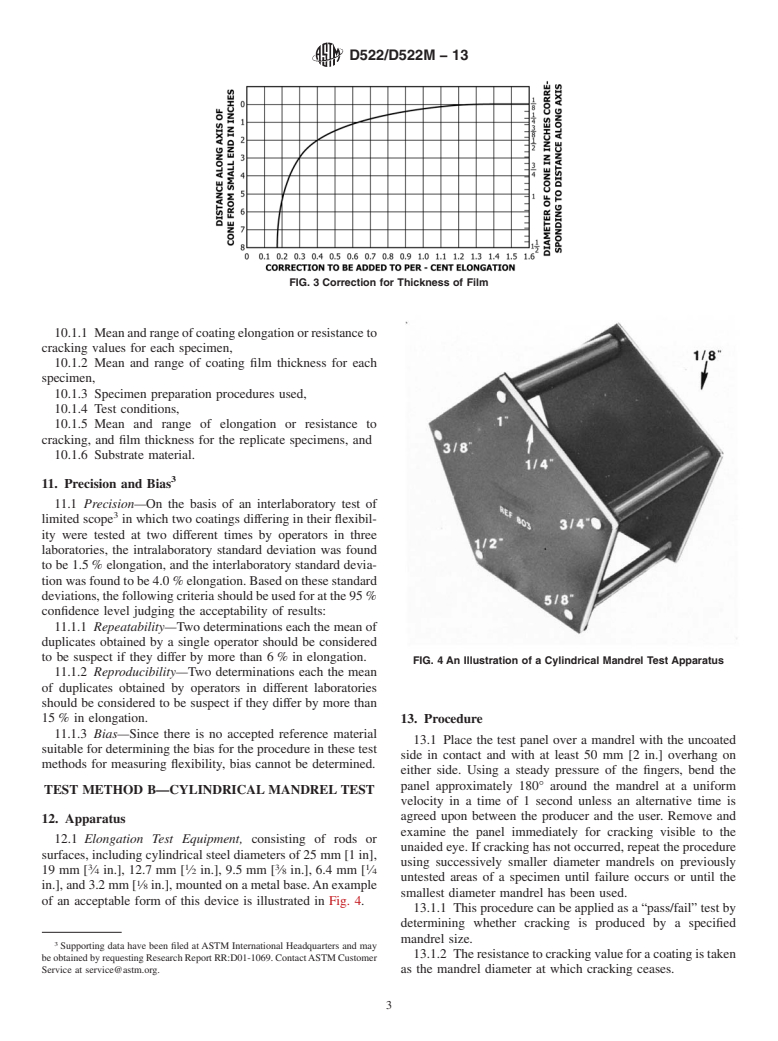
Standards Content (Sample)
NOTICE: This standard has either been superseded and replaced by a new version or withdrawn.
Contact ASTM International (www.astm.org) for the latest information
Designation: D522/D522M −13
Standard Test Methods for
1
Mandrel Bend Test of Attached Organic Coatings
This standard is issued under the fixed designation D522/D522M; the number immediately following the designation indicates the year
of original adoption or, in the case of revision, the year of last revision.Anumber in parentheses indicates the year of last reapproval.
A superscript epsilon (´) indicates an editorial change since the last revision or reapproval.
This standard has been approved for use by agencies of the U.S. Department of Defense.
1. Scope mandrel and the resistance to cracking of the coating is
determined. In Test Method A the coated panels are bent over
1.1 These test methods cover the determination of the
aconicalmandrel.InTestMethodBthecoatedpanelsarebent
resistance to cracking (flexibility) of attached organic coatings
over cylindrical mandrels of various diameters.
on substrates of sheet metal or rubber-type materials.
1.2 The values stated in either SI units or inch-pound units
4. Significance and Use
are to be regarded separately as standard. The values stated in
4.1 Coatings attached to substrates are elongated when the
each system may not be exact equivalents; therefore, each
substrates are bent during the manufacture of articles or when
system shall be used independently of the other. Combining
thearticlesareabusedinservice.Thesetestmethodshavebeen
values from the two systems may result in non-conformance
useful in rating attached coatings for their ability to resist
with the standard.
cracking when elongated. They have been useful in evaluating
1.3 This standard does not purport to address all of the
the flexibility of coatings on flexible substrates.
safety concerns, if any, associated with its use. It is the
responsibility of the user of this standard to establish appro-
5. Test Specimen
priate safety and health practices and determine the applica-
5.1 Substrates:
bility of regulatory limitations prior to use.
5.1.1 Ifthepurposeofthetestistodeterminethepercentof
elongation of the coating material, the substrate shall be
2. Referenced Documents
1
cold-rolled steel strip 0.8 mm [ ⁄32 in.] (22 gage) thick.
2
2.1 ASTM Standards:
5.1.2 If the purpose of the test is to rate the coated material
D823Practices for Producing Films of Uniform Thickness
for resistance to cracking, the substrate may be any type of
of Paint, Varnish, and Related Products on Test Panels
sheet metal or rubber-type material (for example, steel,
D1005Test Method for Measurement of Dry-Film Thick-
aluminum, tinplate, or synthetic rubber). The thickness of the
ness of Organic Coatings Using Micrometers
1
sheetmetalmaybelessthan0.8mm[ ⁄32in.]andthethickness
D7091Practice for Nondestructive Measurement of Dry
1
of the rubber-type materials may be as great as 13 mm [ ⁄2 in.].
Film Thickness of Nonmagnetic Coatings Applied to
5.1.3 The recommended panel size is 100 mm [4 in.] in
Ferrous Metals and Nonmagnetic, Nonconductive Coat-
widthand150mm[6in.]inlength.Themaximumsizethatthe
ings Applied to Non-Ferrous Metals
1
conical mandrel can accommodate is 115 mm [4 ⁄2 in.] wide
1
and 190 mm [7 ⁄2 in.] long.
3. Summary of Test Method
5.1.4 The surface preparation of the substrate shall be
3.1 The coating materials under test are applied at uniform
agreed upon between the purchaser and the seller. Prior to the
thickness to panels of sheet metal or rubber-type materials.
application of the coating, round slightly the edges of metal
After drying or curing the coated panels are bent over a
panels to remove burrs in order to eliminate anomalous edge
effects.
1
NOTE 1—If elongations are to be determined for coatings applied to
These test methods are under the jurisdiction of ASTM Committee D01 on
1
Paint and Related Coatings, Materials, and Applications and are the direct substrates other than 0.8 mm [ ⁄32 in.] thick cold-rolled steel, they must be
responsibility of Subcommittee D01.23 on Physical Properties of Applied Paint measured with a special mandrel jig as described in Appendix X1.2.
Films.
5.2 Coated Panels:
Current edition approved Nov. 1, 2013. Published December 2013. Originally
5.2.1 Apply uniform coatings of the materials under test to
approved in 1939. Last previous edition approved in 2008 as D522–93a(2008).
DOI: 10.1520/D0522_D0522M-13.
thesubstratesinaccordancewithPracticesD823andairdryor
2
For referenced ASTM standards, visit the ASTM website, www.astm.org, or
bake under conditions mutually agreeable to the purchaser and
contact ASTM Customer Service at service@astm.org. For Annual Book of ASTM
the seller. If percent elongation is to be measured, a minimum
Standards volume information, refer to the standard’s Document Summary page on
1
the ASTM website. thickness of 25.4 µm [1.0 mil] is required on 0.8 mm [ ⁄32 in.]
Copyright © ASTM International, 100 Barr
...
This document is not an ASTM standard and is intended only to provide the user of an ASTM standard an indication of what changes have been made to the previous version. Because
it may not be technically possible to adequately depict all changes accurately, ASTM recommends that users consult prior editions as appropriate. In all cases only the current version
of the standard as published by ASTM is to be considered the official document.
Designation: D522 − 93a (Reapproved 2008) D522/D522M − 13
Standard Test Methods for
1
Mandrel Bend Test of Attached Organic Coatings
This standard is issued under the fixed designation D522;D522/D522M; the number immediately following the designation indicates the
year of original adoption or, in the case of revision, the year of last revision. A number in parentheses indicates the year of last
reapproval. A superscript epsilon (´) indicates an editorial change since the last revision or reapproval.
This standard has been approved for use by agencies of the U.S. Department of Defense.
1. Scope
1.1 These test methods cover the determination of the resistance to cracking (flexibility) of attached organic coatings on
substrates of sheet metal or rubber-type materials.
1.2 The values stated in either SI units or inch-pound units are to be regarded separately as the standard. The values given in
parentheses are for information only.stated in each system may not be exact equivalents; therefore, each system shall be used
independently of the other. Combining values from the two systems may result in non-conformance with the standard.
1.3 This standard does not purport to address all of the safety concerns, if any, associated with its use. It is the responsibility
of the user of this standard to establish appropriate safety and health practices and determine the applicability of regulatory
limitations prior to use.
2. Referenced Documents
2
2.1 ASTM Standards:
D823 Practices for Producing Films of Uniform Thickness of Paint, Varnish, and Related Products on Test Panels
D1005 Test Method for Measurement of Dry-Film Thickness of Organic Coatings Using Micrometers
D1186D7091 Test Methods Practice for Nondestructive Measurement of Dry Film Thickness of Nonmagnetic Coatings Applied
to a Ferrous BaseFerrous Metals and Nonmagnetic, Nonconductive Coatings Applied to Non-Ferrous Metals (Withdrawn
2006)
D1400 Test Method for Nondestructive Measurement of Dry Film Thickness of Nonconductive Coatings Applied to a
3
Nonferrous Metal Base (Withdrawn 2006)
3. Summary of Test Method
3.1 The coating materials under test are applied at uniform thickness to panels of sheet metal or rubber-type materials. After
drying or curing the coated panels are bent over a mandrel and the resistance to cracking of the coating is determined. In Test
Method A the coated panels are bent over a conical mandrel. In Test Method B the coated panels are bent over cylindrical mandrels
of various diameters.
4. Significance and Use
4.1 Coatings attached to substrates are elongated when the substrates are bent during the manufacture of articles or when the
articles are abused in service. These test methods have been useful in rating attached coatings for their ability to resist cracking
when elongated. They have been useful in evaluating the flexibility of coatings on flexible substrates.
5. Test Specimen
5.1 Substrates:
5.1.1 If the purpose of the test is to determine the percent of elongation of the coating material, the substrate shall be cold-rolled
1
steel strip 0.8 mm ([ ⁄32 in.)in.] (22 gage) thick.
1
These test methods are under the jurisdiction of ASTM Committee D01 on Paint and Related Coatings, Materials, and Applications and are the direct responsibility of
Subcommittee D01.23 on Physical Properties of Applied Paint Films.
Current edition approved Feb. 15, 2008Nov. 1, 2013. Published February 2008December 2013. Originally approved in 1939. Last previous edition approved in 20012008
as D522 – 93a (2001).(2008). DOI: 10.1520/D0522-93AR08.10.1520/D0522_D0522M-13.
2
For referenced ASTM standards, visit the ASTM website, www.astm.org, or contact ASTM Customer Service at service@astm.org. For Annual Book of ASTM Standards
volume information, refer to the standard’s Document Summary page on the ASTM website.
Copyright © ASTM International, 100 Barr Harbor Drive, PO Box C700, West Conshohocken, PA 19428-2959. United States
1
---------------------- Page: 1 ----------------------
D522/D522M − 13
5.1.2 If the purpose of the test is to rate the coated material for resistance to cracking, the substrate may be any type of sheet
metal or rubber-type material (for example, steel, aluminum, tinplate, or synthetic rubber). The thickness of the sheet metal may
1 1
be less than 0.8 mm ([ ⁄32 in.)in.] and the thickness of the rubber-type materials may be as great as 13 mm ([ ⁄2 in.). in.].
5.1.3 The recommended panel size is 100 mm (4 in.)[4 in.] in width and 150 mm (6 in.)[6 in.] in length. The maximum size
1 1
that the conical mandr
...


Questions, Comments and Discussion
Ask us and Technical Secretary will try to provide an answer. You can facilitate discussion about the standard in here.