ASTM F450-13(2019)
(Test Method)Standard Test Methods for Vacuum Cleaner Hose—Durability and Reliability (Plastic)
Standard Test Methods for Vacuum Cleaner Hose—Durability and Reliability (Plastic)
SIGNIFICANCE AND USE
4.1 These test methods can be used by buyers of vacuum cleaner hose to specify the test criteria the hose must meet to be acceptable for their purposes.
SCOPE
1.1 These test methods cover the determination of the effect of anticipated stresses and strains that vacuum cleaner and extractor hoses will receive in normal use.
1.2 These test methods apply to plastic (regular and reinforced) vacuum cleaner and extractor hoses for household use.
1.3 The following tests are included:
Section
Torsional Flex
6
Hot and Cold Flex with Aging
7
Abrasion, External Surfaces
8
Flex
9
Pull Test on Hose Fittings with Aging
10
Crush
11
Stretch Ratio
12
Extractor Hoses
13
1.4 These test methods are individual tests as agreed upon between the hose and vacuum manufacturer.
1.5 The values stated in inch-pound units are to be regarded as standard. The values given in parentheses are mathematical conversions to SI units that are provided for information only and are not considered standard.
1.6 This standard does not purport to address all of the safety concerns, if any, associated with its use. It is the responsibility of the user of this standard to establish appropriate safety, health, and environmental practices and determine the applicability of regulatory limitations prior to use.
1.7 This international standard was developed in accordance with internationally recognized principles on standardization established in the Decision on Principles for the Development of International Standards, Guides and Recommendations issued by the World Trade Organization Technical Barriers to Trade (TBT) Committee.
General Information
- Status
- Published
- Publication Date
- 30-Sep-2019
- Technical Committee
- F11 - Vacuum Cleaners
- Drafting Committee
- F11.30 - Durability-Reliability
Relations
- Effective Date
- 01-Mar-2018
- Effective Date
- 15-May-2010
- Effective Date
- 01-Apr-2010
- Effective Date
- 01-Apr-2010
- Effective Date
- 01-Aug-2008
- Effective Date
- 01-Sep-2007
- Effective Date
- 01-Dec-2003
- Effective Date
- 01-Oct-2003
- Effective Date
- 10-Dec-2002
- Effective Date
- 10-Nov-2002
- Effective Date
- 10-Aug-2002
- Effective Date
- 10-Apr-2002
- Effective Date
- 10-Apr-2002
- Effective Date
- 10-Apr-2002
- Effective Date
- 10-Apr-2002
Overview
ASTM F450-13(2019) is an internationally recognized standard published by ASTM International that outlines comprehensive test methods for evaluating the durability and reliability of plastic vacuum cleaner and extractor hoses intended for household use. This standard provides a robust framework for manufacturers, buyers, and quality assurance professionals to assess plastic vacuum hose performance under conditions simulating real-world stresses and strains.
The standard includes a suite of mechanical and aging tests that measure how hoses perform under flexing, compression, stretching, abrasion, temperature variation, and load application. Adherence to these test methods is vital in ensuring that vacuum cleaner hoses meet industry quality requirements and perform reliably throughout their service life.
Key Topics
The main areas covered by ASTM F450-13(2019) include:
- Torsional Flex: Determines hose resistance to twisting and the adhesion integrity between wire reinforcement and hose jacket.
- Hot and Cold Flex with Aging: Assesses hose flexibility and durability under repeated heating and cooling cycles to simulate long-term usage.
- Abrasion Resistance: Measures the hose’s ability to withstand wear from contact with abrasive surfaces - critical for long-term surface integrity.
- Flex Resistance: Evaluates the hose’s capability to bend repeatedly without failure.
- Pull Test on Hose Fittings with Aging: Tests the strength of hose-to-fitting connections after temperature cycling to ensure secure attachment under strain.
- Crush Resistance: Assesses hose deformation and recovery after being subjected to compression forces.
- Stretch Ratio: Determines how much a hose can stretch under a specified load without compromising function.
- Extractor Hoses: Provides additional pre-conditioning for hoses intended for wet vacuum or extractor applications with exposure to cleaning chemicals and moisture.
Each test method details specimen preparation, conditioning, procedures, reporting criteria, and failure modes, allowing results to be used in purchase specifications, manufacturing quality control, and research.
Applications
The ASTM F450-13(2019) standard is highly valuable for:
- Vacuum Cleaner Manufacturers: Ensuring hoses meet durability and reliability expectations, aiding in product development, and reducing warranty claims.
- Hose Suppliers: Demonstrating product performance and compliance with recognized specifications during procurement.
- Quality Assurance Professionals: Standardizing test criteria for batch testing and benchmarking plastic vacuum hoses against industry norms.
- Retailers and End Users: Providing confidence that hoses have been subjected to rigorous quality and performance assessments before market release.
These test methods support mutual understanding and agreement between hose and vacuum manufacturers on quality standards, fostering consistent product reliability and user satisfaction.
Related Standards
ASTM F450-13(2019) references several related documents to broaden its applicability and ensure standardization across the vacuum cleaner industry:
- ASTM D638: Test Method for Tensile Properties of Plastics.
- ASTM D695: Test Method for Compressive Properties of Rigid Plastics.
- ASTM F395: Terminology Relating to Vacuum Cleaners.
- ASTM F595: (Withdrawn) Test Methods for Vacuum Cleaner Hose-Durability and Reliability (All-Plastic Hose).
For users seeking a comprehensive approach to vacuum cleaner hose testing, reviewing these related ASTM standards will provide additional protocols and vocabulary essential for laboratory and production environments.
Keywords: vacuum cleaner hose durability, vacuum cleaner hose reliability, vacuum cleaner hose test methods, ASTM F450, plastic vacuum hose standards, vacuum extractor hose testing, vacuum hose abrasion resistance, vacuum hose crush test, vacuum hose pull test, ASTM International standards.
Buy Documents
ASTM F450-13(2019) - Standard Test Methods for Vacuum Cleaner Hose—Durability and Reliability (Plastic)
Frequently Asked Questions
ASTM F450-13(2019) is a standard published by ASTM International. Its full title is "Standard Test Methods for Vacuum Cleaner Hose—Durability and Reliability (Plastic)". This standard covers: SIGNIFICANCE AND USE 4.1 These test methods can be used by buyers of vacuum cleaner hose to specify the test criteria the hose must meet to be acceptable for their purposes. SCOPE 1.1 These test methods cover the determination of the effect of anticipated stresses and strains that vacuum cleaner and extractor hoses will receive in normal use. 1.2 These test methods apply to plastic (regular and reinforced) vacuum cleaner and extractor hoses for household use. 1.3 The following tests are included: Section Torsional Flex 6 Hot and Cold Flex with Aging 7 Abrasion, External Surfaces 8 Flex 9 Pull Test on Hose Fittings with Aging 10 Crush 11 Stretch Ratio 12 Extractor Hoses 13 1.4 These test methods are individual tests as agreed upon between the hose and vacuum manufacturer. 1.5 The values stated in inch-pound units are to be regarded as standard. The values given in parentheses are mathematical conversions to SI units that are provided for information only and are not considered standard. 1.6 This standard does not purport to address all of the safety concerns, if any, associated with its use. It is the responsibility of the user of this standard to establish appropriate safety, health, and environmental practices and determine the applicability of regulatory limitations prior to use. 1.7 This international standard was developed in accordance with internationally recognized principles on standardization established in the Decision on Principles for the Development of International Standards, Guides and Recommendations issued by the World Trade Organization Technical Barriers to Trade (TBT) Committee.
SIGNIFICANCE AND USE 4.1 These test methods can be used by buyers of vacuum cleaner hose to specify the test criteria the hose must meet to be acceptable for their purposes. SCOPE 1.1 These test methods cover the determination of the effect of anticipated stresses and strains that vacuum cleaner and extractor hoses will receive in normal use. 1.2 These test methods apply to plastic (regular and reinforced) vacuum cleaner and extractor hoses for household use. 1.3 The following tests are included: Section Torsional Flex 6 Hot and Cold Flex with Aging 7 Abrasion, External Surfaces 8 Flex 9 Pull Test on Hose Fittings with Aging 10 Crush 11 Stretch Ratio 12 Extractor Hoses 13 1.4 These test methods are individual tests as agreed upon between the hose and vacuum manufacturer. 1.5 The values stated in inch-pound units are to be regarded as standard. The values given in parentheses are mathematical conversions to SI units that are provided for information only and are not considered standard. 1.6 This standard does not purport to address all of the safety concerns, if any, associated with its use. It is the responsibility of the user of this standard to establish appropriate safety, health, and environmental practices and determine the applicability of regulatory limitations prior to use. 1.7 This international standard was developed in accordance with internationally recognized principles on standardization established in the Decision on Principles for the Development of International Standards, Guides and Recommendations issued by the World Trade Organization Technical Barriers to Trade (TBT) Committee.
ASTM F450-13(2019) is classified under the following ICS (International Classification for Standards) categories: 97.080 - Cleaning appliances. The ICS classification helps identify the subject area and facilitates finding related standards.
ASTM F450-13(2019) has the following relationships with other standards: It is inter standard links to ASTM F395-10(2018), ASTM D638-10, ASTM F395-10, ASTM D695-10, ASTM D695-08, ASTM F395-03(2007), ASTM D638-03, ASTM F395-03, ASTM F395-02, ASTM D638-02a, ASTM D695-02a, ASTM D638-01, ASTM D695-96, ASTM D695-02, ASTM D638-00. Understanding these relationships helps ensure you are using the most current and applicable version of the standard.
ASTM F450-13(2019) is available in PDF format for immediate download after purchase. The document can be added to your cart and obtained through the secure checkout process. Digital delivery ensures instant access to the complete standard document.
Standards Content (Sample)
This international standard was developed in accordance with internationally recognized principles on standardization established in the Decision on Principles for the
Development of International Standards, Guides and Recommendations issued by the World Trade Organization Technical Barriers to Trade (TBT) Committee.
Designation: F450 − 13 (Reapproved 2019)
Standard Test Methods for
Vacuum Cleaner Hose—Durability and Reliability (Plastic)
ThisstandardisissuedunderthefixeddesignationF450;thenumberimmediatelyfollowingthedesignationindicatestheyearoforiginal
adoptionor,inthecaseofrevision,theyearoflastrevision.Anumberinparenthesesindicatestheyearoflastreapproval.Asuperscript
epsilon (´) indicates an editorial change since the last revision or reapproval.
1. Scope 2. Referenced Documents
1.1 These test methods cover the determination of the effect 2.1 ASTM Standards:
of anticipated stresses and strains that vacuum cleaner and D638Test Method for Tensile Properties of Plastics
extractor hoses will receive in normal use. D695Test Method for Compressive Properties of Rigid
Plastics
1.2 These test methods apply to plastic (regular and rein-
F395Terminology Relating to Vacuum Cleaners
forced) vacuum cleaner and extractor hoses for household use.
F595Test Methods for Vacuum Cleaner Hose—Durability
1.3 The following tests are included:
and Reliability (All-Plastic Hose) (Withdrawn 2010)
Section
Torsional Flex 6
3. Terminology
Hot and Cold Flex with Aging 7
Abrasion, External Surfaces 8
3.1 Definitions—Refer to Terminology F395.
Flex 9
Pull Test on Hose Fittings with Aging 10
4. Significance and Use
Crush 11
Stretch Ratio 12
4.1 These test methods can be used by buyers of vacuum
Extractor Hoses 13
cleaner hose to specify the test criteria the hose must meet to
1.4 These test methods are individual tests as agreed upon
be acceptable for their purposes.
between the hose and vacuum manufacturer.
1.5 The values stated in inch-pound units are to be regarded 5. Sampling
as standard. The values given in parentheses are mathematical
5.1 The sample size shall be one that is mutually agreed
conversions to SI units that are provided for information only
upon between the hose manufacturer and the vacuum cleaner
and are not considered standard.
manufacturer.
1.6 This standard does not purport to address all of the
TEST METHODS
safety concerns, if any, associated with its use. It is the
responsibility of the user of this standard to establish appro-
6. Torsional Flex Test
priate safety, health, and environmental practices and deter-
6.1 Scope—Thistestmethodcoversthedeterminationofthe
mine the applicability of regulatory limitations prior to use.
adhesion of the reinforcement wire coating to the hose jacket,
1.7 This international standard was developed in accor-
the jacket strength, and the strength of the reinforcement wire
dance with internationally recognized principles on standard-
for plastic hose with inside diameter from 1 to 2 in. (25 to 51
ization established in the Decision on Principles for the
mm).
Development of International Standards, Guides and Recom-
mendations issued by the World Trade Organization Technical
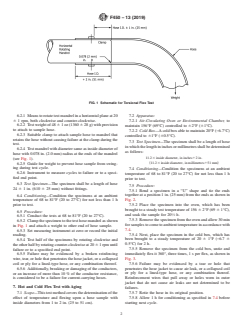
6.2 Apparatus—The apparatus shown in Fig. 1 is suitable
Barriers to Trade (TBT) Committee.
for this test method with the following provisions:
1 2
These methods are under the jurisdiction ofASTM Committee F11 on Vacuum For referenced ASTM standards, visit the ASTM website, www.astm.org, or
Cleaners and are the direct responsibility of Subcommittee F11.30 on Durability- contact ASTM Customer Service at service@astm.org. For Annual Book of ASTM
Reliability. Standards volume information, refer to the standard’s Document Summary page on
Current edition approved Oct. 1, 2019. Published October 2019. Originally the ASTM website.
approved in 1979. Last previous edition approved in 2013 as F450–13. DOI: The last approved version of this historical standard is referenced on
10.1520/F0450-13R19. www.astm.org.
Copyright © ASTM International, 100 Barr Harbor Drive, PO Box C700, West Conshohocken, PA 19428-2959. United States
F450 − 13 (2019)
FIG. 1 Schematic for Torsional Flex Test
6.2.1 Meanstorotatetestmandrelinahorizontalplaneat20 7.2 Apparatus:
6 1 rpm, both clockwise and counter-clockwise.
7.2.1 Air-Circulating Oven or Environmental Chamber, to
6.2.2 Testweightof48 61oz(1360 628g)withprovision maintain 156°F (69°C) controlled to 62°F (61°C).
to attach to sample hose.
7.2.2 Cold Box—Acoldboxabletomaintain20°F(−6.7°C)
6.2.3 Suitable clamp to attach sample hose to mandrel that
controlled to 61°F (60.5°C).
retainsthehosewithoutcausingfailureattheclampduringthe
7.3 Test Specimen—The specimen shall be a length of hose
test.
inwhichthelengthininchesormillimetresshallbedetermined
6.2.4 Testmandrelwithdiametersameasinsidediameterof
as follows:
hose with 0.078 in. (2.0 mm) radius at the ends of the mandrel
11.2 3insidediameter, ininches12 in.
(see Fig. 1).
11.2 3insidediameter, inmillimetres151mm
~ !
6.2.5 Guide for weight to prevent hose sample from swing-
ing during test cycle.
7.4 Conditioning—Condition the specimens at an ambient
6.2.6 Instrument to measure cycles to failure or to a speci-
temperature of 68 to 81°F (20 to 27°C) for not less than 1 h
fied end point.
prior to test.
6.3 Test Specimen—The specimen shall be a length of hose
7.5 Procedure:
24 6 1 in. (610 6 25 mm) without fittings.
7.5.1 Bend a specimen in a “U” shape and tie the ends
6.4 Conditioning—Condition the specimens at an ambient together at a position 1 in. (25 mm) from the ends as shown in
Fig. 2.
temperature of 68 to 81°F (20 to 27°C) for not less than 1 h
prior to test.
7.5.2 Place the specimen into the oven, which has been
brought to a steady test temperature of 156 6 2°F (69 6 1°C),
6.5 Procedure:
and soak the sample for 20 ⁄2 h.
6.5.1 Conduct the tests at 68 to 81°F (20 to 27°C).
7.5.3 Removethespecimenfromtheovenandallow30min
6.5.2 Clampthespecimentothetesthosemandrelasshown
forsamplestocometoambienttemperatureinaccordancewith
in Fig. 1 and attach a weight to other end of hose sample.
7.4.
6.5.3 Set measuring instrument at zero or record the initial
7.5.4 Next, place the specimen in the cold box, which has
reading.
been brought to a steady temperature of 20 6 1°F (−6.7 6
6.5.4 Test half of the specimens by rotating clockwise and
0.5°C) for 2 h.
theotherhalfbyrotatingcounter-clockwiseat20 61rpmuntil
7.5.5 Remove the specimen from the cold box, untie and
failure or to a specified end point.
immediately flex it 360°, three times, 1 s per flex, as shown in
6.5.5 Failure may be evidenced by a broken reinforcing
Fig. 3.
wire,tear,orholethatpenetratesthehosejacket,oracollapsed
coil or ply for a lined-type hose, or any combination thereof. 7.5.6 Failure may be evidenced by a tear or hole that
6.5.6 Additionally,breakingordamagingoftheconductors, penetrates the hose jacket to cause air leak, or a collapsed coil
or an increase of more than 10 % of the conductor resistance, or ply for a lined-type hose, or any combination thereof.
is considered to be a failure for current-carrying hoses. Reinforcement wires that pull away or holes worn in outer
jacket that do not cause air leaks are not determined to be
7. Hot and Cold Flex Test with Aging
failures.
7.5.7 Retie the hose in its original position.
7.1 Scope—Thistestmethodcoversthedeterminationofthe
effect of temperature and flexing upon a hose sample with 7.5.8 Allow 1 h for conditioning as specified in 7.4 before
inside diameters from 1 to 2 in. (25 to 51 cm). starting next cycle.
F450 − 13 (2019)
8.3 Test Specimen—The specimen shall be a full length
hose, or a length of hose suitable for the test unit.
8.4 Conditioning—Conditionthespecimenat68to81°F(20
to27°C)ambienttemperaturefornotlessthan1hpriortotest.
8.5 Procedure:
8.5.1 Conduct the tests at 68 to 81°F (20 to 27°C).
8.5.2 Clamp a new sheet of standard wet-dry, 500-grit
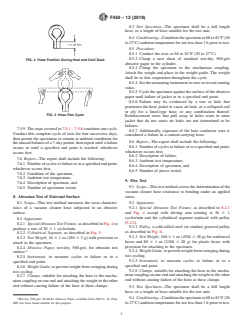
FIG. 2 Hose Position During Heat and Cold Soak
abrasive paper to the cylinder.
8.5.3 Clamp the specimen to the mechanism coupling.
Attach the weight and place in the weight guide. The weight
shall be in free suspension throughout the cycle.
8.5.4 Setthemeasuringinstrumenttozeroorrecordstarting
value.
8.5.5 Cycle the specimen against the surface of the abrasive
paper until failure of jacket or to a specified end point.
8.5.6 Failure may be evidenced by a tear or hole that
penetrates the hose jacket to cause air leak, or a collapsed coil
or ply for a lined-type hose, or any combination thereof.
FIG. 3 Hose Flex Cycle
Reinforcement wires that pull away or holes worn in outer
jacket that do not cause air leaks are not determined to be
failures.
7.5.9 Thestepscoveredin7.5.1–7.5.8constituteonecycle.
8.5.7 Additionally, exposure of the bare conductor wire is
Conduct this complete cycle of tests for four successive days,
considered a failure in a current-carrying hose.
then permit the specimens to remain at ambient conditions for
8.6 Report—The report shall include the following:
theunusedbalanceofa7-dayperiod,thenrepeatuntilafailure
8.6.1 Numberofcyclestofailureortoaspecifiedendpoint,
occurs or until a specified end point is reached, whichever
whichever occurs first,
occurs first.
8.6.2 Description of failure,
7.6 Report—The report shall include the following:
8.6.3 Ambient test temperature,
7.6.1 Numberofcyclestofailureortoaspecifiedendpoint,
8.6.4 Description of specimen, and
whichever occurs first,
8.6.5 Number of pieces tested.
7.6.2 Condition of the specimen,
7.6.3 Ambient test temperature,
9. Flex Test
7.6.4 Description of specimen, and
9.1 Scope—Thistestmethodcoversthedeterminationofthe
7.6.5 Number of specimens tested.
vacuum cleaner hose resistance to bending under an applied
8. Abrasion Test of External Surface stress.
8.1 Scope—This test method measures the wear character-
9.2 Apparatus:
istics of a vacuum cleaner hose subjected to an abrasive
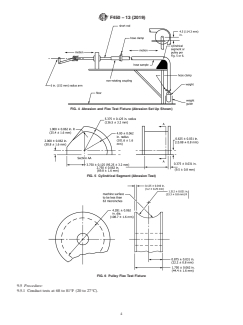
9.2.1 Special Abrasion Test Fixture, as described in 8.2.1
surface.
and Fig. 4 except with driving arm rotating at 36 6 1
cycles/min and the cylindrical segment replaced with pulley
8.2 Apparatus:
(9.2.2).
8.2.1 SpecialAbrasion Test Fixture,asdescribedinFig.4to
9.2.2 Pulley, a cold-rolled steel (or similar) grooved pulley
produce a rate of 20 6 1 cycles/min.
as described in Fig. 6.
8.2.2 Cylindrical Segment, as described in Fig. 5.
9.2.3 Test Weight, 160 6 1 oz (4536 6 28 g) for reinforced
8.2.3 Test Weight, 16 6 1 oz (454 6 3 g) with provision to
hoses and 80 6 1 oz (2268 6 28 g) for plastic hoses with
attach to the specimen.
provision for attaching to the specimen.
8.2.4 Abrasive Paper, wet-dry, 500-grit, for abrasion test
9.2.4 Weight Guide,topreventweightfromswingingduring
surface.
test cycling.
8.2.5 Instrument, to measure cycles to failure or to a
9.2.5 Instrument, to measure cycles to failure or to a
specified end point.
specified end point.
8.2.6 Weight Guide,topreventweightfromswingingduring
9.2.6 Clamps, suitable for attaching the hose to the mecha-
test cycling.
nismcouplingononeendandattachingtheweighttotheother
8.2.7 Clamps, suitable for attaching the hose to the mecha-
end without causing failure of the hose at these clamps.
nismcouplingononeendandattachingtheweighttotheother
end without causing failure of the hose at these clamps.
9.3 Test Specimen—The specimen shall be a full length
hose, or a length of hose suitable for the test unit.
9.4 Conditioning—Conditionthespecimenat68to81°F(20
Wet-dry, 500-grit, Tri-M-Ite Abrasive Paper, available from 3M Co., St. Paul,
MN, has been found suitable for this purpose. to27°C)ambienttemperaturefornotlessthan1hpriortotest.
-------------
...


Questions, Comments and Discussion
Ask us and Technical Secretary will try to provide an answer. You can facilitate discussion about the standard in here.
Loading comments...