ASTM F2378-05(2023)
(Test Method)Standard Test Method for Sealability of Sheet, Composite, and Solid Form-in-Place Gasket Materials
Standard Test Method for Sealability of Sheet, Composite, and Solid Form-in-Place Gasket Materials
SIGNIFICANCE AND USE
5.1 This test method is designed to compare sealing characteristics of gasket materials under controlled conditions by providing a precise measure of leakage rate at different press loads up to 32 MPa (4640 psi).
5.2 This test method is suitable for measuring leakage rates from 0.1 mL/min to as high as 5 L/min for gases.
5.3 This test method evaluates leak rates after time periods (typically 30 min) that result in a steady state leakage rate condition. Holding gasket materials under load and internal fluid pressure until steady state is achieved is required to obtain reproducible results.
5.4 If the fluid being used in the test causes changes, such as swelling, in the gasket material, it may affect results and diminish repeatability.
SCOPE
1.1 This test method covers a means of evaluating the sealing properties of sheet, composite, and solid form-in-place gasket materials (see Classification F104 or F868) at room temperature, and may be used for fluid (gas or liquid) leak rate measurements. It utilizes relatively short hold times and is not intended to predict long-term performance in application.
1.2 This test method is suitable for evaluating the sealing characteristics of a gasket material under different press loads by measuring the leakage rate. This test method may be used as an acceptance test when the producer and user have agreed to specific test conditions for the following parameters: (1) test medium, (2) internal pressure of the medium, (3) press load on the gasket specimen, and (4) the surface finish of the platens.
1.3 The values stated in SI units are to be regarded as the standard. The values given in parentheses are for information only.
1.4 This standard does not purport to address all of the safety concerns, if any, associated with its use. It is the responsibility of the user of this standard to establish appropriate safety, health, and environmental practices and determine the applicability of regulatory limitations prior to use.
1.5 This international standard was developed in accordance with internationally recognized principles on standardization established in the Decision on Principles for the Development of International Standards, Guides and Recommendations issued by the World Trade Organization Technical Barriers to Trade (TBT) Committee.
General Information
- Status
- Published
- Publication Date
- 31-Mar-2023
- Technical Committee
- F03 - Gaskets
- Drafting Committee
- F03.10 - Composite Gaskets
Relations
- Effective Date
- 01-Jan-2020
- Effective Date
- 01-May-2017
- Effective Date
- 01-Apr-2011
- Effective Date
- 01-Oct-2009
- Effective Date
- 01-May-2009
- Effective Date
- 10-Apr-2003
- Effective Date
- 10-Oct-2002
- Effective Date
- 10-Oct-2002
- Effective Date
- 10-Oct-2000
- Effective Date
- 01-Jan-1997
Overview
ASTM F2378-05(2023), "Standard Test Method for Sealability of Sheet, Composite, and Solid Form-in-Place Gasket Materials," is a key international standard published by ASTM International. This standard provides a consistent method to evaluate the sealing performance, or sealability, of a variety of gasket materials-including sheet, composite, and solid form-in-place types-when subjected to different compressive loads. By precisely measuring leakage rates at defined press loads, this standard helps manufacturers, engineers, and quality control professionals assess gasket materials under controlled, reproducible conditions.
Sealability testing according to ASTM F2378-05(2023) is particularly applicable to nonmetallic gasket materials at room temperature, using either liquid or gas as the test fluid. It provides essential data for the selection, comparison, and quality assurance of gasket materials in industries where sealing integrity is critical.
Key Topics
- Sealing Performance Under Load: The standard focuses on measuring the leakage rate of gaskets at press loads up to 32 MPa (4640 psi).
- Leakage Rate Measurement: It is suitable for quantifying leakage rates ranging from 0.1 mL/min to as high as 5 L/min for gases.
- Test Conditions: The method evaluates gasket materials after specific hold times (typically 30 minutes) to ensure a steady-state leakage rate is achieved.
- Material Types: Covers sheet, composite, and solid form-in-place gasket materials as referenced in ASTM F104 and F868.
- Fluid Compatibility: Recognizes that interaction between the test fluid and the gasket material (such as swelling) may affect the repeatability and reliability of results.
- Test Customization: Allows for adjustment of test medium, internal fluid pressure, compression load, and surface finish based on agreement between manufacturer and end user.
- Safety and Calibration: Emphasizes the need for calibrated apparatus, adherence to safety practices, and proper environmental considerations.
Applications
ASTM F2378-05(2023) is widely used in industries where gaskets form a vital component of sealed joints, ensuring leak-tight performance in equipment and piping. Common applications include:
- Manufacturing Quality Control: Assuring gasket sealability before product shipment or installation.
- Material Selection: Comparing sealing properties of different gasket materials for suitability in specific operational conditions.
- Supplier Compliance: Used as an acceptance test when both producers and users agree upon the test conditions.
- Research and Development: Supporting development of new nonmetallic, composite, or form-in-place gasket materials with improved sealing characteristics.
- Engineering Design: Informing design decisions where reliable fluid or gas sealing is mandatory.
Industries that benefit from the standard include automotive, chemical processing, oil and gas, HVAC, and water treatment, where flange joints or pressure-containing assemblies rely on gasket integrity.
Related Standards
For comprehensive gasket evaluation and classification, consider the following related ASTM and ANSI standards:
- ASTM F104: Classification System for Nonmetallic Gasket Materials - provides a framework for categorizing gasket materials based on their physical and chemical properties.
- ASTM F868: Classification for Laminated Composite Gasket Materials - classifies multilayer gasket compositions.
- ASTM D2000: Classification System for Rubber Products in Automotive Applications - includes standards for rubber material properties relevant to gasket production.
- ANSI B57.1: Compressed Gas Cylinder Valve Outlet and Inlet Connections - includes requirements for gas handling safety in testing environments.
Practical Value
Adopting ASTM F2378-05(2023) ensures comparability and consistency in the evaluation of gasket sealability, supporting product reliability, regulatory compliance, and safety. It enables clear communication between gasket manufacturers and end users regarding material performance benchmarks, and helps prevent costly leaks or system failures in critical process applications.
Keywords: ASTM F2378-05(2023), gasket sealability test, leakage rate, sheet gaskets, composite gaskets, form-in-place gaskets, nonmetallic gasket materials, leak testing standard, industrial sealing, quality assurance, ASTM International.
Buy Documents
ASTM F2378-05(2023) - Standard Test Method for Sealability of Sheet, Composite, and Solid Form-in-Place Gasket Materials
Frequently Asked Questions
ASTM F2378-05(2023) is a standard published by ASTM International. Its full title is "Standard Test Method for Sealability of Sheet, Composite, and Solid Form-in-Place Gasket Materials". This standard covers: SIGNIFICANCE AND USE 5.1 This test method is designed to compare sealing characteristics of gasket materials under controlled conditions by providing a precise measure of leakage rate at different press loads up to 32 MPa (4640 psi). 5.2 This test method is suitable for measuring leakage rates from 0.1 mL/min to as high as 5 L/min for gases. 5.3 This test method evaluates leak rates after time periods (typically 30 min) that result in a steady state leakage rate condition. Holding gasket materials under load and internal fluid pressure until steady state is achieved is required to obtain reproducible results. 5.4 If the fluid being used in the test causes changes, such as swelling, in the gasket material, it may affect results and diminish repeatability. SCOPE 1.1 This test method covers a means of evaluating the sealing properties of sheet, composite, and solid form-in-place gasket materials (see Classification F104 or F868) at room temperature, and may be used for fluid (gas or liquid) leak rate measurements. It utilizes relatively short hold times and is not intended to predict long-term performance in application. 1.2 This test method is suitable for evaluating the sealing characteristics of a gasket material under different press loads by measuring the leakage rate. This test method may be used as an acceptance test when the producer and user have agreed to specific test conditions for the following parameters: (1) test medium, (2) internal pressure of the medium, (3) press load on the gasket specimen, and (4) the surface finish of the platens. 1.3 The values stated in SI units are to be regarded as the standard. The values given in parentheses are for information only. 1.4 This standard does not purport to address all of the safety concerns, if any, associated with its use. It is the responsibility of the user of this standard to establish appropriate safety, health, and environmental practices and determine the applicability of regulatory limitations prior to use. 1.5 This international standard was developed in accordance with internationally recognized principles on standardization established in the Decision on Principles for the Development of International Standards, Guides and Recommendations issued by the World Trade Organization Technical Barriers to Trade (TBT) Committee.
SIGNIFICANCE AND USE 5.1 This test method is designed to compare sealing characteristics of gasket materials under controlled conditions by providing a precise measure of leakage rate at different press loads up to 32 MPa (4640 psi). 5.2 This test method is suitable for measuring leakage rates from 0.1 mL/min to as high as 5 L/min for gases. 5.3 This test method evaluates leak rates after time periods (typically 30 min) that result in a steady state leakage rate condition. Holding gasket materials under load and internal fluid pressure until steady state is achieved is required to obtain reproducible results. 5.4 If the fluid being used in the test causes changes, such as swelling, in the gasket material, it may affect results and diminish repeatability. SCOPE 1.1 This test method covers a means of evaluating the sealing properties of sheet, composite, and solid form-in-place gasket materials (see Classification F104 or F868) at room temperature, and may be used for fluid (gas or liquid) leak rate measurements. It utilizes relatively short hold times and is not intended to predict long-term performance in application. 1.2 This test method is suitable for evaluating the sealing characteristics of a gasket material under different press loads by measuring the leakage rate. This test method may be used as an acceptance test when the producer and user have agreed to specific test conditions for the following parameters: (1) test medium, (2) internal pressure of the medium, (3) press load on the gasket specimen, and (4) the surface finish of the platens. 1.3 The values stated in SI units are to be regarded as the standard. The values given in parentheses are for information only. 1.4 This standard does not purport to address all of the safety concerns, if any, associated with its use. It is the responsibility of the user of this standard to establish appropriate safety, health, and environmental practices and determine the applicability of regulatory limitations prior to use. 1.5 This international standard was developed in accordance with internationally recognized principles on standardization established in the Decision on Principles for the Development of International Standards, Guides and Recommendations issued by the World Trade Organization Technical Barriers to Trade (TBT) Committee.
ASTM F2378-05(2023) is classified under the following ICS (International Classification for Standards) categories: 21.140 - Seals, glands. The ICS classification helps identify the subject area and facilitates finding related standards.
ASTM F2378-05(2023) has the following relationships with other standards: It is inter standard links to ASTM F104-11(2020), ASTM F868-17, ASTM F104-11, ASTM F104-03(2009), ASTM F868-02(2009), ASTM F104-03, ASTM F104-02e1, ASTM F868-02, ASTM F104-00, ASTM F868-91(1997)e1. Understanding these relationships helps ensure you are using the most current and applicable version of the standard.
ASTM F2378-05(2023) is available in PDF format for immediate download after purchase. The document can be added to your cart and obtained through the secure checkout process. Digital delivery ensures instant access to the complete standard document.
Standards Content (Sample)
This international standard was developed in accordance with internationally recognized principles on standardization established in the Decision on Principles for the
Development of International Standards, Guides and Recommendations issued by the World Trade Organization Technical Barriers to Trade (TBT) Committee.
Designation: F2378 − 05 (Reapproved 2023)
Standard Test Method for
Sealability of Sheet, Composite, and Solid Form-in-Place
Gasket Materials
This standard is issued under the fixed designation F2378; the number immediately following the designation indicates the year of
original adoption or, in the case of revision, the year of last revision. A number in parentheses indicates the year of last reapproval. A
superscript epsilon (´) indicates an editorial change since the last revision or reapproval.
1. Scope motive Applications
F104 Classification System for Nonmetallic Gasket Materi-
1.1 This test method covers a means of evaluating the
als
sealing properties of sheet, composite, and solid form-in-place
F868 Classification for Laminated Composite Gasket Mate-
gasket materials (see Classification F104 or F868) at room
rials
temperature, and may be used for fluid (gas or liquid) leak rate
2.2 ANSI Standard:
measurements. It utilizes relatively short hold times and is not
B57.1 Compressed Gas Cylinder Valve Outlet and Inlet
intended to predict long-term performance in application.
Connections
1.2 This test method is suitable for evaluating the sealing
characteristics of a gasket material under different press loads
3. Terminology
by measuring the leakage rate. This test method may be used as
3.1 Definitions:
an acceptance test when the producer and user have agreed to
3.1.1 press load—the load applied by the hydraulic press to
specific test conditions for the following parameters: (1) test
the test assembly divided by the gasket area. The press load is
medium, (2) internal pressure of the medium, (3) press load on
not compensated for as the internal pressure is increased, so the
the gasket specimen, and (4) the surface finish of the platens.
gasket stress is reduced for the test conditions.
1.3 The values stated in SI units are to be regarded as the
3.1.2 solid form-in-place gasket—a solid length of gasket-
standard. The values given in parentheses are for information
ing material generally in a ribbon or rope form that can be laid
only.
out on the platen surface and overlapped at the ends to form a
1.4 This standard does not purport to address all of the
continuous sealing surface.
safety concerns, if any, associated with its use. It is the
4. Summary of Test Method
responsibility of the user of this standard to establish appro-
priate safety, health, and environmental practices and deter-
4.1 This test method utilizes a test specimen compressed in
mine the applicability of regulatory limitations prior to use.
increasing stages between the surfaces of two flat steel platens.
1.5 This international standard was developed in accor-
After the specified press load is applied, fluid (typically
dance with internationally recognized principles on standard-
nitrogen) is introduced into the center of the annular gasket
ization established in the Decision on Principles for the
compressed between platens, and a pressure of 4 MPa (580 psi)
Development of International Standards, Guides and Recom-
is applied. The fluid leak rate is measured. The fluid pressure is
mendations issued by the World Trade Organization Technical
relieved and the press load is increased to the next level. The
Barriers to Trade (TBT) Committee.
fluid pressure is reapplied and the leak rate measured again.
The cycle is repeated 5 times until a final press load of 32 MPa
2. Referenced Documents
(4640 psi) is achieved. Other press loads, internal pressures,
2.1 ASTM Standards: pressurizing fluids, and number of cycles can be used as agreed
D2000 Classification System for Rubber Products in Auto- upon between the producer and the user. All variations from the
standard requirements must be reported with the test results.
4.1.1 The fluid leak rate is measured by mass flow meters
located downstream from the gasket test fixture. Other means
This test method is under the jurisdiction of ASTM Committee F03 on Gaskets
and is the direct responsibility of Subcommittee F03.10 on Composite Gaskets.
of leak measurement also may be used and would depend upon
Current edition approved April 1, 2023. Published April 2023. Originally
the test fluid, the leak rate, and the accuracy required as agreed
approved in 2005. Last previous edition approved in 2016 as F2378 – 05 (2016).
upon between the producer and the user.
DOI: 10.1520/F2378-05R23.
For referenced ASTM standards, visit the ASTM website, www.astm.org, or
contact ASTM Customer Service at service@astm.org. For Annual Book of ASTM
Standards volume information, refer to the standard’s Document Summary page on Available from American National Standards Institute (ANSI), 25 W. 43rd St.,
the ASTM website. 4th Floor, New York, NY 10036.
Copyright © ASTM International, 100 Barr Harbor Drive, PO Box C700, West Conshohocken, PA 19428-2959. United States
F2378 − 05 (2023)
4.2 This test method uses flat platens on which an external 6.3 Calibrated Regulator and Gages, to monitor internal
load is applied to produce a compressive force on the gasket gas pressure or gas pressure over liquid. Test pressure should
test specimen. The uncompensated load applied is the press be monitored and controlled with an accuracy of 640 kPa (6
load. psi).
4.3 Results of the sealability tests are typically expressed as
6.4 Temperature and Pressure (10.35 MPa (1500 psi))
a leak rate in mL/min for the test specimen under the specific
Corrected Mass Flow Meters, to monitor gas flow (leakage)
conditions of the test for gases or mL/h for liquids, or may be
from the gasket fixture. Typically multiple mass flow meters
expressed as mass loss per unit of time.
are piped parallel to the flow with only the most sensitive meter
for the flow conditions valved to the leakage stream. For
5. Significance and Use
example, 0-10, 0-100, and 0-1000 mL/min mass flow meters
may all be accurate to 0.25 %, but the former will measure a 1
5.1 This test method is designed to compare sealing char-
mL/min-leak 100 times more accurately than the latter. Other
acteristics of gasket materials under controlled conditions by
leak measurement devices may be used as agreed upon
providing a precise measure of leakage rate at different press
between the producer and the user. Mass flow meters should
loads up to 32 MPa (4640 psi).
have an accuracy of 61 % of full scale or better.
5.2 This test method is suitable for measuring leakage rates
from 0.1 mL/min to as high as 5 L/min for gases. 6.5 Pressure Control Regulators, to limit variation and
alarm, low pressure may be used at the discretion of the users,
5.3 This test method evaluates leak rates after time periods
producers, or both.
(typically 30 min) that result in a steady state leakage rate
condition. Holding gasket materials under load and internal
6.6 Platens, hardened and machined with either a serrated
fluid pressure until steady state is achieved is required to obtain
concentric or serrated spiral finish having a resultant surface
reproducible results.
finish as agreed upon between the producer and user. Platens
should be a minimum of 25 mm (1.0 in.) thick. Platens, an
5.4 If the fluid being used in the test causes changes, such as
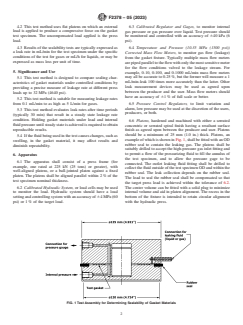
example of which is shown in Fig. 1, shall be fitted with an OD
swelling, in the gasket material, it may affect results and
rubber seal to contain the leaking gas. The platens shall be
diminish repeatability.
suitably drilled to accept the high-pressure gas inlet fitting and
to permit a flow of the pressurizing fluid to fill the annulus of
6. Apparatus
the test specimen, and to allow the pressure gage to be
6.1 The apparatus shall consist of a press frame (for
connected. The outlet leaking fluid fitting shall be drilled to
example, one rated at 225 kN (25 tons) or greater), with
collect the fluid outside of the test specimen OD and within the
well-aligned platens, or a ball-jointed platen against a fixed
rubber seal. The leak collection depends on the rubber seal.
platen. The platens shall be aligned parallel within 2 % of the
The load to seal the rubber seal shall be compensated so that
test specimen nominal thickness.
the target press load is achieved within the tolerance of 6.2.
6.2 Calibrated Hydraulic System, or load cells may be used The center volume can be fitted with a solid plug to minimize
to monitor the load. Hydraulic system should have a load internal volume and aid in platen alignment. The recess in the
setting and controlling system with an accuracy of 64 MPa (60 bottom of the fixture is intended to retain circular alignment
psi) or 1 % of the target load. with the hydraulic press.
FIG. 1 Test Assembly for Determining Sealability of Gasket Materials
F2378 − 05 (2023)
7. Reagents and Materials (4640 psi) and the internal pressure of the test fluid to 4 MPa
(580 psi). The system shall be free of leaks for 30 min under
7.1 Commercially available bottled, compressed nitrogen is
these conditions.
the recommended test fluid. Other fluids may be used as agreed
upon between the producer and the user.
11. Calibration and Standardization
7.2 Gasket test specimens as agreed upon by the producer
11.1 The load frame should be calibrated using suitable
and the user.
equipment, for example Morehouse Rings from Morehouse
Instrument Company. Calibration range shall be consistent
8. Hazards
with the load range needed. Suitable calibration curves shall be
8.1 Normal safety practices required for operating pressure
generated as needed.
equipment shall be observed by the personnel conducting the
11.2 Gages to monitor internal fluid pressure should be
tests.
calibrated using suitable equipment, for example, Transmation
8.2 A suitably mounted, transparent safety shield shall be
Precision Pressure Calibrator Model 109. Calibration range
used as a barrier between the operator and the pressurized
shall be consistent with the internal pressure being monitored.
system in case of a gasket blowout.
Calibration curves shall be generated as needed.
8.3 All components of the system must be designed to
11.3 The mass flow meters used to measure gas leakage
safely accommodate a maximum internal working pressure of
rates should be calibrated using suitable equipment, for
10.3 MPa (1500 psi) and a gasket face load of 225 kN (25 tons)
example, Precision Wet Test Meter. Calibration range shall be
in order to satisfy the requirements of the user and ensure the
consistent with the mass flow leak rate being monitored.
safety of the operator.
Calibration curves shall be generated as needed.
8.4 Care shall be exercised to ensure proper support of
11.4 If liquids are used as the pressuring fluid, the liquid
nitrogen gas cylinders and pressure regulators used for oper-
measuring system should be calibrated using suitable
ating pressure control in accordance with ANSI B57.1.
equipment, for example, Precision Micro Buret. Calibration
range shall be consistent with the liquid flow leak rate being
...


Questions, Comments and Discussion
Ask us and Technical Secretary will try to provide an answer. You can facilitate discussion about the standard in here.
Loading comments...