ASTM F2136-18(2024)
(Test Method)Standard Test Method for Notched, Constant Ligament-Stress (NCLS) Test to Determine Slow-Crack-Growth Resistance of HDPE Resins or HDPE Corrugated Pipe
Standard Test Method for Notched, Constant Ligament-Stress (NCLS) Test to Determine Slow-Crack-Growth Resistance of HDPE Resins or HDPE Corrugated Pipe
SIGNIFICANCE AND USE
4.1 This test method does not purport to interpret the data generated.
4.2 This test method is intended to compare slow-crack-growth (SCG) resistance for a limited set of HDPE resins.
4.3 This test method may be used on virgin HDPE resin compression-molded into a plaque or on extruded HDPE corrugated pipe that is chopped and compression-molded into a plaque (see 7.1.1 for details).
SCOPE
1.1 This test method is used to determine the susceptibility of high-density polyethylene (HDPE) resins or corrugated pipe to slow-crack-growth under a constant ligament-stress in an accelerating environment. This test method is intended to apply only to HDPE of a limited melt index (0.947 g/cm3 to 0.955 g/cm3). This test method may be applicable for other materials, but data are not available for other materials at this time.
1.2 This test method measures the failure time associated with a given test specimen at a constant, specified, ligament-stress level.
1.3 The values stated in inch-pound units are to be regarded as standard. The values given in parentheses are mathematical conversions to SI units that are provided for information only and are not considered standard.
1.4 Definitions are in accordance with Terminology F412, and abbreviations are in accordance with Terminology D1600, unless otherwise specified.
1.5 This standard does not purport to address all of the safety concerns, if any, associated with its use. It is the responsibility of the user of this standard to establish appropriate safety, health, and environmental practices and determine the applicability of regulatory limitations prior to use.
1.6 This international standard was developed in accordance with internationally recognized principles on standardization established in the Decision on Principles for the Development of International Standards, Guides and Recommendations issued by the World Trade Organization Technical Barriers to Trade (TBT) Committee.
General Information
- Status
- Published
- Publication Date
- 31-Jan-2024
- Technical Committee
- F17 - Plastic Piping Systems
- Drafting Committee
- F17.40 - Test Methods
Relations
- Effective Date
- 01-Feb-2024
- Effective Date
- 10-Apr-1999
- Effective Date
- 01-Feb-2024
- Effective Date
- 01-Feb-2024
- Effective Date
- 01-Feb-2024
- Effective Date
- 01-Feb-2024
- Effective Date
- 01-Feb-2024
- Effective Date
- 01-Feb-2024
- Effective Date
- 01-Feb-2024
- Effective Date
- 01-Feb-2024
- Effective Date
- 01-Feb-2024
- Effective Date
- 01-Feb-2024
- Referred By
ASTM F2435-22 - Standard Specification for Steel Reinforced Polyethylene (PE) Corrugated Pipe - Effective Date
- 01-Feb-2024
- Effective Date
- 01-Feb-2024
Overview
ASTM F2136-18(2024) is the international standard test method for conducting the Notched, Constant Ligament-Stress (NCLS) Test to determine the slow-crack-growth (SCG) resistance of high-density polyethylene (HDPE) resins and HDPE corrugated pipe materials. Developed by ASTM International, this standard ensures reliable, comparative testing of HDPE materials against environmental stressors that can lead to slow crack growth-a critical aspect for quality assurance in plastic piping systems.
This test method is applied specifically to HDPE materials with a restricted density and melt index range, and helps manufacturers, researchers, and quality control professionals compare SCG resistance of different resin formulations or pipe structures under controlled, accelerated conditions.
Key Topics
- Constant Ligament-Stress Testing: The NCLS method subjects notched, dumbbell-shaped HDPE test specimens to a maintained ligament stress in a surface-active environment at elevated temperature.
- Material Scope: Applies primarily to HDPE resins and corrugated pipe with densities from 0.947 g/cm³ to 0.955 g/cm³. The method is intended for both virgin resins compression-molded into plaques, or corrugated pipes chopped and compression-molded for testing.
- Measurement and Precision: The core metric is the time to failure at the specified constant stress. Specimen preparation and test conditions, such as precise measurement of specimen dimensions and control of the test environment, are critical for obtaining reliable results.
- Purpose: The standard does not interpret data but enables valid comparison between materials for slow-crack-growth resistance.
Applications
- HDPE Pipe Manufacturing: Quality control and benchmarking of resins or finished pipes to ensure long-term mechanical integrity in sewer, drainage, and other infrastructure projects.
- Plastics Research & Development: Assessment of new HDPE formulations or additives designed to improve slow-crack-growth resistance.
- Regulatory and Compliance Testing: Verifying compliance with product specifications and industry requirements for HDPE piping systems.
- Material Selection: Enabling engineers and designers to select HDPE grades with proven SCG resistance for applications requiring durability under continuous loading and exposure to stress cracking environments.
- Process Optimization: Monitoring the effect of processing variables (e.g., compounding, extrusion, molding) on slow-crack-growth performance.
Related Standards
- ASTM D4703 - Practice for Compression Molding Thermoplastic Materials into Test Specimens, Plaques, or Sheets
- ASTM D1822 - Test Method for Determining the Tensile-Impact Resistance of Plastics
- ASTM D5397 - Test Method for Evaluation of Stress Crack Resistance of Polyolefin Geomembranes Using Notched Constant Tensile Load Test
- ASTM F412 - Terminology Relating to Plastic Piping Systems
- ASTM E4 - Practices for Force Calibration and Verification of Testing Machines
- ASTM E691 - Practice for Conducting an Interlaboratory Study to Determine the Precision of a Test Method
Practical Value
Implementing ASTM F2136-18(2024) allows stakeholders in the plastic piping industry to:
- Identify materials at risk for premature failure due to slow crack growth.
- Benchmark products and processes for market competitiveness and regulatory compliance.
- Enhance the durability and reliability of piping systems in municipal, industrial, and environmental applications.
By providing standardized procedures for NCLS testing, ASTM F2136-18(2024) supports safer, longer-lasting HDPE products and advances best practices in polymer testing and quality control.
Keywords: slow-crack-growth resistance, NCLS test, HDPE pipe, HDPE resin, ASTM F2136, constant ligament-stress, piping quality assurance.
Buy Documents
ASTM F2136-18(2024) - Standard Test Method for Notched, Constant Ligament-Stress (NCLS) Test to Determine Slow-Crack-Growth Resistance of HDPE Resins or HDPE Corrugated Pipe
Get Certified
Connect with accredited certification bodies for this standard

Smithers Quality Assessments
US management systems and product certification.

DIN CERTCO
DIN Group product certification.

IMP NDT d.o.o.
Non-destructive testing services. Radiography, ultrasonic, magnetic particle, penetrant, visual inspection.
Sponsored listings
Frequently Asked Questions
ASTM F2136-18(2024) is a standard published by ASTM International. Its full title is "Standard Test Method for Notched, Constant Ligament-Stress (NCLS) Test to Determine Slow-Crack-Growth Resistance of HDPE Resins or HDPE Corrugated Pipe". This standard covers: SIGNIFICANCE AND USE 4.1 This test method does not purport to interpret the data generated. 4.2 This test method is intended to compare slow-crack-growth (SCG) resistance for a limited set of HDPE resins. 4.3 This test method may be used on virgin HDPE resin compression-molded into a plaque or on extruded HDPE corrugated pipe that is chopped and compression-molded into a plaque (see 7.1.1 for details). SCOPE 1.1 This test method is used to determine the susceptibility of high-density polyethylene (HDPE) resins or corrugated pipe to slow-crack-growth under a constant ligament-stress in an accelerating environment. This test method is intended to apply only to HDPE of a limited melt index (0.947 g/cm3 to 0.955 g/cm3). This test method may be applicable for other materials, but data are not available for other materials at this time. 1.2 This test method measures the failure time associated with a given test specimen at a constant, specified, ligament-stress level. 1.3 The values stated in inch-pound units are to be regarded as standard. The values given in parentheses are mathematical conversions to SI units that are provided for information only and are not considered standard. 1.4 Definitions are in accordance with Terminology F412, and abbreviations are in accordance with Terminology D1600, unless otherwise specified. 1.5 This standard does not purport to address all of the safety concerns, if any, associated with its use. It is the responsibility of the user of this standard to establish appropriate safety, health, and environmental practices and determine the applicability of regulatory limitations prior to use. 1.6 This international standard was developed in accordance with internationally recognized principles on standardization established in the Decision on Principles for the Development of International Standards, Guides and Recommendations issued by the World Trade Organization Technical Barriers to Trade (TBT) Committee.
SIGNIFICANCE AND USE 4.1 This test method does not purport to interpret the data generated. 4.2 This test method is intended to compare slow-crack-growth (SCG) resistance for a limited set of HDPE resins. 4.3 This test method may be used on virgin HDPE resin compression-molded into a plaque or on extruded HDPE corrugated pipe that is chopped and compression-molded into a plaque (see 7.1.1 for details). SCOPE 1.1 This test method is used to determine the susceptibility of high-density polyethylene (HDPE) resins or corrugated pipe to slow-crack-growth under a constant ligament-stress in an accelerating environment. This test method is intended to apply only to HDPE of a limited melt index (0.947 g/cm3 to 0.955 g/cm3). This test method may be applicable for other materials, but data are not available for other materials at this time. 1.2 This test method measures the failure time associated with a given test specimen at a constant, specified, ligament-stress level. 1.3 The values stated in inch-pound units are to be regarded as standard. The values given in parentheses are mathematical conversions to SI units that are provided for information only and are not considered standard. 1.4 Definitions are in accordance with Terminology F412, and abbreviations are in accordance with Terminology D1600, unless otherwise specified. 1.5 This standard does not purport to address all of the safety concerns, if any, associated with its use. It is the responsibility of the user of this standard to establish appropriate safety, health, and environmental practices and determine the applicability of regulatory limitations prior to use. 1.6 This international standard was developed in accordance with internationally recognized principles on standardization established in the Decision on Principles for the Development of International Standards, Guides and Recommendations issued by the World Trade Organization Technical Barriers to Trade (TBT) Committee.
ASTM F2136-18(2024) is classified under the following ICS (International Classification for Standards) categories: 19.060 - Mechanical testing; 83.140.01 - Rubber and plastics products in general. The ICS classification helps identify the subject area and facilitates finding related standards.
ASTM F2136-18(2024) has the following relationships with other standards: It is inter standard links to ASTM F2136-18, ASTM D1822-99, ASTM F2986-23, ASTM F2306/F2306M-21, ASTM F3390-20, ASTM F2562/F2562M-15(2019), ASTM F3181-16(2023), ASTM F2763/F2763M-16(2021)e1, ASTM F2764/F2764M-23, ASTM F2987-12(2018), ASTM F2947/F2947M-21a, ASTM F2922-13(2018), ASTM F2435-22, ASTM F2648/F2648M-23. Understanding these relationships helps ensure you are using the most current and applicable version of the standard.
ASTM F2136-18(2024) is available in PDF format for immediate download after purchase. The document can be added to your cart and obtained through the secure checkout process. Digital delivery ensures instant access to the complete standard document.
Standards Content (Sample)
This international standard was developed in accordance with internationally recognized principles on standardization established in the Decision on Principles for the
Development of International Standards, Guides and Recommendations issued by the World Trade Organization Technical Barriers to Trade (TBT) Committee.
Designation: F2136 − 18 (Reapproved 2024)
Standard Test Method for
Notched, Constant Ligament-Stress (NCLS) Test to
Determine Slow-Crack-Growth Resistance of HDPE Resins
or HDPE Corrugated Pipe
This standard is issued under the fixed designation F2136; the number immediately following the designation indicates the year of
original adoption or, in the case of revision, the year of last revision. A number in parentheses indicates the year of last reapproval. A
superscript epsilon (´) indicates an editorial change since the last revision or reapproval.
1. Scope 2. Referenced Documents
2.1 ASTM Standards:
1.1 This test method is used to determine the susceptibility
of high-density polyethylene (HDPE) resins or corrugated pipe D1600 Terminology for Abbreviated Terms Relating to Plas-
tics (Withdrawn 2024)
to slow-crack-growth under a constant ligament-stress in an
accelerating environment. This test method is intended to apply D1822 Test Method for Determining the Tensile-Impact
Resistance of Plastics
only to HDPE of a limited melt index (<0.4 to 0.15) and
3 3
density range (>0.947 g ⁄cm to 0.955 g ⁄cm ). This test method D4703 Practice for Compression Molding Thermoplastic
Materials into Test Specimens, Plaques, or Sheets
may be applicable for other materials, but data are not available
for other materials at this time. D5397 Test Method for Evaluation of Stress Crack Resis-
tance of Polyolefin Geomembranes Using Notched Con-
1.2 This test method measures the failure time associated
stant Tensile Load Test
with a given test specimen at a constant, specified, ligament-
E4 Practices for Force Calibration and Verification of Test-
stress level.
ing Machines
1.3 The values stated in inch-pound units are to be regarded
E691 Practice for Conducting an Interlaboratory Study to
as standard. The values given in parentheses are mathematical
Determine the Precision of a Test Method
conversions to SI units that are provided for information only
F412 Terminology Relating to Plastic Piping Systems
and are not considered standard.
3. Summary of Test Method
1.4 Definitions are in accordance with Terminology F412,
and abbreviations are in accordance with Terminology D1600,
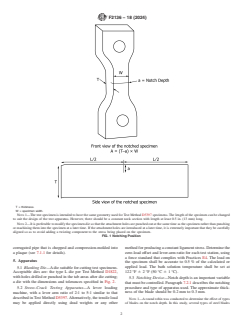
3.1 This test method subjects a dumbbell-shaped, notched
unless otherwise specified. test-specimen (Fig. 1) to a constant ligament-stress in the
presence of a surface-active agent at an elevated temperature.
1.5 This standard does not purport to address all of the
It differs from Test Method D5397 in that a constant ligament
safety concerns, if any, associated with its use. It is the
stress is used instead of a constant tensile load.
responsibility of the user of this standard to establish appro-
priate safety, health, and environmental practices and deter-
4. Significance and Use
mine the applicability of regulatory limitations prior to use.
4.1 This test method does not purport to interpret the data
1.6 This international standard was developed in accor-
generated.
dance with internationally recognized principles on standard-
ization established in the Decision on Principles for the
4.2 This test method is intended to compare slow-crack-
Development of International Standards, Guides and Recom-
growth (SCG) resistance for a limited set of HDPE resins.
mendations issued by the World Trade Organization Technical
4.3 This test method may be used on virgin HDPE resin
Barriers to Trade (TBT) Committee.
compression-molded into a plaque or on extruded HDPE
1 2
This test method is under the jurisdiction of ASTM Committee F17 on Plastic For referenced ASTM standards, visit the ASTM website, www.astm.org, or
Piping Systems and is the direct responsibility of Subcommittee F17.40 on Test contact ASTM Customer Service at service@astm.org. For Annual Book of ASTM
Methods. Standards volume information, refer to the standard’s Document Summary page on
Current edition approved Feb. 1, 2024. Published February 2024. Originally the ASTM website.
approved in 2001. Last previous edition approved in 2018 as F2136 – 18. DOI: The last approved version of this historical standard is referenced on
10.1520/F2136-18R24. www.astm.org.
Copyright © ASTM International, 100 Barr Harbor Drive, PO Box C700, West Conshohocken, PA 19428-2959. United States
F2136 − 18 (2024)
T = thickness.
W = specimen width.
NOTE 1—The test specimen is intended to have the same geometry used for Test Method D5397 specimens. The length of the specimen can be changed
to suit the design of the test apparatus. However, there should be a constant neck section with length at least 0.5 in. (13 mm) long.
NOTE 2—It is preferable to modify the specimen die so that the attachment holes are punched out at the same time as the specimen rather than punching
or machining them into the specimen at a later time. If the attachment holes are introduced at a later time, it is extremely important that they be carefully
aligned so as to avoid adding a twisting component to the stress being placed on the specimen.
FIG. 1 Notching Position
corrugated pipe that is chopped and compression-molded into method for producing a constant ligament stress. Determine the
a plaque (see 7.1.1 for details). zero-load offset and lever-arm ratio for each test station, using
a force standard that complies with Practices E4. The load on
5. Apparatus
the specimen shall be accurate to 0.5 % of the calculated or
applied load. The bath solution temperature shall be set at
5.1 Blanking Die—A die suitable for cutting test specimens.
122 °F 6 2 °F (50 °C 6 1 °C).
Acceptable dies are: the type L die per Test Method D1822,
with holes drilled or punched in the tab areas after die cutting;
5.3 Notching Device—Notch depth is an important variable
a die with the dimensions and tolerances specified in Fig. 2.
that must be controlled. Paragraph 7.2.1 describes the notching
procedure and type of apparatus used. The approximate thick-
5.2 Stress-Crack Testing Apparatus—A lever loading
ness of the blade should be 0.2 mm to 0.3 mm.
machine, with a lever arm ratio of 2:1 to 5:1 similar to that
described in Test Method D5397. Alternatively, the tensile load
NOTE 1—A round robin was conducted to determine the effect of types
may be applied directly using dead weights or any other of blades on the notch depth. In this study, several types of steel blades
F2136 − 18 (2024)
effect by molding into a plaque. Chop and mold a pipe
specimen in accordance with the following procedure. Cut 1 in.
(25 mm) wide sections from the pipe along its longitudinal
axis. To randomize the orientation, cut these sections into
smaller pieces until there is about 1 lb (0.5 kg) of material.
These sections represent a complete cross-sectional sample
from the inside to the outside of the pipe specimen. Compres-
sion mold a plaque as previously stated. If different materials
are used for the inner and outer wall of dual wall pipe, each
wall must be tested separately.
7.1.2 Die cut test specimens from the sheet, and make holes
in the specimen as shown in Fig. 1.
7.1.3 Specimen tolerances are as follows:
Length = 2.36 in. ± 0.01 in. (60.00 mm ± 0.25 mm)
Width = 0.125 in. ± 0.001 in. (3.20 mm ± 0.02 mm)
Thickness = 0.075 in. ± 0.003 in. (1.90 mm ± 0.08 mm)
7.2 Notching:
7.2.1 Notch specimens across the center of the 0.125 in.
(3.20 mm) wide, 0.500 in. (12.7 mm) long reduced section as
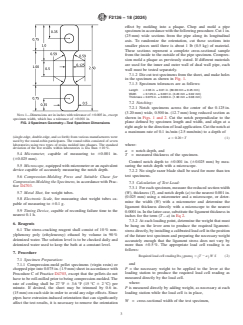
NOTE 1—Dimensions are in inches with tolerance of 60.005 in., except
shown in Figs. 1 and 2. Cut the notch perpendicular to the
specimen width, which has a tolerance of 60.001 in.
plane defined by specimen length and width, and align at a
FIG. 2 Specimen Geometry—Test Specimen Dimensions
right angle to the direction of load application. Cut the notch at
a maximum rate of 0.1 in./min (2.5 mm/min) to a depth of
(single-edge, double-edge, and so forth) from various manufacturers were
a 5 0.20 × T (1)
used by the round-robin participants. The round robin consisted of seven
laboratories using two types of resins molded into plaques. The standard
where:
deviation of the test results within laboratories is less than 610 %.
a = notch depth, and
5.4 Micrometer, capable of measuring to 60.001 in.
T = measured thickness of the specimen.
(60.025 mm).
C
...


Questions, Comments and Discussion
Ask us and Technical Secretary will try to provide an answer. You can facilitate discussion about the standard in here.
Loading comments...