ASTM F2156-17(2022)
(Test Method)Standard Test Method for Measuring Optical Distortion in Transparent Parts Using Grid Line Slope
Standard Test Method for Measuring Optical Distortion in Transparent Parts Using Grid Line Slope
SIGNIFICANCE AND USE
5.1 Transparent parts, such as aircraft windshields, canopies, cabin windows, and visors, shall be measured for compliance with optical distortion specifications using this test method. This test method is suitable for assessing optical distortion of transparent parts as it relates to the visual perception of distortion. It is not suitable for assessing distortion as it relates to pure angular deviation of light as it passes through the part. Either Test Method F801 or Practice F733 is appropriate and shall be used for this latter application. This test method is not recommended for raw material.
SCOPE
1.1 When an observer looks through an aerospace transparency, relative optical distortion results, specifically in thick, highly angled, multilayered plastic parts. Distortion occurs in all transparencies but is especially critical to aerospace applications such as combat and commercial aircraft windscreens, canopies, or cabin windows. This is especially true during operations such as takeoff, landing, and aerial refueling. It is critical to be able to quantify optical distortion for procurement activities.
1.2 This test method covers the apparatus and procedures that are suitable for measuring the grid line slope (GLS) of transparent parts, including those that are small or large, thin or thick, flat or curved, or already installed. This test method is not recommended for raw material.
1.3 The values stated in SI units are to be regarded as standard. No other units of measurement are included in this standard.
1.3.1 Exception—The values given in parentheses are for information only.
1.4 This standard does not purport to address all of the safety concerns, if any, associated with its use. It is the responsibility of the user of this standard to establish appropriate safety, health, and environmental practices and determine the applicability of regulatory limitations prior to use.
1.5 This international standard was developed in accordance with internationally recognized principles on standardization established in the Decision on Principles for the Development of International Standards, Guides and Recommendations issued by the World Trade Organization Technical Barriers to Trade (TBT) Committee.
General Information
- Status
- Published
- Publication Date
- 30-Apr-2022
- Technical Committee
- F07 - Aerospace and Aircraft
- Drafting Committee
- F07.08 - Transparent Enclosures and Materials
Relations
- Effective Date
- 01-Nov-2019
- Effective Date
- 01-Dec-2014
- Effective Date
- 01-May-2014
- Effective Date
- 01-May-2013
- Effective Date
- 01-May-2013
- Effective Date
- 01-Nov-2011
- Effective Date
- 01-Oct-2010
- Effective Date
- 15-May-2009
- Effective Date
- 01-Oct-2008
- Effective Date
- 01-Oct-2008
- Effective Date
- 01-Apr-2008
- Refers
ASTM E177-06b - Standard Practice for Use of the Terms Precision and Bias in ASTM Test Methods - Effective Date
- 15-Nov-2006
- Refers
ASTM E177-06a - Standard Practice for Use of the Terms Precision and Bias in ASTM Test Methods - Effective Date
- 01-Nov-2006
- Effective Date
- 01-Nov-2005
- Refers
ASTM E177-04e1 - Standard Practice for Use of the Terms Precision and Bias in ASTM Test Methods - Effective Date
- 01-Nov-2004
Overview
ASTM F2156-17(2022), the Standard Test Method for Measuring Optical Distortion in Transparent Parts Using Grid Line Slope, provides a standardized procedure to quantify visual optical distortion in transparent components. This test method is recognized for its significance in critical industries, particularly aerospace, where performance and safety depend on clear, undistorted vision through components like windshields, canopies, cabin windows, and visors. It is specifically intended for use on finished parts in their installed position and is not recommended for raw materials.
By employing a grid line slope (GLS) assessment, the standard enables accurate evaluation of distortion as perceived visually-not in terms of pure angular light deviation. This distinction is crucial for applications where human observation and optical clarity are essential for operational effectiveness and safety.
Key Topics
Purpose of Measurement
Evaluation of visual distortion in aerospace transparencies-essential for pilot safety and mission effectiveness.Test Method Scope
Suitable for transparent parts of varying size, thickness, shape (flat or curved), and installation status. Not applicable to raw materials.Grid Line Slope (GLS)
Defines optical distortion as the ratio of deviation (slope) of grid lines observed through the transparency compared to a non-distorted baseline.Apparatus and Procedures
- Grid boards (string or printed grid with high-contrast black-and-white design)
- High-resolution cameras (film or digital)
- Drafting machines or manual measurement tools for analyzing photographs
- Specific standardized test room setups to minimize reflective interference
Measurement Process
The test part is positioned at an installed angle and photographed through a grid board. The maximum slope of distorted grid lines, either horizontally or vertically, is measured and expressed as a GLS ratio (e.g., 1 in 17 indicates high optical quality).Reporting Requirements
Includes detailed information on the part, measurement setup, apparatus, and observed GLS values.
Applications
Aerospace Industry:
- Combat and Commercial Aircraft: Ensures critical transparencies-windscreens, canopies, and windows-adhere to strict optical distortion limits, reducing visual error during takeoff, landing, and aerial operations.
- Procurement and Quality Control: Provides a quantifiable standard for suppliers and manufacturers to meet end-user requirements.
- Installed Parts: Ideal for assessing both newly manufactured and already-installed aerospace transparencies to confirm continued compliance.
Other Industries:
- Any sector requiring exacting standards for visual clarity through transparent parts, such as transportation, defense vehicles, and advanced marine craft.
Related Standards
- ASTM F801: Test Method for Measuring Optical Angular Deviation of Transparent Parts-applied when measurement is based on the angular deviation of light rather than visual distortion.
- ASTM F733: Practice for Optical Distortion and Deviation of Transparent Parts Using the Double-Exposure Method.
- ASTM E177: Guidance on the use of terms precision and bias in ASTM test methods.
- ASTM E691: Guidance for conducting interlaboratory studies to determine the precision of a test method.
Keywords: optical distortion, grid line slope, aerospace transparency, ASTM F2156, aircraft windscreen distortion, canopy visual quality, transparency testing, cabin window clarity, standard test method, grid board optical evaluation
ASTM F2156-17(2022) is essential for organizations demanding the highest standards in optical performance of transparent parts, ensuring safety, compliance, and operational reliability.
Buy Documents
ASTM F2156-17(2022) - Standard Test Method for Measuring Optical Distortion in Transparent Parts Using Grid Line Slope
Get Certified
Connect with accredited certification bodies for this standard

DEKRA North America
DEKRA certification services in North America.

Eagle Registrations Inc.
American certification body for aerospace and defense.

Element Materials Technology
Materials testing and product certification.
Sponsored listings
Frequently Asked Questions
ASTM F2156-17(2022) is a standard published by ASTM International. Its full title is "Standard Test Method for Measuring Optical Distortion in Transparent Parts Using Grid Line Slope". This standard covers: SIGNIFICANCE AND USE 5.1 Transparent parts, such as aircraft windshields, canopies, cabin windows, and visors, shall be measured for compliance with optical distortion specifications using this test method. This test method is suitable for assessing optical distortion of transparent parts as it relates to the visual perception of distortion. It is not suitable for assessing distortion as it relates to pure angular deviation of light as it passes through the part. Either Test Method F801 or Practice F733 is appropriate and shall be used for this latter application. This test method is not recommended for raw material. SCOPE 1.1 When an observer looks through an aerospace transparency, relative optical distortion results, specifically in thick, highly angled, multilayered plastic parts. Distortion occurs in all transparencies but is especially critical to aerospace applications such as combat and commercial aircraft windscreens, canopies, or cabin windows. This is especially true during operations such as takeoff, landing, and aerial refueling. It is critical to be able to quantify optical distortion for procurement activities. 1.2 This test method covers the apparatus and procedures that are suitable for measuring the grid line slope (GLS) of transparent parts, including those that are small or large, thin or thick, flat or curved, or already installed. This test method is not recommended for raw material. 1.3 The values stated in SI units are to be regarded as standard. No other units of measurement are included in this standard. 1.3.1 Exception—The values given in parentheses are for information only. 1.4 This standard does not purport to address all of the safety concerns, if any, associated with its use. It is the responsibility of the user of this standard to establish appropriate safety, health, and environmental practices and determine the applicability of regulatory limitations prior to use. 1.5 This international standard was developed in accordance with internationally recognized principles on standardization established in the Decision on Principles for the Development of International Standards, Guides and Recommendations issued by the World Trade Organization Technical Barriers to Trade (TBT) Committee.
SIGNIFICANCE AND USE 5.1 Transparent parts, such as aircraft windshields, canopies, cabin windows, and visors, shall be measured for compliance with optical distortion specifications using this test method. This test method is suitable for assessing optical distortion of transparent parts as it relates to the visual perception of distortion. It is not suitable for assessing distortion as it relates to pure angular deviation of light as it passes through the part. Either Test Method F801 or Practice F733 is appropriate and shall be used for this latter application. This test method is not recommended for raw material. SCOPE 1.1 When an observer looks through an aerospace transparency, relative optical distortion results, specifically in thick, highly angled, multilayered plastic parts. Distortion occurs in all transparencies but is especially critical to aerospace applications such as combat and commercial aircraft windscreens, canopies, or cabin windows. This is especially true during operations such as takeoff, landing, and aerial refueling. It is critical to be able to quantify optical distortion for procurement activities. 1.2 This test method covers the apparatus and procedures that are suitable for measuring the grid line slope (GLS) of transparent parts, including those that are small or large, thin or thick, flat or curved, or already installed. This test method is not recommended for raw material. 1.3 The values stated in SI units are to be regarded as standard. No other units of measurement are included in this standard. 1.3.1 Exception—The values given in parentheses are for information only. 1.4 This standard does not purport to address all of the safety concerns, if any, associated with its use. It is the responsibility of the user of this standard to establish appropriate safety, health, and environmental practices and determine the applicability of regulatory limitations prior to use. 1.5 This international standard was developed in accordance with internationally recognized principles on standardization established in the Decision on Principles for the Development of International Standards, Guides and Recommendations issued by the World Trade Organization Technical Barriers to Trade (TBT) Committee.
ASTM F2156-17(2022) is classified under the following ICS (International Classification for Standards) categories: 49.035 - Components for aerospace construction. The ICS classification helps identify the subject area and facilitates finding related standards.
ASTM F2156-17(2022) has the following relationships with other standards: It is inter standard links to ASTM F733-19, ASTM F733-09(2014), ASTM E177-14, ASTM E691-13, ASTM E177-13, ASTM E691-11, ASTM E177-10, ASTM F733-09, ASTM E691-08, ASTM E177-08, ASTM F801-96(2008), ASTM E177-06b, ASTM E177-06a, ASTM E691-05, ASTM E177-04e1. Understanding these relationships helps ensure you are using the most current and applicable version of the standard.
ASTM F2156-17(2022) is available in PDF format for immediate download after purchase. The document can be added to your cart and obtained through the secure checkout process. Digital delivery ensures instant access to the complete standard document.
Standards Content (Sample)
This international standard was developed in accordance with internationally recognized principles on standardization established in the Decision on Principles for the
Development of International Standards, Guides and Recommendations issued by the World Trade Organization Technical Barriers to Trade (TBT) Committee.
Designation: F2156 − 17 (Reapproved 2022)
Standard Test Method for
Measuring Optical Distortion in Transparent Parts Using
Grid Line Slope
This standard is issued under the fixed designation F2156; the number immediately following the designation indicates the year of
original adoption or, in the case of revision, the year of last revision. A number in parentheses indicates the year of last reapproval. A
superscript epsilon (´) indicates an editorial change since the last revision or reapproval.
1. Scope 2. Referenced Documents
2.1 ASTM Standards:
1.1 When an observer looks through an aerospace
transparency, relative optical distortion results, specifically in E177 Practice for Use of the Terms Precision and Bias in
ASTM Test Methods
thick, highly angled, multilayered plastic parts. Distortion
occurs in all transparencies but is especially critical to aero- E691 Practice for Conducting an Interlaboratory Study to
Determine the Precision of a Test Method
space applications such as combat and commercial aircraft
windscreens, canopies, or cabin windows. This is especially F733 Practice for Optical Distortion and Deviation of Trans-
parent Parts Using the Double-Exposure Method
true during operations such as takeoff, landing, and aerial
refueling. It is critical to be able to quantify optical distortion F801 Test Method for Measuring OpticalAngular Deviation
of Transparent Parts
for procurement activities.
1.2 This test method covers the apparatus and procedures
3. Terminology
that are suitable for measuring the grid line slope (GLS) of
3.1 Definitions of Terms Specific to This Standard:
transparent parts, including those that are small or large, thin or
3.1.1 design eye, n—the reference point in aircraft design
thick, flat or curved, or already installed. This test method is
from which all anthropometrical design considerations are
not recommended for raw material.
taken.
1.3 The values stated in SI units are to be regarded as
3.1.2 distortion, n—the rate of change of deviation resulting
standard. No other units of measurement are included in this
from an irregularity in a transparent part.
standard.
3.1.2.1 Discussion—Distortion shall be expressed as the
1.3.1 Exception—The values given in parentheses are for
slope of the angle of localized grid line bending, for example,
information only.
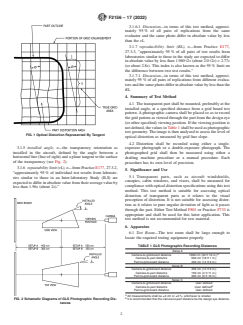
1 in 5 (see Fig. 1).
1.4 This standard does not purport to address all of the
3.1.3 grid board, n—an optical evaluation tool used to
safety concerns, if any, associated with its use. It is the
detect the presence of distortion in transparent parts.
responsibility of the user of this standard to establish appro-
3.1.3.1 Discussion—The grid board is usually, but not
priate safety, health, and environmental practices and deter-
always, a vertical rectangular backboard with horizontal and
mine the applicability of regulatory limitations prior to use.
vertical intersecting lines with maximum contrast between the
1.5 This international standard was developed in accor-
white lines and the black background.
dance with internationally recognized principles on standard-
3.1.4 grid line slope, n—an optical distortion evaluation
ization established in the Decision on Principles for the
parameterthatcomparestheslopeofadeviatedgridlinetothat
Development of International Standards, Guides and Recom-
of a nondeviated grid line.
mendations issued by the World Trade Organization Technical
3.1.4.1 Discussion—The degree of deviation shall be indi-
Barriers to Trade (TBT) Committee.
cated by a ratio, for example, 1 in 2, 1 in 8, or 1 in 20 (the
visual optical quality improves as the second number gets
larger.)
This test method is under the jurisdiction of ASTM Committee F07 on
Aerospace and Aircraft and is the direct responsibility of Subcommittee F07.08 on
Transparent Enclosures and Materials. For referenced ASTM standards, visit the ASTM website, www.astm.org, or
Current edition approved May 1, 2022. Published June 2022. Originally contact ASTM Customer Service at service@astm.org. For Annual Book of ASTM
approved in 2001. Last previous edition approved in 2017 as F2156 – 17. DOI: Standards volume information, refer to the standard’s Document Summary page on
10.1520/F2156-17R22. the ASTM website.
Copyright © ASTM International, 100 Barr Harbor Drive, PO Box C700, West Conshohocken, PA 19428-2959. United States
F2156 − 17 (2022)
3.1.6.1 Discussion—in terms of this test method, approxi-
mately 95 % of all pairs of replications from the same
evaluator and the same photo differ in absolute value by less
than the rL.
3.1.7 reproducibility limit (RL), n—from Practice E177,
27.3.3, “approximately 95 % of all pairs of test results from
laboratories similar to those in the study are expected to differ
in absolute value by less than 1.960√2s (about 2.0√2s) = 2.77s
(or about 2.8s). This index is also known as the 95 % limit on
the difference between two test results.”
3.1.7.1 Discussion—in terms of this test method, approxi-
mately 95 % of all pairs of replications from different evalua-
tors and the same photo differ in absolute value by less than the
RL.
4. Summary of Test Method
4.1 The transparent part shall be mounted, preferably at the
installed angle, at a specified distance from a grid board test
pattern. A photographic camera shall be placed so as to record
the grid pattern as viewed through the part from the design eye
(or other specified) viewing position. If the viewing position is
not defined, the values in Table 1 shall be used as photographic
test geometry.The image is then analyzed to assess the level of
FIG. 1 Optical Distortion Represented By Tangent
optical distortion as measured by grid line slope.
4.2 Distortion shall be recorded using either a single-
3.1.5 installed angle, n—the transparency orientation as
exposure photograph or a double-exposure photograph. The
installed in the aircraft, defined by the angle between a
photographed grid shall then be measured using either a
horizontal line (line of sight) and a plane tangent to the surface
drafting machine procedure or a manual procedure. Each
of the transparency (see Fig. 2).
procedure has its own level of precision.
3.1.6 repeatability limit (rL), n—fromPracticeE177,27.3.2,
5. Significance and Use
“approximately 95 % of individual test results from laborato-
5.1 Transparent parts, such as aircraft windshields,
ries similar to those in an Inter-laboratory Study (ILS) are
canopies, cabin windows, and visors, shall be measured for
expected to differ in absolute value from their average value by
compliance with optical distortion specifications using this test
less than 1.96s (about 2s).”
method. This test method is suitable for assessing optical
distortion of transparent parts as it relates to the visual
perception of distortion. It is not suitable for assessing distor-
tion as it relates to pure angular deviation of light as it passes
through the part. Either Test Method F801 or Practice F733 is
appropriate and shall be used for this latter application. This
test method is not recommended for raw material.
6. Apparatus
6.1 Test Room—The test room shall be large enough to
locate the required testing equipment properly.
TABLE 1 GLS Photographic Recording Distances
Setup A
A
Camera-to-grid-board distance 1000 cm (32 ft 10 in.)
Camera-to-part distance 550 cm (18 ft 1 in.)
Part-to-grid-board distance 450 cm (14 ft 9 in.)
Setup B
Camera-to-grid-board distance 450 cm (14 ft 9 in.)
Camera-to-part distance 150 cm (4 ft 11 in.)
Part-to-grid-board distance 300 cm (9 ft 10 in.)
Setup C
Camera-to-grid-board distance User defined
B
Camera-to-part distance User defined
Part-to-grid-board distance User defined
A
All measurements shall be ±3 cm or ±3 %, whichever is smaller.
B
FIG. 2 Schematic Diagrams of GLS Photographic Recording Dis-
It is recommended that the camera-to-part distance be the design eye distance.
tances
F2156 − 17 (2022)
6.1.1 Setup A requires a room approximately 12 m (40 ft)
long.
6.1.2 Setup B requires a room approximately 7 m (23 ft)
long.
6.1.3 Setup C: other distances shall be used if desired. GLS
results will vary with different distances, which means that
measurements of different parts taken at different distances
cannot be compared.
6.1.4 The walls, ceiling, and floor shall have low reflec-
tance. A flat black paint or coating is preferred though not
required.
6.2 Grid Board—The grid board shall provide a defined
pattern against which the transparent part is examined. Grid
boards shall be one of the following types:
6.2.1 Type 1—The grid board shall be composed of white
strings held taut, each spaced at a specific interval, with the
strings stretched vertically and horizontally. The grid board
frame and background shall have a flat black finish to reduce
light reflection. A bank of fluorescent lights at each side or
evenly distributed natural sunlight conditions provide illumi-
nation of the strings.
6.2.2 Type 2—The grid board shall be a transparent sheet
having an opaque, flat black outer surface except for the grid
lines. The grid lines remain transparent, and when backlit with
fluorescent or incandescent lights, provide a bright grid pattern
FIG. 3 GLS Double-Exposure Recording Technique
against a black background with excellent contrast character-
istics.
6.5 Manual Procedure—Measurements shall be made using
6.2.3 Type 3—The grid board shall be a rigid sheet of
high-quality drafting instruments (for example, metal scales,
material that has a grid pattern printed on the front surface.
right triangle).
Details of the grid lines, pattern, and lighting shall be as
specified by the procuring activity.
7. Test Specimen
6.2.4 The grid board shall have a width and height large
7.1 The transparency to be measured shall be cleaned, using
enough so that the area of the part to be imaged is superim-
the manufacturer or procuring agency approved procedure, to
posed within the perimeter of the grid board. Details of the grid
remove any foreign material that might cause localized optical
square size shall be as specified by the procuring activity. The
distortion.Unlessspecifiedbytheprocuringactivity,nospecial
recommended grid line spacing shall be not less than 1.27 cm
1 conditioning, other than cleaning, shall be required and the part
( ⁄2 in.) or more than 2.54 cm (1 in.).
shall be at ambient temperature. If required, a mask shall be
6.3 Camera—The camera shall be used to photograph
applied to the transparency to eliminate non-optical zones.
distortion for the evaluation of grid line slope. For highest
resolution, it is recommended that a large format camera be
8. Calibration and Standardization
used, although a 35-mm camera is also acceptable. Black-and-
8.1 Test Procedure Geometry—Distance measurements
white film shall be 400 ASA (or slower). Use of a digital
shall be made using a high-quality tape measure.
camera is permitted if it has sufficiently high resolution (that is,
8.2 Drafting Machine Procedure—Measurements shall be
with no visible pixilation in the printed image). When using a
made using high-quality drafting instruments. The drafting
double-exposure recording technique (Fig. 3), the film-based
machineshallbeaccuratetowithinitsspecifiedmanufacturer’s
camera shall have a double-exposure capability. Separate
tolerances.
digital images are superimposed using a computer-based photo
editor. The camera lens shall have very low distortion charac-
8.3 Manual Procedure—Measurements shall be made using
teristics. The camera shall be firmly mounted at design eye (or
high-quality drafting instruments (for example, metal scales,
other specified viewing position) to prevent any movement
right triangle).
during the photographic exposure.
9. Procedure
6.4 Drafting Machine Procedure—The drafting machine
shall consist of a vertical and horizontal scale attached to a 9.1 Photographic Recording Techniques:
rotating head that displays the angular position of the horizon- 9.1.1 The procuring activity specifies whether Setup A, B,
tal or vertical scale in degrees with a resolution of at least 1 arc o
...


Questions, Comments and Discussion
Ask us and Technical Secretary will try to provide an answer. You can facilitate discussion about the standard in here.
Loading comments...