ASTM D950-03(2020)e1
(Test Method)Standard Test Method for Impact Strength of Adhesive Bonds
Standard Test Method for Impact Strength of Adhesive Bonds
SIGNIFICANCE AND USE
4.1 Adhesives can fail under a sudden impact load and not under a slowly applied load of the same or greater force.
4.2 This test method can be used to compare the sensitivity of various adhesives to suddenly applied loads.
SCOPE
1.1 This test method covers the determination of the comparative impact strength of adhesive bonds in shear, when tested on standard specimens under specified conditions of preparation, conditioning, and testing.
1.2 The values stated in SI units are to be regarded as the standard. The values in parentheses are for information only.
1.3 This standard does not purport to address all of the safety concerns, if any, associated with its use. It is the responsibility of the user of this standard to establish appropriate safety, health, and environmental practices and determine the applicability of regulatory limitations prior to use.
1.4 This international standard was developed in accordance with internationally recognized principles on standardization established in the Decision on Principles for the Development of International Standards, Guides and Recommendations issued by the World Trade Organization Technical Barriers to Trade (TBT) Committee.
General Information
- Status
- Published
- Publication Date
- 31-Dec-2019
- Technical Committee
- D14 - Adhesives
- Drafting Committee
- D14.80 - Metal Bonding Adhesives
Relations
- Effective Date
- 01-Jan-2020
- Effective Date
- 01-Apr-2024
- Effective Date
- 01-Mar-2024
- Effective Date
- 01-Apr-2020
- Effective Date
- 01-Oct-2019
- Effective Date
- 01-Nov-2018
- Effective Date
- 01-Apr-2017
- Effective Date
- 01-Apr-2016
- Effective Date
- 01-Jan-2016
- Effective Date
- 01-May-2015
- Effective Date
- 01-Oct-2013
- Effective Date
- 15-Aug-2013
- Effective Date
- 15-Nov-2012
- Effective Date
- 01-Nov-2012
- Effective Date
- 01-Oct-2012
Overview
ASTM D950-03(2020)e1 is an international standard developed by ASTM International to establish a consistent and reliable method for measuring impact strength of adhesive bonds in shear. The Standard Test Method for Impact Strength of Adhesive Bonds is essential for industries where adhesives may be subjected to sudden impact loads that could cause failure, even when such loads would not cause failure if applied gradually. This test provides a comparative evaluation of adhesive performance under impact conditions, supporting research, development, procurement, and quality control in adhesive technology.
Key Topics
- Adhesive Bond Impact Strength: The standard outlines procedures to determine the energy absorbed by adhesive bonds in shear, expressed as impact strength, when subjected to a single blow from a standardized testing machine.
- Test Specimens and Preparation: Guidelines are provided for the preparation, conditioning, and assembly of standard metal-to-metal specimens for testing. The specific preparation, including surface treatment and adhesive application, should follow manufacturer recommendations.
- Testing Apparatus: The method uses a pendulum-type impact machine, along with a specially designed jig to securely hold specimens and ensure accurate testing.
- Test Conditions: Detailed instructions cover specimen placement, impact energy determination, and environmental conditioning to ensure repeatable and meaningful results.
- Data Recording and Reporting: Users are instructed to document detailed information on adhesive identification, specimen preparation, testing conditions, and failure modes (cohesion, adhesion, or contact failures).
Applications
This ASTM standard is widely used in applications such as:
- Adhesive Selection and Product Comparison: Manufacturers and purchasers can compare the sensitivity of various adhesives to sudden impacts, aiding in the selection of the most suitable product for applications from automotive and aerospace to electronics and construction.
- Quality Assurance: Routine testing following ASTM D950 ensures consistent manufacturing quality and supports compliance with industry requirements.
- Research and Development: Material scientists and R&D teams use the impact strength data to improve adhesives or forecast product performance under real-world impact conditions.
- Failure Analysis: Provides a basis for better understanding and diagnosing adhesive failures arising from sudden mechanical shocks.
Related Standards
For a comprehensive approach to evaluating adhesive bonds under various conditions, consider these related ASTM standards:
- ASTM D905: Test Method for Strength Properties of Adhesive Bonds in Shear by Compression Loading.
- ASTM D907: Standard Terminology of Adhesives, which provides definitions for terms used throughout adhesive testing standards.
- ASTM E23: Test Methods for Notched Bar Impact Testing of Metallic Materials, relevant for calibrating impact testing machines.
- Referenced Material Specifications: Standards such as ASTM B16/B16M for brass, ASTM B133 for copper, ASTM B211 for aluminum, and ASTM B139/B139M for phosphor bronze are commonly used in preparing test specimens.
Practical Value
By following ASTM D950-03(2020)e1, organizations gain:
- Reliable, reproducible impact strength measurements for adhesive bonds.
- Consistent test methodology that enables direct comparison of different adhesives under sudden impact.
- Enhanced confidence in product safety and durability, protecting against unforeseen failures due to impact events.
- Alignment with internationally recognized testing principles, meeting global market and regulatory requirements.
Keywords: impact strength, adhesive bonds, ASTM D950, adhesive failure, impact testing, shear test, quality assurance, materials selection, adhesive testing standard.
Buy Documents
ASTM D950-03(2020)e1 - Standard Test Method for Impact Strength of Adhesive Bonds
Get Certified
Connect with accredited certification bodies for this standard

Smithers Quality Assessments
US management systems and product certification.

DIN CERTCO
DIN Group product certification.
Sponsored listings
Frequently Asked Questions
ASTM D950-03(2020)e1 is a standard published by ASTM International. Its full title is "Standard Test Method for Impact Strength of Adhesive Bonds". This standard covers: SIGNIFICANCE AND USE 4.1 Adhesives can fail under a sudden impact load and not under a slowly applied load of the same or greater force. 4.2 This test method can be used to compare the sensitivity of various adhesives to suddenly applied loads. SCOPE 1.1 This test method covers the determination of the comparative impact strength of adhesive bonds in shear, when tested on standard specimens under specified conditions of preparation, conditioning, and testing. 1.2 The values stated in SI units are to be regarded as the standard. The values in parentheses are for information only. 1.3 This standard does not purport to address all of the safety concerns, if any, associated with its use. It is the responsibility of the user of this standard to establish appropriate safety, health, and environmental practices and determine the applicability of regulatory limitations prior to use. 1.4 This international standard was developed in accordance with internationally recognized principles on standardization established in the Decision on Principles for the Development of International Standards, Guides and Recommendations issued by the World Trade Organization Technical Barriers to Trade (TBT) Committee.
SIGNIFICANCE AND USE 4.1 Adhesives can fail under a sudden impact load and not under a slowly applied load of the same or greater force. 4.2 This test method can be used to compare the sensitivity of various adhesives to suddenly applied loads. SCOPE 1.1 This test method covers the determination of the comparative impact strength of adhesive bonds in shear, when tested on standard specimens under specified conditions of preparation, conditioning, and testing. 1.2 The values stated in SI units are to be regarded as the standard. The values in parentheses are for information only. 1.3 This standard does not purport to address all of the safety concerns, if any, associated with its use. It is the responsibility of the user of this standard to establish appropriate safety, health, and environmental practices and determine the applicability of regulatory limitations prior to use. 1.4 This international standard was developed in accordance with internationally recognized principles on standardization established in the Decision on Principles for the Development of International Standards, Guides and Recommendations issued by the World Trade Organization Technical Barriers to Trade (TBT) Committee.
ASTM D950-03(2020)e1 is classified under the following ICS (International Classification for Standards) categories: 83.180 - Adhesives. The ICS classification helps identify the subject area and facilitates finding related standards.
ASTM D950-03(2020)e1 has the following relationships with other standards: It is inter standard links to ASTM D950-03(2011), ASTM E23-24, ASTM A108-24, ASTM B151/B151M-20, ASTM B16/B16M-19, ASTM A108-18, ASTM B139/B139M-12(2017), ASTM E23-16a, ASTM E23-16, ASTM B16/B16M-10(2015), ASTM B151/B151M-13, ASTM A108-13, ASTM E23-12c, ASTM B107/B107M-12, ASTM B139/B139M-12. Understanding these relationships helps ensure you are using the most current and applicable version of the standard.
ASTM D950-03(2020)e1 is available in PDF format for immediate download after purchase. The document can be added to your cart and obtained through the secure checkout process. Digital delivery ensures instant access to the complete standard document.
Standards Content (Sample)
This international standard was developed in accordance with internationally recognized principles on standardization established in the Decision on Principles for the
Development of International Standards, Guides and Recommendations issued by the World Trade Organization Technical Barriers to Trade (TBT) Committee.
´1
Designation: D950 − 03 (Reapproved 2020)
Standard Test Method for
Impact Strength of Adhesive Bonds
This standard is issued under the fixed designation D950; the number immediately following the designation indicates the year of
original adoption or, in the case of revision, the year of last revision. A number in parentheses indicates the year of last reapproval. A
superscript epsilon (´) indicates an editorial change since the last revision or reapproval.
This standard has been approved for use by agencies of the U.S. Department of Defense.
ε NOTE—Section 10 was editorially corrected in January 2020.
INTRODUCTION
The accuracy of the results of strength tests of adhesive bonds will depend on the conditions under
which the bonding process is carried out. Unless otherwise agreed upon between the manufacturer and
the purchaser, the bonding conditions shall be prescribed by the manufacturer of the adhesive. In order
to ensure that complete information is available to the individual conducting the tests, the
manufacturer of the adhesive shall furnish numerical values and other specific information for each of
the following variables:
(1)Procedureforpreparationofsurfacespriortoapplicationoftheadhesivethecleaninganddrying
of metal surfaces, and special surface treatments such as sanding which are not specifically limited by
the pertinent test method.
(2) Complete mixing directions for the adhesive.
(3) Conditions for application of the adhesive including the rate of spread or thickness of film,
number of coats to be applied, whether to be applied to one or both surfaces, and the conditions of
drying where more than one coat is required.
(4) Assembly conditions before application of pressure, including the room temperature, length of
time, and whether open or closed assembly is to be used.
(5) Curing conditions, including the amount of pressure to be applied, the length of time under
pressure and the temperature of the assembly when under pressure. It should be stated whether this
temperature is that of the bond line, or of the atmosphere at which the assembly is to be maintained.
(6) Conditioning procedure before testing, unless a standard procedure is specified, including the
length of time, temperature, and relative humidity.
Arange may be prescribed for any variable by the manufacturer of the adhesive if it can be assumed
by the test operator that any arbitrarily chosen value within such a range or any combination of such
values for several variables will be acceptable to both the manufacturer and the purchaser of the
adhesive.
1. Scope tested on standard specimens under specified conditions of
preparation, conditioning, and testing.
1.1 This test method covers the determination of the com-
parative impact strength of adhesive bonds in shear, when 1.2 The values stated in SI units are to be regarded as the
standard. The values in parentheses are for information only.
1.3 This standard does not purport to address all of the
This test method is under the jurisdiction of ASTM Committee D14 on
Adhesives and is the direct responsibility of Subcommittee D14.80 on Metal
safety concerns, if any, associated with its use. It is the
Bonding Adhesives.
responsibility of the user of this standard to establish appro-
Current edition approved Jan. 1, 2020. Published February 2020. Originally
priate safety, health, and environmental practices and deter-
approved in 1952. Last previous edition approved in 2011 as D950 – 03 (2011).
DOI: 10.1520/D0950-03R20E01. mine the applicability of regulatory limitations prior to use.
Copyright © ASTM International, 100 Barr Harbor Drive, PO Box C700, West Conshohocken, PA 19428-2959. United States
´1
D950 − 03 (2020)
1.4 This international standard was developed in accor- 5.1.1.1 Impact Head equipped with a flat striking face
dance with internationally recognized principles on standard- slightly wider than the test specimen, aligned to strike the
ization established in the Decision on Principles for the specimen full-face.
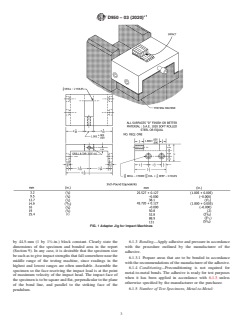
Development of International Standards, Guides and Recom- 5.1.1.2 Jigtoholdthetestspecimen,asshowninFig.1.The
mendations issued by the World Trade Organization Technical
jig illustrated is not suitable for use with all impact machines
Barriers to Trade (TBT) Committee. andvises.Varythedimensionsanddesignofthejigasrequired
for adaptation to machines and vises available, provided the
2. Referenced Documents
following general requirements are met: Machine the jig from
2.1 ASTM Standards: a solid piece of steel and bolt it solidly to the base of the testing
machine. Drill the corners to ensure that the test specimen sets
A108 Specification for Steel Bar, Carbon and Alloy, Cold-
flush against the retaining end of the jig. Minimize the dirt
Finished
collection at the drilled corners which could hold the end of the
B16/B16M Specification for Free-Cutting Brass Rod, Bar
specimen away from the face of the jig. Provide the jig with a
and Shapes for Use in Screw Machines
screw to tighten the specimen in the jig, in order to minimize
B107/B107M Specification for Magnesium-Alloy Extruded
the tendency of the specimen to overturn when struck. Locate
Bars, Rods, Profiles, Tubes, and Wire
the jig so that the specimen will be struck at the point of
B133 Specification for Copper Rod, Bar,And Shapes (With-
maximum head velocity.
drawn 1994)
5.1.1.3 Vise or Bolts to hold the jig rigid and immobile
B139/B139M Specification for Phosphor Bronze Rod, Bar,
and Shapes under the stress of the testing machine hammer with the total
height of the vise, jig, and test specimen such that the lower
B151/B151M Specification for Copper-Nickel-Zinc Alloy
(Nickel Silver) and Copper-Nickel Rod and Bar edge of the striking face of the impact head strikes the
specimen as near the adhesive line as possible, preferably
B211 Specification for Aluminum and Aluminum-Alloy
Rolled or Cold-Finished Bar, Rod, and Wire (Metric) within 0.79 mm ( ⁄32 in.). Ordinarily the distance between the
B0211_B0211M top of the jaws of the vise of the machine and the bottom of the
D905 Test Method for Strength Properties of Adhesive striking face of the head is 22 mm (0.866 in.), and proper
Bonds in Shear by Compression Loading height of the specimen may be obtained by adjusting its height
in the jig.
D907 Terminology of Adhesives
E23 Test Methods for Notched Bar Impact Testing of Me- 5.1.2 See Test Methods E23 for additional information on
tallic Materials impact testing machines and their calibration.
5.2 Conditioning Room or Desiccators—A conditioning
3. Terminology
room capable of maintaining a relative humidity of 50 62%
3.1 Definitions—Many terms in this test method are defined
at 23 6 1.1°C (73.4 6 2°F), or desiccators filled with a
in Terminology D907.
saturatedsaltsolution(Note1)togivearelativehumidityof50
3.2 Definitions of Terms Specific to This Standard: 6 2 % at 23 6 1.1°C.
3.2.1 impact strength, n—the energy absorbed expressed in
NOTE 1—A saturated salt solution of calcium nitrate will give approxi-
joules per square metre or foot-pounds-force (ft-lbf) per square
mately 51 % relative humidity at the test temperature.
inch, by a specimen of standard design when impacted to
failure by
...


Questions, Comments and Discussion
Ask us and Technical Secretary will try to provide an answer. You can facilitate discussion about the standard in here.
Loading comments...