ASTM G137-97(2017)
(Test Method)Standard Test Method for Ranking Resistance of Plastic Materials to Sliding Wear Using a Block-On-Ring Configuration
Standard Test Method for Ranking Resistance of Plastic Materials to Sliding Wear Using a Block-On-Ring Configuration
SIGNIFICANCE AND USE
5.1 The specific wear rates determined by this test method can be used as a guide in ranking the wear resistance of plastic materials. The specific wear rate is not a material property and will therefore differ with test conditions and test geometries. The significance of this test will depend on the relative similarity to the actual service conditions.
5.2 This test method seeks only to describe the general test procedure and the procedure for calculating and reporting data.
Note 2: This test configuration allows steady state specific wear rates to be achieved very quickly through the use of high loads and speeds. The thrust washer configuration described in Test Method D3702 does not allow for the use of such high speeds and loads because of possible overheating (which may cause degradation or melting, or both) of the specimen. Despite the differences in testing configurations, a good correlation in the ranking of wear resistance is achieved between the two tests (Table X2.1).
SCOPE
1.1 This test method covers a laboratory procedure to measure the resistance of plastic materials under dry sliding conditions. The test utilizes a block-on-ring geometry to rank materials according to their sliding wear characteristics under various conditions.
1.2 The test specimens are small so that they can be molded or cut from fabricated plastic parts. The test may be run at the load, velocity, and temperature which simulate the service condition.
1.3 Wear test results are reported as specific wear rates calculated from volume loss, sliding distance, and load. Materials with superior wear resistance have lower specific wear rates.
1.4 This test method allows the use of both single- and multi-station apparatus to determine the specific wear rates.
1.5 The values stated in SI units are to be regarded as the standard. The values given in parentheses are for information only.
1.6 This standard does not purport to address all of the safety concerns, if any, associated with its use. It is the responsibility of the user of this standard to establish appropriate safety, health, and environmental practices and determine the applicability of regulatory limitations prior to use.
1.7 This international standard was developed in accordance with internationally recognized principles on standardization established in the Decision on Principles for the Development of International Standards, Guides and Recommendations issued by the World Trade Organization Technical Barriers to Trade (TBT) Committee.
General Information
- Status
- Published
- Publication Date
- 31-Oct-2017
- Technical Committee
- G02 - Wear and Erosion
- Drafting Committee
- G02.40 - Non-Abrasive Wear
Relations
- Effective Date
- 01-May-2019
- Effective Date
- 01-Nov-2015
- Effective Date
- 01-May-2014
- Effective Date
- 01-Aug-2013
- Effective Date
- 01-Jun-2013
- Effective Date
- 01-May-2012
- Effective Date
- 01-Aug-2011
- Effective Date
- 01-Dec-2010
- Effective Date
- 01-Jul-2010
- Effective Date
- 01-Apr-2010
- Effective Date
- 01-Jan-2010
- Effective Date
- 15-Nov-2009
- Effective Date
- 01-Oct-2009
- Effective Date
- 01-Aug-2009
- Effective Date
- 01-Nov-2008
Overview
ASTM G137-97(2017) - Standard Test Method for Ranking Resistance of Plastic Materials to Sliding Wear Using a Block-On-Ring Configuration is a widely recognized test method developed by ASTM International. This standard provides a laboratory procedure for determining the resistance of plastic materials to dry sliding wear using a block-on-ring geometry. The main purpose of ASTM G137 is to rank plastic materials based on their relative wear performance under a range of controlled conditions, thereby assisting manufacturers, researchers, and engineers in material selection and product development for applications where wear resistance is critical.
Key Topics
- Test Scope: The method measures the wear resistance of plastics in dry sliding contact using small test specimens, which can be molded or cut from fabricated plastic parts.
- Block-on-Ring Configuration: A plastic block is brought into controlled contact with a rotating metallic ring under specified load and speed to simulate wear.
- Wear Rate Measurement: Wear is quantified by periodic mass loss (volume loss), sliding distance, and the applied load, resulting in a specific wear rate value for each material tested.
- Simulated Service Conditions: Tests may be run under load, velocity, and temperature settings that simulate real-world service conditions for the plastic material.
- Reporting: Results are reported as specific wear rates. Materials with better sliding wear resistance display lower specific wear rates.
- Test Apparatus: The method allows the use of both single- and multi-station apparatus to determine specific wear rates, with SI units as the standard for measurement.
- Correlation with Other Standards: Although configurations differ, the block-on-ring method achieves good correlation in wear resistance ranking with other test methods, such as the thrust washer test described in ASTM D3702.
Applications
ASTM G137-97(2017) is essential for quality control, research, and development of plastic components that are subject to friction and wear. Typical applications include:
- Material Selection: Ranking and comparing the sliding wear resistance of thermoplastics and thermosets for use in bearings, gears, bushings, and other tribological components.
- Design Engineering: Informing designers and engineers about suitable plastic grades for applications where wear performance is critical, such as in automotive, aerospace, electrical, and industrial machinery.
- Product Development: Assisting manufacturers in developing new plastic materials or blends with improved wear resistance tailored for demanding applications.
- Quality Control: Establishing wear resistance benchmarks for production batches and monitoring consistency across different lots and suppliers.
- Research & Standardization: Providing a consistent methodology for scientific studies and interlaboratory comparisons of wear performance in plastics.
Related Standards
ASTM G137-97(2017) supports and is complemented by several related ASTM standards:
- ASTM D3702: Test Method for Wear Rate and Coefficient of Friction of Materials in Self-Lubricated Rubbing Contact Using a Thrust Washer Testing Machine.
- ASTM G77: Test Method for Ranking Resistance of Materials to Sliding Wear Using Block-on-Ring Wear Test.
- ASTM D618: Practice for Conditioning Plastics for Testing.
- ASTM G40: Terminology Relating to Wear and Erosion.
- ASTM E122: Practice for Calculating Sample Size to Estimate, With Specified Precision, the Average for a Characteristic of a Lot or Process.
By adhering to ASTM G137-97(2017), organizations ensure reliable, reproducible, and internationally recognized testing of plastic wear resistance. This helps facilitate material selection, ensures product durability, and supports regulatory compliance in global markets.
Keywords: ASTM G137, sliding wear, plastics, block-on-ring, wear resistance, specific wear rate, material ranking, laboratory testing, tribology.
Buy Documents
ASTM G137-97(2017) - Standard Test Method for Ranking Resistance of Plastic Materials to Sliding Wear Using a Block-On-Ring Configuration
Get Certified
Connect with accredited certification bodies for this standard

Smithers Quality Assessments
US management systems and product certification.

DIN CERTCO
DIN Group product certification.

IMP NDT d.o.o.
Non-destructive testing services. Radiography, ultrasonic, magnetic particle, penetrant, visual inspection.
Sponsored listings
Frequently Asked Questions
ASTM G137-97(2017) is a standard published by ASTM International. Its full title is "Standard Test Method for Ranking Resistance of Plastic Materials to Sliding Wear Using a Block-On-Ring Configuration". This standard covers: SIGNIFICANCE AND USE 5.1 The specific wear rates determined by this test method can be used as a guide in ranking the wear resistance of plastic materials. The specific wear rate is not a material property and will therefore differ with test conditions and test geometries. The significance of this test will depend on the relative similarity to the actual service conditions. 5.2 This test method seeks only to describe the general test procedure and the procedure for calculating and reporting data. Note 2: This test configuration allows steady state specific wear rates to be achieved very quickly through the use of high loads and speeds. The thrust washer configuration described in Test Method D3702 does not allow for the use of such high speeds and loads because of possible overheating (which may cause degradation or melting, or both) of the specimen. Despite the differences in testing configurations, a good correlation in the ranking of wear resistance is achieved between the two tests (Table X2.1). SCOPE 1.1 This test method covers a laboratory procedure to measure the resistance of plastic materials under dry sliding conditions. The test utilizes a block-on-ring geometry to rank materials according to their sliding wear characteristics under various conditions. 1.2 The test specimens are small so that they can be molded or cut from fabricated plastic parts. The test may be run at the load, velocity, and temperature which simulate the service condition. 1.3 Wear test results are reported as specific wear rates calculated from volume loss, sliding distance, and load. Materials with superior wear resistance have lower specific wear rates. 1.4 This test method allows the use of both single- and multi-station apparatus to determine the specific wear rates. 1.5 The values stated in SI units are to be regarded as the standard. The values given in parentheses are for information only. 1.6 This standard does not purport to address all of the safety concerns, if any, associated with its use. It is the responsibility of the user of this standard to establish appropriate safety, health, and environmental practices and determine the applicability of regulatory limitations prior to use. 1.7 This international standard was developed in accordance with internationally recognized principles on standardization established in the Decision on Principles for the Development of International Standards, Guides and Recommendations issued by the World Trade Organization Technical Barriers to Trade (TBT) Committee.
SIGNIFICANCE AND USE 5.1 The specific wear rates determined by this test method can be used as a guide in ranking the wear resistance of plastic materials. The specific wear rate is not a material property and will therefore differ with test conditions and test geometries. The significance of this test will depend on the relative similarity to the actual service conditions. 5.2 This test method seeks only to describe the general test procedure and the procedure for calculating and reporting data. Note 2: This test configuration allows steady state specific wear rates to be achieved very quickly through the use of high loads and speeds. The thrust washer configuration described in Test Method D3702 does not allow for the use of such high speeds and loads because of possible overheating (which may cause degradation or melting, or both) of the specimen. Despite the differences in testing configurations, a good correlation in the ranking of wear resistance is achieved between the two tests (Table X2.1). SCOPE 1.1 This test method covers a laboratory procedure to measure the resistance of plastic materials under dry sliding conditions. The test utilizes a block-on-ring geometry to rank materials according to their sliding wear characteristics under various conditions. 1.2 The test specimens are small so that they can be molded or cut from fabricated plastic parts. The test may be run at the load, velocity, and temperature which simulate the service condition. 1.3 Wear test results are reported as specific wear rates calculated from volume loss, sliding distance, and load. Materials with superior wear resistance have lower specific wear rates. 1.4 This test method allows the use of both single- and multi-station apparatus to determine the specific wear rates. 1.5 The values stated in SI units are to be regarded as the standard. The values given in parentheses are for information only. 1.6 This standard does not purport to address all of the safety concerns, if any, associated with its use. It is the responsibility of the user of this standard to establish appropriate safety, health, and environmental practices and determine the applicability of regulatory limitations prior to use. 1.7 This international standard was developed in accordance with internationally recognized principles on standardization established in the Decision on Principles for the Development of International Standards, Guides and Recommendations issued by the World Trade Organization Technical Barriers to Trade (TBT) Committee.
ASTM G137-97(2017) is classified under the following ICS (International Classification for Standards) categories: 19.060 - Mechanical testing; 83.140.01 - Rubber and plastics products in general. The ICS classification helps identify the subject area and facilitates finding related standards.
ASTM G137-97(2017) has the following relationships with other standards: It is inter standard links to ASTM D3702-94(2019), ASTM G40-15, ASTM D3702-94(2014), ASTM G117-13, ASTM G40-13, ASTM G40-12, ASTM E122-09e1, ASTM G40-10b, ASTM G40-10a, ASTM G77-05(2010), ASTM G40-10, ASTM G40-09, ASTM D3702-94(2009), ASTM E122-09, ASTM D618-08. Understanding these relationships helps ensure you are using the most current and applicable version of the standard.
ASTM G137-97(2017) is available in PDF format for immediate download after purchase. The document can be added to your cart and obtained through the secure checkout process. Digital delivery ensures instant access to the complete standard document.
Standards Content (Sample)
This international standard was developed in accordance with internationally recognized principles on standardization established in the Decision on Principles for the
Development of International Standards, Guides and Recommendations issued by the World Trade Organization Technical Barriers to Trade (TBT) Committee.
Designation: G137 − 97 (Reapproved 2017)
Standard Test Method for
Ranking Resistance of Plastic Materials to Sliding Wear
Using a Block-On-Ring Configuration
This standard is issued under the fixed designation G137; the number immediately following the designation indicates the year of
original adoption or, in the case of revision, the year of last revision. A number in parentheses indicates the year of last reapproval. A
superscript epsilon (´) indicates an editorial change since the last revision or reapproval.
1. Scope 2. Referenced Documents
1.1 This test method covers a laboratory procedure to 2.1 ASTM Standards:
measure the resistance of plastic materials under dry sliding D618 Practice for Conditioning Plastics for Testing
conditions. The test utilizes a block-on-ring geometry to rank D3702 Test Method for Wear Rate and Coefficient of Fric-
materials according to their sliding wear characteristics under tion of Materials in Self-Lubricated Rubbing Contact
various conditions. Using a Thrust Washer Testing Machine
E122 Practice for Calculating Sample Size to Estimate, With
1.2 The test specimens are small so that they can be molded
Specified Precision, the Average for a Characteristic of a
or cut from fabricated plastic parts. The test may be run at the
Lot or Process
load, velocity, and temperature which simulate the service
G40 Terminology Relating to Wear and Erosion
condition.
G77 Test Method for Ranking Resistance of Materials to
1.3 Wear test results are reported as specific wear rates
Sliding Wear Using Block-on-Ring Wear Test
calculated from volume loss, sliding distance, and load. Mate-
G117 Guide for Calculating and Reporting Measures of
rials with superior wear resistance have lower specific wear
Precision Using Data from Interlaboratory Wear or Ero-
rates.
sion Tests (Withdrawn 2016)
1.4 This test method allows the use of both single- and
3. Terminology
multi-station apparatus to determine the specific wear rates.
3.1 Definitions:
1.5 The values stated in SI units are to be regarded as the
3.1.1 wear—damage to a solid surface, generally involving
standard. The values given in parentheses are for information
progressive loss of material, due to relative motion between
only.
that surface and a contacting substance or substances.
1.6 This standard does not purport to address all of the
3.1.2 Additional definitions relating to wear are found in
safety concerns, if any, associated with its use. It is the
Terminology G40.
responsibility of the user of this standard to establish appro-
3.2 Definitions of Terms Specific to This Standard:
priate safety, health, and environmental practices and deter-
3.2.1 specific wear rate—the volume loss per unit sliding
mine the applicability of regulatory limitations prior to use.
distance, divided by the load. It can be calculated as the volume
1.7 This international standard was developed in accor-
loss per unit time, divided by the load and the sliding velocity.
dance with internationally recognized principles on standard-
ization established in the Decision on Principles for the 3.2.2 steady state specific wear rate—the specific wear rate
Development of International Standards, Guides and Recom- that is established during that part of the test when the specific
mendations issued by the World Trade Organization Technical wear rate remains substantially constant (the specific wear rate
Barriers to Trade (TBT) Committee. versus sliding distance curve flattens out considerably with less
than 30 % difference between the specific wear rates) during a
1 2
This test method is under the jurisdiction of ASTM Committee G02 on Wear For referenced ASTM standards, visit the ASTM website, www.astm.org, or
and Erosion and is the direct responsibility of Subcommittee G02.40 on Non- contact ASTM Customer Service at service@astm.org. For Annual Book of ASTM
Abrasive Wear. Standards volume information, refer to the standard’s Document Summary page on
Current edition approved Nov. 1, 2017. Published December 2017. Originally the ASTM website.
approved in 1995. Last previous edition appeared in 2009 as G137 – 97 (2009). The last approved version of this historical standard is referenced on
DOI: 10.1520/G0137-97R17. www.astm.org.
Copyright © ASTM International, 100 Barr Harbor Drive, PO Box C700, West Conshohocken, PA 19428-2959. United States
G137 − 97 (2017)
minimum of three time intervals spanning a total time duration will therefore differ with test conditions and test geometries.
of at least 18 h, with ideally no single interval exceeding 8 h. The significance of this test will depend on the relative
However, one time interval during the steady state can be as similarity to the actual service conditions.
long as 16 h.
5.2 This test method seeks only to describe the general test
procedure and the procedure for calculating and reporting data.
4. Summary of Test Method
NOTE 2—This test configuration allows steady state specific wear rates
4.1 A plastic block of known dimensions is brought into
to be achieved very quickly through the use of high loads and speeds. The
contact with a counterface ring (usually metal) under con-
thrust washer configuration described in Test Method D3702 does not
trolled conditions of contact pressure and relative velocity. This
allow for the use of such high speeds and loads because of possible
is achieved using a block-on-ring configuration as illustrated in overheating (which may cause degradation or melting, or both) of the
specimen. Despite the differences in testing configurations, a good
Fig. 1. Periodic weighing of the polymer block results in a
correlation in the ranking of wear resistance is achieved between the two
number of mass-time data points where the time relates to the
tests (Table X2.1).
time of sliding. The test is continued until the steady state wear
6. Apparatus and Materials
rate is established. Mass loss measurements made after the
steady state is established are used to determine the steady state
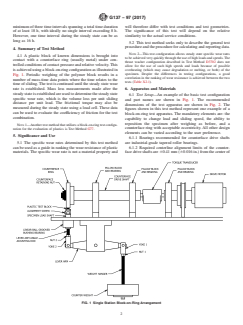
6.1 Test Setup—An example of the basic test configuration
specific wear rate, which is the volume loss per unit sliding
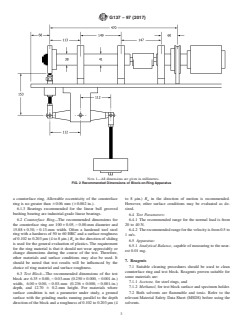
and part names are shown in Fig. 1. The recommended
distance per unit load. The frictional torque may also be
dimensions of the test apparatus are shown in Fig. 2. The
measured during the steady state using a load cell. These data
figures shown in this test method represent one example of a
can be used to evaluate the coefficiency of friction for the test
block-on-ring test apparatus. The mandatory elements are: the
combination.
capability to change load and sliding speed, the ability to
reposition the specimen after weighing as before, and a
NOTE 1—Another test method that utilizes a block-on-ring test configu-
ration for the evaluation of plastics is Test Method G77. counterface ring with acceptable eccentricity. All other design
elements can be varied according to the user preference.
5. Significance and Use
6.1.1 Bearings recommended for counterface drive shafts
5.1 The specific wear rates determined by this test method are industrial-grade tapered roller bearings.
can be used as a guide in ranking the wear resistance of plastic 6.1.2 Required centerline alignment limits of the counter-
materials. The specific wear rate is not a material property and face drive shafts are 60.41 mm (60.016 in.) from the center of
FIG. 1 Single Station Block-on-Ring Arrangement
G137 − 97 (2017)
NOTE 1—All dimensions are given in millimetres.
FIG. 2 Recommended Dimensions of Block-on-Ring Apparatus
a counterface ring. Allowable eccentricity of the counterface to 8 μin.) R in the direction of motion is recommended.
a
ring is no greater than 60.06 mm (60.002 in.). However, other surface conditions may be evaluated as de-
6.1.3 Bearings recommended for the linear ball grooved sired.
bushing bearing are industrial-grade linear bearings.
6.4 Test Parameters:
6.2 Counterface Ring—The recommended dimensions for
6.4.1 The recommended range for the normal load is from
the counterface ring are 100 + 0.05, − 0.00-mm diameter and
20 to 40 N.
15.88 + 0.30, − 0.13-mm width. Often a hardened tool steel
6.4.2 The recommended range for the velocity is from 0.5 to
ring with a hardness of 50 to 60 HRC and a surface roughness
1 m/s.
of 0.102 to 0.203 μm (4 to 8 μin.) R in the direction of sliding
a
6.5 Apparatus:
is used for the general evaluation of plastics. The requirement
6.5.1 Analytical Balance, capable of measuring to the near-
for the ring material is that it should not wear appreciably or
est 0.01 mg.
change dimensions during the course of the test. Therefore,
other materials and surface conditions may also be used. It
7. Reagents
should be noted that test results will be influenced by the
7.1 Suitable cleaning procedures should be used to clean
choice of ring material and surface roughness.
counterface ring and test block. Reagents proven suitable for
6.3 Test Block—The recommended dimensions of the test
some materials are:
block are 6.35 + 0.00, − 0.03-mm (0.250 + 0.000, − 0.001-in.)
7.1.1 Acetone, for steel rings, and
width, 6.00 + 0.00, − 0.03-mm (0.236 + 0.000, − 0.001-in.)
7.1.2 Methanol, for test block surface and specimen holder.
depth, and 12.70 6 0.2-mm height. For materials where
surface condition is not a parameter under study, a ground 7.2 Both solvents are flammable and toxic. Refer to the
surface with the grinding marks running parallel to the depth relevant Material Safety Data Sheet (MSDS) before using the
direction of the block and a roughness of 0.102 to 0.203 μm (4 solvents.
G137 − 97 (2017)
8. Preparation and Calibration of Apparatus
8.1 Perform calibration of torque transducers by applying
NIST traceable dead weight standards and using a reference
load cell.
8.2 Perform calibration of tachometer by comparison to a
handheld tachometer which has been calibrated with NIST
traceable standards.
9. Conditioning
9.1 Conditioning—Condition the test specimens at 23 6
2°C (73.4 6 3.6°F) and 50 6 5 % relative humidity for not less
than 40 h prior to testing in accordance with Procedure A of
Practice D618 for those samples where conditioning is re-
quired.
9.2 Test Conditions—The recommended conditions are the
standard laboratory atmosphere of 23 6 2°C (73.4 6 3.6°F) NOTE 1—All dimensions are given in millimetres.
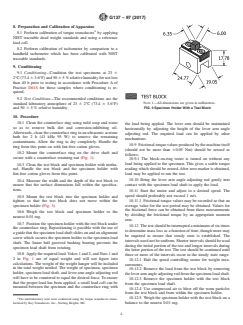
FIG. 3 Specimen Holder With a Test Block
and 50 6 5 % relative humidity.
10. Procedure
10.1 Clean the counterface ring using mild soap and water
the load being applied. The lever arm should be maintained
so as to remove bulk dirt and corrosion-inhibiting oil.
horizontally by adjusting the height of the lever arm angle
Afterwards, clean the counterface ring in an ultrasonic acetone
adjusting rod. The required load can be applied by other
bath for 2 h (43 kHz 95 W) to remove the remaining
mechanisms.
contaminants. Allow the ring to dry completely. Handle the
10.9 Frictional torque values produced by the machine itself
ring from this point on with lint-free cotton gloves.
(should not be more than 60.05 Nm) should be zeroed as
10.2 Mount the counterface ring on the drive shaft and
follows:
se
...


Questions, Comments and Discussion
Ask us and Technical Secretary will try to provide an answer. You can facilitate discussion about the standard in here.
Loading comments...