ASTM D4146-10(2022)
(Test Method)Standard Test Method for Formability of Zinc-Rich Primer/Chromate Complex Coatings on Steel
Standard Test Method for Formability of Zinc-Rich Primer/Chromate Complex Coatings on Steel
SIGNIFICANCE AND USE
5.1 The results of the combined deformation and tape test are related to the ability of the coated metal to withstand stamping in factory applications.
5.2 This test can be used to control the manufacturing process or in development work to improve the product.
5.3 It should be recognized that variability in the results persist due to the test conditions and forming machine variations.
SCOPE
1.1 This test method covers the evaluation of the formability and adhesion of factory applied zinc-rich primer/chromate complex coatings on steel with thicknesses of 0.65 mm to 1.25 mm (0.025 in. to 0.05 in.) typical of those used in the coil coating industry.
1.2 The degree of oil removal prior to forming, the techniques of taping, and differences in adhesive strength of the tape can affect the adhesion rating.
1.3 The values stated in SI units are to be regarded as the standard. The values given in parentheses are for information only.
1.4 This standard does not purport to address all of the safety concerns, if any, associated with its use. It is the responsibility of the user of this standard to establish appropriate safety, health, and environmental practices and determine the applicability of regulatory limitations prior to use. For a specific hazard statement, see Section 7.
1.5 This international standard was developed in accordance with internationally recognized principles on standardization established in the Decision on Principles for the Development of International Standards, Guides and Recommendations issued by the World Trade Organization Technical Barriers to Trade (TBT) Committee.
General Information
- Status
- Published
- Publication Date
- 30-Nov-2022
- Technical Committee
- D01 - Paint and Related Coatings, Materials, and Applications
- Drafting Committee
- D01.53 - Coil Coated Metal
Relations
- Refers
ASTM D3330/D3330M-04(2010) - Standard Test Method for Peel Adhesion of Pressure-Sensitive Tape - Effective Date
- 01-Apr-2010
- Effective Date
- 01-Oct-2004
- Effective Date
- 10-Oct-2002
- Effective Date
- 10-Oct-2000
Overview
ASTM D4146-10(2022), titled Standard Test Method for Formability of Zinc-Rich Primer/Chromate Complex Coatings on Steel, is an internationally recognized standard developed by ASTM International. This test method evaluates the formability and adhesion of factory-applied zinc-rich primer and chromate complex coatings on steel sheets, commonly used in the coil coating industry. The procedure assesses how well these coatings adhere and withstand the deformation that occurs during manufacturing processes such as stamping or forming. The method is applicable to steel of 0.65 mm to 1.25 mm thickness and is vital for maintaining quality control during steel fabrication.
Key Topics
- Formability Testing: The standard details a biaxial stretching test using a ball punch to form a dome in the coated steel specimen.
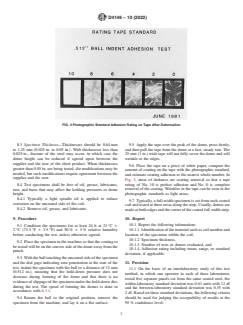
- Adhesion Evaluation: A pressure-sensitive adhesive tape test is applied to the deformed coating. The amount of coating removed is visually assessed using photographic standards.
- Test Variables:
- Degree of oil removal prior to testing,
- Adhesive tape strength and technique,
- Variations in testing machines and forming conditions.
- Reporting Results: Results include material identification, specimen thickness, number of tests, and an adhesion rating with statistical data if applicable.
- Precision and Reproducibility: The test method defines criteria for repeatability and reproducibility, emphasizing consistency in quality assessments across laboratories.
- Safety Considerations: Users must establish appropriate safety, health, and environmental practices, especially when operating hydraulic equipment.
Applications
The ASTM D4146-10(2022) test method is critical for several industrial and manufacturing applications involving coated steel:
- Coil Coating Industry: Ensures that zinc-rich primer and chromate coatings withstand deformation during downstream processes such as stamping, bending, or drawing.
- Quality Control: Utilized by manufacturers to verify the consistency and durability of protective coatings on steel, thereby reducing product failures during fabrication.
- Product Development: Helps in R&D to optimize coating formulations for improved performance during metal forming operations.
- Process Optimization: Used by process engineers to monitor and control variables that affect coating adhesion and formability, ensuring compliance with industry standards.
Related Standards
For comprehensive coating performance assessments, several related standards are frequently referenced alongside ASTM D4146-10(2022):
- ASTM D3330/D3330M - Test Method for Peel Adhesion of Pressure-Sensitive Tape: Specifies the tape adhesion method used in D4146.
- Pictorial Standards of Coating Defects: Provides photographic benchmarks for evaluating coating removal after testing.
- Other ASTM and International Standards: Used in conjunction with D4146 to evaluate other aspects of coil-coated metals, including corrosion resistance, thickness uniformity, and mechanical properties.
Keywords: zinc-rich primer, chromate complex coating, steel formability, adhesion testing, coil coating, ASTM D4146, factory-applied coatings, pressure-sensitive adhesive tape, coating evaluation, quality control.
By adhering to ASTM D4146-10(2022), manufacturers and laboratories ensure reliable, repeatable assessments of coated steel performance, supporting higher quality standards in steel production and processing industries.
Buy Documents
ASTM D4146-10(2022) - Standard Test Method for Formability of Zinc-Rich Primer/Chromate Complex Coatings on Steel
Frequently Asked Questions
ASTM D4146-10(2022) is a standard published by ASTM International. Its full title is "Standard Test Method for Formability of Zinc-Rich Primer/Chromate Complex Coatings on Steel". This standard covers: SIGNIFICANCE AND USE 5.1 The results of the combined deformation and tape test are related to the ability of the coated metal to withstand stamping in factory applications. 5.2 This test can be used to control the manufacturing process or in development work to improve the product. 5.3 It should be recognized that variability in the results persist due to the test conditions and forming machine variations. SCOPE 1.1 This test method covers the evaluation of the formability and adhesion of factory applied zinc-rich primer/chromate complex coatings on steel with thicknesses of 0.65 mm to 1.25 mm (0.025 in. to 0.05 in.) typical of those used in the coil coating industry. 1.2 The degree of oil removal prior to forming, the techniques of taping, and differences in adhesive strength of the tape can affect the adhesion rating. 1.3 The values stated in SI units are to be regarded as the standard. The values given in parentheses are for information only. 1.4 This standard does not purport to address all of the safety concerns, if any, associated with its use. It is the responsibility of the user of this standard to establish appropriate safety, health, and environmental practices and determine the applicability of regulatory limitations prior to use. For a specific hazard statement, see Section 7. 1.5 This international standard was developed in accordance with internationally recognized principles on standardization established in the Decision on Principles for the Development of International Standards, Guides and Recommendations issued by the World Trade Organization Technical Barriers to Trade (TBT) Committee.
SIGNIFICANCE AND USE 5.1 The results of the combined deformation and tape test are related to the ability of the coated metal to withstand stamping in factory applications. 5.2 This test can be used to control the manufacturing process or in development work to improve the product. 5.3 It should be recognized that variability in the results persist due to the test conditions and forming machine variations. SCOPE 1.1 This test method covers the evaluation of the formability and adhesion of factory applied zinc-rich primer/chromate complex coatings on steel with thicknesses of 0.65 mm to 1.25 mm (0.025 in. to 0.05 in.) typical of those used in the coil coating industry. 1.2 The degree of oil removal prior to forming, the techniques of taping, and differences in adhesive strength of the tape can affect the adhesion rating. 1.3 The values stated in SI units are to be regarded as the standard. The values given in parentheses are for information only. 1.4 This standard does not purport to address all of the safety concerns, if any, associated with its use. It is the responsibility of the user of this standard to establish appropriate safety, health, and environmental practices and determine the applicability of regulatory limitations prior to use. For a specific hazard statement, see Section 7. 1.5 This international standard was developed in accordance with internationally recognized principles on standardization established in the Decision on Principles for the Development of International Standards, Guides and Recommendations issued by the World Trade Organization Technical Barriers to Trade (TBT) Committee.
ASTM D4146-10(2022) is classified under the following ICS (International Classification for Standards) categories: 87.040 - Paints and varnishes. The ICS classification helps identify the subject area and facilitates finding related standards.
ASTM D4146-10(2022) has the following relationships with other standards: It is inter standard links to ASTM D3330/D3330M-04(2010), ASTM D3330/D3330M-04, ASTM D3330/D3330M-02, ASTM D3330/D3330M-00. Understanding these relationships helps ensure you are using the most current and applicable version of the standard.
ASTM D4146-10(2022) is available in PDF format for immediate download after purchase. The document can be added to your cart and obtained through the secure checkout process. Digital delivery ensures instant access to the complete standard document.
Standards Content (Sample)
This international standard was developed in accordance with internationally recognized principles on standardization established in the Decision on Principles for the
Development of International Standards, Guides and Recommendations issued by the World Trade Organization Technical Barriers to Trade (TBT) Committee.
Designation: D4146 − 10 (Reapproved 2022)
Standard Test Method for
Formability of Zinc-Rich Primer/Chromate Complex
Coatings on Steel
This standard is issued under the fixed designation D4146; the number immediately following the designation indicates the year of
original adoption or, in the case of revision, the year of last revision. A number in parentheses indicates the year of last reapproval. A
superscript epsilon (´) indicates an editorial change since the last revision or reapproval.
1. Scope 2.2 Other Document:
Pictorial Standards of Coating Defects
1.1 Thistestmethodcoverstheevaluationoftheformability
and adhesion of factory applied zinc-rich primer/chromate
3. Terminology
complex coatings on steel with thicknesses of 0.65 mm to
3.1 Definitions of Terms Specific to This Standard:
1.25 mm (0.025 in. to 0.05 in.) typical of those used in the coil
3.1.1 dome height, n—the height of the dome formed in the
coating industry.
test.
1.2 The degree of oil removal prior to forming, the tech-
3.1.2 indenting ball diameter, n—the diameter of the
niques of taping, and differences in adhesive strength of the
spherical-ended penetrator (ball) used to deform the specimen.
tape can affect the adhesion rating. 5
3.1.2.1 Discussion—The 41-mm (1 ⁄8-in.) diameter ball was
selected because it minimizes the variability in the localized
1.3 The values stated in SI units are to be regarded as the
peak strain. This size ball is commercially available and is as
standard. The values given in parentheses are for information
large as most testing machines can accommodate.
only.
3.1.3 percent strain, n—the percent elongation of scribed
1.4 This standard does not purport to address all of the
gage lengths after forming. For the draw height of 13 mm
safety concerns, if any, associated with its use. It is the
(0.512 in.), using a 1 ⁄8-in. diameter ball, the localized peak
responsibility of the user of this standard to establish appro-
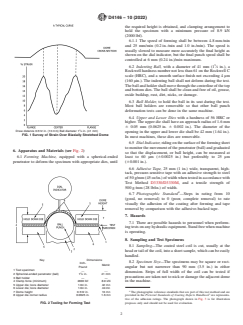
strain is about 19 % (see Fig. 1).
priate safety, health, and environmental practices and deter-
mine the applicability of regulatory limitations prior to use.
4. Summary of Test Method
For a specific hazard statement, see Section 7.
4.1 A coated specimen is biaxially stretched a given dis-
1.5 This international standard was developed in accor-
tance in an appropriate machine, adhesive tape is applied to the
dance with internationally recognized principles on standard-
deformed area (dome) and then pulled off, and the amount of
ization established in the Decision on Principles for the
coating removed is compared with a photographic standard to
Development of International Standards, Guides and Recom-
determine the coating adhesion rating.
mendations issued by the World Trade Organization Technical
Barriers to Trade (TBT) Committee.
5. Significance and Use
5.1 The results of the combined deformation and tape test
2. Referenced Documents
are related to the ability of the coated metal to withstand
stamping in factory applications.
2.1 ASTM Standards:
D3330/D3330M Test Method for PeelAdhesion of Pressure-
5.2 This test can be used to control the manufacturing
Sensitive Tape
process or in development work to improve the product.
5.3 It should be recognized that variability in the results
persist due to the test conditions and forming machine varia-
This test method is under the jurisdiction of ASTM Committee D01 on Paint
tions.
and Related Coatings, Materials, andApplications and is the direct responsibility of
Subcommittee D01.53 on Coil Coated Metal.
Current edition approved Dec. 1, 2022. Published December 2022. Originally
approved in 1983. Last previous edition approved in 2018 as D4146 – 10 (2018). Copies of the pictorial photographic reference standard are contained in the
DOI: 10.1520/D4146-10R22. publication Pictorial Standards of Coating Defects and may be obtained from the
For referenced ASTM standards, visit the ASTM website, www.astm.org, or Federation of Societies for Coatings Technology (FSCT), 492 Norristown Rd., Blue
contact ASTM Customer Service at service@astm.org. For Annual Book of ASTM Bell, PA 19422-2350, http://www.coatingstech.org. The silver halide gelatin photo-
Standards volume information, refer to the standard’s Document Summary page on graphs are intended to be the only primary reference standards for this test method.
the ASTM website. Thereproductionsoftheminthistestmethodareforthepurposeofillustrationonly.
Copyright © ASTM International, 100 Barr Harbor Drive, PO Box C700, West Conshohocken, PA 19428-2959. United States
D4146 − 10 (2022)
the required height is obtained, and clamping arrangement to
hold the specimen with a minimum pressure of 8.9 kN
(2000 lbf).
6.1.1 The speed of forming shall be between 4.8 mm⁄min
and 25 mm/min (0.2 in.⁄min and 1.0 in./min). The speed is
usually slowed to measure more accurately the final height as
shown on the dial indicator, but the final punch speed shall be
controlled at 6 mm (0.24 in.)/min maximum.
6.2 Indenting Ball, with a diameter of 41 mm (1 ⁄8 in.), a
Rockwell hardness number not less than 61 on the Rockwell C
scale (HRC), and a smooth surface finish not exceeding 4 µm
(160 µin.). The indenting ball shall not deform during the test.
Theballandholdershallmovethroughthecenterlineofthetop
and bottom dies. The ball shall be clean and free of oil, grease,
oxide buildup, rust, dirt, nicks, or damage.
6.3 Ball Holder, to hold the ball in its seat during the test.
Most ball holders are removable so that other ball punch
deformation tests can be done in the same machine.
6.4 Upper and Lower Dies with a hardness of 56 HRC or
higher. The upper die shall have an approach radius of 1.6 mm
6 0.05 mm (0.0625 in. 6 0.002 in.). The diameter of the
Draw distance 0.512 in. (13 mm) Ball diameter 1 ⁄8 in. (41 mm)
opening in the upper and lower die shall be 42 mm (1.64 in.).
FIG. 1 Survey of Strain Over Biaxially Stretched Dome
In most machines, these dies are removable.
6.5 Dial Indicator,ridingonthesurfaceoftheformingsheet
to monitor the movement of the penetrator (ball) and graduated
6. Apparatus and Materials (see Fig. 2)
so that the displacement, or ball height, can be measured at
6.1 Forming Machine, equipped with a spherical-ended
least to 60 µm (60.0025 in.) but preferably to 25 µm
penetrator to deform the specimen with appropriate dies, until (60.001 in.).
6.6 Adhesive Tape, 25 mm (1 in.) wide, transparent, high-
tack, pressure-sensitive tape with an adhesive strength to steel
of50g/mm(45oz/in.)ofwidthwhentested
...


Questions, Comments and Discussion
Ask us and Technical Secretary will try to provide an answer. You can facilitate discussion about the standard in here.
Loading comments...