ASTM B223-08(2018)
(Test Method)Standard Test Method for Modulus of Elasticity of Thermostat Metals (Cantilever Beam Method)
Standard Test Method for Modulus of Elasticity of Thermostat Metals (Cantilever Beam Method)
ABSTRACT
This test method covers the determination of the modulus of elasticity of thermostat metals within a particular temperature range. The test is done by mounting the specimen as a cantilever and measuring its deflection when subjected to a mechanical load. Each test specimen should be finished to size by careful machining or filing after being roughly cut, slit, or sheared from the samples. Then the specimen is preformed into a shape approximating the segment of a circle and subsequently heat treated to relieve all internal stresses. To permit maximum sensitivity, any oxide and other foreign substances must be carefully removed from all surfaces of the test specimen which directly affect the electrical resistance of the electronic indicator circuit through the testing apparatus. Extra care should be taken so that the load does not overstress the specimen beyond its elastic limit, if this happens, a new specimen shall be substituted and a lighter load should be used. The modulus of elasticity of each test material is computed using the specimen size and the average deflection for a known load.
SCOPE
1.1 This test method covers the determination of the modulus of elasticity of thermostat metals at any temperature between −300 and +1000°F (−185 and 540°C) by mounting the specimen as a cantilever beam and measuring the deflection when subjected to a mechanical load.
1.2 The values stated in inch-pound units are to be regarded as standard. The values given in parentheses are mathematical conversions to SI units that are provided for information only and are not considered standard.
1.3 This standard does not purport to address all of the safety concerns, if any, associated with its use. It is the responsibility of the user of this standard to become familiar with all hazards including those identified in the appropriate Safety Data Sheet (SDS) for this product/material as provided by the manufacturer, to establish appropriate safety, health, and environmental practices, and determine the applicability of regulatory limitations prior to use.
1.4 This international standard was developed in accordance with internationally recognized principles on standardization established in the Decision on Principles for the Development of International Standards, Guides and Recommendations issued by the World Trade Organization Technical Barriers to Trade (TBT) Committee.
General Information
- Status
- Published
- Publication Date
- 31-Oct-2018
- Technical Committee
- B02 - Nonferrous Metals and Alloys
- Drafting Committee
- B02.10 - Thermostat Metals and Electrical Resistance Heating Materials
Relations
- Effective Date
- 01-Nov-2018
- Effective Date
- 01-Apr-2018
- Effective Date
- 01-May-2012
- Effective Date
- 01-Jun-2006
- Effective Date
- 10-Oct-2000
Overview
ASTM B223-08(2018) - Standard Test Method for Modulus of Elasticity of Thermostat Metals (Cantilever Beam Method), establishes procedures for determining the modulus of elasticity for thermostat metals across a wide temperature range. Developed by ASTM International, this test method is designed for use with metallic composite materials commonly known as thermostat metals, which exhibit unique curvature changes based on temperature due to differing thermal expansion rates within their structure. The cantilever beam method involves securely mounting a specimen, applying a controlled load, and measuring the resulting deflection to calculate the material's modulus of elasticity.
Key Topics
- Modulus of Elasticity Measurement: This standard describes how to determine the modulus of elasticity for thermostat metals by measuring the deflection of a cantilever-mounted specimen when subjected to a mechanical load.
- Temperature Range: Testing can be performed at temperatures between −300°F and +1000°F (−185°C to 540°C), making this method highly versatile for applications in both very low and very high-temperature environments.
- Specimen Preparation: Detailed instructions are provided to ensure that each test specimen is precisely machined, free of oxide and foreign substances, and heat-treated for stress relief, ensuring measurement accuracy.
- Apparatus Requirements: The standard outlines the use of specialized equipment, including a rigid specimen holder, a low-expansion loading rod, a micrometer depth gage for precise deflection measurement, and an electronic indicator for enhanced sensitivity.
- Safety and Compliance: Users are reminded to observe all relevant safety and environmental practices, review Safety Data Sheets (SDS), and ensure regulatory compliance when performing testing according to this standard.
Applications
- Quality Assurance for Thermostat Metals: The standard is essential for manufacturers and purchasers of thermostat metals (bimetallic strips) seeking to verify mechanical properties, particularly the modulus of elasticity, for use in sensitive temperature control devices.
- Thermostat Device Design: Accurate data on modulus of elasticity allows engineers to design more reliable thermostatic components for appliances, HVAC systems, and industrial temperature controllers.
- Research and Development: The test method is widely used in materials science research to develop new thermostat alloys and optimize performance parameters under various temperature conditions.
- Material Specification Compliance: Laboratories utilize ASTM B223 to ensure consistency and conformity with procurement specifications or industry standards.
Related Standards
- ASTM B388 - Specification for Thermostat Metal Sheet and Strip: Complements B223 by specifying dimensional and material requirements for thermostat metal forms.
- ASTM E4 - Practices for Force Verification of Testing Machines: Useful for verifying the accuracy of machines used for applying mechanical loads.
- Other ASTM Standards: Consult the ASTM Annual Book of Standards or the ASTM website for additional related material testing and mechanical property measurement standards.
By adhering to ASTM B223-08(2018), professionals in metallurgy, manufacturing, and quality assurance can ensure reliable measurement of modulus of elasticity in thermostat metals, supporting product quality, safety, and performance in critical thermal management applications.
Buy Documents
ASTM B223-08(2018) - Standard Test Method for Modulus of Elasticity of Thermostat Metals (Cantilever Beam Method)
Get Certified
Connect with accredited certification bodies for this standard

Element Materials Technology
Materials testing and product certification.

Inštitut za kovinske materiale in tehnologije
Institute of Metals and Technology. Materials testing, metallurgical analysis, NDT.
Sponsored listings
Frequently Asked Questions
ASTM B223-08(2018) is a standard published by ASTM International. Its full title is "Standard Test Method for Modulus of Elasticity of Thermostat Metals (Cantilever Beam Method)". This standard covers: ABSTRACT This test method covers the determination of the modulus of elasticity of thermostat metals within a particular temperature range. The test is done by mounting the specimen as a cantilever and measuring its deflection when subjected to a mechanical load. Each test specimen should be finished to size by careful machining or filing after being roughly cut, slit, or sheared from the samples. Then the specimen is preformed into a shape approximating the segment of a circle and subsequently heat treated to relieve all internal stresses. To permit maximum sensitivity, any oxide and other foreign substances must be carefully removed from all surfaces of the test specimen which directly affect the electrical resistance of the electronic indicator circuit through the testing apparatus. Extra care should be taken so that the load does not overstress the specimen beyond its elastic limit, if this happens, a new specimen shall be substituted and a lighter load should be used. The modulus of elasticity of each test material is computed using the specimen size and the average deflection for a known load. SCOPE 1.1 This test method covers the determination of the modulus of elasticity of thermostat metals at any temperature between −300 and +1000°F (−185 and 540°C) by mounting the specimen as a cantilever beam and measuring the deflection when subjected to a mechanical load. 1.2 The values stated in inch-pound units are to be regarded as standard. The values given in parentheses are mathematical conversions to SI units that are provided for information only and are not considered standard. 1.3 This standard does not purport to address all of the safety concerns, if any, associated with its use. It is the responsibility of the user of this standard to become familiar with all hazards including those identified in the appropriate Safety Data Sheet (SDS) for this product/material as provided by the manufacturer, to establish appropriate safety, health, and environmental practices, and determine the applicability of regulatory limitations prior to use. 1.4 This international standard was developed in accordance with internationally recognized principles on standardization established in the Decision on Principles for the Development of International Standards, Guides and Recommendations issued by the World Trade Organization Technical Barriers to Trade (TBT) Committee.
ABSTRACT This test method covers the determination of the modulus of elasticity of thermostat metals within a particular temperature range. The test is done by mounting the specimen as a cantilever and measuring its deflection when subjected to a mechanical load. Each test specimen should be finished to size by careful machining or filing after being roughly cut, slit, or sheared from the samples. Then the specimen is preformed into a shape approximating the segment of a circle and subsequently heat treated to relieve all internal stresses. To permit maximum sensitivity, any oxide and other foreign substances must be carefully removed from all surfaces of the test specimen which directly affect the electrical resistance of the electronic indicator circuit through the testing apparatus. Extra care should be taken so that the load does not overstress the specimen beyond its elastic limit, if this happens, a new specimen shall be substituted and a lighter load should be used. The modulus of elasticity of each test material is computed using the specimen size and the average deflection for a known load. SCOPE 1.1 This test method covers the determination of the modulus of elasticity of thermostat metals at any temperature between −300 and +1000°F (−185 and 540°C) by mounting the specimen as a cantilever beam and measuring the deflection when subjected to a mechanical load. 1.2 The values stated in inch-pound units are to be regarded as standard. The values given in parentheses are mathematical conversions to SI units that are provided for information only and are not considered standard. 1.3 This standard does not purport to address all of the safety concerns, if any, associated with its use. It is the responsibility of the user of this standard to become familiar with all hazards including those identified in the appropriate Safety Data Sheet (SDS) for this product/material as provided by the manufacturer, to establish appropriate safety, health, and environmental practices, and determine the applicability of regulatory limitations prior to use. 1.4 This international standard was developed in accordance with internationally recognized principles on standardization established in the Decision on Principles for the Development of International Standards, Guides and Recommendations issued by the World Trade Organization Technical Barriers to Trade (TBT) Committee.
ASTM B223-08(2018) is classified under the following ICS (International Classification for Standards) categories: 77.120.01 - Non-ferrous metals in general. The ICS classification helps identify the subject area and facilitates finding related standards.
ASTM B223-08(2018) has the following relationships with other standards: It is inter standard links to ASTM B223-08(2013), ASTM B388-06(2018), ASTM B388-06(2012), ASTM B388-06, ASTM B388-00. Understanding these relationships helps ensure you are using the most current and applicable version of the standard.
ASTM B223-08(2018) is available in PDF format for immediate download after purchase. The document can be added to your cart and obtained through the secure checkout process. Digital delivery ensures instant access to the complete standard document.
Standards Content (Sample)
This international standard was developed in accordance with internationally recognized principles on standardization established in the Decision on Principles for the
Development of International Standards, Guides and Recommendations issued by the World Trade Organization Technical Barriers to Trade (TBT) Committee.
Designation: B223 − 08 (Reapproved 2018)
Standard Test Method for
Modulus of Elasticity of Thermostat Metals (Cantilever
Beam Method)
This standard is issued under the fixed designation B223; the number immediately following the designation indicates the year of
original adoption or, in the case of revision, the year of last revision.Anumber in parentheses indicates the year of last reapproval.A
superscript epsilon (´) indicates an editorial change since the last revision or reapproval.
1. Scope 3.1.1 thermostat metal, n—a composite material, usually in
the form of sheet or strip, comprising two or more materials of
1.1 This test method covers the determination of the modu-
any appropriate nature, metallic or otherwise, which, by virtue
lus of elasticity of thermostat metals at any temperature
of the differing expansivities of the components, tends to alter
between−300and+1000°F(−185and540°C)bymountingthe
its curvature when its temperature is changed.
specimen as a cantilever beam and measuring the deflection
when subjected to a mechanical load. 3.1.2 modulus of elasticity, n—the ratio, within the elastic
limit of a material, of stress to corresponding strain. In this test
1.2 The values stated in inch-pound units are to be regarded
method the modulus of elasticity is calculated from the
as standard. The values given in parentheses are mathematical
expression for the deflection of a cantilever beam under
conversions to SI units that are provided for information only
mechanical load which is transposed to read as follows:
and are not considered standard.
3 3
E 5 4Pl /dbt
1.3 This standard does not purport to address all of the
safety concerns, if any, associated with its use. It is the
where:
responsibility of the user of this standard to become familiar
E = modulus of elasticity, psi or MPa,
with all hazards including those identified in the appropriate
P = load, lbf or N,
Safety Data Sheet (SDS) for this product/material as provided
l = gage length, in. or mm,
by the manufacturer, to establish appropriate safety, health,
d = specimen deflection, in. or mm,
and environmental practices, and determine the applicability
b = specimen width, in. or mm, and
of regulatory limitations prior to use. t = specimen thickness, in. or mm.
1.4 This international standard was developed in accor-
dance with internationally recognized principles on standard-
4. Apparatus (Figs. 1-3)
ization established in the Decision on Principles for the
4.1 Specimen Holder for securely clamping the test speci-
Development of International Standards, Guides and Recom-
men in a horizontal position as a cantilever beam when
mendations issued by the World Trade Organization Technical
immersed in a bath at the desired temperature. It shall carry a
Barriers to Trade (TBT) Committee.
micrometer depth gage for reading the deflection of the
specimen and a loading rod for loading the specimen. Both of
2. Referenced Documents
theseshallextendsufficientlyabovetheliquidlevelofthebath
2.1 ASTM Standards:
to permit the operator to perform the test at the higher test
B388Specification for Thermostat Metal Sheet and Strip
temperatures.
4.1.1 Specimen holder to be made sufficiently rigid to allow
3. Terminology
normal handling without distortion.
3.1 Definitions:
4.2 Loading Rod, ⁄8 in. (3.2 mm) or less in diameter, for
carrying the load and transmitting its weight vertically to the
free end of the cantilever specimen. It shall be made of a low
This test method is under the jurisdiction of ASTM Committee B02 on
expansion material; the mounting clamp and tube shall be
Nonferrous Metals and Alloys and is the direct responsibility of Subcommittee
madeofthesamematerialasthespecimenmountingclampsin
B02.10 on Thermostat Metals and Electrical Resistance Heating Materials.
order to prevent a difference in expansion rates from affecting
Current edition approved Nov. 1, 2018. Published November 2018. Originally
the deflection readings. The bottom end shall be conically
approved in 1948. Last previous edition approved in 2013 as B223– 08 (2013).
DOI: 10.1520/B0223-08R18.
shaped and shall rest in the conical punch mark at the free end
For referenced ASTM standards, visit the ASTM website, www.astm.org, or
ofthespecimen.Anysupportsshallpermitfreemovementwith
contact ASTM Customer Service at service@astm.org. For Annual Book of ASTM
specimendeflectionandshallprovideelectricalinsulationfrom
Standards volume information, refer to the standard’s Document Summary page on
the ASTM website. the micrometer depth gage. Near the top shall be a holder for
Copyright © ASTM International, 100 Barr Harbor Drive, PO Box C700, West Conshohocken, PA 19428-2959. United States
B223 − 08 (2018)
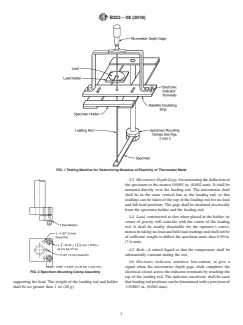
FIG. 1 Testing Machine for Determining Modulus of Elasticity of Thermostat Metal
4.3 Micrometer Depth Gage,formeasuringthedeflectionof
the specimen to the nearest 0.0001 in. (0.002 mm). It shall be
mounted directly over the loading rod. The micrometer shaft
shall be in the same vertical line as the loading rod, so that
readings can be taken of the top of the loading rod for no-load
and full-load positions.The gage shall be insulated electrically
from the specimen holder and the loading rod.
4.4 Load, constructed so that when placed in the holder, its
center of gravity will coincide with the center of the loading
rod. It shall be readily detachable for the operator’s conve-
nienceintakingno-loadandfull-loadreadingsandshallnotbe
of sufficient weight to deflect the specimen more than 0.30 in.
(7.6 mm).
4.5 Bath—A stirred liquid so that the temperature shall be
substantially constant during the test.
4.6 Electronic Indicator, sensitive, low-current, to give a
signal when the micrometer depth gage shaft completes the
FIG. 2 Specimen Mounting Clamp Assembly
electrical circuit across the indicator terminals by touching the
top of the loading rod. The indicator sensitivity shall be such
supporting the load. The weight of the loading rod and holder thatloadingrodpositionscanbedeterminedwithaprecisionof
shall be no greater than 1 oz (28 g). 60.0001 in. (0.002 mm).
B223 − 08 (2018)
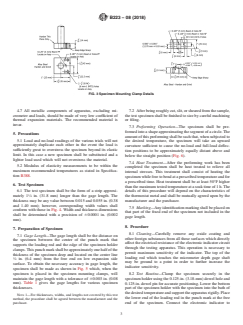
FIG. 3 Specimen Mounting Clamp Details
4.7 All metallic components of apparatus, excluding mi- 7.2 Afterbeingroughlycut,slit,orshearedfromthesample,
crometer and loads, should be made of very low coefficient of thetestspecimenshallbefinishedtosizebycarefulmachining
thermal expansion materials. The recommended material is or filing.
invar.
7.3 Preforming Operation—The specimen shall be pre-
formedintoashapeapproximatingthesegmentofacircle.The
5. Precautions
amountofthispreformingshallbesuchthat,whensubjectedto
5.1 Load and no-load readings of the various trials will not
the desired temperature, the specimen will take an upward
approximately duplicate each other in the event the load is
curva
...


Questions, Comments and Discussion
Ask us and Technical Secretary will try to provide an answer. You can facilitate discussion about the standard in here.
Loading comments...