Standard Test Method for Peel Adhesion of Pressure-Sensitive Tape

SCOPE
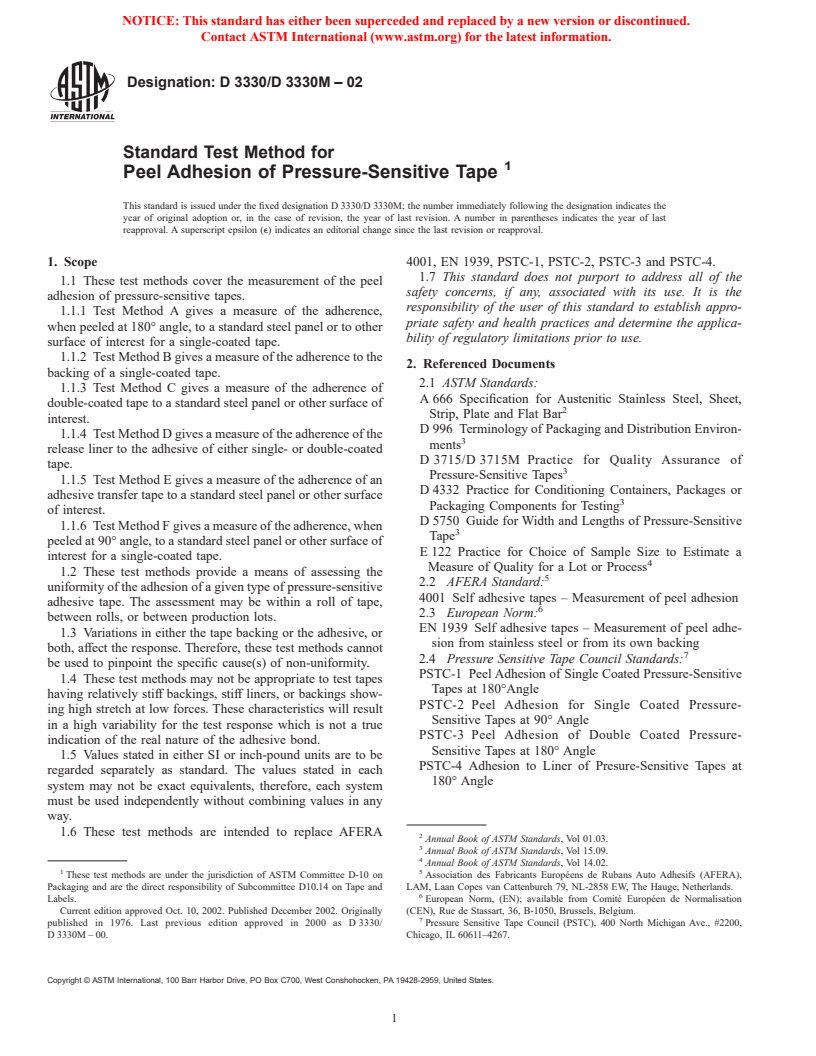
1.1 These test methods cover the measurement of the peel adhesion of pressure-sensitive tapes.
1.1.1 Test Method A gives a measure of the adherence, when peeled at 180o angle, to a standard steel panel or to other surface of interest for a single-coated tape.
1.1.2 Test Method B gives a measure of the adherence to the backing of a single-coated tape.
1.1.3 Test Method C gives a measure of the adherence of double-coated tape to a standard steel panel or other surface of interest.
1.1.4 Test Method D gives a measure of the adherence of the release liner to the adhesive of either single- or double-coated tape.
1.1.5 Test Method E gives a measure of the adherence of an adhesive transfer tape to a standard steel panel or other surface of interest.
1.1.6 Test Method F gives a measure of the adherence, when peeled at 90o angle, to a standard steel panel or other surface of interest for a single-coated tape.
1.2 These test methods provide a means of assessing the uniformity of the adhesion of a given type of pressure-sensitive adhesive tape. The assessment may be within a roll of tape, between rolls, or between production lots.
1.3 Variations in either the tape backing or the adhesive, or both, affect the response. Therefore, these test methods cannot be used to pinpoint the specific cause(s) of non-uniformity.
1.4 These test methods may not be appropriate to test tapes having relatively stiff backings, stiff liners, or backings showing high stretch at low forces. These characteristics will result in a high variability for the test response which is not a true indication of the real nature of the adhesive bond.
1.5 Values stated in either SI or inch-pound units are to be regarded separately as standard. The values stated in each system may not be exact equivalents, therefore, each system must be used independently without combining values in any way.
1.6 These test methods are intended to replace AFERA 4001, EN 1939, PSTC-1, PSTC-2, PSTC-3 and PSTC-4.
1.7 This standard does not purport to address all of the safety concerns, if any, associated with its use. It is the responsibility of the user of this standard to establish appropriate safety and health practices and determine the applicability of regulatory limitations prior to use.

General Information

Status
Historical
Publication Date
09-Oct-2000
Technical Committee
Drafting Committee
Current Stage
Ref Project

Relations

Buy Standard

Standard
ASTM D3330/D3330M-00 - Standard Test Method for Peel Adhesion of Pressure-Sensitive Tape
English language
5 pages
sale 15% off
Preview
sale 15% off
Preview

Standards Content (Sample)


NOTICE: This standard has either been superseded and replaced by a new version or discontinued.
Contact ASTM International (www.astm.org) for the latest information.
Designation: D 3330/D 3330M – 00
Standard Test Method for
Peel Adhesion of Pressure-Sensitive Tape
This standard is issued under the fixed designation D 3330/D 3330M; the number immediately following the designation indicates the
year of original adoption or, in the case of revision, the year of last revision. A number in parentheses indicates the year of last
reapproval. A superscript epsilon (e) indicates an editorial change since the last revision or reapproval.
1. Scope safety concerns, if any, associated with its use. It is the
responsibility of the user of this standard to establish appro-
1.1 These test methods cover the measurement of the peel
priate safety and health practices and determine the applica-
adhesion of pressure-sensitive tapes.
bility of regulatory limitations prior to use.
1.1.1 Test Method A gives a measure of the adherence,
when peeled at 180° angle, to a standard steel panel or to other
2. Referenced Documents
surface of interest for a single-coated tape.
2.1 ASTM Standards:
1.1.2 Test Method B gives a measure of the adherence to the
A 666 Specification for Austenitic Stainless Steel, Sheet,
backing of a single-coated tape.
Strip, Plate and Flat Bar
1.1.3 Test Method C gives a measure of the adherence of
D 996 Terminology of Packaging and Distribution Environ-
double-coated tape to a standard steel panel or other surface of
ments
interest.
D 3715/D 3715M Practice for Quality Assurance of
1.1.4 Test Method D gives a measure of the adherence of the
Pressure-Sensitive Tapes
release liner to the adhesive of either single- or double-coated
D 4332 Practice for Conditioning Containers, Packages or
tape.
Packaging Components for Testing
1.1.5 Test Method E gives a measure of the adherence of an
D 5750 Guide for Width and Lengths of Pressure-Sensitive
adhesive transfer tape to a standard steel panel or other surface
Tape
of interest.
E 122 Practice for Choice of Sample Size to Estimate a
1.1.6 Test Method F gives a measure of the adherence, when
Measure of Quality for a Lot or Process
peeled at 90° angle, to a standard steel panel or other surface of
2.2 AFERA Standard:
interest for a single-coated tape.
4001 Self adhesive tapes – Measurement of peel adhesion
1.2 These test methods provide a means of assessing the
2.3 European Norm:
uniformity of the adhesion of a given type of pressure-sensitive
EN 1939 Self adhesive tapes – Measurement of peel adhe-
adhesive tape. The assessment may be within a roll of tape,
sion from stainless steel or from its own backing
between rolls, or between production lots.
2.4 Pressure Sensitive Tape Council Standards:
1.3 Variations in either the tape backing or the adhesive, or
PSTC-1 Peel Adhesion of Single Coated Pressure-Sensitive
both, affect the response. Therefore, these test methods cannot
Tapes at 180°Angle
be used to pinpoint the specific cause(s) of non-uniformity.
PSTC-2 Peel Adhesion for Single Coated Pressure-
1.4 These test methods may not be appropriate to test tapes
Sensitive Tapes at 90° Angle
having relatively stiff backings, stiff liners, or backings show-
PSTC-3 Peel Adhesion of Double Coated Pressure-
ing high stretch at low forces. These characteristics will result
Sensitive Tapes at 180° Angle
in a high variability for the test response which is not a true
PSTC-4 Adhesion to Liner of Presure-Sensitive Tapes at
indication of the real nature of the adhesive bond.
180° Angle
1.5 Values stated in either SI or inch-pound units are to be
regarded separately as standard. The values stated in each
3. Terminology
system may not be exact equivalents, therefore, each system
3.1 Definitions—Terminology found in Terminology D 996
must be used independently without combining values in any
shall apply.
way.
1.6 These test methods are intended to replace AFERA
4001, EN 1939, PSTC-1, PSTC-2, PSTC-3 and PSTC-4.
Annual Book of ASTM Standards, Vol 01.03.
1.7 This standard does not purport to address all of the
Annual Book of ASTM Standards, Vol 15.09.
Annual Book of ASTM Standards, Vol 14.02.
Association des Fabricants Européens de Rubans Auto Adhesifs (AFERA),
These test methods are under the jurisdiction of ASTM Committee D-10 on LAM, Laan Copes van Cattenburch 79, NL-2858 EW, The Hauge, Netherlands.
Packaging and are the direct responsibility of Subcommittee D10.14 on Tape and European Norm, (EN); available from Comité Européen de Normalisation
Labels. (CEN), Rue de Stassart, 36, B-1050, Brussels, Belgium.
Current edition approved Oct. 10, 2000. Published December 2000. Originally Pressure Sensitive Tape Council (PSTC), 400 North Michigan Ave., #2200,
published as D 3330 – 76. Last previous edition D 3330/D 3330M – 99. Chicago, IL 60611–4267.
Copyright © ASTM, 100 Barr Harbor Drive, West Conshohocken, PA 19428-2959, United States.
NOTICE: This standard has either been superseded and replaced by a new version or discontinued.
Contact ASTM International (www.astm.org) for the latest information.
D 3330/D 3330M
4. Summary of Test Method because the measured peel force is not normalized for a fixed
area of stress. The area under stress varies with backing
4.1 Test Method A—Single-Coated Tapes, Peel Adhesion at
stiffness and adhesive rheology (firmness). Two different tapes
180° Angle—A strip of tape is applied to a standard test panel
seldom agree in these properties.
(or other surface of interest) with controlled pressure. The tape
5.4 Test Method D can show the amount of force required to
is peeled from the panel at 180° angle at a specified rate, during
remove a liner that covers the adhesive side of a tape at a
which time the force required to effect peel is measured.
specified peel rate. The force will be different at other peel
4.2 Test Method B—Adhesion to Backing, Single-Coated
rates.
Tapes—A strip of the tape under test is applied to a rigid panel.
5.5 These test methods may not provide design information
A strip of the tape under test is applied to the backing of the
as there is usually no direct relationship between peel adhesion
first strip of tape and tested for peel adhesion as described in
and any functional requirement.
Test Method A.
4.3 Test Method C—Double-Coated Tapes:
6. Apparatus
4.3.1 Face Side Adhesion—The double-coated tape is ad-
6.1 Specimen Cutter —The specimen cutter shall hold two
hered to a stainless steel panel (or other surface of interest),
single-edged razor blades in parallel planes, a precise distance
liner side up. The liner is removed and the exposed adhesive
apart, to form a cutter of exact specimens widths. Two cutters,
covered with a strip of 0.025-mm [0.001-in.] thick polyester
12- and 24-mm [0.05- and 1-in.] cutting width, shall be
film. The resulting tape is then tested as described in Test
available. Appropriate alternates which will not cause edge
Method A.
damage may be used.
4.3.2 Liner Side Adhesion—The face side adhesive is ad-
hered to a 0.025-mm [0.001-in.] polyester film. The liner is NOTE 1—The 12-mm [0.5-in.] cutter shall consist of a 12-mm [0.5-in.]
thick by 220-mm [8-in.] length aluminum bar stock 12-mm [0.05-in.]
removed and the tape is applied adhesive down to a stainless
wide. The edges for about 125 mm [5 in.] from one end shall be slightly
steel panel (or other surface of interest). Testing is conducted as
rounded to form a handle. The width of the bar for 75 mm [3 in.] from the
described in Test Method A.
opposite end shall be narrowed to exactly 12 mm [0.5 in.] minus the
4.4 Test Method D—Adhesion to Liner—The tape is adhered
thickness of a single razor blade (one of two used as cutting edges). The
to a standard steel test panel with the liner side up. The liner is
razor blades shall be held in position using side plates. The end of the
peeled from the adhesive in the same manner as in peeling a
cutter shall be cut away at 45° angle to expose the cutting edge at one end
of the blades. The edges shall be separated by 12 6 0.10 mm [0.5 in.]. The
single-coated tape from a standard panel as described in Test
24-mm [1-in.] cutter shall follow the same description except the bar stock
Method A.
shall be 24.0 mm [1 in.] and shall be narrowed exactly 24 mm [1 in.]
4.5 Test Method E—Adhesion of Adhesive Transfer Tapes:
minus the thickness of a single razor blade.
4.5.1 Face Side—The tape is adhered to a standard panel (or
6.2 Dispensing System—For solvents, such as a wash bottle.
other surface of interest). The liner is removed and a 0.025-mm
6.3 Panel —A stainless steel panel, 50 by 125 mm [2 by 5
[0.001-in.] thick strip of polyester is adhered to form a
in.] no less than 1.1 mm [0.043 in.] thickness, conforming to
film-backed strip of tape. The adhesion is measured as de-
Type 302 or 304 of Specification A 666, having a bright
scribed in Test Method A.
annealed finish. The surface roughness height shall be 50 6 25
4.5.2 Linear Side—The transfer tape is applied to a strip of
nm [2.06 1.0 μin.] arithmetical average deviation from the
0.025-mm [0.001-in.] thick polyester film, the liner is removed
mean line. Panels showing stains, discoloration, or many
and the resulting tape’s adhesion is measured as described in
scratches are not acceptable. New panels should be cleaned
Test Method A.
prior to use as described in 11.1, except with ten washes of the
4.6 Test Method F—Single-Coated Tapes, 90° Peel—A strip
final solvent. Between uses, the panel test surface shall be
of tape is applied to a standard test panel (or other surface of
protected from scratches and contamination, and the panels
interest) with controlled pressure. The tape is peeled from the
stored at conditions described in Section 10.
panel at 90° angle at a specified rate, during which time the
6.4 Roller—Mechanically or hand operated.
force required to effect peel is measured.
6.4.1 A steel roller 85 6 2.5 mm [3.25 6 0.1 in.] in diameter
and 45 6 1.5 mm [1.75 6 0.005 in.] in width, covered with
5. Significance and Use
rubber approximately 6 mm [0.25 in.] in thickness, having a
5.1 These test methods are tools for quality assurance use.
Shore scale A durometer hardness of 80 6 5. The surface shall
Given specific pressure-sensitive tape and a requirement in
be a true cylinder void of any convex or concave deviations.
terms of the minimum or maximum peel value expected for
The mass of the roller shall be 2040 6 45 g [4.5 6 0.1 lb].
this tape, the data from the test can be used in conjunction with
6.4.2 No part of the apparatus shall increase the mass of the
acceptance criteria.
roller during use. The roller shall move either mechanically or
5.2 Test Method A, B, C, E, or F can show the relative bond
strength of a given tape to one or more surfaces (material and
texture) as compared to the standard stainless steel panel.
Available from Chemsultants International, 9349 Hamilton Dr., Mentor, OH
Substitution of representative samples of materials in question
44061-1118, and PSTC, 400 North Michigan Ave., #2200, Chicago, IL 60611–4267.
These widths correspond to the primary metric (SI) units described in Guide
for the standard steel panel would suffice to do this.
D 5750. These so-called “modular metric” units are used throughout the world,
5.3 Test Methods A, B, C, E or F cannot be used to compare
except for Europe. If it is desirable to test slightly different widths (for example, 25
two pressure-sensitive tapes of the same type but of different
mm) of specimens than those described in 9.1, this should be noted (see 18.1.7) and
manufacture for their ability to adhere to a surface. This is calculations must also account for the difference (see 17.1).
NOTICE: This standard has either been superseded and replaced by a new version or discontinued.
Contact ASTM International (www.astm.org) for the latest information.
D 3330/D 3330M
by hand at the rate of 10 6 0.5 mm/s [24 6 0.5 in./min]. A 9. Test Specimen
mechanically operated roller is recommended for referee
9.1 The specimen shall be 24-mm [1-in.] wide. If the
purposes.
specimen is of a different width, refer to Note 5. A tolerance
of6 0.5 mm [61/64 in.] shall be allowed. The length shall be
NOTE 2—A simple check to determine if the rubber surface is cylindri-
approximately 300 mm [12 in.].
cal is to wrap the roller in a very thin paper (onionskin) and drag it across
a flat glass plate on which is placed carbon paper, face up. The carbon rubs
9.2 Discard at least three but no more than six outer wraps
off onto the thin paper wrapper to reveal high spots or hollows on the
of tape from the sample roll before taking the specimens for
rubber surface.
testing.
9.3 Remove one specimen per sample roll for each test to be
6.5 Adhesion Tester—A constant-rate-of-extension (CRE)
performed. Remove the specimen from a freely rotating roll at
tension tester shall be used. It is proposed to use an electronic
the rate of 500 to 750 mm/s [20 to 30 in./s]. Where width or
machine taking at least one reading per mm [0.1 in.] of tape
other factors causing a high adherence to backing makes it
peeled. The tester shall have two clamps with centers in the
impossible to remove the specimen at the prescribed rate,
same plane, parallel with the direction of the motion on the
remove it at a rate as close to 500 mm/s [20 in./s] as possible.
stressing clamp, and so aligned that they will hold the
9.4 When tape is wider than 24 mm [1 in.], specimens of the
specimen wholly in the same plane; a means of moving the
widest specified width are to be cut from the center of a strip
stressing clamp at a uniform rate of 5.0 6 0.2 mm/s [126 0.5
removed from the roll in accordance with 9.3.
in./min] and a device for recording load. The instrument shall
9.5 Apply specimen within 5 min after unwinding.
be calibrated to an accuracy of 0.5 % of full scale and the scale
range used for any test shall be such that the mean test level
10. Conditioning
falls within 20 to 80 % of full scale.
8 10.1 Condition the sample rolls of tape in the standard
6.6 Fixture—90° peel for Test Method F.
conditioning atmosphere as described in Practice D 4332 for a
period of not less than 24 h. Test at these conditions.
7. Reagents and Materials
NOTE 3—Caution: The tester should know that by prolonged handling
7.1 Purity of Reagents—Reagent grade chemicals should be
heat is transmitted to the stainless steel test panel. Therefore, during and
used in all tests. Other grades may be used, provided it is first
after application of the adhesive tape to the test panel, the panel should be
ascertained that the reagent is of sufficiently high purity to
handled as little as possible.
permit its use without lessening accuracy of the determination.
7.2 Solvents:
11. Test Method A—Single-Coated Tapes at 180° Angle
7.2.1 Any of the following solvents may be used for
11.1 Dispen
...

Questions, Comments and Discussion

Ask us and Technical Secretary will try to provide an answer. You can facilitate discussion about the standard in here.