ASTM F812/F812M-12(2022)e1
(Specification)Standard Specification for Surface Discontinuities of Nuts, Inch and Metric Series
Standard Specification for Surface Discontinuities of Nuts, Inch and Metric Series
ABSTRACT
This specification establishes allowable limits for the various types of surface discontinuities such as cracks that may occur during the manufacture and processing of metric-series nuts and inch-series nuts. The different types of surface discontinuities and allowable limits are presented in details. The nuts shall be inspected for surface discontinuities to meet the requirements prescribed. Cone proof load test shall be performed to meet the requirements prescribed.
SCOPE
1.1 This specification establishes allowable limits for the various types of surface discontinuities that may occur during the manufacture and processing of metric-series nuts with nominal diameters 5 mm and larger and inch-series nuts with nominal diameters 1/4 in. and larger.
1.2 The values stated in either SI (metric) or inch-pound units are to be regarded separately as standard. The values stated in each system are not exact equivalents; therefore, each system must be used independently of the other. Combining values from the two systems may result in nonconformance with the specification.
1.3 When the engineering requirements of the application necessitate control of surface discontinuities on nuts, the purchaser shall specify conformance to this ASTM specification in the original inquiry and purchase order.
1.3.1 When the engineering requirements of the application necessitate that surface discontinuities on nuts be controlled within limits closer than those specified in this specification, the purchaser shall specify the applicable limits in the original inquiry and purchase order.
1.4 The allowable limits established in this specification for metric nuts, with nominal diameters 5 to 24 mm inclusive, are essentially identical with requirements given in ISO/DIS 6157/II. There are no ISO standards for surface discontinuities on metric-series nuts with nominal diameters larger than 24 mm or on any inch-series nuts.
1.5 The following precautionary caveat pertains only to the test method portion, Section 7, of this specification: This standard does not purport to address all of the safety concerns, if any, associated with its use. It is the responsibility of the user of this standard to establish appropriate safety, health, and environmental practices and determine the applicability of regulatory limitations prior to use.
1.6 This international standard was developed in accordance with internationally recognized principles on standardization established in the Decision on Principles for the Development of International Standards, Guides and Recommendations issued by the World Trade Organization Technical Barriers to Trade (TBT) Committee.
General Information
- Status
- Published
- Publication Date
- 31-Jul-2022
- Technical Committee
- F16 - Fasteners
- Drafting Committee
- F16.93 - Quality Assurance Provisions for Fasteners
Relations
- Effective Date
- 01-Jan-2024
- Effective Date
- 01-Nov-2023
- Effective Date
- 01-Feb-2018
- Effective Date
- 01-Jun-2017
- Effective Date
- 01-Sep-2016
- Effective Date
- 01-Aug-2016
- Effective Date
- 01-Mar-2015
- Effective Date
- 01-Feb-2015
- Effective Date
- 01-Nov-2014
- Effective Date
- 01-Sep-2014
- Effective Date
- 01-Feb-2014
- Effective Date
- 01-Dec-2012
- Effective Date
- 15-Nov-2012
- Effective Date
- 01-Jun-2012
- Effective Date
- 01-Nov-2011
Overview
ASTM F812/F812M-12(2022)e1 is the standard specification developed by ASTM International for surface discontinuities of nuts in both inch and metric series. This standard provides detailed requirements on the types and allowable limits of surface discontinuities, such as cracks, seams, voids, and tool marks, that may occur during the manufacture and processing of nuts. The standard applies to metric nuts with nominal diameters of 5 mm and larger, and inch-series nuts of 1/4 inch and larger. The document outlines inspection procedures and performance tests, ensuring nuts meet quality and safety expectations in demanding applications.
Key Topics
Surface Discontinuities Defined: The standard categorizes and defines various types of surface discontinuities that can be found on nuts, including:
- Quench cracks
- Forging cracks and inclusion cracks
- Locking-element cracks
- Washer-retainer cracks
- Bursts and shear bursts
- Seams and folds
- Voids, tool marks, gouges, and nicks
Allowable Limits: Each type of discontinuity is assigned specific limits regarding its size, location, and effect on functionality. For instance, the presence, depth, and width for cracks, seams, and voids are strictly regulated.
Inspection and Testing: Procedures for visual inspection are outlined, along with mechanical testing such as the cone proof load test, to verify that nuts with observable discontinuities still meet performance requirements.
Purchaser Responsibilities: The standard emphasizes that if closer control over discontinuities is required, the purchaser must specify this in their inquiry and purchase order.
Unit Consistency: All requirements are provided in both SI (metric) and inch-pound units, with a caution not to combine values across systems in a way that would result in nonconformance.
Applications
ASTM F812/F812M-12(2022)e1 is critical for a wide range of industrial and engineering sectors where mechanical fasteners, specifically nuts, must meet stringent quality control standards:
- Automotive and Aerospace Manufacturing: These industries require high-performance fasteners free from critical surface discontinuities to ensure safety and long-term service.
- Construction and Structural Engineering: Building applications rely on fasteners with proven reliability under load and environmental stress.
- Machinery and Equipment Production: Properly specified nuts help reduce risk of mechanical failure related to flawed fasteners.
- Procurement and Quality Assurance: Buyers and inspectors use this standard for specifying, purchasing, and verifying compliant hardware for their projects.
- International Trade: As the standard aligns closely with ISO requirements for metric nuts up to 24 mm, it supports global supply chain consistency and conformity assessment.
Related Standards
The following standards are closely linked to ASTM F812/F812M-12(2022)e1 and frequently referenced for comprehensive quality control of fasteners:
- ASTM F606/F606M: Test Methods for Determining the Mechanical Properties of Externally and Internally Threaded Fasteners, Washers, Direct Tension Indicators, and Rivets.
- ASTM F1470: Practice for Fastener Sampling for Specified Mechanical Properties and Performance Inspection.
- ASTM F1789: Terminology for F16 Mechanical Fasteners.
- ISO/DIS 6157/II: Fasteners - Surface Discontinuities on Nuts (applies to metric nuts with diameters 5 to 24 mm).
By adhering to ASTM F812/F812M-12(2022)e1, manufacturers, suppliers, and users ensure that nuts meet rigorous surface quality requirements, resulting in safer, more reliable assemblies across critical industries.
Buy Documents
ASTM F812/F812M-12(2022)e1 - Standard Specification for Surface Discontinuities of Nuts, Inch and Metric Series
Frequently Asked Questions
ASTM F812/F812M-12(2022)e1 is a technical specification published by ASTM International. Its full title is "Standard Specification for Surface Discontinuities of Nuts, Inch and Metric Series". This standard covers: ABSTRACT This specification establishes allowable limits for the various types of surface discontinuities such as cracks that may occur during the manufacture and processing of metric-series nuts and inch-series nuts. The different types of surface discontinuities and allowable limits are presented in details. The nuts shall be inspected for surface discontinuities to meet the requirements prescribed. Cone proof load test shall be performed to meet the requirements prescribed. SCOPE 1.1 This specification establishes allowable limits for the various types of surface discontinuities that may occur during the manufacture and processing of metric-series nuts with nominal diameters 5 mm and larger and inch-series nuts with nominal diameters 1/4 in. and larger. 1.2 The values stated in either SI (metric) or inch-pound units are to be regarded separately as standard. The values stated in each system are not exact equivalents; therefore, each system must be used independently of the other. Combining values from the two systems may result in nonconformance with the specification. 1.3 When the engineering requirements of the application necessitate control of surface discontinuities on nuts, the purchaser shall specify conformance to this ASTM specification in the original inquiry and purchase order. 1.3.1 When the engineering requirements of the application necessitate that surface discontinuities on nuts be controlled within limits closer than those specified in this specification, the purchaser shall specify the applicable limits in the original inquiry and purchase order. 1.4 The allowable limits established in this specification for metric nuts, with nominal diameters 5 to 24 mm inclusive, are essentially identical with requirements given in ISO/DIS 6157/II. There are no ISO standards for surface discontinuities on metric-series nuts with nominal diameters larger than 24 mm or on any inch-series nuts. 1.5 The following precautionary caveat pertains only to the test method portion, Section 7, of this specification: This standard does not purport to address all of the safety concerns, if any, associated with its use. It is the responsibility of the user of this standard to establish appropriate safety, health, and environmental practices and determine the applicability of regulatory limitations prior to use. 1.6 This international standard was developed in accordance with internationally recognized principles on standardization established in the Decision on Principles for the Development of International Standards, Guides and Recommendations issued by the World Trade Organization Technical Barriers to Trade (TBT) Committee.
ABSTRACT This specification establishes allowable limits for the various types of surface discontinuities such as cracks that may occur during the manufacture and processing of metric-series nuts and inch-series nuts. The different types of surface discontinuities and allowable limits are presented in details. The nuts shall be inspected for surface discontinuities to meet the requirements prescribed. Cone proof load test shall be performed to meet the requirements prescribed. SCOPE 1.1 This specification establishes allowable limits for the various types of surface discontinuities that may occur during the manufacture and processing of metric-series nuts with nominal diameters 5 mm and larger and inch-series nuts with nominal diameters 1/4 in. and larger. 1.2 The values stated in either SI (metric) or inch-pound units are to be regarded separately as standard. The values stated in each system are not exact equivalents; therefore, each system must be used independently of the other. Combining values from the two systems may result in nonconformance with the specification. 1.3 When the engineering requirements of the application necessitate control of surface discontinuities on nuts, the purchaser shall specify conformance to this ASTM specification in the original inquiry and purchase order. 1.3.1 When the engineering requirements of the application necessitate that surface discontinuities on nuts be controlled within limits closer than those specified in this specification, the purchaser shall specify the applicable limits in the original inquiry and purchase order. 1.4 The allowable limits established in this specification for metric nuts, with nominal diameters 5 to 24 mm inclusive, are essentially identical with requirements given in ISO/DIS 6157/II. There are no ISO standards for surface discontinuities on metric-series nuts with nominal diameters larger than 24 mm or on any inch-series nuts. 1.5 The following precautionary caveat pertains only to the test method portion, Section 7, of this specification: This standard does not purport to address all of the safety concerns, if any, associated with its use. It is the responsibility of the user of this standard to establish appropriate safety, health, and environmental practices and determine the applicability of regulatory limitations prior to use. 1.6 This international standard was developed in accordance with internationally recognized principles on standardization established in the Decision on Principles for the Development of International Standards, Guides and Recommendations issued by the World Trade Organization Technical Barriers to Trade (TBT) Committee.
ASTM F812/F812M-12(2022)e1 is classified under the following ICS (International Classification for Standards) categories: 21.060.20 - Nuts. The ICS classification helps identify the subject area and facilitates finding related standards.
ASTM F812/F812M-12(2022)e1 has the following relationships with other standards: It is inter standard links to ASTM F1470-24, ASTM F1789-23, ASTM F1470-18, ASTM F1789-17, ASTM F606/F606M-16, ASTM F1789-16, ASTM F1789-15a, ASTM F1789-15, ASTM F606/F606M-14a, ASTM F1789-14a, ASTM F1789-14, ASTM F1789-12a, ASTM F1470-12, ASTM F1789-12, ASTM F1789-11b. Understanding these relationships helps ensure you are using the most current and applicable version of the standard.
ASTM F812/F812M-12(2022)e1 is available in PDF format for immediate download after purchase. The document can be added to your cart and obtained through the secure checkout process. Digital delivery ensures instant access to the complete standard document.
Standards Content (Sample)
This international standard was developed in accordance with internationally recognized principles on standardization established in the Decision on Principles for the
Development of International Standards, Guides and Recommendations issued by the World Trade Organization Technical Barriers to Trade (TBT) Committee.
´1
Designation: F812/F812M − 12 (Reapproved 2022)
Standard Specification for
Surface Discontinuities of Nuts, Inch and Metric Series
This standard is issued under the fixed designation F812/F812M; the number immediately following the designation indicates the year
of original adoption or, in the case of revision, the year of last revision. A number in parentheses indicates the year of last reapproval.
A superscript epsilon (´) indicates an editorial change since the last revision or reapproval.
ε NOTE—Editorially updated designation in September 2023.
This standard has been approved for use by agencies of the U.S. Department of Defense.
1. Scope* environmental practices and determine the applicability of
regulatory limitations prior to use.
1.1 This specification establishes allowable limits for the
1.6 This international standard was developed in accor-
various types of surface discontinuities that may occur during
dance with internationally recognized principles on standard-
the manufacture and processing of metric-series nuts with
ization established in the Decision on Principles for the
nominal diameters 5 mm and larger and inch-series nuts with
Development of International Standards, Guides and Recom-
nominal diameters ⁄4 in. and larger.
mendations issued by the World Trade Organization Technical
1.2 The values stated in either SI (metric) or inch-pound
Barriers to Trade (TBT) Committee.
units are to be regarded separately as standard. The values
stated in each system are not exact equivalents; therefore, each 2. Referenced Documents
system must be used independently of the other. Combining 2
2.1 ASTM Standards:
values from the two systems may result in nonconformance
F606/F606M Test Methods for Determining the Mechanical
with the specification.
Properties of Externally and Internally Threaded
Fasteners, Washers, Direct Tension Indicators, and Rivets
1.3 When the engineering requirements of the application
F1470 Practice for Fastener Sampling for Specified Me-
necessitate control of surface discontinuities on nuts, the
chanical Properties and Performance Inspection
purchaser shall specify conformance to this ASTM specifica-
F1789 Terminology for F16 Mechanical Fasteners
tion in the original inquiry and purchase order.
2.2 ISO Standard:
1.3.1 When the engineering requirements of the application
necessitate that surface discontinuities on nuts be controlled ISO/DIS 6157 ⁄II Fasteners, Surface Discontinuities on
Nuts
within limits closer than those specified in this specification,
the purchaser shall specify the applicable limits in the original
3. Ordering Information
inquiry and purchase order.
3.1 Orders for nuts requiring surface discontinuity control
1.4 The allowable limits established in this specification for
shall include:
metric nuts, with nominal diameters 5 to 24 mm inclusive, are
3.1.1 ASTM designation and date of issue of this specifica-
essentially identical with requirements given in ISO/
tion.
DIS 6157 ⁄II. There are no ISO standards for surface disconti-
3.1.2 Special requirements, for example, closer discontinu-
nuities on metric-series nuts with nominal diameters larger
ity limits (1.3.1) and inspection sampling plan (6.2).
than 24 mm or on any inch-series nuts.
1.5 The following precautionary caveat pertains only to the
4. Types of Surface Discontinuities (See Standard F1789
test method portion, Section 7, of this specification: This
for definitions not provided)
standard does not purport to address all of the safety concerns,
4.1 Crack:
if any, associated with its use. It is the responsibility of the user
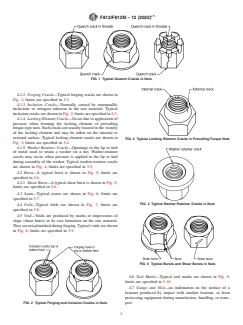
4.1.1 Quench Cracks—Typical quench cracks are shown in
of this standard to establish appropriate safety, health, and
Fig. 1; limits are specified in 5.2.
1 2
This specification is under the jurisdiction of ASTM Committee F16 on For referenced ASTM standards, visit the ASTM website, www.astm.org, or
Fasteners and is the direct responsibility of Subcommittee F16.93 on Quality contact ASTM Customer Service at service@astm.org. For Annual Book of ASTM
Assurance Provisions for Fasteners. Standards volume information, refer to the standard’s Document Summary page on
Current edition approved Aug. 1, 2022. Published August 2022. Originally the ASTM website.
approved in 1983. Last previous edition approved in 2017 as F812 – 12 (2017). Available from American National Standards Institute (ANSI), 25 W. 43rd St.,
DOI: 10.1520/F0812_F0812M-12R22E01. 4th Floor, New York, NY 10036, http://www.ansi.org.
*A Summary of Changes section appears at the end of this standard
Copyright © ASTM International, 100 Barr Harbor Drive, PO Box C700, West Conshohocken, PA 19428-2959. United States
´1
F812/F812M − 12 (2022)
FIG. 1 Typical Quench Cracks in Nuts
4.1.2 Forging Cracks—Typical forging cracks are shown in
Fig. 2; limits are specified in 5.3.
4.1.3 Inclusion Cracks—Normally caused by nonmetallic
inclusions or stringers inherent in the raw material. Typical
inclusion cracks are shown in Fig. 2; limits are specified in 5.3.
4.1.4 Locking-Element Cracks—Occur due to application of
pressure when forming the locking element of prevailing
torque-type nuts. Such cracks are usually located in the vicinity
of the locking element and may be either on the internal or
external surface. Typical locking element cracks are shown in
FIG. 3 Typical Locking Element Cracks in Prevailing-Torque Nuts
Fig. 3; limits are specified in 5.4.
4.1.5 Washer-Retainer Cracks—Openings in the lip or hub
of metal used to retain a washer on a nut. Washer-retainer
cracks may occur when pressure is applied to the lip or hub
during assembly of the washer. Typical washer-retainer cracks
are shown in Fig. 4; limits are specified in 5.5.
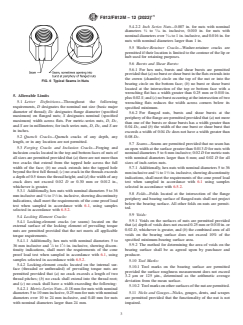
4.2 Burst—A typical burst is shown in Fig. 5; limits are
specified in 5.6.
4.2.1 Shear Burst—A typical shear burst is shown in Fig. 5;
limits are specified in 5.6.
4.3 Seam—Typical seams are shown in Fig. 6; limits are
specified in 5.7.
FIG. 4 Typical Washer Retainer Cracks in Nuts
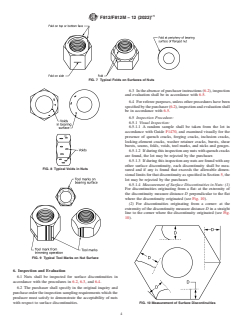
4.4 Fold—Typical folds are shown in Fig. 7; limits are
specified in 5.8.
4.5 Void—Voids are produced by marks or impressions of
chips (shear burrs) or by rust formation on the raw material.
They are not planished during forging. Typical voids are shown
in Fig. 8; limits are specified in 5.9.
FIG. 5 Typical Bursts and Shear Bursts in Nuts
4.6 Tool Marks—Typical tool marks are shown in Fig. 9;
limits are specified in 5.10.
4.7 Gouge and Nick—an indentation on the surface of a
fastener produced by impact with another fastener, or from
processing equipment during manufacture, handling, or trans-
FIG. 2 Typical Forging and Inclusion Cracks in Nuts port.
´1
F812/F812M − 12 (2022)
5.4.2.2 Inch Series Nuts—0.007 in. for nuts with nominal
1 7
diameters ⁄4 to ⁄16 in. inclusive, 0.010 in. for nuts with
nominal diameters over ⁄16 to 1 in. inclusive, and 0.016 in. for
nuts with nominal diameters larger than 1 in.
5.5 Washer-Retainer Cracks—Washer-retainer cracks are
permitted if their location is limited to the contour of the lip or
hub used for retaining purposes.
5.6 Bursts and Shear Bursts:
5.6.1 For hex nuts, bursts and shear bursts are permitted
provided that (a) no burst or shear burst in the flats extends into
the crown (chamfer) circle on the top of the nut or into the
FIG. 6 Typical Seams in Nuts
bearing circle on the bottom face; (b) no burst or shear burst
located at the intersection of the top or bottom face with a
wrenching flat has a width greater than 0.25 mm or 0.010 in.
5. Allowable Limits
plus 0.02 S; and (c) no burst occurring at the intersection of two
5.1 Letter Definitions—Throughout the following
wrenching flats reduces the width across corners below its
requirements, D designates the nominal nut size (basic major
specified minimum.
diameter of thread); Dc designates flange diameter (specified
5.6.2 For flanged nuts, bursts and shear bursts at the
maximum) on flanged nuts; S designates nominal (specified
periphery of the flange are permitted provided that (a) not more
maximum) width across flats. For metric-series nuts, D, Dc,
than one of th
...


Questions, Comments and Discussion
Ask us and Technical Secretary will try to provide an answer. You can facilitate discussion about the standard in here.
Loading comments...